Spring学习笔记——从配置文件到注解开发 & 创建对象+成员变量赋值 & 增强方法
目录
- 引出
- Spring入门案例
-
- 初识Spring
- 入门案例1----用配置文件实现 Druid + JDBCTemplate + dao
-
- 1.之前的方式:new对象
- 2.用配置文件的方法把new对象交给Spring
- 3.如果要用对象,从spring的容器中获取ac.getBean("userDao");
- 4.实体类和dao层的代码--问题:如果接口有两个实现类?
- 【补充】获取spring容器中对象的两种方式:id 或 对象类型
- 入门案例2----person实体类对配置文件理解
-
- (1)初始情况:当spring程序读到这一行时,就创建了一个person类,放到spring的容器中,其id为person;
- (2)参数scope="singleton"单例、scope="prototype"非单例:
- (3)给成员变量赋值的方式 + 依赖注入
- (4)测试文件执行顺序,new spring容器--读取bean.xml文件...
- Spring新建对象+给成员变量赋值—从配置文件到注解开发
-
- 用配置文件实现controller≈servlet
-
- 1.导包--用spring.verson实现版本控制
- 2.配置文件编写applicationContext.xml
- 3.进行测试ClassPathXmlApplicationContext
- 用注解的方式实现controller
-
- 1.配置文件xml的更新context:component-scan
- 2.在dao,service,controller上标注注解@Component(@Repository @Service @Controller) + @Autowired
- 3.进行测试ClassPathXmlApplicationContext
- 用SpringConfig.java文件代替resource下的xml配置文件
-
- 3.用SpringConfig.java文件代替resource下的xml配置文件 @Configuration @ComponentScan @Bean
- 4.进行测试AnnotationConfigApplicationContext
- SpringCofig.java文件引入properties文件---解耦druid + 引入其他config.java
-
- 1.引入jdbc.properties配置文件@PropertySource("classpath:jdbc.properties")+@Value("${jdbc.url}")
- 2.引入其他的config.java文件@Import(SpringConfig.class)
- 配置单例/多例,初始化化方法,销毁方法
-
- 1.@Scope(value = "singleton") prototype + @PostConstruct + @PreDestroy
- 2.配置文件@Configuration @ComponentScan("com.tianju") + 测试AnnotationConfigApplicationContext
- 如果一个接口有两个实现类---入门案例的问题
-
- 1.方案一:指定名字---指定其中的一个实现类userServiceImpl
- 2.方案二:用注解 @Qualifier("userServiceImp2") 进行指定 + @Autowired
- 3.方案三:用一个注解@Resource(name = "userServiceImpl")替换上面的两个
- Spring增强方法——给一批类全部做增强
-
- 用配置文件做增强
-
- 1.增强类LogActiveDemo.java文件
- 2.被增强的类UserController.java文件
- 3.进行增强与被增强的配置
- 4.测试用例及其结果ClassPathXmlApplicationContext("beans.xml");
- 用注解做增强
-
- 1.增强类LogActiveDemo.java文件 @Aspect,(@Before("execution(* com.tianju.controller.UserController.*(..))"), @After, @AfterReturning, @AfterThrowing)
- 2.自定义注解MyAnnoClass.java文件@Target({ElementType.TYPE}) +@Retention(RetentionPolicy.RUNTIME)
- 3.被增强的类UserController.java文件@MyAnnoClass
- 4.配置文件SpringConfig.java文件开启动态代理 @EnableAspectJAutoProxy
- 5.测试用例AnnotationConfigApplicationContext(SpringConfig.class);
- 简化:从 @Before("execution(* com.tianju.controller.UserController.*(..))") 到@After("@annotation(com.tianju.anno.MyAnnoMethod)")
-
- 1.自定义注解MyAnnoMethod.java文件@Target({ElementType.METHOD})
- 2.增强类LoginActiveAnnoMethod.java文件@Before("@annotation(com.tianju.anno.MyAnnoMethod)")
- 3.被增强类OpusController.java文件@MyAnnoMethod
- 4.配置文件SpringConfig.java文件开启动态代理 @EnableAspectJAutoProxy
- 5.测试AnnotationConfigApplicationContext(SpringConfig.class)
- 另一种方式:@Before("@within(org.springframework.stereotype.Controller)") + 日志的案例
-
- 1.定义一个增强方法,标注@within
- 2.正常写controller的逻辑
- 3.配置文件+测试
- 升级的方法@Around可以实现@Before, @After, @AfterReturning, @AfterThrowing
- 总结
引出
spring可以new对象,给成员变量赋值,增强方法;


Spring入门案例
初识Spring

spring能干啥:
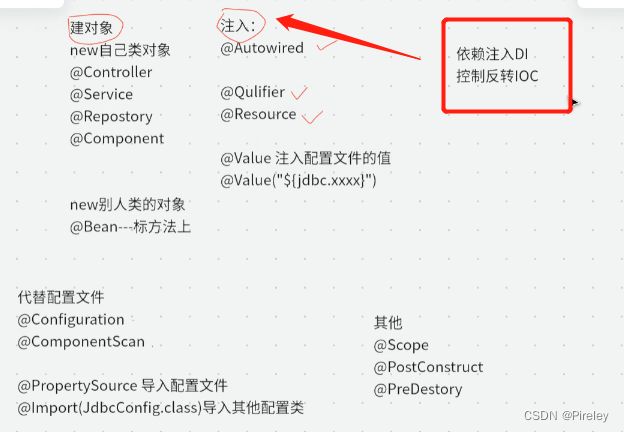
(1)new对象,放到spring容器中;
(2)给成员变量注入,依赖注入,控制反转;
(3)增强方法


入门案例1----用配置文件实现 Druid + JDBCTemplate + dao
1.之前的方式:new对象
package com.tianju;

import com.alibaba.druid.pool.DruidDataSource;
import com.tianju.dao.UserDaoImpl;
import com.tianju.entity.User;
import org.springframework.jdbc.core.JdbcTemplate;

import java.util.List;

/**
 * 之前的方式,new对象,建立连接,拿到JDBCTemplate,然后dao层使用,到service,到servlet
 */
public class DemoDaoImpl {
    public static void main(String[] args) {
        // Druid
        DruidDataSource druidDataSource = new DruidDataSource();
        druidDataSource.setDriverClassName("com.mysql.cj.jdbc.Driver");
        druidDataSource.setUrl("jdbc:mysql://127.0.0.1:3306/javaweb?useSSL=false&serverTimezone=Asia/Shanghai&allowPublicKeyRetrieval=true");
        druidDataSource.setUsername("root");
        druidDataSource.setPassword("123");
        druidDataSource.setMaxActive(10);

        // JDBCTemplate
        JdbcTemplate jdbcTemplate = new JdbcTemplate();
        jdbcTemplate.setDataSource(druidDataSource);

        // dao
        UserDaoImpl userDao = new UserDaoImpl();
        userDao.setJdbcTemplate(jdbcTemplate);
        List<User> list = userDao.queryAll();
        System.out.println(list);

    }
}
2.用配置文件的方法把new对象交给Spring
(1)配置文件

配置文件模板:
<beans xmlns="http://www.springframework.org/schema/beans"
       xmlns:xsi="http://www.w3.org/2001/XMLSchema-instance"
       xsi:schemaLocation="http://www.springframework.org/schema/beans
        http://www.springframework.org/schema/beans/spring-beans.xsd">
beans>
beans.xml文件
<beans xmlns="http://www.springframework.org/schema/beans"
       xmlns:xsi="http://www.w3.org/2001/XMLSchema-instance"
       xsi:schemaLocation="http://www.springframework.org/schema/beans
        http://www.springframework.org/schema/beans/spring-beans.xsd">


    <bean id="dataSource" class="com.alibaba.druid.pool.DruidDataSource">

        <property name="driverClassName" value="com.mysql.cj.jdbc.Driver">property>

        <property name="url" value="jdbc:mysql://127.0.0.1:3306/javaweb?useSSL=false&serverTimezone=Asia/Shanghai&allowPublicKeyRetrieval=true">property>
        <property name="username" value="root">property>
        <property name="password" value="123">property>
    bean>


    <bean id="jdbcTemplate" class="org.springframework.jdbc.core.JdbcTemplate">


        <property name="dataSource" ref="dataSource">property>
    bean>


    <bean id="userDao" class="com.tianju.dao.impl.UserDaoImpl">
        <property name="jdbcTemplate" ref="jdbcTemplate">property>
    bean>
beans>
3.如果要用对象,从spring的容器中获取ac.getBean(“userDao”);
package com.tianju.test;

import com.tianju.dao.IUserDao;
import com.tianju.entity.User;
import org.springframework.context.ApplicationContext;
import org.springframework.context.support.ClassPathXmlApplicationContext;

import java.util.List;

/**
 * 用户测试spring配置的是否好用
 */
public class JDBCTestDemo {
    public static void main(String[] args) {
        // TODO:直接从spring容器中获取dao
//        ApplicationContext ac = new ClassPathXmlApplicationContext("beans.xml");
        ClassPathXmlApplicationContext ac = new ClassPathXmlApplicationContext("beans.xml");
        IUserDao userDaoImpl = (IUserDao) ac.getBean("userDao");
        List<User> userList = userDaoImpl.queryAll();
        userList.forEach(System.out::println);

    }
}

4.实体类和dao层的代码–问题:如果接口有两个实现类?
User.java文件
package com.tianju.entity;

import lombok.AllArgsConstructor;
import lombok.Data;
import lombok.NoArgsConstructor;

import java.util.Date;

/**
 * 用户登陆的实体类
 */
@Data //包括get,set,toString
@NoArgsConstructor
@AllArgsConstructor
public class User {
    private Integer id;
    private String username;
    private String password;
    private String nickname;
    private Date createTime;
    private Date updateTime;
    private String imgUrl;
}
IUserDao.java接口文件
package com.tianju.dao;

import com.tianju.entity.User;

import java.util.List;

public interface IUserDao {
    List<User> queryAll();
}
UserDaoImpl.java实现类文件
package com.tianju.dao.impl;

import com.tianju.dao.IUserDao;
import com.tianju.entity.User;
import org.springframework.jdbc.core.BeanPropertyRowMapper;
import org.springframework.jdbc.core.JdbcTemplate;
import org.springframework.jdbc.core.RowMapper;

import java.util.List;

/**
 * UserDao的实现类
 */
public class UserDaoImpl implements IUserDao {
    private JdbcTemplate jdbcTemplate;

    /**
     * set方法,用于给这个jdbcTemplate设置druidDataSource,
     * 从而可以使用这个jdbcTemplate
     * @param jdbcTemplate
     */
    public void setJdbcTemplate(JdbcTemplate jdbcTemplate) {
        this.jdbcTemplate = jdbcTemplate;
    }

    @Override
    public List<User> queryAll() {
        RowMapper<User> rowMapper = new BeanPropertyRowMapper<>(User.class);
        return jdbcTemplate.query("SELECT * FROM user_tab", rowMapper );
    }
}
【补充】获取spring容器中对象的两种方式:id 或 对象类型
(1)通过id获取,id是在xml配置文件中是唯一的:不会出现问题;
如果id重复,会报错:
Exception in thread “main” org.springframework.beans.factory.parsing.BeanDefinitionParsingException: Configuration problem:
Bean name ‘userDao’ is already used in this beans> element
Offending resource: class path resource [beans.xml]
IUserDao userDaoImpl = (IUserDao) ac.getBean("userDao");
(2)通过类的类型获取:
IUserDao userDaoImpl = ac.getBean(IUserDao.class);
此时如果接口有两个实现类,则会出现异常,Spring不知道应该取容器中两个对象中的哪一个,就会报错:
No qualifying bean of type ‘com.tianju.dao.IUserDao’ available: expected single matching bean but found 2: userDao,userDao1
入门案例2----person实体类对配置文件理解
person.java实体类文件
package com.tianju.entity;

import lombok.AllArgsConstructor;
import lombok.Data;
import lombok.NoArgsConstructor;

import java.util.Date;
@Data
@NoArgsConstructor
@AllArgsConstructor
public class Person {
    private Integer id;
    private String name;
    private Date birthday;

    public void init(){
        // 每次new出来都执行该方法
        System.out.println("每次new person对象时都执行的方法");
    }

    public void destroy(){
        // 在spring容器销毁时执行该方法
        System.out.println("spring容器销毁时执行的方法");
    }
}
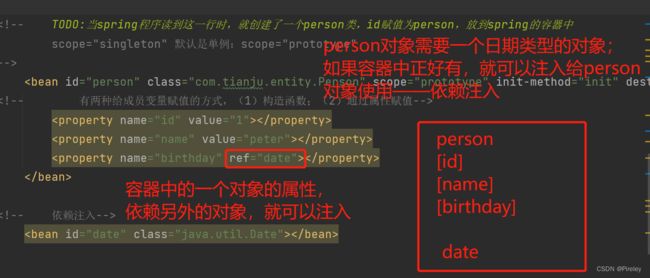
(1)初始情况:当spring程序读到这一行时,就创建了一个person类,放到spring的容器中,其id为person;
<bean id="person" class="com.tianju.entity.Person" scope="singleton">
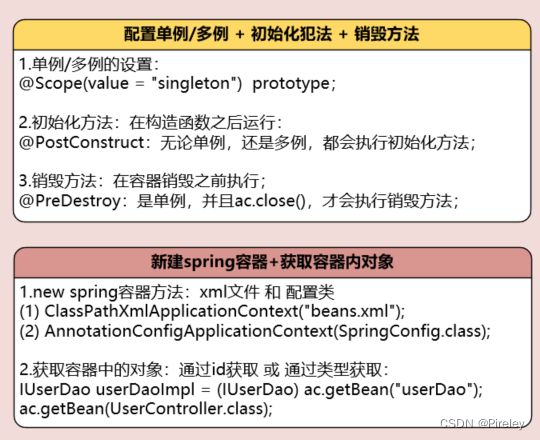
(2)参数scope="singleton"单例、scope="prototype"非单例:
无论是否为单例,都会执行init-method 方法;
如果是单例"singleton",关闭容器时会执行destroy方法;
如果不是单例"prototype",关闭容器时不会执行destroy方法;
<bean id="person" class="com.tianju.entity.Person" scope="singleton" init-method="init" destroy-method="destroy">
单例模式下,从容器中获取的都是同一个对象;==为true;
非单例模式下,从容器中获取的不是同一个对象;==为false;
(3)给成员变量赋值的方式 + 依赖注入
给成员变量赋值:(1)通过构造函数constructor-arg;(2)通过属性赋值property;
赋值有两种方式:(1)直接赋值value;(2)依赖注入ref;
通过构造函数赋值:
    <bean id="person" class="com.tianju.entity.Person" scope="prototype" init-method="init" destroy-method="destroy">

        <constructor-arg name="id" value="100">constructor-arg>
        <constructor-arg name="name" value="peter">constructor-arg>

        <constructor-arg name="birthday" ref="date">constructor-arg>
    bean>


    <bean id="date" class="java.util.Date">bean>
通过属性赋值property:
    <bean id="person" class="com.tianju.entity.Person" scope="prototype" init-method="init" destroy-method="destroy">
<!--        有两种给成员变量赋值的方式,(1)构造函数;(2)通过属性赋值-->
        <property name="id" value="1"></property>
        <property name="name" value="peter"></property>
        <property name="birthday" ref="date"></property>

    </bean>

<!--    依赖注入-->
    <bean id="date" class="java.util.Date"></bean>
(4)测试文件执行顺序,new spring容器–读取bean.xml文件…
package com.tianju.test;

import com.tianju.entity.Person;
import org.springframework.context.support.ClassPathXmlApplicationContext;

public class PersonTestDemo {
    public static void main(String[] args) {
        // 1.new ClassPathXmlApplicationContext spring创建了一个容器,用来放对象;
        // 2.读取bean.xml文件,如果配置了bean标签,就生成配置的对象,Person对象;
        // 3.把对象放到容器中,给成员变量赋值;
        ClassPathXmlApplicationContext ac = new ClassPathXmlApplicationContext("beans.xml");
        // 4.从容器中通过id获取对象;
        Person person = (Person)ac.getBean("person");
        // 5.从容器中通过类名获取对象;
        Person person1 = ac.getBean(Person.class);
        System.out.println("是否是同一个对象:"+(person1==person));

        // 关闭容器
        ac.close();
    }
}
Spring新建对象+给成员变量赋值—从配置文件到注解开发
用配置文件实现controller≈servlet
1.导包–用spring.verson实现版本控制

<project xmlns="http://maven.apache.org/POM/4.0.0"
         xmlns:xsi="http://www.w3.org/2001/XMLSchema-instance"
         xsi:schemaLocation="http://maven.apache.org/POM/4.0.0 http://maven.apache.org/xsd/maven-4.0.0.xsd">
    <modelVersion>4.0.0modelVersion>

    <groupId>com.tianjugroupId>
    <artifactId>spring0615artifactId>
    <version>1.0-SNAPSHOTversion>

    <properties>
        <maven.compiler.source>8maven.compiler.source>
        <maven.compiler.target>8maven.compiler.target>
        <project.build.sourceEncoding>UTF-8project.build.sourceEncoding>

        <spring.version>5.2.22.RELEASEspring.version>
    properties>

    <dependencies>

        <dependency>
            <groupId>org.springframeworkgroupId>
            <artifactId>spring-contextartifactId>
            <version>${spring.version}version>
        dependency>

        <dependency>
            <groupId>mysqlgroupId>
            <artifactId>mysql-connector-javaartifactId>
            <version>8.0.20version>
        dependency>

        <dependency>
            <groupId>com.alibabagroupId>
            <artifactId>druidartifactId>
            <version>1.2.16version>
        dependency>

        <dependency>
            <groupId>org.springframeworkgroupId>
            <artifactId>spring-jdbcartifactId>
            <version>${spring.version}version>
        dependency>

        <dependency>
            <groupId>org.projectlombokgroupId>
            <artifactId>lombokartifactId>
            <version>1.18.22version>
        dependency>
    dependencies>
project>
2.配置文件编写applicationContext.xml
<beans xmlns="http://www.springframework.org/schema/beans"
       xmlns:xsi="http://www.w3.org/2001/XMLSchema-instance"
       xsi:schemaLocation="http://www.springframework.org/schema/beans
        http://www.springframework.org/schema/beans/spring-beans.xsd">

    <bean id="dataSource" class="com.alibaba.druid.pool.DruidDataSource">
        <property name="driverClassName" value="com.mysql.jdbc.Driver">property>
        <property name="url" value="jdbc:mysql://127.0.0.1:3306/javaweb?useSSL=false&serverTimezone=Asia/Shanghai&allowPublicKeyRetrieval=true">property>
        <property name="username" value="root">property>
        <property name="password" value="123">property>
    bean>

    <bean id="jdbcTemplate" class="org.springframework.jdbc.core.JdbcTemplate">
        <property name="dataSource" ref="dataSource">property>
    bean>

    <bean id="userDao" class="com.tianju.dao.impl.UserDaoImpl">
        <property name="jdbcTemplate" ref="jdbcTemplate">property>
    bean>

    <bean id="userService" class="com.tianju.service.impl.UserServiceImpl">
        <property name="userDao" ref="userDao">property>
    bean>

    <bean id="userController" class="com.tianju.controller.UserController">
        <property name="userService" ref="userService">property>
    bean>
beans>
3.进行测试ClassPathXmlApplicationContext
package com.tianju.test;

import com.tianju.controller.UserController;
import com.tianju.entity.User;
import org.springframework.context.support.ClassPathXmlApplicationContext;

import java.util.List;

public class TestXMLDemo {
    public static void main(String[] args) {
        ClassPathXmlApplicationContext ac = new ClassPathXmlApplicationContext("applicationContext.xml");
        UserController userController = (UserController) ac.getBean("userController");
        List<User> userList = userController.queryAll();
        userList.forEach(System.out::println);
    }
}
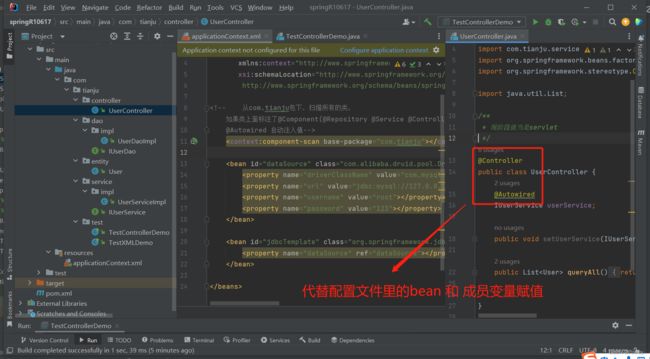
用注解的方式实现controller

1.配置文件xml的更新context:component-scan
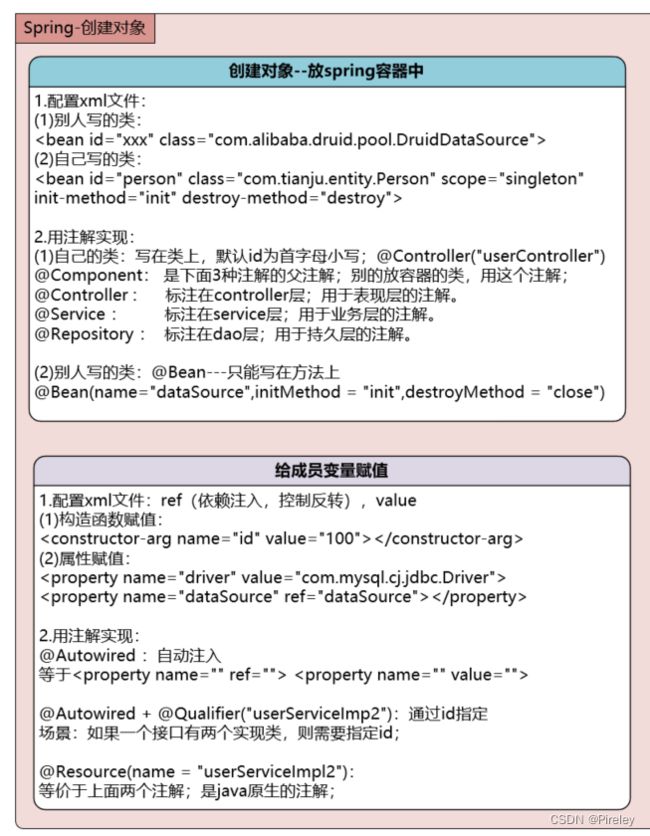
如果类上面标注了@Component(@Repository @Service @Controller) Spring就会new类,放容器中,@Autowired 自动注入值
<beans xmlns="http://www.springframework.org/schema/beans"
       xmlns:xsi="http://www.w3.org/2001/XMLSchema-instance"
       xmlns:context="http://www.springframework.org/schema/context"
       xsi:schemaLocation="http://www.springframework.org/schema/beans
        http://www.springframework.org/schema/beans/spring-beans.xsd http://www.springframework.org/schema/context https://www.springframework.org/schema/context/spring-context.xsd">


    <context:component-scan base-package="com.tianju">context:component-scan>

    <bean id="dataSource" class="com.alibaba.druid.pool.DruidDataSource">
        <property name="driverClassName" value="com.mysql.jdbc.Driver">property>
        <property name="url" value="jdbc:mysql://127.0.0.1:3306/javaweb?useSSL=false&serverTimezone=Asia/Shanghai&allowPublicKeyRetrieval=true">property>
        <property name="username" value="root">property>
        <property name="password" value="123">property>
    bean>

    <bean id="jdbcTemplate" class="org.springframework.jdbc.core.JdbcTemplate">
        <property name="dataSource" ref="dataSource">property>
    bean>

beans>
2.在dao,service,controller上标注注解@Component(@Repository @Service @Controller) + @Autowired
比如Controller.java文件
package com.tianju.controller;

import com.tianju.entity.User;
import com.tianju.service.IUserService;
import org.springframework.beans.factory.annotation.Autowired;
import org.springframework.stereotype.Controller;

import java.util.List;

/**
 * 现阶段就当是servlet
 */
@Controller
public class UserController {
    @Autowired
    IUserService userService;

    public void setUserService(IUserService userService) {
        this.userService = userService;
    }

    public List<User> queryAll(){
        return userService.queryAll();
    }
}
3.进行测试ClassPathXmlApplicationContext
package com.tianju.test;

import com.tianju.controller.UserController;
import com.tianju.entity.User;
import org.springframework.context.support.ClassPathXmlApplicationContext;

import java.util.List;

public class TestControllerDemo {
    public static void main(String[] args) {
        ClassPathXmlApplicationContext ac = new ClassPathXmlApplicationContext("applicationContext.xml");
        UserController userController = (UserController) ac.getBean("userController");
        List<User> userList = userController.queryAll();
        userList.forEach(System.out::println);
    }
}
用SpringConfig.java文件代替resource下的xml配置文件
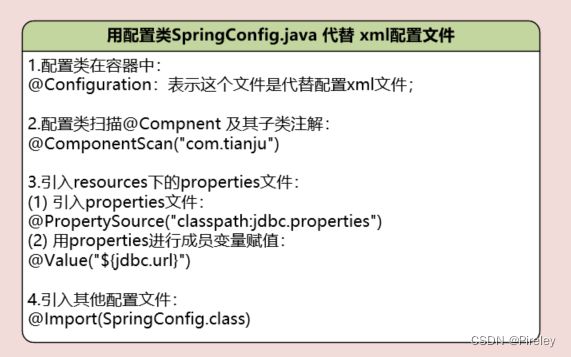
3.用SpringConfig.java文件代替resource下的xml配置文件 @Configuration @ComponentScan @Bean
要点:
- 1.如何告诉spring,这个文件是代替配置xml文件;@Configuration
- 2.如何代替xml文件中context:component-scan,知道扫描哪些包;@ComponentScan(“com.tianju”)
要想实现代替xml配置文件,则还需要
- 1.dataSource放到容器中;
- 2.jdbcTemplate放到容器中;
- 如果一个方法上加了@Bean,这个方法的返回值就在容器中了;方法名 就是id;
如果一个方法依赖其他方法,则
- 如果一个方法依赖了容器中的对象,在该方法的参数中写这个对象名,
- spring会把容器中的dataSource注入到方法中
package com.tianju.config;

import com.alibaba.druid.pool.DruidDataSource;
import org.springframework.context.annotation.Bean;
import org.springframework.context.annotation.ComponentScan;
import org.springframework.context.annotation.Configuration;
import org.springframework.jdbc.core.JdbcTemplate;

import javax.sql.DataSource;

/**
 * 用来代替resources中的配置xml文件:
 * 1.如何告诉spring,这个文件是代替配置xml文件;@Configuration
 * 2.如何代替xml文件中context:component-scan,知道扫描哪些包;@ComponentScan("com.tianju")
 */
@Configuration
@ComponentScan("com.tianju")
public class SpringConfig {
    /**
     * 要想实现代替xml配置文件,则还需要
     * 1.dataSource放到容器中;
     * 2.jdbcTemplate放到容器中;
     * 如果一个方法上加了@Bean,这个方法的返回值就在容器中了;方法名 就是id;
     */
    @Bean
    public DataSource dataSource(){
        DruidDataSource dataSource = new DruidDataSource();
        dataSource.setDriverClassName("com.mysql.cj.jdbc.Driver");
        dataSource.setUrl("jdbc:mysql://127.0.0.1:3306/javaweb?useSSL=false&serverTimezone=Asia/Shanghai&allowPublicKeyRetrieval=true");
        dataSource.setUsername("root");
        dataSource.setPassword("123");
        return dataSource;
    }

    /**
     * 如果一个方法依赖了容器中的对象,在该方法的参数中写这个对象名,
     * spring会把容器中的dataSource注入到方法中
     * @param dataSource 从容器中根据id获取 DataSource
     * @return
     */
    @Bean
    public JdbcTemplate jdbcTemplate(DataSource dataSource){
        JdbcTemplate jdbcTemplate = new JdbcTemplate(dataSource);
        jdbcTemplate.setDataSource(dataSource);
        return jdbcTemplate;
    }

}
4.进行测试AnnotationConfigApplicationContext
package com.tianju.test;

import com.tianju.config.SpringConfig;
import com.tianju.controller.UserController;
import com.tianju.entity.User;
import org.springframework.context.annotation.AnnotationConfigApplicationContext;

import java.util.Arrays;
import java.util.List;

/**
 * 测试配置文件SpringConfig.java
 */
public class TestConfigDemo1 {
    public static void main(String[] args) {
        // 用java的config文件,代替配置文件xml
        AnnotationConfigApplicationContext ac = new AnnotationConfigApplicationContext(SpringConfig.class);
        // 获取所有bean的名字
        String[] beanDefinitionNames = ac.getBeanDefinitionNames();
        System.out.println(Arrays.toString(beanDefinitionNames));
        UserController userController = ac.getBean(UserController.class);
        List<User> list = userController.queryAll();
        list.forEach(System.out::println);
    }
}
SpringCofig.java文件引入properties文件—解耦druid + 引入其他config.java


1.引入jdbc.properties配置文件@PropertySource(“classpath:jdbc.properties”)+@Value(“${jdbc.url}”)
在上面的方式中,又把jdbc耦合到了java代码中,如果在resources下有一个jdbc相关配置的jdbc.properties文件,如何在springConfig.java文件中读取配置文件?
jdbc.properties文件
jdbc.driverClassName=com.mysql.cj.jdbc.Driver
jdbc.url=jdbc:mysql://127.0.0.1:3306/javaweb?useSSL=false&serverTimezone=Asia/Shanghai&allowPublicKeyRetrieval=true
jdbc.username=root
jdbc.password=123
更新后的SpringConfig.java文件
package com.tianju.config;
import com.alibaba.druid.pool.DruidDataSource;
import org.springframework.beans.factory.annotation.Value;
import org.springframework.context.annotation.Bean;
import org.springframework.context.annotation.ComponentScan;
import org.springframework.context.annotation.Configuration;
import org.springframework.context.annotation.PropertySource;
import org.springframework.jdbc.core.JdbcTemplate;
import javax.sql.DataSource;
/**
* 用来代替resources中的配置xml文件
* 注解 @Configuration表示是spring的配置类,用来代替 applicationContext.xml文件的;
* 注解 @ComponentScan("com.tianju") 用来代替 进行测试AnnotationConfigApplicationContext
package com.tianju.test;

import com.tianju.config.SpringConfig;
import com.tianju.controller.UserController;
import com.tianju.entity.User;
import org.springframework.context.annotation.AnnotationConfigApplicationContext;

import java.util.List;

public class TestPropertiesDemo1 {
    public static void main(String[] args) {
        AnnotationConfigApplicationContext ac = new AnnotationConfigApplicationContext(SpringConfig.class);
        UserController userController = ac.getBean(UserController.class);
        List<User> userList = userController.queryAll();
        userList.forEach(System.out::println);
    }
}
2.引入其他的config.java文件@Import(SpringConfig.class)
package com.tianju.config;

import org.springframework.context.annotation.Import;

/**
 * 引入其他配置文件 @Import(SpringConfig.class)
 */
@Import(SpringConfig.class)
public class SConfig {
}
配置单例/多例,初始化化方法,销毁方法

- 注解 :@Controller 扫描时,发现了有这句话就会new对象出来;
代替 bean id=“userController” class=“com.tianju.controller.UserController”>
id:默认不写小字母小写,如果自己指定,则用 @Controller(“userController”)
单例:默认是单例;如果想设置不是单例,则 @Scope(value = “PROTOTYPE”)
初始化方法:@PostConstruct:在构造函数之后运行
销毁方法:@PreDestroy;在容器销毁之前执行;单例ac.close()执行;
注解:@Autowired,用来代替property name=“userService” ref=“userService”>/property>
1.@Scope(value = “singleton”) prototype + @PostConstruct + @PreDestroy
实体类Person.java代码
package com.tianju.entity;

import lombok.AllArgsConstructor;
import lombok.Data;
import lombok.NoArgsConstructor;
import org.springframework.context.annotation.Scope;
import org.springframework.stereotype.Component;

import javax.annotation.PostConstruct;
import javax.annotation.PreDestroy;
import java.util.Date;
@Data
@NoArgsConstructor
@AllArgsConstructor

@Component
@Scope(value = "singleton") // singleton prototype
public class Person {
    private Integer id;
    private String name;
    private Date birthday;

    @PostConstruct
    public void init(){
        // 每次new出来都执行该方法
        System.out.println("每次new person对象时都执行的方法");
    }

    @PreDestroy
    public void destroy(){
        // 在spring容器销毁时执行该方法
        System.out.println("spring容器销毁时执行的方法");
    }
}
2.配置文件@Configuration @ComponentScan(“com.tianju”) + 测试AnnotationConfigApplicationContext
配置文件SpringConfig.java文件
package com.tianju.config;

import org.springframework.context.annotation.ComponentScan;
import org.springframework.context.annotation.Configuration;

@Configuration
@ComponentScan("com.tianju")
public class SpringConfig {
}
测试文件
package com.tianju.test;

import com.tianju.config.SpringConfig;
import com.tianju.entity.Person;
import org.springframework.context.annotation.AnnotationConfigApplicationContext;

public class SpringConfigTest {
    public static void main(String[] args) {
        AnnotationConfigApplicationContext ac = new AnnotationConfigApplicationContext(SpringConfig.class);
        Person person = ac.getBean(Person.class);
        System.out.println(person);
        ac.close();
    }
}
如果一个接口有两个实现类—入门案例的问题
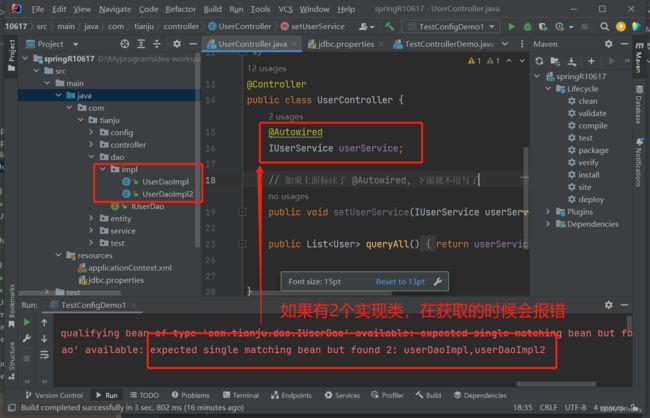
注入的时候:1.按照类型注入,寻找IUserService的实现类注入进来;
- 2.方案1:如果有多个实现类,则按照变量名字的id在容器中找对应的实现类;或者按照3解决
- 3.方案2:意外情况:如果变量名不想改,怎么搞? 可以配合 @Qualifier(“userServiceImp1”) 进行指定;
- 4.方案3:用一个注解@Resource(name = “userServiceImpl1”),既可以注入,也可以指定,代替@Autowired 和 @Qualifier(“userServiceImpl1”);
- 补充:@Autowired 是spring开发的; @Resource是java自身的;
1.方案一:指定名字—指定其中的一个实现类userServiceImpl
package com.tianju.controller;

import com.tianju.entity.User;
import com.tianju.service.IUserService;
import org.springframework.beans.factory.annotation.Autowired;
import org.springframework.stereotype.Controller;

import java.util.List;

/**
 * 现阶段就当是servlet
 */
@Controller
public class UserController {
    @Autowired
    IUserService userServiceImpl;

    // 如果上面标注了 @Autowired, 下面就不用写了
    public void setUserService(IUserService userService) {
        this.userServiceImpl = userService;
    }

    public List<User> queryAll(){
        return userServiceImpl.queryAll();
    }
}
2.方案二:用注解 @Qualifier(“userServiceImp2”) 进行指定 + @Autowired
package com.tianju.controller;

import com.tianju.entity.User;
import com.tianju.service.IUserService;
import org.springframework.beans.factory.annotation.Autowired;
import org.springframework.beans.factory.annotation.Qualifier;
import org.springframework.stereotype.Controller;

import java.util.List;

/**
 * 现阶段就当是servlet
 */
@Controller

public class UserController {

    @Autowired
    @Qualifier("userServiceImpl2")
    IUserService userService;

    public List<User> queryAll(){
        return userService.queryAll();
    }
}
3.方案三:用一个注解@Resource(name = “userServiceImpl”)替换上面的两个
package com.tianju.controller;

import com.tianju.entity.User;
import com.tianju.service.IUserService;
import org.springframework.beans.factory.annotation.Autowired;
import org.springframework.beans.factory.annotation.Qualifier;
import org.springframework.stereotype.Controller;

import javax.annotation.Resource;
import java.util.List;

/**
 * 现阶段就当是servlet
 */
@Controller

public class UserController {

    @Resource(name = "userServiceImpl")
    IUserService userService;

    public List<User> queryAll(){
        return userService.queryAll();
    }
}
补充代码:
package com.tianju.controller;
import com.tianju.entity.User;
import com.tianju.service.IUserService;
import org.springframework.beans.factory.annotation.Autowired;
import org.springframework.beans.factory.annotation.Qualifier;
import org.springframework.context.annotation.Scope;
import org.springframework.stereotype.Controller;
import javax.annotation.PostConstruct;
import javax.annotation.PreDestroy;
import javax.annotation.Resource;
import java.util.List;
/**
* 现阶段它就是servlet
* 注解 :@Controller 扫描时,发现了有这句话就会new对象出来;
* 代替
* id:默认不写小字母小写,如果自己指定,则用 @Controller("userController")
* 单例:默认是单例;如果想设置不是单例,则 @Scope(value = "PROTOTYPE")
* 初始化方法:@PostConstruct:在构造函数之后运行
* 销毁方法:@PreDestroy;在容器销毁之前执行
* 注解:@Autowired,用来代替
@Controller("userController")
//@Scope(value = "prototype") // 指定不是单例
public class UserController {
// 自己new的对象,不在容器中,只有spring管理的才会在容器中;
// 因此这里不能自己new,要交给spring
// @Autowired // TODO:方案3,用一个注解@Resource(name = "userServiceImpl1") 代替 @Autowired 和 @Qualifier("userServiceImpl1")
// TODO:如果有两个实现类,怎么解决:方案一:指定一下名字
/**
* 注入的时候:1.按照类型注入,寻找IUserService的实现类注入进来;
* 2.方案1:如果有多个实现类,则按照变量名字的id在容器中找对应的实现类;或者按照3解决
* 3.方案2:意外情况:如果变量名不想改,怎么搞? 可以配合 @Qualifier("userServiceImp1") 进行指定;
* 4.方案3:用一个注解@Resource(name = "userServiceImpl1"),既可以注入,也可以指定
* 代替@Autowired 和 @Qualifier("userServiceImpl1");
* 补充:@Autowired 是spring开发的; @Resource是java的
*/
// @Qualifier("userServiceImpl1") // TODO:方案2,用注解 @Qualifier("userServiceImp1") 进行指定
@Resource(name = "userServiceImpl1") // TODO:方案3,用一个注解@Resource(name = "userServiceImpl1") 代替 @Autowired 和 @Qualifier("userServiceImpl1")
private IUserService userService;
// private IUserService userServiceImpl; // TODO:方案1.指定名字
// public void setUserService(IUserService userService) {
// this.userService = userService;
// }
@PostConstruct // 在构造函数之后运行
public void init(){
System.out.println("控制器 Controller init");
}
@PreDestroy // 在容器销毁之前执行
public void destroy(){
System.out.println("Controller destroy");
}
public List<User> queryAll(){
return userService.queryAll();
// return userServiceImpl.queryAll(); // TODO:方案1.指定名字
}
}
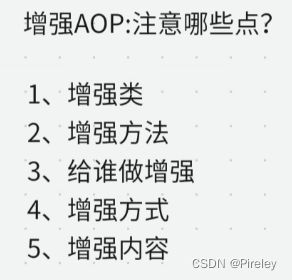
Spring增强方法——给一批类全部做增强

用配置文件做增强

1.增强类LogActiveDemo.java文件
package com.tianju.aop;

import org.springframework.stereotype.Component;

/**
 * 增强类---用来给别的类做增强
 * 1.需要在容器中
 */
@Component
public class LogActiveDemo {
    public void before(){
        System.out.println("增强类的before==========");
    }
    public void after(){
        System.out.println("增强类的 after==========");
    }
    public void afterReturning(){
        System.out.println("增强类的 beforeReturning==========");
    }
    public void afterThrowing(){
        System.out.println("增强类的 beforeThrowing==========");
    }
}
2.被增强的类UserController.java文件
package com.tianju.controller;

import org.springframework.stereotype.Controller;

/**
 * 被增强的类---被增强类增强
 * 1.需要在容器中;
 */
@Controller
public class UserController {
    public void add(){
        System.out.println("add a new user");
    }
}
3.进行增强与被增强的配置
aop:config+
aop:aspect+
pointcut=“execution(* com.tianju.controller.UserController.*(…))”
 如果是所有类的所有方法做增强:
pointcut=“execution( * com.tianju.controller. * .*(…))”
beans.xml文件
<?xml version="1.0" encoding="UTF-8"?>
<beans xmlns="http://www.springframework.org/schema/beans"
       xmlns:xsi="http://www.w3.org/2001/XMLSchema-instance"
       xmlns:context="http://www.springframework.org/schema/context"
       xmlns:aop="http://www.springframework.org/schema/aop"
       xsi:schemaLocation="http://www.springframework.org/schema/beans
        http://www.springframework.org/schema/beans/spring-beans.xsd
        http://www.springframework.org/schema/context
        http://www.springframework.org/schema/context/spring-context.xsd
        http://www.springframework.org/schema/aop
        http://www.springframework.org/schema/aop/spring-aop.xsd">

<!--    进行扫描,保证增强类和被增强的类都在容器中-->
    <context:component-scan base-package="com.tianju"></context:component-scan>

<!--    进行增强方法的配置-->
    <aop:config>
<!--        增强类是容器中的 logActiveDemo -->
        <aop:aspect id="logActiveDemo" ref="logActiveDemo">
<!--           pointcut="execution(* com.tianju.controller.UserController.*(..))" 作用在所有方法上-->
            <aop:before method="before" pointcut="execution(* com.tianju.controller.UserController.*(..))"></aop:before>
            <aop:after method="after" pointcut="execution(* com.tianju.controller.UserController.*(..))"></aop:after>
            <aop:after-returning method="afterReturning" pointcut="execution(* com.tianju.controller.UserController.*(..))"></aop:after-returning>
            <aop:after-throwing method="afterThrowing" pointcut="execution(* com.tianju.controller.UserController.*(..))"></aop:after-throwing>
        </aop:aspect>

    </aop:config>

</beans>
4.测试用例及其结果ClassPathXmlApplicationContext(“beans.xml”);
package com.tianju.test;

import com.tianju.controller.UserController;

import org.springframework.context.support.ClassPathXmlApplicationContext;

public class LogDemoTest1 {
    public static void main(String[] args) {
        ClassPathXmlApplicationContext ac = new ClassPathXmlApplicationContext("beans.xml");
        UserController userController = ac.getBean(UserController.class);
        userController.add();
    }
}

用注解做增强
1.增强类LogActiveDemo.java文件 @Aspect,(@Before(“execution(* com.tianju.controller.UserController.*(…))”), @After, @AfterReturning, @AfterThrowing)
增强类—用来给别的类做增强
- 1.需要在容器中 @Component;
- 2.标识自己是增强类 @Aspect;
- 3.自己的方法作用于什么时候@Before, @After, @AfterReturning, @AfterThrowing;
- 4.标识自己要给哪些方法做增强,用自定义注解
package com.tianju.aop;

import org.aspectj.lang.annotation.*;
import org.springframework.stereotype.Component;

/**
 * 增强类---用来给别的类做增强
 * 1.需要在容器中 @Component;
 * 2.标识自己是增强类 @Aspect;
 * 3.要给哪些类做增强 用自定义注解实现
 */
@Component
@Aspect
public class LogActiveDemo {
    @Before("execution(* com.tianju.controller.UserController.*(..))")
    public void before(){
        System.out.println("增强类的before==========");
    }
    @After("execution(* com.tianju.controller.UserController.*(..))")
    public void after(){
        System.out.println("增强类的 after==========");
    }
    @AfterReturning("execution(* com.tianju.controller.UserController.*(..))")
    public void afterReturning(){
        System.out.println("增强类的 beforeReturning==========");
    }
    @AfterThrowing("execution(* com.tianju.controller.UserController.*(..))")
    public void afterThrowing(){
        System.out.println("增强类的 beforeThrowing==========");
    }
}
2.自定义注解MyAnnoClass.java文件@Target({ElementType.TYPE}) +@Retention(RetentionPolicy.RUNTIME)
package com.tianju.anno;

import java.lang.annotation.ElementType;
import java.lang.annotation.Retention;
import java.lang.annotation.RetentionPolicy;
import java.lang.annotation.Target;

/**
 * 自定义注解,进行是否增强类的选择
 */
@Target({ElementType.TYPE}) // 这个注解作用在类上
@Retention(RetentionPolicy.RUNTIME) // 在运行时阶段增强
public @interface MyAnnoClass {
}
3.被增强的类UserController.java文件@MyAnnoClass
被增强的类—被增强类增强
- 1.需要在容器中 @Controller;
- 2.标识自己这个类被增强,用自定义注解 @MyAnnoClass
package com.tianju.controller;

import com.tianju.anno.MyAnnoClass;
import org.springframework.stereotype.Controller;

/**
 * 被增强的类---被增强类增强
 * 1.需要在容器中 @Controller;
 * 2.标识自己这个类被增强,用自定义注解 @MyAnnoClass
 */
@Controller
@MyAnnoClass
public class UserController {
    public void add(){
        System.out.println("add a new user");
    }
}
4.配置文件SpringConfig.java文件开启动态代理 @EnableAspectJAutoProxy
package com.tianju.config;

import org.springframework.context.annotation.ComponentScan;
import org.springframework.context.annotation.Configuration;
import org.springframework.context.annotation.EnableAspectJAutoProxy;

@Configuration
@ComponentScan("com.tianju")
@EnableAspectJAutoProxy // 让动态代理生效
public class SpringConfig {
}
5.测试用例AnnotationConfigApplicationContext(SpringConfig.class);
package com.tianju.test;

import com.tianju.config.SpringConfig;
import com.tianju.controller.UserController;
import org.springframework.context.annotation.AnnotationConfigApplicationContext;
import org.springframework.context.support.ClassPathXmlApplicationContext;

public class LogConfigDemoTest1 {
    public static void main(String[] args) {
        AnnotationConfigApplicationContext ac = new AnnotationConfigApplicationContext(SpringConfig.class);
        UserController userController = ac.getBean(UserController.class);
        userController.add();
    }
}
简化:从 @Before(“execution(* com.tianju.controller.UserController.*(…))”) 到@After(“@annotation(com.tianju.anno.MyAnnoMethod)”)

1.自定义注解MyAnnoMethod.java文件@Target({ElementType.METHOD})
package com.tianju.anno;

import java.lang.annotation.ElementType;
import java.lang.annotation.Retention;
import java.lang.annotation.RetentionPolicy;
import java.lang.annotation.Target;

/**
 * 标识哪些方法要做加强,替换
 * @Before("execution(* com.tianju.controller.UserController.*(..))")
 */

@Target({ElementType.METHOD}) // 这个注释作用在方法上
@Retention(RetentionPolicy.RUNTIME) // 以后全部用这个,运行时阶段
public @interface MyAnnoMethod {
}
2.增强类LoginActiveAnnoMethod.java文件@Before(“@annotation(com.tianju.anno.MyAnnoMethod)”)
增强类—给别的类的方法做增强
- 1.在容器中;
- 2.是增强类;
- 3.标注可以给哪些方法做增强
package com.tianju.aop;

import org.aspectj.lang.annotation.Aspect;
import org.aspectj.lang.annotation.Before;
import org.springframework.stereotype.Component;


/**
 * 增强类---给别的类的方法做增强
 * 1.在容器中;
 * 2.是增强类;
 * 3.标注可以给哪些方法做增强
 */
@Component
@Aspect
public class LoginActiveAnnoMethod {
    @Before("@annotation(com.tianju.anno.MyAnnoMethod)")
    public void before(){
        System.out.println("~~~~~~~~~~~~~~~利用标注了某个注解的 方法 进行增强~ 增强方法的 before 方法~~~~~~~~~~");
    }
}
3.被增强类OpusController.java文件@MyAnnoMethod
package com.tianju.controller;
import com.tianju.anno.MyAnnoMethod;
import org.springframework.stereotype.Controller;
@Controller
public class OpusController {
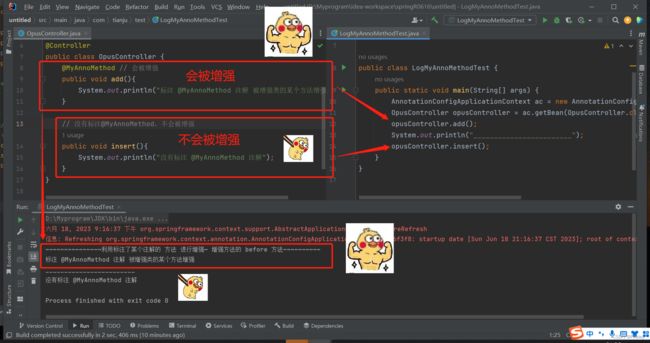
@MyAnnoMethod // 会被增强
public void add(){
System.out.println("标注 @MyAnnoMethod 注解 被增强类的某个方法增强");
}
// 没有标注@MyAnnoMethod,不会被增强
public void insert(){
System.out.println("没有标注 @MyAnnoMethod 注解");
}
}
4.配置文件SpringConfig.java文件开启动态代理 @EnableAspectJAutoProxy
package com.tianju.config;

import org.springframework.context.annotation.ComponentScan;
import org.springframework.context.annotation.Configuration;
import org.springframework.context.annotation.EnableAspectJAutoProxy;

@Configuration
@ComponentScan("com.tianju")
@EnableAspectJAutoProxy // 让动态代理生效
public class SpringConfig {
}
5.测试AnnotationConfigApplicationContext(SpringConfig.class)
package com.tianju.test;

import com.tianju.config.SpringConfig;
import com.tianju.controller.OpusController;
import com.tianju.controller.UserController;
import org.springframework.context.annotation.AnnotationConfigApplicationContext;

public class LogMyAnnoMethodTest {
    public static void main(String[] args) {
        AnnotationConfigApplicationContext ac = new AnnotationConfigApplicationContext(SpringConfig.class);
        OpusController opusController = ac.getBean(OpusController.class);
        opusController.add();
        System.out.println("________________________");
        opusController.insert();
    }
}
另一种方式:@Before(“@within(org.springframework.stereotype.Controller)”) + 日志的案例
1.定义一个增强方法,标注@within
LogActiveWith.java文件;@Before(“@within(org.springframework.stereotype.Controller)”)
增强别的类时,通过JoinPoint能够
- 1.能知道访问的类是啥;
- 2.能知道访问的目标方法是啥;
- 3.能知道访问传的参数是啥;
package com.tianju.aop;

import org.aspectj.lang.JoinPoint;
import org.aspectj.lang.annotation.Aspect;
import org.aspectj.lang.annotation.Before;
import org.springframework.stereotype.Component;

import java.util.Arrays;
import java.util.Date;

/**
 * 增强类--给别的方法做增强
 * 1.在容器中;
 * 2.是增强类;
 * 3.给哪些方法做增强;
 */

@Component // 在容器中
@Aspect // 是增强类
public class LogActiveWith {
    /**
     * 增强别的类时,通过JoinPoint能够
     * 1.能知道访问的类是啥;
     * 2.能知道访问的目标方法是啥;
     * 3.能知道访问传的参数是啥;
     * @param joinPoint
     */
    @Before("@within(org.springframework.stereotype.Controller)")
    public void before(JoinPoint joinPoint){
        // 1.获取被增强的方法名
        String className = joinPoint.getTarget().getClass().getName();
        // 2.获取访问的目标方法是啥
        String methodName = joinPoint.getSignature().getName();
        // 3.能知道访问时传的参数是啥
        Object[] args = joinPoint.getArgs();
        System.out.println(
                "在"+new Date()
                + "时,访问了" + className
                + "类的," + methodName
                + "方法,传的参数为 "+ Arrays.toString(args));
    }
}
2.正常写controller的逻辑
MoneyController.java文件
package com.tianju.controller;

import org.springframework.stereotype.Controller;

/**
 * 被增强的类,
 * 1.在容器中;2.被增强;
 * 记录交易的日志数据
 */
@Controller
public class MoneyController {
    public void pay(Double money){
        System.out.println("~~~~~~~进行支付~~~~~~");
    }

    public void income(Double income){
        System.out.println("~~~~~~~~~~收入~~~~~~~~~");
    }
}
3.配置文件+测试
配置文件SpringConfig.java文件,@EnableAspectJAutoProxy
package com.tianju.config;

import org.springframework.context.annotation.ComponentScan;
import org.springframework.context.annotation.Configuration;
import org.springframework.context.annotation.EnableAspectJAutoProxy;

@Configuration
@ComponentScan("com.tianju")
@EnableAspectJAutoProxy // 让动态代理生效
public class SpringConfig {
}
测试用例
package com.tianju.test;

import com.tianju.config.SpringConfig;
import com.tianju.controller.MoneyController;
import org.springframework.context.annotation.AnnotationConfigApplicationContext;

public class MoneyDemoTest {
    public static void main(String[] args) {
        AnnotationConfigApplicationContext ac = new AnnotationConfigApplicationContext(SpringConfig.class);
        MoneyController moneyController = ac.getBean(MoneyController.class);
        moneyController.pay(500.58);
        moneyController.income(458.69);
    }
}
打印出的日志信息

升级的方法@Around可以实现@Before, @After, @AfterReturning, @AfterThrowing
around方法,环绕方法
- 可以替代之前的before,after,afterReturning,afterThrowing
- 1.在容器中;2.是增强方法;3.给谁做增强
package com.tianju.aop;

import org.aspectj.lang.ProceedingJoinPoint;
import org.aspectj.lang.annotation.Around;
import org.aspectj.lang.annotation.Aspect;
import org.springframework.stereotype.Component;

import java.text.SimpleDateFormat;
import java.util.Arrays;
import java.util.Date;

/**
 * around方法,环绕方法
 * 可以替代之前的before,after,afterReturning,afterThrowing
 * 1.在容器中;2.是增强方法;3.给谁做增强
 */
@Component
@Aspect
public class LogActiveAround {

    @Around("@within(org.springframework.stereotype.Controller)")
    public void around(ProceedingJoinPoint joinPoint){
        String className = joinPoint.getTarget().getClass().getName();// 获取被增强的类名
        String methodName = joinPoint.getSignature().getName();// 获取被增强类的方法名
        Object[] args = joinPoint.getArgs();//获取增强方法的参数
        // 1.@before 在方法执行前做一些事情;
        SimpleDateFormat sdf = new SimpleDateFormat("yyyy-MM-dd hh:mm:ss");
        String beforeAspectLog = "【执行前】在" + sdf.format(new Date())+"时,开始执行"+className+"类的"+methodName+"方法,传的参数是"+ Arrays.toString(args);
        System.out.println(beforeAspectLog);
        try {
            // 此时方法执行也由joinPoint控制
            joinPoint.proceed(args); // 执行目标方法
            // 2.在方法正常执行完成后做一些事情;
            System.out.println("正常执行完成");
        } catch (Throwable e) {
            // 3.@AfterThrowing 在抛出异常后执行代码
            String afterThrowingLog = "【异常】在" + sdf.format(new Date())+"时,执行"+className+"类的"+methodName+"方法,传的参数是"+ Arrays.toString(args) +"出现异常";
            System.out.println(afterThrowingLog);
        } finally {
            // 4.@AfterReturning 在返回后执行代码
            String afterReturningLog = "【完成】在" + sdf.format(new Date())+"时,完成了"+className+"类的"+methodName+"方法,传的参数是"+ Arrays.toString(args);
            System.out.println(afterReturningLog);
        }
    }
}
总结
spring可以new 对象,给对象属性赋值,增强方法;
要记住spring的常用注解;