Android R(11)实现HIDL接口--ICustomHardware(三)
1.实现接口 ICustomHardware
1.1使用hidl-gen自动生成实现类
使用hidl-gen直接生成ICustomHardware接口的实现类CustomHardware.cpp,命令如下
flagstaff@flagstaff-pc:~/aosp_r.lns$ hidl-gen -L c++-impl -o test/flagstaffTest/hardware/interfaces/custom_hardware/1.0/default -r flagstaff.hardware:test/flagstaffTest/hardware/interfaces flagstaff.hardware.custom_hardware@1.0
成功执行后,目录结构如下
flagstaff@flagstaff-pc:~/aosp_r.lns/test/flagstaffTest/hardware/interfaces/custom_hardware/1.0$ tree
.
├── Android.bp
├── default
│   ├── CustomHardware.cpp
│   └── CustomHardware.h
└── ICustomHardware.hal
1.2 CustomHardware.h
使用hidl-gen确实为我们省略了不少的工作量。
#pragma once
#include 命名空间:
CustomHardware的命名空间为如下,该命名空间由ICustomHardware.hal中的package转化而来,规则很简单,就是将packge中的.用::来替换,对于实现类后跟implementation。
//file:ICustomHardware.hal
package flagstaff.hardware.custom_hardware@1.0;
//CustomHardware.h
namespace flagstaff::hardware::custom_hardware::implementation
HIDL中的后端大都是cpp来写的,这里实在没看懂为什么HIDL中喜欢用package加点的方式。
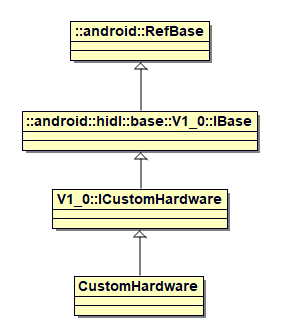
类定义:
下面是CustomHardware的类继承关系图,顶层的父类为RefBase,可见CustomHardware是支持强弱指针的。
返回值–Return
Return实际上是一个模板类,方便调用者捕获远程调用状态的。并且如果Client本次远程调用失败且不调用Return.isOk检查的话,HIDL框架则会强制kill掉当前进程。其定义如下
//file:system\libhidl\base\include\hidl\Status.h
class Status final {
public:
    ...
    bool isOk() const { return mException == EX_NONE; }
};

class return_status {
private:
    Status mStatus {};
public:
    bool isOk() const {
        mCheckedStatus = true;
        return mStatus.isOk();
    }
};

template<typename T> class Return : public details::return_status {
...
};
因为Return重载了符号,所以使用时直接当作原类型即可,如此处为boolean类型。
1.3 CustomHardware.cpp
测试用,所以在方法enableHardware中打印值来验证是否调用成功即可,代码如下
#include "CustomHardware.h"
#include mName用于验证单接口多实例功能,此处可以直接忽略。可见最终接口enableHardware被调用时会打印入参和被调用的实例名称。
2.HIDL实例的注册
前面提过,远程调用模型就是C/S模型,对于调用者也就是Client端,其也可是一个常驻的后台服务也可以是单次调用命令。但是实现端其必须是一个常驻后台的server,下面则是HIDL server的一种写法。
#include configureRpcThreadpool
用于设置server的线程池数量,每一次client端调用,Server都会对应一个线程去处理client的调用请求。如果client的请求数量小于等于此处设置的5,那么这5次调用实际上就是并行的,即使此处的接口没有设置oneway关键字,所以实现接口的时候要考虑并发。
本次的server则是为ICustomHardware接口注册了两个实例,并且其命名分别为default/custom,其中registerAsService无入参的时候默认为defalut,其代码如下
//file:out\soong\.intermediates\test\flagstaffTest\hardware\interfaces\custom_hardware\1.0\[email protected]_genc++_headers\gen\flagstaff\hardware\custom_hardware\1.0\ICustomHardware.h
namespace flagstaff {
namespace hardware {
namespace custom_hardware {
namespace V1_0 {

struct ICustomHardware : public ::android::hidl::base::V1_0::IBase {
...
/**
* Registers a service with the service manager. For Trebilized devices, the service
* must also be in the VINTF manifest.
*/
__attribute__ ((warn_unused_result))::android::status_t registerAsService(const std::string &serviceName="default");
...
};
joinRpcThreadpool
该函数实际上等同于thread->join(),并且binder线程是在死循环中轮询client是否发送消息过来的,所以并不会返回,正常情况下server也就不会退出。
3.Android.bp
Android团队推荐使用Android.bp来编写编译规则,因此此处也使用Android.bp。
cc_binary {
    name: "[email protected]",
    defaults: ["hidl_defaults"],
    vendor: true,
    relative_install_path: "hw",
    srcs: [
        "service.cpp",
        "src/*.cpp",
    ],
    init_rc: ["[email protected]"],
    local_include_dirs: [
        "include",
    ],
    shared_libs: [
        "libbinder",
        "libhidlbase",
        "libbase",
        "libutils",
        "libcutils",
        "liblog",
        "[email protected]",
    ],
    cppflags:[
        "-Wno-unused-parameter",
        "-DLOG_TAG=\"flagstaff.hardware.custom_hardware\"",
    ],
    vintf_fragments: ["[email protected]"],
}
对于其中关键字的解释AOSP自带的文档已经解释的很详细了,所以就不赘诉了,注意只有编译后才会生成。
flagstaff@flagstaff-pc:~/aosp_r.lns/out/soong/docs$ ls cc.html
cc.html
额外说明下,如果熟悉Android.mk的写法,想学习Android.bp的写法,可以使用AOSP自带的工具androidmk来将Android.mk转化为Android.bp来对比学习,下面是其简略使用说明
flagstaff@flagstaff-pc:~/aosp_r.lns$ androidmk
usage: androidmk [flags] <inputFile>

androidmk parses <inputFile> as an Android.mk file and attempts to output an analogous Android.bp file (to standard out)
另外如果有问题,欢迎留言或者email([email protected])我,技术升级在于交流~~