springboot3深度学习(在更)
jar包外进行配置文件的修改
在jar包的同目录创建application.properties文件,直接在这个文件中配置对应的信息,就可以完成对应的修改,我们就可以做到不修改源代码。
例子:

 测试结果为下:
yml文件和properties文件都可以实现此功能,但必须保证这个配置文件的名字为application,才能生效。
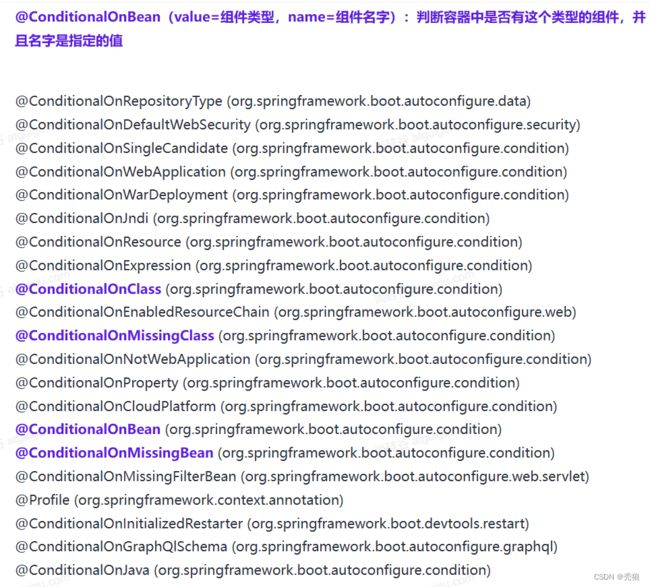
条件注释
通过对应的条件判断完成对Bean的配置。
例子测试:
配置类
import com.huang.pojo.Cat;
import com.huang.pojo.Dog;
import com.huang.pojo.People;
import com.huang.pojo.User;
import org.springframework.boot.SpringBootConfiguration;
import org.springframework.boot.autoconfigure.condition.ConditionalOnBean;
import org.springframework.boot.autoconfigure.condition.ConditionalOnClass;
import org.springframework.boot.autoconfigure.condition.ConditionalOnMissingBean;
import org.springframework.boot.autoconfigure.condition.ConditionalOnMissingClass;
import org.springframework.context.annotation.Bean;

@SpringBootConfiguration
public class SpringbootConfig {
    //条件注解测试
    @Bean
    public User getUser() {
        return new User("tolen", 22);
    }

    @ConditionalOnClass(value = com.huang.pojo.User.class)
    @Bean
    public Dog getDog() {
        return new Dog("haha", 1);
    }

    //此时是不会执行下面的方法
    @ConditionalOnMissingClass(value = "com.huang.pojo.Dog")
    @Bean
    public Cat getCat() {
        return new Cat("mimi", 2);
    }
    //因为在ioc容器中存在User,所以会执行
    @ConditionalOnBean(value = User.class)
    @Bean
    public Cat getCat2() {
        return new Cat("mimi", 2);
    }
    //因为在ioc容器中存在Cat,所以不会执行
    @ConditionalOnMissingBean(value = Cat.class)
    @Bean
    public People getPeople() {
        return new People("秃狼", 22);
    }
}
启动类
import com.huang.pojo.Cat;
import com.huang.pojo.Dog;
import com.huang.pojo.People;
import com.huang.pojo.User;
import org.springframework.boot.SpringApplication;
import org.springframework.boot.autoconfigure.SpringBootApplication;
import org.springframework.context.ConfigurableApplicationContext;

@SpringBootApplication(scanBasePackages = "com.huang")
public class Springboot3StudyApplication {

    public static void main(String[] args) {
        //返回spring的ioc容器
        var ioc = SpringApplication.run(Springboot3StudyApplication.class, args);
        var cat = ioc.getBeanNamesForType(Cat.class);
        if(cat != null) {
            System.out.println("cat被创建");
            System.out.println(cat[0]);
        };
        var dog = ioc.getBeanNamesForType(Dog.class);
        if(dog != null) {
            System.out.println("dog被创建");
            System.out.println(dog[0]);
        };
        var people = ioc.getBeanNamesForType(People.class);
        if(people != null) {
            System.out.println("people被创建");
            System.out.println(people[0]);
        };
        var user = ioc.getBeanNamesForType(User.class);
        if(user != null) {
            System.out.println("user被创建");
            System.out.println(user[0]);
//            这里报错说数组的索引越界了,说明没有查到people,也就说明ioc容器中没有people的Bean
        };
    }

}
测试结果为下
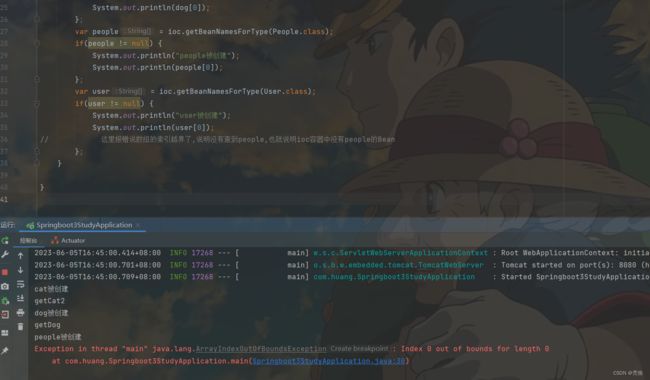 这里报错说数组的索引越界了,说明没有查到people,也就说明ioc容器中没有people的Bean。
属性绑定注解
@ConfigurationProperties("前缀"): 声明组件的属性和配置文件哪些前缀开始项进行绑定。(配合@Compoment或@Bean使用)
@EnableConfigurationProperties:快速注册注解。(主要使用在外部引入的类上,因为外部类通常是没有注解扫描的,其上的注解是失效的,所以使用@EnableConfigurationProperties,使其类上的注解@ConfigurationProperties生效,这时就会和我们设置的配置文件中的信息绑定了。这个注解会自动将引入的文件配置到ioc容器中,无需添加@Bean)
例子
实体类
import lombok.AllArgsConstructor;
import lombok.Data;
import lombok.NoArgsConstructor;
import org.springframework.boot.context.properties.ConfigurationProperties;

@Data
@AllArgsConstructor
@NoArgsConstructor
@ConfigurationProperties("cat")
public class Cat {
    private String name;
    private Integer age;
}
import lombok.AllArgsConstructor;
import lombok.Data;
import lombok.NoArgsConstructor;
import org.springframework.boot.context.properties.ConfigurationProperties;

@Data
@AllArgsConstructor
@NoArgsConstructor
@ConfigurationProperties("dog")
public class Dog {
    private String name;
    private Integer age;
}
配置类
import com.huang.pojo.Cat;
import com.huang.pojo.Dog;
import org.springframework.boot.SpringBootConfiguration;
import org.springframework.boot.context.properties.EnableConfigurationProperties;
import org.springframework.context.annotation.Bean;

@SpringBootConfiguration
@EnableConfigurationProperties({Dog.class})
public class SpringbootConfig {
   @Bean
    public Cat getCat() {
        return new Cat();
    }
}
application.yml
cat:
  name: mimi
  age: 12
dog:
  name: wangwang
  age: 23
测试类
import com.huang.pojo.Cat;
import com.huang.pojo.Dog;
import org.junit.jupiter.api.Test;
import org.springframework.beans.factory.annotation.Autowired;
import org.springframework.boot.test.context.SpringBootTest;
@SpringBootTest
class Springboot3StudyApplicationTests {
@Autowired
Cat cat;
@Autowired
Dog dog;
@Test
void test1() {
System.out.println(cat);
System.out.println(dog);
}
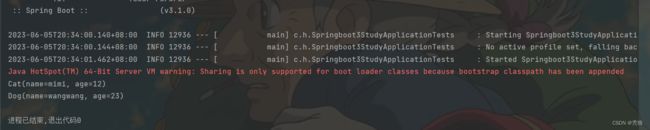
}
测试结果为下:
日志配置
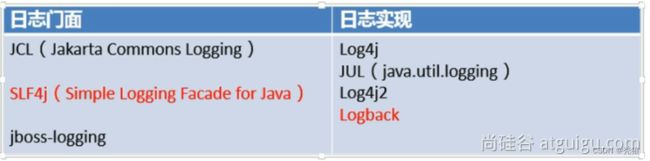
springboot默认使用lokback日志。
默认日志的打印信息:
2023-06-07T21:56:38.780+08:00  INFO 19264 --- [           main] com.huang.SpringbootDemo1Application     : Starting SpringbootDemo1Application using Java 17.0.7 with PID 19264 (D:\桌面\java\springboot3\springboot3Study\springboot-demo1\target\classes started by 86159 in D:\桌面\java\springboot3\springboot3Study)
2023-06-07T21:56:38.786+08:00  INFO 19264 --- [           main] com.huang.SpringbootDemo1Application     : No active profile set, falling back to 1 default profile: "default"
2023-06-07T21:56:39.719+08:00  INFO 19264 --- [           main] o.s.b.w.embedded.tomcat.TomcatWebServer  : Tomcat initialized with port(s): 8080 (http)
默认输出格式:
- 时间和日期:毫秒级精度
- 日志级别:ERROR, WARN, INFO, DEBUG, or TRACE.
- 进程 ID
- ---: 消息分割符
- 线程名: 使用[]包含
- Logger 名: 通常是产生日志的类名
- 消息: 日志记录的内容
添加日志信息
方法一:使用logger讲添加信息。
import org.slf4j.LoggerFactory;
import org.springframework.web.bind.annotation.GetMapping;
import org.springframework.web.bind.annotation.RestController;

@RestController
public class helloController {

    @GetMapping("hello")
    public String hello() {
        var logger = LoggerFactory.getLogger(this.getClass());
        logger.info("hhhh");
        logger.error("废了");
        return "hello, world";
    }
}
测试结果为下
![]()
方法二:使用lombok种的@log4j或@log4j2
import lombok.extern.log4j.Log4j;
import lombok.extern.log4j.Log4j2;
import org.springframework.web.bind.annotation.GetMapping;
import org.springframework.web.bind.annotation.RestController;

@RestController
@Log4j2
//@Log4j
public class helloController {

    @GetMapping("hello")
    public String hello() {
        log.info("hhhh");
        log.error("废了");
        return "hello, world";
    }
}
测试结果为下:
![]()
日志级别
- 由低到高:
ALL,TRACE, DEBUG, INFO, WARN, ERROR,FATAL,OFF;(就是越来越近精确)
-
- 只会打印指定级别及以上级别的日志
- ALL:打印所有日志
- TRACE:追踪框架详细流程日志,一般不使用
- DEBUG:开发调试细节日志
- INFO:关键、感兴趣信息日志
- WARN:警告但不是错误的信息日志,比如:版本过时
- ERROR:业务错误日志,比如出现各种异常
- FATAL:致命错误日志,比如jvm系统崩溃
- OFF:关闭所有日志记录
使用application.yml进行日志级别的配置
#logging:
#  level:
#    #表示项目所有的类的日志级别都为info
#    root: info

logging:
  level:
#    表示指定包路径中的所有类的日志级别都为info
    com.huang.controller: info
日志分组
有时我们想要对不同的包路径中的类设置相同的日志级别,这时我们就可以使用组。
logging:
  group:
#    将controller包和pojo包设置为名字为name的组
    name: com.huang.controller, com.huang.pojo
  level:
    name: DEBUG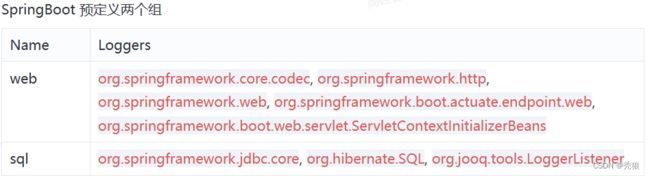
日志文件的输出
logging:
  file:
    #这里直接设置需要生成的文件的路径,如果只写了个文件名,文件就会默认生成在次项目下
    name: D:\\log
结果为下

日志文件的归档和滚动切割
归档:每天的日志单独存到一个文档中。
切割:每个文件10MB,超过大小切割成另外一个文件。
这里使用默认的日志logback,如果需要使用其他日志,则在resources中创建xxx-spring.xml的日志配置文件。(如:log4j2-spring.xml)
 例子:
例子:
logging:
  logback:
    rollingpolicy:
      #${LOG_FILE}.%d{yyyy-MM-dd}.%i.gz)为默认值.(格式:日志名+当前时间+今日的第几个日志+对应的压缩格式)
      file-name-pattern: ${LOG_FILE}.%d{yyyy-MM-dd}.%i.gz)
#      设置一个日志文件的大小
      max-file-size: 1KB
  file:
    name: haha
结果为下:

切换使用其他日志
            org.springframework.boot
            spring-boot-starter-web


            org.springframework.boot
            spring-boot-starter


                    org.springframework.boot
                    spring-boot-starter-logging


            org.springframework.boot
            spring-boot-starter-log4j2
编辑日志步骤
1. 导入任何第三方框架,先排除它的日志包,因为Boot底层控制好了日志。
2. 修改 application.properties 配置文件,就可以调整日志的所有行为。如果不够,可以编写日志框架自己的配置文件放在类路径下就行,比如logback-spring.xml,log4j2-spring.xml。
3. 如需对接专业日志系统,也只需要把 logback 记录的日志灌倒 kafka之类的中间件,这和SpringBoot没关系,都是日志框架自己的配置,修改配置文件即可。
4. 业务中使用slf4j-api记录日志。不要再 sout 了。
WebMvcAutoConfiguration自动配置原理
webmvc的配置方法

生效条件:
//需要在前两个类配置后,再进行配置
@AutoConfiguration(after = { DispatcherServletAutoConfiguration.class, TaskExecutionAutoConfiguration.class,
		ValidationAutoConfiguration.class })
//项目要为serlet web类型才会生效
@ConditionalOnWebApplication(type = Type.SERVLET)
//要存在这三个类才会进行自动配置
@ConditionalOnClass({ Servlet.class, DispatcherServlet.class, WebMvcConfigurer.class })
@ConditionalOnMissingBean(WebMvcConfigurationSupport.class)
@AutoConfigureOrder(Ordered.HIGHEST_PRECEDENCE + 10)
@ImportRuntimeHints(WebResourcesRuntimeHints.class)
public class WebMvcAutoConfiguration {
自动配置效果
自动配置了HiddenHttpMethodFilter(表单的提交方式)和FormContentFilter(数据的格式化)。
因为要实现手自一体配置的话,我们需要引入webmvcConfigurer,这里源码通过实现WebMvcConfigurer接口的方式引入。

这里我们实现springmvc的配置只需要在apllication.yml中使用
spring.mvc和spring.web
webmvcConfigurer的底层方法:
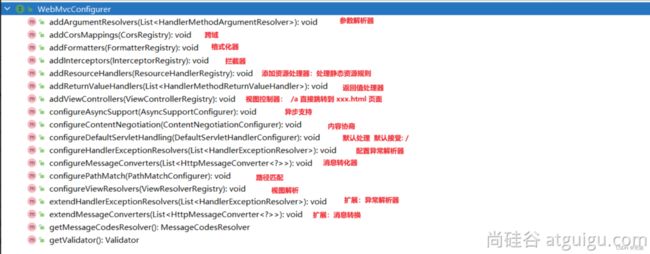
静态资源处理器
@Override
		public void addResourceHandlers(ResourceHandlerRegistry registry) {
			if (!this.resourceProperties.isAddMappings()) {
				logger.debug("Default resource handling disabled");
				return;
			}
			addResourceHandler(registry, this.mvcProperties.getWebjarsPathPattern(),
					"classpath:/META-INF/resources/webjars/");
			addResourceHandler(registry, this.mvcProperties.getStaticPathPattern(), (registration) -> {
				registration.addResourceLocations(this.resourceProperties.getStaticLocations());
				if (this.servletContext != null) {
					ServletContextResource resource = new ServletContextResource(this.servletContext, SERVLET_LOCATION);
					registration.addResourceLocations(resource);
				}
			});
		}
默认设置了两个静态资源的访问路径。
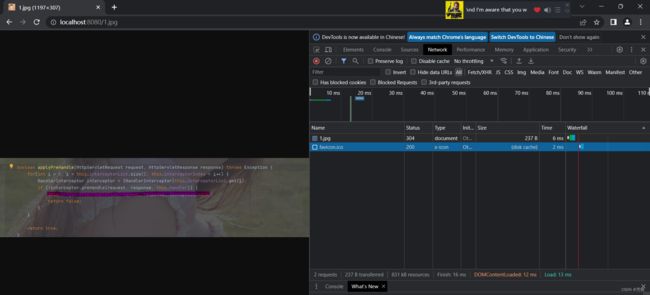
1. 当访问/webjars/**路径时就会去classpath:/META-INF/resources/webjars/路径下查找对应的资源。
2.当访问/**路径时就会去
 "classpath:/META-INF/resources/",
      "classpath:/resources/", "classpath:/static/", "classpath:/public/"
这些路径下查找对应的资源。(按此顺序进行查找对应的路径资源)
两种设置静态资源规则的方法
1.通过application.properties配置
#访问静态资源的路径,这里就是添加了static前缀
spring.mvc.static-path-pattern=/static/**
#添加访问静态资源对应的服务器中的路径
#此时原本默认的设置就会失效
spring.web.resources.static-locations=classpath:/a/, classpath:/b/
2.通过配置类进行配置
import org.springframework.context.annotation.Configuration;
import org.springframework.web.servlet.config.annotation.EnableWebMvc;
import org.springframework.web.servlet.config.annotation.ResourceHandlerRegistry;
import org.springframework.web.servlet.config.annotation.WebMvcConfigurer;

@Configuration
@EnableWebMvc//此直接作用是使原本的默认配置失效
public class myConfig implements WebMvcConfigurer {
    @Override
    public void addResourceHandlers(ResourceHandlerRegistry registry) {
        //配置状态资源的访问前缀和添加访问静态资源对应的服务器中的路径
        registry.addResourceHandler("/static/**").addResourceLocations("classpath:/a/", "class[ath:/b/");
    }
}
状态资源缓存配置
在配置静态资源的访问路径时,webmvcConfigurer也配置了资源缓存。
private void addResourceHandler(ResourceHandlerRegistry registry, String pattern,
				Consumer customizer) {
			if (registry.hasMappingForPattern(pattern)) {
				return;
			}
			ResourceHandlerRegistration registration = registry.addResourceHandler(pattern);
			customizer.accept(registration);
			registration.setCachePeriod(getSeconds(this.resourceProperties.getCache().getPeriod()));
			registration.setCacheControl(this.resourceProperties.getCache().getCachecontrol().toHttpCacheControl());
			registration.setUseLastModified(this.resourceProperties.getCache().isUseLastModified());
			customizeResourceHandlerRegistration(registration);
		}
1.其可以通过在application.yml中的spring.web进行配置。
2.registration.setCachePeriod:设置缓存周期(周期过了就直接相服务器发请求,而不通过缓存),默认为0,也就不会过期。
3.registration.setCacheControl:http缓存设置。
4.registration.setUseLastModified:设置最后一次的修改时间。(通过修改时间是否相同来判断是否使用缓存中的数据)
欢迎页处理源码
@Configuration(proxyBeanMethods = false)
@EnableConfigurationProperties(WebProperties.class)
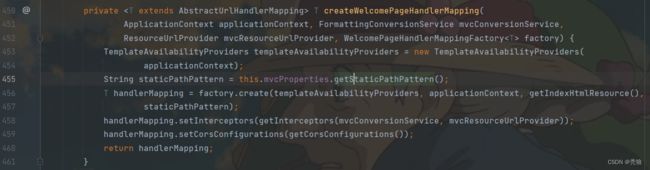
public static class EnableWebMvcConfiguration extends DelegatingWebMvcConfiguration implements ResourceLoaderAware在EnableWebMvcConfiguration 的 welcomePageHandlerMapping 方法
@Bean
		public WelcomePageHandlerMapping welcomePageHandlerMapping(ApplicationContext applicationContext,
				FormattingConversionService mvcConversionService, ResourceUrlProvider mvcResourceUrlProvider) {
			return createWelcomePageHandlerMapping(applicationContext, mvcConversionService, mvcResourceUrlProvider,
					WelcomePageHandlerMapping::new);
		}


获取对应路径下的index.html
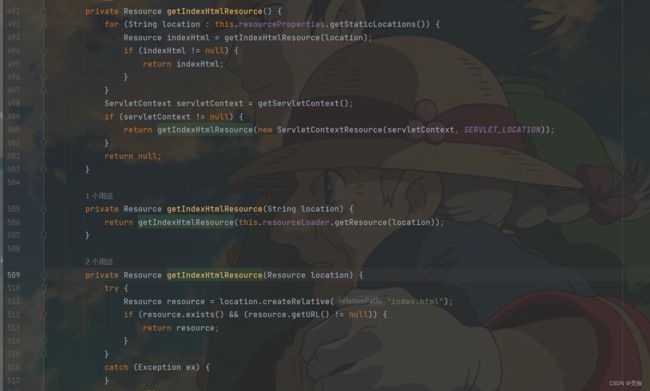
从源码中可以分析出,在访问路径为/**时,就"classpath:/META-INF/resources/", "classpath:/resources/", "classpath:/static/", "classpath:/public/"查找index.html,只要在对应的路径中存在index.html就将其作为欢迎页。
Favicon图标
Favicon图标就是自定义的网站小图标。
在static目录下创建一个favicon.ico文件就可以实现。
资源缓存配置测试
application.yml配置
spring:
  web:
    resources:
      #默认为ture,就是开启路径映射规则的自动配置
      add-mappings: true
      cache:
#        设置缓存的周期时间(如果不存在cachecontrol的配置,
#        也就是没有更详细的配置就是用period,如果有cachecontrol,period就会被覆盖,而失效)
        period: 3600
        cachecontrol:
#          此时的缓存的周期就是7200,而不是3600
          max-age: 7200
#          使最后一次修改时间进行缓存的匹配
        use-last-modified: true
测试结果为下:

使用到缓存里存放的资源。
内容协商
一个接口需要根据用户端返回不同的数据格式,这时我们就可以使用内容协商。
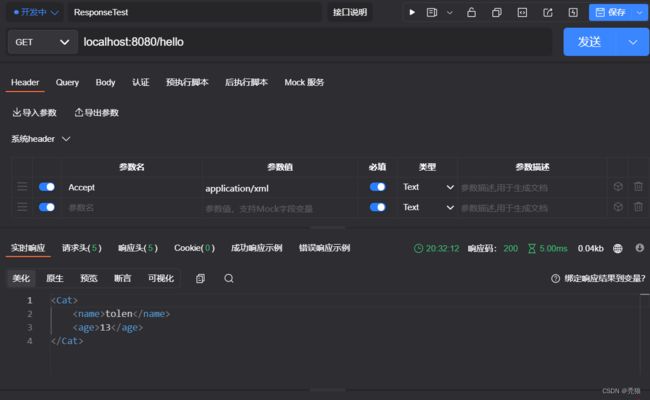
例子:需要一个既可以返回json数据有可以返回xml的接口。
1.通过配置请求头中的accpect。
引入支持写入xml的依赖
    com.fasterxml.jackson.dataformat
    jackson-dataformat-xml
在实体类上添加@JacksonXmlRootElement,可以写出为xml文档
import com.fasterxml.jackson.dataformat.xml.annotation.JacksonXmlRootElement;
import lombok.AllArgsConstructor;
import lombok.Data;

@Data
@AllArgsConstructor
@JacksonXmlRootElement
public class Cat {
    private String name;
    private Integer age;
}
进行测试
返回json时:

返回xml时:
2.通过设置对应的请求参数(在请求后面添加相应的参数)
在application.properties中配置开启信息,就可以实现功能。
#开启内容协商中的请求参数设置
spring.mvc.contentnegotiation.favor-parameter=true
#设置内容协商中请求参数的名字,默认名是format
spring.mvc.contentnegotiation.parameter-name=type