jacoco增量覆盖率平台开发
先聊聊做这个平台的意义,从项目管理角度来说,测试说项目测试完成,该如何证明呢?一般情况下我们进行验收时没什么问题就算完成了,但是实际上测试很多情况并没有考虑到。所以该平台可以反哺测试的测试用例,让平台质量把控上升一个层次,其次可以作为产品验收的标准。覆盖率至少达到百分90才可以发布到生产。为什么时百分90不是百分百,作为开发人员有很多时候会写一些防止报错的异常代码,这部分代码可能正常情况下是永远执行不到的。
本来想找找看有没有开源的现成的平台可以使用,在github翻了半天,发现没有一个能用的,所以决定自己基于jacoco开发一个,反正这个东西挺简单的,并不复杂。
以下分享平台搭建历程,没有贴全部代码。使用了个责任链模式,串了整个流程,因为整个流程分了很多独立的又有点关联的步骤,使用责任链易于扩展,且职责清晰,比如需要clone代码,如果代码存在需要进行pull代码,比如需要在生成报告时需要进行jacoco.exec的dump动作,比如需要进行代码的diff,需要进行代码的编译,最后报告的生成。
效果展示
生成报告的页面

报告管理页面
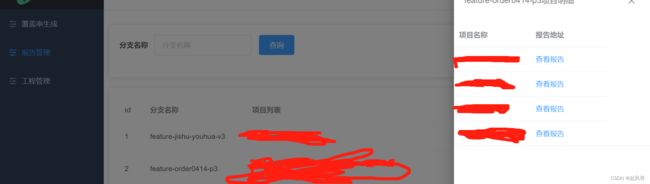
报告主页
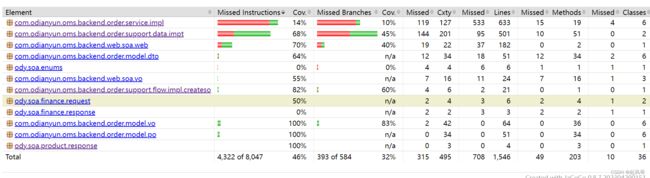
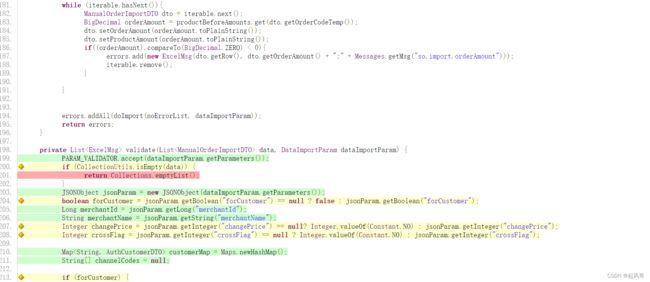
代码的增量覆盖效果
基础知识
java-agent方式使用
-javaagent:[yourpath/]jacocoagent.jar=[option1]=[value1],[option2]=[value2]
参数说明
-
destfile 执行数据输出文件路径 默认值当前路径下 jacoco.exec
-
append 如果为true,覆盖率数据附加到当前的jacoco.exec文件下,如果为false将替换jacoco.exec 默认true
-
includes 应分析的class列表,使用:符号分割,支持通配符和?。默认所有class
-
excludes 排除分析的class列表,同上,默认 空
-
exclclassloader 默认排除分析的classloader列表,同上,为了防止插装冲突,默认 sun.reflect.DelegatingClassLoader
-
inclbootstrapclasses 指定是否也应该检测引导类装入器中的类。谨慎使用此功能,它需要大量的包括/排除调优 默认false
-
inclnolocationclasses 指定是否也应该检测没有源位置的类。通常,这样的类是在运行时生成的,例如通过mock框架,因此默认情况下被排除在外。 默认false
-
sessionid A session identifier that is written with the execution data. Without this parameter a random identifier is created by the agent. 默认auto-generated 自动生成
-
dumponexit 如果设置为true,覆盖率将在虚拟机关机时写入数据。只有指定了其中一个文件,或者输出为tcpserver/tcpclient,并且在虚拟机终止时打开了连接,才可以写入转储文件。默认true
-
output 用于写入覆盖率数据的输出方法。有效的选项有:
- file:在虚拟机终止时,执行数据被写入destfile属性中指定的文件。
- tcpserver:代理侦听由地址和端口属性指定的TCP端口上的传入连接。执行数据写入该TCP连接。
- tcpclient:在启动时,代理连接到由地址和端口属性指定的TCP端口。执行数据写入该TCP连接。
- none:不输出。
请参阅下面的安全注意事项
-
address 当输出方式为tcpserver时要绑定的IP地址或主机名,当输出方式为tcpclient时要连接的IP地址或主机名。在tcpserver模式下,值“*”表示代理接受任何本地地址上的连接。默认 loopback interface
-
port 输出方式为tcpserver时要绑定的端口,输出方式为tcpclient时要连接的端口。在tcpserver模式下,端口必须可用,这意味着如果在同一台机器上运行多个JaCoCo代理,则必须指定不同的端口。默认6300
-
classdumpdir 相对于代理看到的所有类文件转储到的工作目录的位置。这对于调试或动态创建类(例如在使用脚本引擎时)非常有用 默认 no dumps
-
jmx 如果设置为true,代理将通过JMX以org.jacoco:type=Runtime的名称公开功能。请参阅下面的安全注意事项。 默认false
远程代理的安全考虑
在tcpserver和tcpclient模式下打开的端口和连接以及JMX接口不提供任何身份验证机制。如果在生产系统上运行JaCoCo,请确保没有不受信任的源可以访问TCP服务器端口,或者JaCoCo TCP客户端只能连接到受信任的目标。否则,可能会泄露应用程序的内部信息或受到DOS攻击。
所以jacoco不要在生产环境使用
报告生成
jacococli指令说明
dump指令
java -jar jacococli.jar dump [--address
- –address
- –destfile
- –help 帮助
- –port
- –quiet 静默输出
- –reset 获取完成后清空服务端缓存
- –retry
instrument指令
Off-line instrumentation of Java class files and JAR files.
java -jar jacococli.jar instrument [ ...] --dest [--help] [--quiet]
- –dest
- –help
- –quiet
merge 指令
合并多个exec文件
java -jar jacococli.jar merge [ ...] --destfile [--help] [--quiet]
- –destfile
- –help
- –quiet
report指令
读取exec文件和class文件生成不同格式的报告
java -jar jacococli.jar report [ ...] --classfiles [--csv ] [--encoding ] [--help] [--html ] [--name ] [--quiet] [--sourcefiles ] [--tabwith ] [--xml ]
- execfiles exec文件列表
- –classfiles
- –csv
- –encoding
- –help
- –html
- –name
- –quiet
- –sourcefiles
- –tabwith
- –xml
classinfo指令
输出指定的class文件信息
java -jar jacococli.jar classinfo [ ...] [--help] [--quiet] [--verbose]
- –help
- –quiet
- –verbose
execinfo指令
使用人类可读的方式输出exec文件
java -jar jacococli.jar execinfo [ ...] [--help] [--quiet]
- –help 指令帮助文档
- –quiet 禁止控制台输出
version指令
打印jacoco的版本信息
java -jar jacococli.jar version [--help] [--quiet]
- –help 指令帮助文档
- –quiet 禁止控制台输出
通过API进行平台实现
增量diff阶段分析
- 直接对增量代码插桩,获取增量代码,并修改jacocoagent仅针对增量代码进行插桩,然后直接生成增量报告。
- 生成报告阶段diff代码,获取增量代码,并修改jacococli在生成报告阶段去判断增量代码并生成报告。
- 生成报告后diff代码,获取差异代码,解析生成的report报告,再过滤出差异代码的报告。
使用jgit进行代码diff
首先拉取两个分支,基准分支和当前分支,一般基准分支我们定为master,如果不存在进行clone,如果存在进行pull
clone得diamagnetic如下
public void cloneProject(String url, String branchName, String baseBranch, String dir) {
        Git git = null;
        try {
            git = Git.cloneRepository()
                    .setCredentialsProvider(new UsernamePasswordCredentialsProvider(config.getJgit().getUsername(), config.getJgit().getPassword()))
                    .setURI(url)
                    .setBranch(baseBranch)
                    .setDirectory(new File(dir))
                    .setBranchesToClone(Arrays.asList("refs/heads/" + branchName, "refs/heads/" + baseBranch))
                    .call();
            if (this.branchNameExist(git, branchName)) {
            //如果分支在本地已存在,直接checkout即可。
                git.checkout().setCreateBranch(false).setName(branchName).call();
            } else {
            //如果分支在本地不存在,需要创建这个分支,并追踪到远程分支上面。
                git.checkout().setCreateBranch(true).setName(branchName).setStartPoint("origin/" + branchName).call();
            }
        } catch (Exception e) {
            log.error("{}", e);
            throw new RuntimeException("clone 项目失败" + url);
        } finally {
            if(git!=null) {
                git.close();
            }
        }
    }
pull的代码大同小异,此处不贴了。我们的工作空间为当前分支。将当前分支与基准分支master进行比对,取出差异的类。一般我们命令上的操作为
git checkout branch
git diff master --name-only --name-status
使用jgit 核心代码
public List<DiffInfo> diff(String projectPath, String branch, String baseBranch) {

        try (Repository repo = Git.open(new File(projectPath)).getRepository()) {
            Git git = new Git(repo);
            // Get the latest commits of each branch
            RevWalk walk = new RevWalk(repo);
            RevCommit newCommit = walk.parseCommit(repo.resolve(branch));
            RevCommit oldCommit = walk.parseCommit(repo.resolve(baseBranch));

            // Get the tree of each commit
            CanonicalTreeParser newTree = new CanonicalTreeParser();
            newTree.reset(repo.newObjectReader(), newCommit.getTree().getId());
            CanonicalTreeParser oldTree = new CanonicalTreeParser();
            oldTree.reset(repo.newObjectReader(), oldCommit.getTree().getId());

            // Compare the two trees
            List<DiffEntry> diffs = git.diff()
                    .setNewTree(newTree)
                    .setOldTree(oldTree)
                    .setShowNameAndStatusOnly(true)
                    .call();

            //筛选有效的对比文件
            Collection<DiffEntry> validDiffList = diffs.stream()
                    .filter(e -> e.getNewPath().endsWith(".java"))
                    .filter(e -> {
                        if (e.getNewPath().endsWith(".java")) {
                            return e.getNewPath().contains("src/main/java/");
                        }
                        return Boolean.TRUE;
                    })
                    .filter(e -> DiffEntry.ChangeType.ADD.equals(e.getChangeType()) || DiffEntry.ChangeType.MODIFY.equals(e.getChangeType()))
                    .collect(Collectors.toList());

            if (CollectionUtils.isEmpty(validDiffList)) {
                log.info("没有需要对比的类");
                return null;
            }
            //获取变更的方法
            List<DiffInfo> diffInfos=new ArrayList<>();
            for (DiffEntry diffEntry : validDiffList) {
                DiffInfo diffInfo = new DiffInfo();
                String newFilePath=projectPath+ File.separator+diffEntry.getNewPath();
                String classFile = diffEntry.getNewPath().split("src/main/java/")[1].split("\\.")[0];
                diffInfo.setClassFile(classFile);
                ObjectId oldObjectId = git.getRepository().resolve("master:"+diffEntry.getNewPath());
                CompilationUnit oldCU=null;
                if (oldObjectId!=null) {
                    oldCU = StaticJavaParser.parse(git.getRepository().open(oldObjectId).openStream());
                }
                CompilationUnit newCU= StaticJavaParser.parse(new File(newFilePath));
                List<MethodInfo> changedMethods = getChangedMethods(oldCU, newCU);
                diffInfo.setMethodInfos(changedMethods);
                diffInfo.setModuleName("src");
                diffInfos.add(diffInfo);
            }
            return diffInfos;
        } catch (Exception e) {
            e.printStackTrace();
            throw new RuntimeException("diff code错误" + e);
        }
    }
差异类提取完成之后,我们知道了每个类的文件路径,此时我们可以使用javaParser进行语法树转换,然后从语法树上摘出具体差异,一般我们差异对比到方法级别即可。
然后将两个CompilationUnit 进行比对摘出差异的方法,此处可以使用MethodDeclaration的tostring方法,此方法屏蔽了格式上的差异。这样能有效过滤出有效的差异方法。
private List<MethodInfo> getChangedMethods(CompilationUnit oldCU, CompilationUnit newCU) {
        List<MethodInfo> changedMethods = new ArrayList<>();
        List<MethodDeclaration> oldMethods = getMethods(oldCU);
        List<MethodDeclaration> newMethods = getMethods(newCU);
        //先遍历旧的类,如果旧类不存在则为新增类
        for (MethodDeclaration oldMethod : oldMethods) {
            MethodDeclaration newMethod = findMethod(newMethods, oldMethod);
            if (newMethod == null) {
                //当前分支方法被移除,不列入统计
                log.info("{} (removed)",oldMethod.getNameAsString());
            } else {
                if (!oldMethod.toString().equals(newMethod.toString())) {
                    //方法不相等则为修改过 tostring方法进行格式化
                    MethodInfo methodInfo = new MethodInfo();
                    populateMethodInfo(methodInfo,newMethod);
                    changedMethods.add(methodInfo);
                }
                newMethods.remove(newMethod);
            }
        }
        //新增类的情况
        for (MethodDeclaration newMethod : newMethods) {
            MethodInfo methodInfo = new MethodInfo();
            populateMethodInfo(methodInfo,newMethod);
            changedMethods.add(methodInfo);
        }
        return changedMethods;
    }

    private void populateMethodInfo(MethodInfo methodInfo,MethodDeclaration newMethod){
        String methodName = newMethod.getNameAsString();
        NodeList<Parameter> parameters = newMethod.getParameters();
        methodInfo.setMethodName(methodName);
        List<String> params = parameters.stream().map(e -> {
            if (e.getType().isClassOrInterfaceType()) {
                return e.getType().asClassOrInterfaceType().getNameAsString();
            }
            return e.getType().toString().trim();
        }).collect(Collectors.toList());
        methodInfo.setParameters(params);
    }

    private List<MethodDeclaration> getMethods(CompilationUnit cu) {
        List<MethodDeclaration> methods = new ArrayList<>();
        if (cu!=null) {
            for (TypeDeclaration<?> type : cu.getTypes()) {
                for (BodyDeclaration<?> member : type.getMembers()) {
                    if (member instanceof MethodDeclaration) {
                        methods.add((MethodDeclaration) member);
                    }
                }
            }
        }
        return methods;
    }

    private MethodDeclaration findMethod(List<MethodDeclaration> methods, MethodDeclaration target) {
        for (MethodDeclaration method : methods) {
            if (method.getNameAsString().equals(target.getNameAsString())) {
                if (method.getParameters().toString().equals(target.getParameters().toString())) {
                    return method;
                }
            }
        }
        return null;
    }
使用maven-invoker进行编译
jacoco生成报告时还需要传入class文件路径,所以此处还需要对项目进行编译,这个很简单
public void compile(String project){
        String pomPath = project + File.separator + "pom.xml";
        InvocationRequest request = new DefaultInvocationRequest();
        //想要操控的pom文件的位置
        request.setPomFile(new File(pomPath));
        //操控的maven命令
        request.setGoals(Collections.singletonList("clean compile -Dmaven.test.skip=true"));
        InvocationOutputHandler outputHandler = s -> log.info(s);
        request.setOutputHandler(outputHandler);
        Invoker invoker = new DefaultInvoker();
        //maven的位置
        invoker.setMavenHome(new File(config.getMaven().getHome()));
        try {
            invoker.execute(request);
        } catch (MavenInvocationException e) {
            log.error("编译项目失败:", pomPath, "失败原因:", e);
            throw new RuntimeException("编译失败");
        }

    }
编译完成之后提取src目录和class目录
public void findJavaPath(String dirPath,List<String> javaPaths,List<String> classPaths) {
        File dir = new File(dirPath);
        File[] files = dir.listFiles();
        if (files != null) {
            for (File file : files) {
                if (file.isDirectory()) {
                    if (file.getName().equals("src")||file.getName().equals("target")) {
                        if (file.getName().equals("src")) {
                            String javaPath = file.getPath() + "/main/java/";
                            javaPaths.add(javaPath);
                            System.out.println("java+++:"+javaPath);
                        }else{
                            String classPath=file.getPath()+"/classes/";
                            classPaths.add(file.getPath());
                            System.out.println("classes***:"+file.getPath());
                        }
                    }else {
                        findJavaPath(file.getPath(),javaPaths,classPaths);
                    }
                }
            }
        }
    }
到此代码的差异以及对应的资源目录都生成完成,到生成报告的环节,官方默认的包不支持增量报告,所以此处需要应用第三方的cli-api包,这个可以去github上找一个开源的,就不用自己改了,当然要自己改也是可以的。也不难,剩下的就是将对应的参数丢给report指令即可。
场景分析
- 假如AB两个个分支并行开发,A先提测了,接着B提测,B提测一天后A合并代码到master,然后B改了个BUG重新编译发布,此时A的代码是否影响覆盖率。
解决方案:A上线后,其它分支必须反合master,反合的动作最好人为操作,避免反合冲突之类的问题,并打包重新发布
- 假设A项目对B项目有依赖关系,比如A项目依赖了B项目的client.jar包,此时不能单独编译A项目,因为有可能在一个需求中client.jar也发生了变更,就会导致编译报错。
解决方案:在编译阶段做项目整合。所以此时需要知道该项目依赖了什么项目,需要有个地方可以配置项目对应的依赖列表。我们采用的是直接配置gitlab ci的variables。并且通过拉取所有的项目代码,在将所有代码作为模块合并到一个项目下去编译。
整合代码的代码如下,其实很简单,就是根据模板创建一个pom.xml然后将所有的子项目设置为它的module即可。
<project xmlns="http://maven.apache.org/POM/4.0.0" xmlns:xsi="http://www.w3.org/2001/XMLSchema-instance"
  xsi:schemaLocation="http://maven.apache.org/POM/4.0.0 http://maven.apache.org/maven-v4_0_0.xsd">
  <modelVersion>4.0.0modelVersion>
  <groupId>com.jacocogroupId>
  <artifactId>merge-reportartifactId>
  <packaging>pompackaging>
  <version>1.0-SNAPSHOTversion>
  <modules>modules>
project>
public void createProject(String project, List<String> modules) {
        try {
            MavenXpp3Reader reader = new MavenXpp3Reader();
            String output = project + File.separator + "pom.xml";
            Model model = reader.read(new FileReader(Const.POM_TEMPLATE));
            model.setModules(modules);
            MavenXpp3Writer mavenXpp3Writer = new MavenXpp3Writer();
            mavenXpp3Writer.write(new FileWriter(output), model);
        }catch (Exception e){
            throw new RuntimeException(e);
        }
    }
疑问
- 代码的diff是到什么维度:类维度、方法维度、行维度、逻辑控制维度?
我们控制到方法维度,即只要这个方法发生变更,哪怕只变更一行,也需要对整个方法进行重新标记。
- 那么如果方法上新增了空行怎么办?
没关系我们可以在比对方法时进行格式化。直接使用JavaParser的方法的toString方法可以进行格式化,并且可以在比对的时候将注释信息移除掉。
- 我们采用tcpserver模式,如果服务器宕机,或者重新发版之后测试测试之后的jaoco.exec文件是否还能继续存在?
这个问题是跟你的部署架构息息相关,我们采用的是k8s 环境,所以我们在pod的lifcycle的prestop阶段调用一个接口请求jacoco.exec文件。如果你采用的是普通服务器部署,那么直接以写本地文件的方式,采用append的方式。也没有什么问题。
原理分析
jacoco的原理相当简单,不管你是通过哪种方式进行集成,他们所使用的原理是一样的,就是进行代码插桩,代码插桩的内容也是非常简单的,就是对编译后的class文件进行插桩,分析class文件,在每行代码前后插入一个数组记录行数,当代码执行到这行代码时把行号写给数组标记它被执行过了。并且把执行记录写入到jacoco.exec这种特定的文件结构中
然后在报告生成阶段解析jacoco.exec文件。并且根你后续编译的class文件的行号进行对比,然后染色标记哪些代码执行过了,哪些代码没执行过。
这里涉及到两次编译,所以编译环境一定要一样,不然编译出来的class文件可能不同,就会导致你的覆盖率数据不准确。