Postman使用详解
Postman使用详解
一、postman安装和使用
官网下载地址:https://www.getpostman.com/apps 直接傻瓜式安装就好了
界面简介
| 界面元素 | 使用 |
|---|---|
| 标题栏 | |
| Home | 返回到首页 |
| Workspaces | 创建工作区,可邀请不同团队参与到不同的工作区内进行协同工作,在同一个工作区的协作者可共享API、集合、环境和工作中的其它组件 |
| ApI Network | 发现、探索和共享 API |
| Reports | 访问报告 |
| Explore | 探索公共API网络 |
| Search Postman | 输入搜索字符串并更改搜索范围以将搜索结果缩小到所有 Postman、个人或团队空间或公共 API 网络。还可以将搜索范围更改为工作区、集合、API或团队。已登录账户默认搜索范围是团队,搜索的是公共 API 网络,游客的搜索结果仅包含公共资源 |
| 设置 | |
| 查看同步状态和通知 | |
 |
邀请协作者到工作区 |
| 账户 | |
| 捕获请求和 cookie |
| 左侧边栏 | |
|---|---|
| Collections | 单个的Collections区分不同项目或者项目中的不同的模块(Collections下面的所有request请求可以通过Run Collections一次性发出,所以也可以区分需要一次性运行的请求),Collections下可以再创建Collections,也可创建folder区分项目中的不同模块,也可以直接创建request请求 |
| Environments | 设置环境变量 |
| Mock Servers | 模拟依赖接口的返回值,专注的测试当前接口 推荐 https://www.cnblogs.com/eosclover/p/15695581.html |
| Monitors | 自动运行测试脚本和定期执行其他测试 参考 https://learning.postman.com/docs/monitoring-your-api/intro-monitors/ |
| Flows | 在 Postman 工作区中链接请求、处理数据和创建真实世界的工作流 |
| History | 发出请求的历史记录 |

| 中间面板 | |
|---|---|
| Params | 请求参数 |
| Authorization | 请求认证份验证信息 参考 https://learning.postman.com/docs/sending-requests/authorization/ |
| Headers | 头部信息 |
| Body | 请求体,可以是from-data、x-www-form-urlencoded、raw(Text、json、Javascript、HTML、XML)、binary、GraphQL格式 |
| Pre-request Script | 请求前置脚本,在发送请求前运行的脚本,为发送请求创建环境条件,可以是准备数据、清除缓存等操作。右侧会出现脚本快速编写tip |
| Tests | JavaScript编写的脚本,用于测试判断响应结果是否正常。右侧会出现脚本快速编写tip |
| Settings | 设置允许SSL证书认证、自动开启url重定向、允许原始HTTP请求、允许认证头部信息、重定向不携带referer header、自动编码URL、禁用cookie jar等 |

| 右侧面板 | |
|---|---|
| Environment | 显示当前所在环境 参考 https://learning.postman.com/docs/sending-requests/variables/ |
| 设置环境以及该环境下的全局变量,全局变量下的环境变量使用{{变量名}}引用 | |
| 查看文本化请求信息,可以添加相关注释,可发布集合文档 | |
| 对请求的特定部分发表评论,包括参数、标头、正文和测试 | |
| 代码选项卡 参考 https://learning.postman.com/docs/sending-requests/generate-code-snippets/ | |
| 请求创建编辑的基本信息 | |
| 查看API 网络中与请求共享相同基本 URL 的公共集合 |
| 底部面板 | |
|---|---|
| request栏目展开/隐藏 | |
| Find and Replace | 可通过正则查找和替换 |
| Console | 控制台 |
| 启动Bootcamp,Postman使用步骤教程 | |
| 收集运行器 | |
| 垃圾箱 | |
| 中间面板中的request请求区域和Response相应区域视图展示布局切换 | |
| 访问帮助资源 |
二、postman集和测试
参考官方文档:https://learning.postman.com/docs/running-collections/intro-to-collection-runs/
简单集和测试
将需要一次性运行的接口放在集合中,或者选择某个集合中的个别请求一次性运行运行的顺序可根据请求的排列而调整,可点击某个集合的右上角 run collections 或者点击postman右下角的runner,然后直接将collection/历史记录拖拽进面板中进行选择运行
步骤一:选择运行的集合

| 内容 | 作用 |
|---|---|
| Iterations | 集合运行的迭代次数 |
| Delay | 每个请求之间的间隔延迟(毫秒) |
| Data | 收集运行的数据文件 |
步骤二:运行集合,点击 run(集合名称)


使用监视器调度运行集合测试
步骤一:点击左侧栏 Monitors,点击 + 新建一个监视器,并进行配置

步骤二:点击 run

使用webhook触发运行集合测试
webhook在许多应用中都得到了使用,比如上期学习的Jenkins,使用钩子函数webhook,使得代码仓库中的代码进行了修改,便会自动触发Jenkins下拉代码,进行编译构建。在这里,使用 webhook,也可以在特定时间或事件发生时触发在 Postman 中运行的收集,使用 POST 请求将数据发送到 webhook URL(发送到 webhook 的数据可以在globals 对象的集合中访问)。还可以将自定义负载发送到 webhook,在集合运行时可以访问该负载。这使集合能够独立于任何环境运行,而不是仅依赖于发送到 webhook 的数据
步骤一:生成Postman API秘钥
需要有效的 API 密钥才能向 Postman API 发送请求,而构建webhook需要向 Postman API 发送请求
导航到您的Postman API Keys 页面。在右上角选择您的头像 >帐户设置。然后选择Postman API 密钥,输入密钥的名称并选择Generate API Key,复制您的密钥,然后关闭

步骤二:创建webhook
使用Postman API创建集合的 Webhook:
| API | ||
|---|---|---|
| URL | https://api.getpostman.com/webhooks?workspace={{workspace_id}} | |
| 授权 | 生成密钥时的名称 | 步骤一中生成的秘钥 |
| 参数1 | workspace_id | 工作区 |
| body | { “webhook”:{ “name”: “{{webhook_name}}”, “collection”: “{{collection_uid}}” }} | webhook_name:正在创建的 webhook 的名称 collection_uid:调用此 webhook 后要触发的集合的 UID |
步骤三:在脚本中访问请求正文
Webhook 的请求正文在globals.previousRequest对象内部可用。为了使用它,首先解析globals.previousRequest对象。发送到 webhook 的数据在data解析对象内部的参数中可用
var previousRequest = JSON.parse(globals.previousRequest),
    webhookRequestData = previousRequest.data;

// webhookRequestData contains the data sent to your webhook.
console.log(JSON.stringify(webhookRequestData));
构建请求工作流
运行集合时(按钮运行单个请求无效),使用 postman.setNextRequest 在Tests中使用脚本指定Postman 在当前请求之后接下来运行哪个请求
设置下一个请求,如果下一个请求依然设置的是本次请求,在没有添加任何循环条件以保证循环可退出的情况下,将无限循环运行此请求
postman.setNextRequest("request_name");
postman.setNextRequest("request_ID");
停止工作流
postman.setNextRequest(null);
导入数据文件
数据文件格式为 CSV 或 JSON

脚本中访问数据文件值
pm.iterationData.get("value")
集成Jenkins
步骤一:安装Jenkins,可参考上篇
步骤二:在Jenkins中安装Node.js和Newman
管理 Jenkins --> 管理插件 -->安装 NodeJS 插件;
Manage Jenkins --> Global Tool Configuration --> NodeJS,选择Add NodeJS,输入Node.js安装的名称,在要安装的全局npm包中,输入newman
步骤三:创建Postman集合
postman中新建集和测试,并将其导出为Json文件,在Jenkins项目中的构建步骤,选择Execute Shell,输入要运行的shell命令,如:
newman run ~/Desktop/jenkins_demo_postman_collection.json.
在Build Environment > Build Environment中,选择Provide Node & npm bin/ folder to PATH并选择您使用 Newman 配置的 NodeJS 安装
三、postman接口关联
一般都是在Test中对响应内容进行提取,然后经过各种脚本操作设置成环境变量/全局变量,再在其他接口中进行引用,全局变量使用 {{变量名}} 引用,环境变量使用 $变量名 引用
响应内容提取有三种方式:JSON提取 正则表达式提取 Cookies提取
( 注:相关脚本的编写参考 https://learning.postman.com/docs/writing-scripts/script-references/test-examples/ )
步骤一:准备工作
设置一个环境变量ip:

将接口请求数据准备好:


测试登录接口,发现查询所需要的cookie值为登录接口响应cookie中的JSESSIONID,所以需要在Test中将JSESSIONID提取出来保存为变量供其他接口使用

步骤二:Test提取接口相应值,并保存为环境变量
Cookie提取example
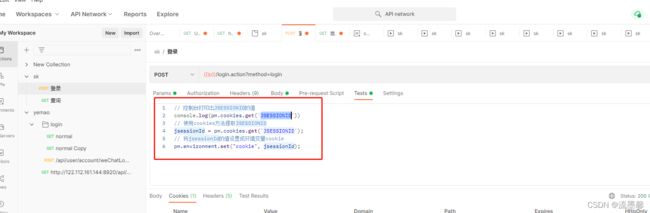
运行后发现环境变量中存储了相应的cookie值:

步骤四:在其它接口中使用{{变量名}}或$变量名引用上一个接口提取保存的值

步骤五:删除环境变量中登陆接口保存的cookie,运行整个sk_qa集合,测试接口关联连贯性

JSON提取example
// 提取access_token
var jsValue = JSON.parse(responseBody)
console.log(jsValue.access_token)
// 把提取到的值保存到全局变量
pm.globals.set("access_token",jsValue.access_token);
正则表达式提取example
// 使用正则表达式提取 match:匹配 new RegExp新建规则
var flag_id = responseBody.match(new RegExp('"id":(.+?),'))[1]
console.log(flag_id)
pm.globals.set("flag_id",flag_id);
四、基本脚本语法
参考官方文档:https://learning.postman.com/docs/writing-scripts/intro-to-scripts/
解析
解析响应json数据
const responseJson = pm.response.json()
解析XML
const responseJson = xml2Json(pm.response.text());
解析CSV
const parse = require('csv-parse/lib/sync');
const responseJson = parse(pm.response.text());
解析HTML
const $ = cheerio.load(pm.response.text());
console.log($.html());
处理不解析的响应
// 测试响应正文是否包含字符串
pm.test("Body contains string",() =>{
    pm.except(pm.response.text()).to.include("customer_id");
});
pm.test("Body is string",function(){
    pm.response.to.have.body("whole-body-text");
});
测试
测试响应体
pm.test("Person is Jane",()=> {
    const responseJson = pm.response.json();
    pm.expect(responseJson.name).to.eql("Jane");
    pm.except(responseJson.age).to.eql(23);
});
测试状态码
pm.test(Status code is 201",()=>{
        pm.response.to.have.status(201);
        });
pm.test("Successful POST request",() => {
    pm.except(pm.response.code).to.be.oneOf([201,202]);
});
pm.test("Status code name has string",() => {
    pm.response.to.have.status("Createed");
});
测试标头
// 检查是否存在标头
pm.test("Content-Type header is present",() => {
    pm.response.to.have.header("Content-Type");
});
//测试具有特定值的响应标头
pm.test("Content-Type header is application/json",() => {
    pm.expect(pm.response.headers.get("Content-Type")).to.eql('application/json');
});
测试cookie
// 测试响应中是否存在cookie
pm.test("Cookie JSESSIONID is present",() => {
    pm.expect(pm.cookies.has('JESSIONID')).to.be.true;
});
//测试特定的cookie值
pm.test("Cookie isLoggedIn has value 1",() => {
    pm.expect(pm.cookies.get('isLoggedIn')).to.eql('1');
});
测试响应时间
pm.test("Response time is less than 200ms", () => {
    pm.expect(pm.response.responseTime).to.be.below(200);
});
断言
基本断言
pm.test("Status code is 200",function{
        pm.response.to.have.status(200);
        });
pm.test("Status code is 200",() => {
    pm.expect(pm.response.code).to.eql(200);
});
针对变量断言响应值
pm.test("Response property matches environment variable",function(){
    pm.expect(pm.response.json().name).to.eql(pm.environment.get("name"));
});
断言值类型
/*
响应类型结构:
{
	"name": "Jane",
	"age": 29,
	"hobbies":[
		"skating",
		"painting"
	],
	"email": null
}

*/
const jaonData = pm.response.json();
pm.test("Test data type of the response",() => {
    pm.expect(jsonData).to.be.an("object");
    pm.expect(jsonData.name).to.be.a("string");
    pm.expect(jsonData.age).to.be.a("number");
    pm.expect(jasonData.hobbies).to.be.an("array");
    pm.expect(jsonData.website).to.ba.undefined;
    pm.expect(jsonData.email).to.be.null;
});
断言数组属性
/*
响应类型结构:
{
	"errors": [],
	"areas": ["goods", "services"],
	"settings":[
		{
			"type": "notification",
			"detail": ["email","sms"]
		},
		{
			"type": "visual",
			"detail":["light", "large"]
		}
	],
}

*/
const jsonData = pm.response.jason();
pm.test("Test array properties", () => {
    pm.expect(jsonData.errors).to.be.empty;
    pm.expect(jsonData.areas).to.include("goods");
    const notificationSettings = jsonData.settings.find(
    	m => m.type == "notification");
    pm.expect(notificationSettings).to.be.an("object","Could not find the setting");
    pm.expect(notificationSettings.detail).to.include("sms");
    pm.expect(notificationSettings.detail).to.have.members(["email","sms"])
});
断言对象属性
pm.expect({
    a: 1,
    b: 2
}).to.have.all.keys('a','b');
pm.expect({
    a: 1,
    b: 2
}).to.have.any.keys('a','b');
pm.expect({
    a: 1,
    b: 2
}).to.not.have.any.keys('c','d');
pm.expect({
    a: 1
}).to.have.any.property('a');
pm.expect({
    a: 1,
    b: 2
}).to.be.an('object').that.has.all.keys('a','b');
断言一个值在一个集合中
pm.test("Value is in valid list",() => {
    pm.expect(pm.response.json().type).to.be.oneOf(["Subscriber", "Customer", "User"]);
});
断言包含一个对象
/*
响应类型结构:
{
  "id": "d8893057-3e91-4cdd-a36f-a0af460b6373",
  "created": true,
  "errors": []
}

*/
pm.test("Object is contained", () => {
    const expectedObject = {
    	"created": true,
        "errors": []
        };
	pm.expect(pm.response.json()).to.deep.include(expectObject);
	});
断言当前环境
pm.test("Check the active environment", () => {
  pm.expect(pm.environment.name).to.eql("Production");
});
验证响应结构
const schema = {
 "items": {
 "type": "boolean"
 }
};
const data1 = [true, false];
const data2 = [true, 123];

pm.test('Schema is valid', function() {
  pm.expect(tv4.validate(data1, schema)).to.be.true;
  pm.expect(tv4.validate(data2, schema)).to.be.true;
});
const schema = {
  "properties": {
    "alpha": {
      "type": "boolean"
    }
  }
};
pm.test('Schema is valid', function() {
  pm.response.to.have.jsonSchema(schema);
});
控制台打印查看
记录变量或相应属性的值
console.log(pm.collectionVariables.get("name"));
console.log(pm.response.json().name);
记录变量响应属性的值
console.log(typeof pm.response.json().id);
使用控制台日志来标记代码执行
if (pm.response.json().id){
    console.log("id was found!");
}else{
    console.log("no id ...");
}
变量
具有最近范围的变量会覆盖任何其他变量。例如,如果您score在当前集合和活动环境中都命名了变量,并且您调用pm.variables.get('score'),则 Postman 将返回环境变量的当前值。当您使用 设置变量值pm.variables.set时,该值是本地的,并且只会在当前请求或收集运行中持续存在
变量范围确定 Postman 在您引用变量时赋予它们的优先级,按优先级递增的顺序排列:globals collection environment Data local
//collection var 'score' = 1
//environment var 'score' = 2

//first request run
console.log(pm.variables.get('score'));//outputs 2
console.log(pm.collectionVariables.get('score'));//outputs 1
console.log(pm.environment.get('score'));//outputs 2

//second request run
pm.variables.set('score', 3);//local var
console.log(pm.variables.get('score'));//outputs 3

//third request run
console.log(pm.variables.get('score'));//outputs 2
在脚本中使用环境变量:使用 pm.environment 方法来访问和操作活动(当前选定的)环境中的变量
// 获取活动环境名称
pm.environment.name:String
// 检查环境是否有指定名称的变量
pm.environment.has(variableName:String):function -> Boolean
// 在活动环境中获取具有指定名称的变量
pm.environment.get(variableName:String):function -> *
// 在活动环境中设置具有指定名称和值的变量
pm.environment.set(variableName:String,variableValue:*):function
// 使用一下语法返回脚本内动态变量的解析值{{$variableName}}
pm.environment.replaceIn(variableName:String):function -> *
// example
const stringWithVars = pm.environment.replaceIn("Hi, my name is {{firstName}} and I am {{age}}.");
console.log(stringWithVars);
// 在单个对象中返回活动环境中的所有变量及值
pm.environment.toObject():function → Object
// 从活动环境中删除变量,按名称指定变量
pm.environment.unset(variableName:String):function
// 清除活动环境中的所有变量
pm.environment.clear():function
在脚本中使用集合变量:使用 pm.collectionVariables 方法来访问和操作集合中的变量
// 检查集合中是否存在具有指定名称的变量
pm.collectionVariables.has(variableName:String):function → Boolean
// 返回具有指定名称的集合变量的值
pm.collectionVariables.get(variableName:String):function → *
// 设置具有指定名称和值的集合变量
pm.collectionVariables.set(variableName:String, variableValue:*):function
// 返回脚本内动态变量的解析值{{$variableName}}
pm.collectionVariables.replaceIn(variableName:String):function → *
// example
const stringWithVars = pm.collectionVariables.replaceIn("Hi, my name is {{firstName}} and I am {{age}}.");
console.log(stringWithVars);
// 在对象的集合中返回所有变量及其值
pm.collectionVariables.toObject():function → Object
// 从集合中删除指定的变量
pm.collectionVariables.unset(variableName:String):function
// 清除集合中的所有变量
pm.collectionVariables.clear():function
在脚本中使用全局变量:使用 pm.globals 方法在工作区的全局范围内访问和操作变量
// 检查具有指定名称的全局变量在哪里
pm.globals.has(variableName:String):function → Boolean
// 返回具有指定名称的全局变量的值
pm.globals.get(variableName:String):function → *
// 设置具有指定名称和值的全局变量
pm.globals.set(variableName:String, variableValue:*):function
// 返回脚本内动态变量的解析值 {{$variableName}}
pm.globals.replaceIn(variableName:String):function → String
// example
const stringWithVars = pm.globals.replaceIn("Hi, my name is {{firstName}} and I am {{age}}.");
console.log(stringWithVars);
// 返回对象中的所有全局变量及其值
pm.globals.toObject():function → Object
// 删除指定的全局变量
pm.globals.unset(variableName:String):function
// 清除工作区中的所有全局变量
pm.globals.clear():function
在脚本中使用数据变量:在收集运行期间使用 pm.iterationData 方法访问和操作数据文件中的变量
// 检查当前迭代数据中是否存在指定名称的变量
pm.iterationData.has(variableName:String):function → boolean
// 从具有指定名称的迭代数据中返回一个变量
pm.iterationData.get(variableName:String):function → *
// 返回对象中的迭代数据变量
pm.iterationData.toObject():function → Object
// 将迭代数据对象转换为 JSON 格式
pm.iterationData.toJSON():function → *
// 删除指定的变量
pm.iterationData.unset(key:String):function
请求
多种方法提供对 Postman 脚本中请求和响应数据的访问,包括 pm.request、pm.response、pm.info、pm.cookies ,此外,您可以使用pm.sendRequest发送请求
使用请求数据编写预请求脚本
// 请求网址
pm.request.url:url
// 当前请求的表头列表
pm.request.headers:HeaderList
// HTTP请求方法
pm.request.method:String
// 请求正文中的数据(此对象是不可变的,不能从脚本中修改)
pm.request.body:RequestBody
// 为当前请求添加具有制定名称和值的标头
pm.request.headers.add(header:Header):function
// example
pm.request.headers.add({
  key: "client-id",
  value: "abcdef"
});
// 删除指定名称的请求头
pm.request.headers.remove(headerName:String):function
// 插入指定的 header 名称和值(如果 header 不存在,否则已经存在的 header 将更新为新值)
pm.request.headers.upsert({key: headerName:String, value: headerValue:String}):function)
使用请求信息编写脚本
// 该事件将是“prerequest”或“test”,具体取决于脚本在请求中的执行位置
pm.info.eventName:String
// 当前迭代的值
pm.info.iteration:Number
// 计划运行的迭代总数
pm.info.iterationCount:Number
// 正在运行的请求的保存名称
pm.info.requestName:String
// 标识正在运行的请求的唯一 GUID
pm.info.requestId:String
使用请求cookie编写脚本
// 检查请求的域是否存在特定的 cookie(由名称指定)
pm.cookies.has(cookieName:String):Function → Boolean
// 获取指定cookie的值
pm.cookies.get(cookieName:String):Function → String
// 获取对象中所有 cookie 及其值的副本。返回为请求域和路径定义的任何 cookie
pm.cookies.toObject():Function → Object
// 使用pm.cookies.jar指定域来访问请求 cookie
pm.cookies.jar():Function → Object
// example
const jar = pm.cookies.jar();
// 使用名称和值设置 cookie
jar.set(URL:String, cookie name:String, cookie value:String, callback(error, cookie)):Function → Object
// 使用PostmanCookie或兼容对象设置 cookie
jar.set(URL:String, { name:String, value:String, httpOnly:Bool }, callback(error, cookie)):Function → Object
// example
const jar = pm.cookies.jar();
jar.set("httpbin.org", "session-id", "abc123", (error, cookie) => {
  if (error) {
    console.error(`An error occurred: ${error}`);
  } else {
    console.log(`Cookie saved: ${cookie}`);
  }
});
// 从 cookie jar 中获取 cookie
jar.get(URL:String, cookieName:String, callback (error, value)):Function → Object
// 从 cookie jar 中获取所有cookie
jar.getAll(URL:String, callback (error, cookies)):Function
// 删除 cookie
jar.unset(URL:String, token:String, callback(error)):Function → Object
// 清除 cookie jar 中的所有 cookie
jar.clear(URL:String, callback (error)):Function → Object
从脚本发送请求 使用该pm.sendRequest方法从预请求或测试脚本异步发送请求
pm.sendRequest('https://postman-echo.com/get', (error, response) => {
  if (error) {
    console.log(error);
  } else {
  console.log(response);
  }
});


const postRequest = {
  url: 'https://postman-echo.com/post',
  method: 'POST',
  header: {
    'Content-Type': 'application/json',
    'X-Foo': 'bar'
  },
  body: {
    mode: 'raw',
    raw: JSON.stringify({ key: 'this is json' })
  }
};
pm.sendRequest(postRequest, (error, response) => {
  console.log(error ? error : response.json());
});


pm.sendRequest('https://postman-echo.com/get', (error, response) => {
  if (error) {
    console.log(error);
  }

  pm.test('response should be okay to process', () => {
    pm.expect(error).to.equal(null);
    pm.expect(response).to.have.property('code', 200);
    pm.expect(response).to.have.property('status', 'OK');
  });
});
setNextRequest 构建请求工作流,当运行集合时指定接下来应该运行哪个请求
// 在此之后运行指定的请求(集合中定义的请求名称,例如“获取客户”)
postman.setNextRequest(requestName:String):Function
// 在这个之后运行指定的请求(返回的请求ID pm.info.requestId)
postman.setNextRequest(requestId:String):Function
// example
pm.environment.set('next', pm.info.requestId)
postman.setNextRequest(pm.environment.get('next'));
响应
使用响应数据编写脚本: 该对象提供对添加到Testspm.response的脚本中当前请求的响应中返回的数据的访问
// 响应状态码
pm.response.code:Number
// 状态文本字符串
pm.response.status:String
// 响应头列表
pm.response.headers:HeaderList
// 接收响应所需的时间(以毫秒为单位)
pm.response.responseTime:Number
// 收到的响应大小
pm.response.responseSize:Number
// 响应文本
pm.response.text():Function → String
// 响应 JSON
pm.response.json():Function → Object
用 pm.visualizer.set 指定模板以在可视化工具中显示响应数据
// layout 必须的HTML 模板字符串 data 可选项 option 可选项
pm.visualizer.set(layout:String, data:Object, options:Object):Function
// example
var template = `{{res.info}}
`;
pm.visualizer.set(template, {
res: pm.response.json()
});
将响应数据构建到可视化中
// 用 pm.getData 检索可视化模板字符串中的响应数据
pm.getData(callback):Function
// example
pm.getData(function (error, data) {
  var value = data.res.info;
});
外部库
require(moduleName:String):function → *
参考:入门:https://learning.postman.com/docs/getting-started/introduction/
发送请求:https://learning.postman.com/docs/sending-requests/requests/
编写脚本:https://learning.postman.com/docs/writing-scripts/intro-to-scripts/
运行集合:https://learning.postman.com/docs/running-collections/intro-to-collection-runs/
在postman中协作:https://learning.postman.com/docs/collaborating-in-postman/collaboration-intro/
设计和开发您的API:https://learning.postman.com/docs/designing-and-developing-your-api/the-api-workflow/
发布你的API:https://learning.postman.com/docs/publishing-your-api/documenting-your-api/
监控您的API:https://learning.postman.com/docs/monitoring-your-api/intro-monitors/
API安全:暂无
行政:暂无
开发者资源:https://learning.postman.com/docs/developer/resources-intro/
集成:暂无
postman中的动态变量库:https://learning.postman.com/docs/writing-scripts/script-references/variables-list/
其它测试工具:Jmeter fiddler charles soupui apipost