Silverlight中的Binding使用(一、二、三)
本文将详细讲述Silverlight中Binding,包括Binding的属性和用法,Binding的数据流向。
Binding:一个完整的Binding过程是让源对象中的某个属性值通过一定流向规则进行转换和验证之后绑定到目标对象的某个属性上面。这个源对象由ElementName指定,源对象的属性由Path指定,流向规则由Mode指定,转换由Converter指定,验证由ValidatesOnDataErrors等指定。
首先我们来看Binding的属性如下:
ElementName:指定源对象的名称 Path:指定需要绑定的源对象的属性名称 Mode:指定Binding的数据流向规则 Converter:指定源对象的属性需要经过用户自定义的转换
其次我们来看看Binding的数据流向Mode分为以下几种:
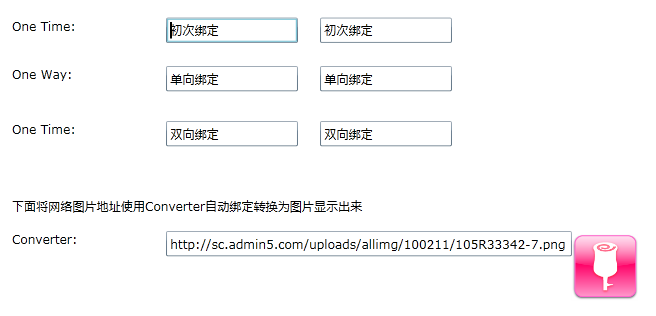
OneTime:源对象的属性只有在第一次的时候绑定到目标对象,以后源对象属性值变化时,目标对象值不变
OneWay:源对象的属性值变化的时候,目标对象值也跟着相应变化,而目标对象值变化时,源对象属性值不变
TwoWay:源对象的属性值变化的时候,目标对象值也跟着相应变化,目标对象值变化时,源对象属性值也跟着变
下面我们通过以下实例源码来看看Binding的简单应用和转换,注意Mode为TwoWay的时候目标对象更新时需要转移焦点(LostFocus)才触发更新源对象。例如本文实例中需要点击到另外的TextBox才更新源。
 View Code

 1 <UserControl x:Class="SLBinding.MainPage"

 2     xmlns="http://schemas.microsoft.com/winfx/2006/xaml/presentation"

 3     xmlns:x="http://schemas.microsoft.com/winfx/2006/xaml"

 4     xmlns:d="http://schemas.microsoft.com/expression/blend/2008"

 5     xmlns:mc="http://schemas.openxmlformats.org/markup-compatibility/2006"

 6     xmlns:local="clr-namespace:SLBinding"

 7     mc:Ignorable="d"

 8     d:DesignHeight="600" d:DesignWidth="800"

 9              xmlns:sdk="http://schemas.microsoft.com/winfx/2006/xaml/presentation/sdk">

10     <UserControl.Resources>

11         <local:ImageConverter x:Key="ImageCoverter"/>

12     </UserControl.Resources>

13     <Grid x:Name="LayoutRoot" Background="White">

14         <!--One Time-->

15         <StackPanel Orientation="Horizontal">

16             <sdk:Label Height="28" HorizontalAlignment="Left" Margin="130,56,0,0"

17                        Name="label1" VerticalAlignment="Top" Width="120" Content="One Time:" />

18             <TextBox Height="23" HorizontalAlignment="Left" Margin="20,56,0,0"

19                      Name="tbOneTimeSource" VerticalAlignment="Top" Width="120" Text="初次绑定" />

20             <TextBox Height="23" HorizontalAlignment="Left" Margin="20,56,0,0"

21                      Name="tbOneTimeTarget" VerticalAlignment="Top" Width="120"

22                      Text="{Binding ElementName=tbOneTimeSource, Path=Text, Mode=OneTime}"/>

23         </StackPanel>

24         <!--One Way-->

25         <StackPanel Orientation="Horizontal">

26             <sdk:Label Height="28" HorizontalAlignment="Left" Margin="130,100,0,0"

27                        Name="label2" VerticalAlignment="Top" Width="120" Content="One Way:" />

28             <TextBox Height="23" HorizontalAlignment="Left" Margin="20,100,0,0"

29                      Name="tbOneWaySource" VerticalAlignment="Top" Width="120" Text="单向绑定" />

30             <TextBox Height="23" HorizontalAlignment="Left" Margin="20,100,0,0"

31                      Name="tbOneWayTarget" VerticalAlignment="Top" Width="120"

32                      Text="{Binding ElementName=tbOneWaySource, Path=Text, Mode=OneWay}"/>

33         </StackPanel>

34         <!--Two Way-->

35         <StackPanel Orientation="Horizontal">

36             <sdk:Label Height="28" HorizontalAlignment="Left" Margin="130,150,0,0"

37                        Name="label3" VerticalAlignment="Top" Width="120" Content="One Time:" />

38             <TextBox Height="23" HorizontalAlignment="Left" Margin="20,150,0,0"

39                      Name="tbTwoWaySource" VerticalAlignment="Top" Width="120" Text="双向绑定" />

40             <TextBox Height="23" HorizontalAlignment="Left" Margin="20,150,0,0"

41                      Name="tbTwoWayTarget" VerticalAlignment="Top" Width="120"

42                      Text="{Binding ElementName=tbTwoWaySource, Path=Text, Mode=TwoWay}"/>

43         </StackPanel>

44

45         <!--Converter-->

46         <StackPanel Orientation="Horizontal">

47             <sdk:Label Height="28" HorizontalAlignment="Left" Margin="130,220,0,0"

48                        Name="label5" VerticalAlignment="Top"

49                        Content="下面将网络图片地址使用Converter自动绑定转换为图片显示出来 " />

50         </StackPanel>

51         <StackPanel Orientation="Horizontal">

52             <sdk:Label Height="28" HorizontalAlignment="Left" Margin="130,250,0,0"

53                        Name="label4" VerticalAlignment="Top" Width="120" Content="Converter:" />

54             <TextBox Height="23" HorizontalAlignment="Left" Margin="20,250,0,0"

55                      Name="tbConverter" VerticalAlignment="Top"

56                      Text="http://sc.admin5.com/uploads/allimg/100211/105R33342-7.png" />

57             <Image Name="imgCity" Width="60" Height="60"

58                    Source="{Binding ElementName=tbConverter,Path=Text,

59                 Mode=TwoWay, Converter={StaticResource ImageCoverter}}"></Image>

60         </StackPanel>

61     </Grid>

62 </UserControl>
ImageConverter.cs
View Code
 1 public class ImageConverter : IValueConverter

 2     {

 3         //在载入数据的时候将数据转换为图片类型

 4         public object Convert(object value, Type targetType, object parameter,

 5             System.Globalization.CultureInfo culture)

 6         {

 7             try

 8             {

 9                 Uri uri = new Uri((string)value, UriKind.RelativeOrAbsolute);

10                 BitmapImage img = new BitmapImage(uri);

11                 return img;

12             }

13             catch

14             {

15                 return new BitmapImage();

16             }

17         }

18

19         //在页面上操作的时候,将图片类型转换为数据,这里只有再TwoWay的时候才有用

20         public object ConvertBack(object value, Type targetType, object parameter,

21             System.Globalization.CultureInfo culture)

22         {

23             BitmapImage img = value as BitmapImage;

24             return img.UriSource.AbsoluteUri;

25         }

26     }
下面我们来看看本实例运行效果如下图,如需源码请点击 SLBinding.zip 下载
二、)数据验证
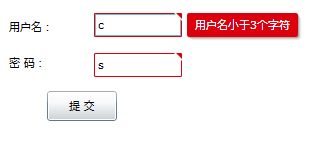
本文将简单讲述Silverlight中的Binding数据时的数据验证。
NotifyOnValidationError:是否在出现异常/错误信息的时候激发BindingValidationError事件。
ValidatesOnExceptions:是否将异常信息作为错误信息显示出来。
ValidatesOnDataErrors:结合IDataErrorInfo接口以显示错误信息。
BindingValidationError:这是一个路由事件,当绑定数据的源对象A有错误的时候,抛出异常让此事件接收并且触发,当源对象A没有BindingValidationError事件的时候让其父对象的BindingValidationError事件接收并且触发。
首先我们写一个用户类,并且在属性中进行简单验证错误时抛出异常如下代码:
View Code
 1 public class User

 2     {

 3         private string m_UserName;

 4

 5         public string UserName

 6         {

 7             get { return m_UserName; }

 8             set

 9             {

10                 if (value.Length < 3)

11                 {

12                     throw new Exception("用户名小于3个字符");

13                 }

14                 m_UserName = value;

15             }

16         }

17

18         private string m_UserPwd;

19

20         public string UserPwd

21         {

22             get { return m_UserPwd; }

23             set

24             {

25                 if (value.Length < 6)

26                 {

27                     throw new Exception("密码长度不能小于6");

28                 }

29                 m_UserPwd = value;

30             }

31         }

32     }
然后我们来看Xaml代码演示一个登录时数据绑定的界面:
View Code
 1 <Grid x:Name="LayoutRoot" Background="White"  >

 2         <Canvas Name="canvasUser" BindingValidationError="canvasUser_BindingValidationError"

 3                 Loaded="canvasUser_Loaded">

 4             <sdk:Label Height="28" Name="lbpwd" Width="55" Canvas.Left="16" Canvas.Top="51"

 5                        Content="密 码:" />

 6             <sdk:Label Canvas.Left="16" Canvas.Top="15" Height="28" Name="lbusername"

 7                        Width="55" Content="用户名:" />

 8             <TextBox x:Name="tbUserName" Width="88" Margin="10"

 9                         Text="{Binding Path=UserName, Mode=TwoWay,

10                         NotifyOnValidationError=True,ValidatesOnExceptions=True}"

11                      Canvas.Left="91" Canvas.Top="5" />

12             <TextBox x:Name="tbUserPwd" Width="88" Margin="10"

13                         Text="{Binding Path=UserPwd, Mode=TwoWay,

14                         NotifyOnValidationError=False,ValidatesOnExceptions=True}"

15                      Canvas.Left="91" Canvas.Top="45" />

16             <Button Height="30" Width="70" Content="提 交"

17                     Canvas.Left="54" Canvas.Top="93" />

18         </Canvas>

19     </Grid>
最后将User类绑定到前台界面原始,并且描述BindingValidationError事件时将TextBox边框变为红色。
View Code
 1 public partial class MainPage : UserControl

 2     {

 3         public MainPage()

 4         {

 5             InitializeComponent();

 6         }

 7

 8         private void canvasUser_BindingValidationError(object sender, ValidationErrorEventArgs e)

 9         {

10

11             TextBox tb = e.OriginalSource as TextBox;

12             if (e.Action == ValidationErrorEventAction.Added)

13             {

14                 tb.BorderBrush = new SolidColorBrush(Colors.Red);

15             }

16             else if (e.Action == ValidationErrorEventAction.Removed)

17             {

18                 tb.BorderBrush = new SolidColorBrush(Colors.White);

19             }

20         }

21

22         private void canvasUser_Loaded(object sender, RoutedEventArgs e)

23         {

24             this.canvasUser.DataContext = new User();

25         }

26     }
实现效果如下图,在输入非正确的字符数目的时候会自动提示错误,如需源码请点击SLBinding2.rar 下载。
三、Binding使用(三)-数据集合的绑定
在本文中将以ListBox为例讲述在Silverlight中Binding数据集合.
在这里我们将实体集的绑定分为三类:
一、直接控件绑定。
二、DataTemplate模板绑定。
三、详细信息绑定。
首先:我们来看第一类直接控件绑定是对控件的ItemsSource属性进行绑定,然后使用SelectedValuePath指定选择值,DisplayMemberPath指定显示值的方式。Xaml代码如下:
<!--第一种:直接绑定一个Collection实体集合-->
<ListBox Height="239" HorizontalAlignment="Left" Margin="112,25,0,0"
Name="lbCollection" VerticalAlignment="Top" Width="198"
ItemsSource="{Binding}" SelectedValuePath="Author" DisplayMemberPath="Name" />
其次:DataTemplate是对象制作一个数据模板,所以的数据实体都安装这个数据模板来呈现,现在我们看看其Xaml代码如下:
View Code
 1 <!--第二种:使用DataTemplate绑定一个Collection实体集合-->

 2         <ListBox Height="239" HorizontalAlignment="Left" Margin="478,25,0,0"

 3                  Name="lbTemplate" ItemsSource="{Binding}" VerticalAlignment="Top" Width="198" >

 4             <ListBox.ItemTemplate>

 5                 <DataTemplate>

 6                     <StackPanel Orientation="Horizontal" Margin="3">

 7                         <sdk:Label  Content="DocName:"></sdk:Label>

 8                         <TextBlock Text="{Binding Name}"></TextBlock>

 9                         <sdk:Label  Content="  Author:"></sdk:Label>

10                         <TextBlock Text="{Binding Author}"></TextBlock>

11                     </StackPanel>

12                 </DataTemplate>

13             </ListBox.ItemTemplate>

14         </ListBox>
最后:详细信息绑定是当用户点击列表中某一个实体标题属性的时候,自动显示其实体的详细信息给用户观看,注意在这里列表的数据源以及详细信息显示页的数据源都必须是CollectionViewSource类型的,其Xaml代码如下:
View Code
 1 <!--第三种:使用绑定一个Detail详细信息-->

 2         <StackPanel HorizontalAlignment="Left"  Orientation="Horizontal" VerticalAlignment="top"

 3                     Width="500" Height="240" Margin="112,294,188,66">

 4             <ListBox Height="239" HorizontalAlignment="Left" Name="lbDetail"

 5                      VerticalAlignment="Top" Width="198" ItemsSource="{Binding}"

 6                      SelectedValuePath="Author" DisplayMemberPath="Name" />

 7

 8             <StackPanel x:Name="spDetail"  Width="300" Height="200">

 9                 <TextBlock FontWeight="Bold" Text="{Binding Name}" />

10                 <TextBlock FontStyle="Italic" Text="{Binding Author}"/>

11                 <TextBlock Text="{Binding Content}" />

12                 <TextBlock Text="{Binding WriteDate}" />

13             </StackPanel>

14         </StackPanel>
View Code
 1 public partial class MainPage : UserControl

 2     {

 3         public MainPage()

 4         {

 5             InitializeComponent();

 6             //获取实体集合

 7             ObservableCollection<Info> list = Info.GetList();

 8

 9             //第一种数据源赋值

10             this.lbCollection.DataContext = list;

11

12             //第二种数据源赋值

13             this.lbTemplate.DataContext = list;

14

15             //第三种数据源赋值

16             CollectionViewSource collection = new CollectionViewSource { Source = list };

17             this.lbDetail.DataContext = collection;

18             this.spDetail.DataContext = collection;

19         }

20     }
View Code
 1 public class Info

 2     {

 3         public string Name { get; set; }

 4

 5         public string Author { get; set; }

 6

 7         public string Content { get; set; }

 8

 9         public string WriteDate { get; set; }

10

11         public static ObservableCollection<Info> GetList()

12         {

13             ObservableCollection<Info> list = new ObservableCollection<Info>();

14             list.Add(new Info() { Name = "文章一", Author = "作者一", Content = "内容一", WriteDate = "2009-02-03" });

15             list.Add(new Info() { Name = "文章二", Author = "作者二", Content = "内容二", WriteDate = "2009-03-03" });

16             list.Add(new Info() { Name = "文章三", Author = "作者三", Content = "内容三", WriteDate = "2009-04-03" });

17             list.Add(new Info() { Name = "文章四", Author = "作者四", Content = "内容四", WriteDate = "2009-05-03" });

18             list.Add(new Info() { Name = "文章五", Author = "作者五", Content = "内容五", WriteDate = "2009-06-03" });

19             list.Add(new Info() { Name = "文章六", Author = "作者六", Content = "内容六", WriteDate = "2009-07-03" });

20             return list;

21         }

22     }
本实例采用Vs2010+Silverlight 4编写,如需源码请点击 SLBinding3.rar 下载。
