SpringCloud Alibaba 微服务 — 微服务调用
概述
微服务之间的通信方式常见的方式有两种:
RPC 代表:dubbo
HTTP 代表:SpringCloud
在微服务架构中,最常见的场景就是微服务间的相互调用。在 SpringCloud 中,默认是使用 HTTP
来进行微服务的通信,微服务间的相互调用方式主要有RestTemplate、Feign 、和OpenFeign 。
1、RestTemplate
(1)
RestTemplate 是从 Spring3.0 开始支持的一个 http 请求工具,这个请求工具是 Spring 自带的,与 Spring Boot 和 Spring Cloud 都无关。RestTemplate 提供了常见的 REST 请求方法模板,如 GET、POST、PUT、DELETE 请求以及一些通用的请求执行方法 exchange 和 execute 方法。RestTemplate 本身实现了 RestOperations 接口,而在 RestOperations 接口中,定义了常见 RESTful 操作,这些操作在 RestTemplate 中都得到了很好的实现。
(2) RestTemplate 是远程调用 Http的工具,是对 java 底层 http 的封装,使用 RestTemplata 用户可以不再关注底层的连接建立;
(3) RestTemplate 是 Spring 提供的用于访问 Rest 服务的客户端,RestTemplate 提供了多种便捷访问远程 Http 服务的方法,能够大大提高客户端的编写效率
(4) RestTemplata 不仅支持 RESTful 规范,还可以定义返回值对象类型。
(5) RestTemplate 支持本地客户端负载均衡,是对 Ribbon 的封装。
2、Feign
在使用 RestTemplate 时,利用 RestTemplate 对 http 请求的封装处理,形成了一套模版化的调用方法。但是在实际开发中,由于对服务依赖的调用可能不止一处,往往一个接口会被多处调用,所以通常都会针对每个微服务自行封装一些客户端类来包装这些依赖服务的调用。所以,Feign 在此基础上做了进一步封装,由他来帮助我们定义和实现依赖服务接口的定义。在 Feign 的实现下,我们只需创建一个接口并使用注解的方式来配置它(以前是 Dao 接口上面标注 Mapper 注解,现在是一个微服务接口上面标注一个 Feign 注解即可),即可完成对服务提供方的接口绑定,简化了使用 Spring cloud 服务调用的开发量。
(1) Feign 是 Spring Cloud 组件中的一个
声明式的轻量级 RESTful 的 HTTP 服务客户端;
(2) Feign 内置了 Ribbon,用来做客户端负载均衡,去调用服务注册中心的服务;
(3) Feign 的使用方式是:使用 Feign 的注解定义接口,然后调用这个接口,就可以调用服务注册中心的服务,用起來就好像调用本地方法一样,完全感觉不到是调用的远程方法;
(4) Feign 本身不支持 SpringMVC 的注解,它有一套自己的注解;
3、OpenFeign
(1)OpenFeign 是 Spring Cloud 在 Feign 的基础上
支持 SpringMVC 的注解,如 @RequesMapping 等等。
(2)OpenFeign 的 @FeignClient 可以解析 SpringMVC 的 @RequestMapping 注解下的接口,并通过动态代理的方式产生实现类,实现类中做负载均衡并调用其他服务。
Feign 跟 RestTemplate 的区别
(1)请求方式不一样
1)
RestTemplate 需要每个请求都拼接 url+参数+类文件,灵活性高但是消息封装臃肿。2)feign 可以伪装成类似 SpringMVC 的 controller 一样,将 rest 的请求进行隐藏,不用再自己拼接 url 和参数,可以便捷优雅地调用 HTTP API。
(2)底层实现方式不一样
1)RestTemplate
(1)RestTemplate 在拼接 url 的时候,可以
直接指定 ip地址+端口号,不需要经过服务注册中心就可以直接请求接口(注意:这时候的 restTemplate 不能添加 @LoadBalanced 注解,直接使用 ip 地址无法起到负载均衡的作用,每次都是调用同一个服务);
(2)可以指定服务名,请求先到服务注册中心(如 nacos)获取对应服务的 ip 地址+端口号,然后经过 HTTP 转发请求到对应的服务接口(注意:这时候的 restTemplate 需要添加 @LoadBalanced 注解,进行负载均衡)。2)Feign
Feign 的底层实现是动态代理,如果对某个接口进行了 @FeignClient 注解的声明,Feign 就会针对这个接口创建一个动态代理的对象,在调用这个接口的时候,其实就是调用这个接口的代理对象,
代理对象根据 @FeignClient 注解中 name 的值在服务注册中心找到对应的服务,然后再根据 @RequestMapping 等其他注解的映射路径构造出请求的地址,针对这个地址,再从本地实现 HTTP 的远程调用。
一、创建一个微服务消费者子模块

在 alibaba-server 子工程下创建一个微服务消费者子模块 springboot 项目alibaba-server-consumer,最终文件目录如下:

1、在微服务消费者子模块 alibaba-server-consumer 的pom文件中添加依赖:
<dependencies>
	<!-- web 应用 -->
    <dependency>
        <groupId>org.springframework.boot</groupId>
        <artifactId>spring-boot-starter-web</artifactId>
    </dependency>
 	<!-- 必须包含spring-boot-starter-actuator包,不然启动会报错。 -->
    <dependency>
        <groupId>org.springframework.boot</groupId>
        <artifactId>spring-boot-starter-actuator</artifactId>
    </dependency>
    <!-- 整合nacos配置中心所需jar包 -->
    <dependency>
        <groupId>org.springframework.cloud</groupId>
        <artifactId>spring-cloud-starter-alibaba-nacos-config</artifactId>
        <version>2.2.1.RELEASE</version>
    </dependency>
    <!-- 整合nacos服务注册 -->
    <dependency>
        <groupId>org.springframework.cloud</groupId>
        <artifactId>spring-cloud-starter-alibaba-nacos-discovery</artifactId>
        <version>2.2.1.RELEASE</version>
    </dependency>
    <!-- sentinel -->
    <dependency>
        <groupId>org.springframework.cloud</groupId>
        <artifactId>spring-cloud-starter-alibaba-sentinel</artifactId>
    </dependency>
        <!-- lombok -->
    <dependency>
        <groupId>org.projectlombok</groupId>
        <artifactId>lombok</artifactId>
        <version>1.18.2</version>
        <optional>true</optional>
    </dependency>
</dependencies>
2、将消费者微服务 alibaba-server-consumer 注册到 nacos上
其中配置如下:

二、调用提供者微服务
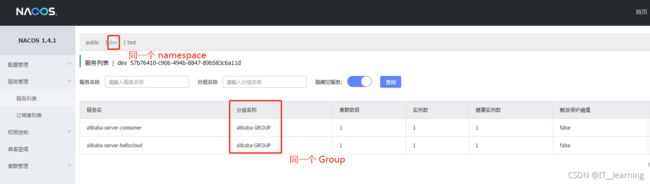
注意:调用者和被调用者两个服务必须注册在同一个命名空间(namespace)且同一个分组(Gropu)下,否则不能调用。
1、使用 RestTemplate
提供者 alibaba-server-helloworld 微服务的 controller 如下:
@RestController
@RequestMapping("/lhj")
public class HelloWorlsController {
    @RequestMapping("/hello")
    public String hello(){
        return "hello world!";
    }
}
端口号是8006,上下文是hello
(1)添加一个 RestTemplate 的配置类
@Configuration
public class RestTemplateConfig {

    @Bean
    // 让这个 RestTemplate 在请求时拥有客户端负载均衡的能力
    // loadBalancerClient 可以通过应用名获取对应的服务实例
    // 将此注解注释掉,可以使用自己的轮询算法而不使用默认的
    @LoadBalanced
    public RestTemplate restTemplate(){
        return new RestTemplate();
    }
}
(2)启动类
@SpringBootApplication
@EnableDiscoveryClient
public class ConsumerApplication {
    public static void main(String[] args) {
        SpringApplication.run(ConsumerApplication.class, args);
    }
}
启动类上必须添加 @EnableDiscoveryClient 注解,用于服务发现。
(3)controller 中调用远程服务
注意:使用 @Autowired 注入 restTemplate 只能通过第三种方式来调用服务,@Autowired 注入的 restTemplate 因为不能直接访问地址,只能通过注册的服务应用名来访问。(原因:前面 RestTemplateConfig 配置类中注解 @LoadBalanced 导致,若去掉该注解则这三种方式均可以使用)
@RestController

public class ConsumerController {
    @Autowired
    private LoadBalancerClient loadBalancerClient; // 负载均衡客户端,能够获取服务实例信息
    @Autowired
    private RestTemplate restTemplate; // 注入 RestTemplate

    @GetMapping("/diaoyong")
    public  ResponseEntity<String> msg(){

        // 1.第一种方式(直接使用restTemplate,url写死)
        // 不可以使用注入的 restTemplate,必须使用 new 的 restTemplate,
        //因为 restTemplate 的配置类使用负载均衡,直接使用 ip 地址,那么就无法起到负载均衡的作用,每次都是调用同一个服务
        RestTemplate restTemplate = new RestTemplate();
        ResponseEntity<String> response = restTemplate.getForEntity("http://localhost:8006/hello/lhj/hello", String.class);

        // 2.第二种方式(利用loadBalancerClient通过应用名获取服务实例,然后再使用 restTemplate)
        ServiceInstance serviceInstance = loadBalancerClient.choose("alibaba-server-helloworld");
        String url = String.format("http://%s:%s",serviceInstance.getHost(),serviceInstance.getPort())+"/hello/lhj/hello";
        // 不可以使用注入的 restTemplate,必须使用 new 的 restTemplate,
        // 因为 restTemplate 的配置类使用负载均衡,通过 loadBalancerClient.choose 选择的服务实例已经确定,就无法负载均衡
        RestTemplate restTemplate = new RestTemplate();
        String response = restTemplate.getForObject(url, String.class);

        // 3.第三种方式(利用@LoadBalanced,可在restTemplate里使用应用名字)
        // 可以使用注入的 restTemplate,因为通过服务名获得的实例可以有多个,因此可以负载均衡
        String response = restTemplate.getForObject("http://alibaba-server-helloworld/hello/lhj/hello", String.class);
        log.info("response={}",response);
        return response;

        System.out.println(response.getStatusCode());
        System.out.println(response.getBody());
        System.out.println(response.getHeaders());
        return response;
    }
}
RestTemplate 调用的三种方式
第一种方式(非负载均衡):直接使用被调用服务的访问地址,
url写死(此时RestTemplate 的配置类不能加 @LoadBalanced 注解,即不能负载均衡,因为直接使用 ip 地址,那么就无法起到负载均衡的作用,因为每次都是调用同一个服务)String response = restTemplate.getForObject("http://localhost:8006/hello/lhj/hello",String.class) return response;第二种方式(非负载均衡):利用 loadBalancerClient
通过应用名获取服务实例,然后再使用 restTemplate(必须 new 一个 restTemplate,不能使用注入的)ServiceInstance serviceInstance = loadBalancerClient.choose("alibaba-server-helloworld"); String url = String.format("http://%s:%s",serviceInstance.getHost(),serviceInstance.getPort())+"/hello/lhj/hello"; RestTemplate restTemplate = new RestTemplate(); String response = restTemplate.getForObject(url, String.class); return response;第三种方式(负载均衡):利用配置类中的 @LoadBalanced,可
在 restTemplate 里直接使用服务应用名字(可以使用注入的 restTemplate)String response = restTemplate.getForObject("http://alibaba-server-helloworld/hello/lhj/hello", String.class); return response;
restTemplate 的返回值类型
返回值类型一共有两类,getForEntity 和 getForObject,每一类有三个重载方法。
① getForEntity
既然 RestTemplate 发送的是 HTTP 请求,那么在响应的数据中必然也有响应头,如果开发者需要获取响应头的话,那么就需要使用 getForEntity 来发送 HTTP 请求,此时返回的对象是一个 ResponseEntity 的实例。这个实例中包含了响应数据以及响应头。
② getForObject
getForObject 方法的参数和 getForEntity 一样,getForObject 的返回值就是服务提供者返回的数据,使用 getForObject 无法获取到响应头。

(4)浏览器访问

2、使用 OpenFeign
消费者 alibaba-server-consumer 微服务的文件结构

提供者 alibaba-server-hellocloud 微服务的 controller 如下:
@RestController
@RequestMapping("zj")
public class HelloCloudController {
    @RequestMapping("hello")
    public String hello(String name){
        return "hello cloud,"+name;
    }
}
端口号是8007,上下文是hello
Feign 原理
● 启动时,程序会进行包扫描,扫描所有包下所有 @FeignClient 注解的类,并将这些类注入到 spring 的 IOC 容器中。当定义的 Feign 中的接口被调用时,通过 JDK 的动态代理来生成 RequestTemplate。
● RequestTemplate 中包含请求的所有信息,如请求参数,请求 URL 等。
● RequestTemplate 声场 Request,然后将 Request 交给 client 处理,这个 client 默认是 JDK 的 HTTPUrlConnection,也可以是 OKhttp、Apache 的 HTTPClient 等。
● 最后 client 封装成 LoadBaLanceClient,结合 ribbon 负载均衡地发起调用。
(1)pom 文件中添加 Feign 依赖
<dependency>
	<groupId>org.springframework.cloud</groupId>
	<artifactId>spring-cloud-starter-openfeign</artifactId>
</dependency>
(2)启动类上添加注解 @EnableFeignClients
在服务的启动类上添加注解 @EnableFeignClients 以开启 Spring Cloud Feign 的支持。
@SpringBootApplication
@EnableDiscoveryClient
@EnableFeignClients
public class ConsumerApplication {

    public static void main(String[] args) {
        SpringApplication.run(ConsumerApplication.class, args);
    }
}
(3)声明服务接口
	@Service
	@FeignClient("alibaba-server-hellocloud") // 服务提供者的名称spring.application.name public interface FeignService {
    @RequestMapping(value="/hello/zj/hello") // 服务提供者方法的访问地址
    String getService(@RequestParam(value="name") String name);
    }
① 接口中的
方法可以不用加public,方法名任意取。
② 在该接口中,使用 @FeignClient 注解指定要调用的服务名来绑定服务,然后再使用Spring MVC的注解@RequestMapping 来绑定具体该服务提供的REST接口。
③@RequestParam 注解必须要加上 value 属性。
(4)controller 中调用服务接口
@RestController
public class ConsumerController {

    @Autowired
    private FeignService feignService;

    @GetMapping("/diaoyong")
    public  String msg(){
        return feignService.getService("lhj");
    }
}
(5)浏览器访问

(6)Feign 开启日志
如果我们想追踪Feign客户端发送的数据,就要启用 Feign 的日志。
Feign 在构建被 @FeignClient 注解修饰的服务客户端时,会为每一个客户端都创建一个feign.Logger实例,这样就可以利用该日志对象的DEBUG模式来帮助分析Feign的请求细节。
使用方法:
1)配置日志 Bean
@Configuration
public class DefaultFeignConfiguration {
    @Bean
    public Logger.Level feignLoggerLevel(){
        return Logger.Level.FULL;
   	 }
 }
2)日志开启
①
配置文件开启:在application.yml 中使用 logging.level.{Feign客户端对应的接口的全限定名} 的参数配置格式来开启指定客户端日志logging: level: # feign日志以什么级别监控哪个接口 {Feign客户端对应的接口的全限定名}: debug②
java bean 的方式开启:@EnableFeignClients 注解上有个 defaultConfiguration 属性,可以指定默认Feign Client的一些配置。@EnableFeignClients(defaultConfiguration =DefaultFeignConfiguration.class) @SpringBootApplication public class ProductApplication { public static void main(String[] args) { SpringApplication.run(ProductApplication.class, args); } }
使用 Feign 的注意事项
①
在 Feign 的服务声明接口使用对象作为参数时必须用 @RequestBody注解,让其以json方式接收void insert(@RequestBody User user);②
在 Feign 的服务声明接口中使用 @RequestParam 一定要加上value属性void delete(@RequestParam("accountCode") String accountCode);③
在 Feign 的服务声明接口中使用 @PathVariable 一定要跟上面一样加上value属性ResultData<AccountDTO> getByCode(@PathVariable(value = "accountCode") String accountCode);④
在消费者模块启动类上使用@EnableFeignClients注解后指明Feign接口所在的包路径@EnableFeignClients(basePackages = "com.javadaily.feign.*")