使用Springboot+MyBatisPlus+Thymeleaf实现对数据库的增删改查(2)
1.创建springboot项目
不带数据库的版本
项目搭建
2.导入依赖:pom.xml
<?xml version="1.0" encoding="UTF-8"?>
://maven.apache.org/POM/4.0.0" xmlns:xsi="http://www.w3.org/2001/XMLSchema-instance"
xsi:schemaLocation="http://maven.apache.org/POM/4.0.0 https://maven.apache.org/xsd/maven-4.0.0.xsd">
>4.0.0 >
>
>org.springframework.boot >
>spring-boot-starter-parent >
>2.3.1.RELEASE >
> <!-- lookup parent from repository -->
com.wang
springboot_thymeleaf
0.0.1-SNAPSHOT
springboot_thymeleaf
Demo project for Spring Boot
>
>1.8 >
>
<!--数据库驱动-->
com.alibaba
fastjson
1.2.48
com.alibaba
druid
1.1.12
log4j
log4j
1.2.17
io.springfox
springfox-swagger2
2.7.0
io.springfox
springfox-swagger-ui
2.7.0
org.projectlombok
lombok
org.projectlombok
lombok
true
<!-- >-->
<!-- >org.thymeleaf >-->
<!-- >thymeleaf-spring5 >-->
<!-- >-->
org.springframework.boot
spring-boot-starter-thymeleaf
org.thymeleaf.extras
thymeleaf-extras-java8time
com.baomidou
mybatis-plus-boot-starter
3.0.5
org.apache.velocity
velocity-engine-core
2.0
org.springframework.boot
spring-boot-configuration-processor
true
>
>mysql >
>mysql-connector-java >
>
>
>org.springframework.boot >
>spring-boot-starter-web >
>
>
>org.springframework.boot >
>spring-boot-devtools >
>runtime >
>true >
>
>
>mysql >
>mysql-connector-java >
<!-- >8.0.11 >-->
runtime
>
>
>javax.servlet >
>servlet-api >
>2.5 >
>provided >
>
>
>org.springframework.boot >
>spring-boot-starter-test >
>test >
>
>
>org.junit.vintage >
>junit-vintage-engine >
>
>
>
>
>
>
>
>org.springframework.boot >
>spring-boot-maven-plugin >
>
>
>
>
3.链接数据库


连接完成,看清楚你链接的库跟项目对不对应,不对应的话可以在这里改

4.新建测试,编写代码生成器

package com.wang;


import com.baomidou.mybatisplus.annotation.DbType;
import com.baomidou.mybatisplus.annotation.FieldFill;
import com.baomidou.mybatisplus.annotation.IdType;
import com.baomidou.mybatisplus.generator.AutoGenerator;
import com.baomidou.mybatisplus.generator.config.DataSourceConfig;
import com.baomidou.mybatisplus.generator.config.GlobalConfig;
import com.baomidou.mybatisplus.generator.config.PackageConfig;
import com.baomidou.mybatisplus.generator.config.StrategyConfig;
import com.baomidou.mybatisplus.generator.config.po.TableFill;
import com.baomidou.mybatisplus.generator.config.rules.DateType;
import com.baomidou.mybatisplus.generator.config.rules.NamingStrategy;

import java.util.ArrayList;

//自动代码生成器
public class Code {
    public static void main(String[] args) {
        //需要构建一个代码自动生成器对象
        AutoGenerator mpg = new AutoGenerator();
        //配置策略

        //1.全局配置
        GlobalConfig gc = new GlobalConfig();

        //获取系统当前目录
        String property = System.getProperty("user.dir");
        //代码生成到这个目录下
        gc.setOutputDir(property + "/src/main/java");
        gc.setAuthor("王");//代码上注释的作者
        gc.setOpen(false);//是否打开资源管理器(代码生成后打开代码所在文件夹)
        gc.setFileOverride(true);//是否覆盖原来生成的
        gc.setServiceName("%sService");//去Service的I前缀
        gc.setIdType(IdType.ID_WORKER);//生成策略
        gc.setDateType(DateType.ONLY_DATE);//时间类型
        gc.setSwagger2(true);//自动配置swagger文档
        mpg.setGlobalConfig(gc);

        //2.设置数据源(配用户名链接密码连接数据库)
        DataSourceConfig dsc = new DataSourceConfig();
        dsc.setUrl("jdbc:mysql://localhost:3306/decorate?useUnicode=true&characterEncoding=utf-8&useSSL=true&serverTimezone=UTC");
        dsc.setDriverName("com.mysql.cj.jdbc.Driver");
        dsc.setUsername("root");
        dsc.setPassword("123456");
        dsc.setDbType(DbType.MYSQL);//数据库的类型
        mpg.setDataSource(dsc);

        //3.包的配置
        PackageConfig pc = new PackageConfig();
        pc.setModuleName("springboot");//模块名字
        pc.setParent("com.wang");//生成模块在这个路径下
        pc.setEntity("entity");
        pc.setMapper("mapper");
        pc.setService("service");
        pc.setController("controller");
        mpg.setPackageInfo(pc);

        //策略配置
        StrategyConfig strategy = new StrategyConfig();
        strategy.setInclude("classic_case");//要生成的表名,想要生成哪个表的代码就填表名,可传多个参数,","隔开
        strategy.setNaming(NamingStrategy.underline_to_camel);//下划线转驼峰命名
        strategy.setColumnNaming(NamingStrategy.underline_to_camel);//列的名字下划线转驼峰
        strategy.setEntityLombokModel(true); //是否使用lombok开启注解链式变成是否支持
        strategy.setLogicDeleteFieldName("deleted");//逻辑删除(deleted表明)

        //自动填充配置
        TableFill tableFill = new TableFill("user", FieldFill.INSERT);//创建时自动填充策略user数据库表
        TableFill tableFill1 = new TableFill("user", FieldFill.INSERT_UPDATE);//修改时
        ArrayList<TableFill> list = new ArrayList<>();
        list.add(tableFill);
        list.add(tableFill1);
        strategy.setTableFillList(list);

        //乐观锁
        strategy.setVersionFieldName("version");//乐观锁
        strategy.setRestControllerStyle(true);//开启驼峰命名格式
        strategy.setControllerMappingHyphenStyle(true);//localhost:8080/hello_id_2


        mpg.execute();//执行

    }
}

5.因为MyBatisPlus继承了子模块的BaseMapper<>,所以省去了大部分的crud代码,直接在控制器中编写代码
UserController类:
package com.wang.springboot.controller;
import com.wang.springboot.entity.Users;
import com.wang.springboot.mapper.UsersMapper;
import com.wang.springboot.service.impl.UsersServiceImpl;
import org.springframework.ui.Model;
import org.springframework.web.bind.annotation.*;
import org.springframework.stereotype.Controller;
import javax.annotation.Resource;
import java.util.List;

/**
 *
 *  前端控制器
 *
 *
 * @author 王
 * @since 2020-06-16
 */
@Controller
@RequestMapping("/user")
public class UsersController {
    @Resource
    UsersServiceImpl usersServiceImpl;
    @Resource
    UsersMapper usersMapper;

    //查询所有列出
    @RequestMapping("list")
    public String list(Model model){
        List<Users> users = usersMapper.selectList(null);
        model.addAttribute("users",users);
//        System.out.println("users"+users);
        return "list";
    }

    //添加页面跳转
    @RequestMapping("add")
    private String add(){
        return "add";
    }
    //添加
    @RequestMapping("adduser")
    private String addUsers(Model model,Users users){
      int i= usersMapper.insert(users);
      model.addAttribute("u",i);
//      System.out.println(i);
//      System.out.println(users);
      return "redirect:/user/list";
    }

    //删除
    @RequestMapping("delete/{id}")
    private String deleteUsers(@PathVariable("id") Integer id){
        usersMapper.deleteById(id);
        return "redirect:/user/list";
    }

    //跳转修改页面
    @RequestMapping("update/{id}")
    private String updateUsers(@PathVariable("id")Integer id,Model model){
        Users users=usersMapper.selectById(id);
        model.addAttribute("user",users);
//        Users users1=usersMapper.selectById(id);
//        System.out.println("userssss"+users);
//        System.out.println("modelssss"+model);
        return "update";
    }
    //修改
    @RequestMapping("updateU")
    private String update(Users users){
        usersServiceImpl.saveOrUpdate(users);
        return "redirect:/user/list";
    }

}
html页面:
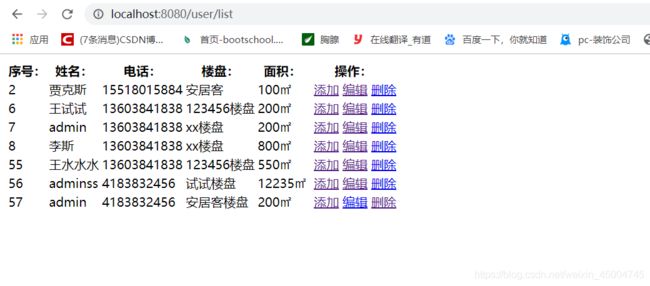
list.html
<!DOCTYPE html>
<!--suppress ALL-->
<html lang="en" xmlns:th="http://www.thymeleaf.org">
<head>
<meta charset="UTF-8">
<title>Title</title>
</head>
<body>
<table>
<tr>
<th>序号:</th>
<th>姓名:</th>
<th>电话:</th>
<th>楼盘:</th>
<th>面积:</th>
<th>操作:</th>
</tr>
<tr th:each="users:${users}">
<td>
<span th:text="${users.getId()}"/>
</td>
<td>
<span th:text="${users.getUserName()}"/>
</td>
<td>
<span th:text="${users.getPhone()}"/>
</td>
<td>
<span th:text="${users.getBuilding()}"/>
</td>
<td>
<span th:text="${users.getArea()}"/>
</td>
<td>
<span/> <a th:href="@{add}">添加</a> <a th:href="@{'update/'+${users.id}}">编辑</a> <a th:href="@{'delete/'+${users.id}}">删除</a>
</td>
<!-- th:href="@{text}" th:href="@{'update/'+${users.id}}"-->
</tr>
</table>
</body>
</html>
add.html:
<!DOCTYPE html>
<html lang="en" xmlns:th="http://www.thymeleaf.org">
<head>
    <meta charset="UTF-8">
    <title>添加</title>
</head>
<body>
<form th:action="@{adduser}" method="post">
    <div>
        <div class="form-group">
            <label>姓名</label>
            <input type="text" name="userName" class="form-control" placeholder="张三">
        </div>
        <div class="form-group">
            <label >电话</label>
            <input type="phone" name="phone" class="form-control" placeholder="13603841838">
        </div>
        <div class="form-group">
            <label >楼盘</label>
            <input type="building" name="building" class="form-control" placeholder="xxx楼盘">
    </div>
        <div class="form-group">
            <label >面积</label>
            <input type="area" name="area" class="form-control" placeholder="xxx㎡">
        </div>

    <button type="submit" class="btn btn-primary">确认添加</button>
    </div>
</form>
</body>
</html>
update.html:
<!DOCTYPE html>
<!--suppress ALL-->
<html lang="en" xmlns:th="http://www.thymeleaf.org">
<head>
    <meta charset="UTF-8">
    <title>Title</title>
</head>
<body>
<form th:action="@{/user/updateU}" method="post">
    <input type="hidden" name="id" th:value="${user.getId()}"/>
    <div>
        <div class="form-group">
            <label>姓名</label>
            <input  th:value="${user.getUserName()}" type="text" name="userName" class="form-control" placeholder="张三"/>
        </div>
        <div class="form-group">
            <label>电话</label>
            <input th:value="${user.getPhone()}" type="text" name="phone" class="form-control" placeholder="13603841838"/>
        </div>
        <div class="form-group">
            <label>楼盘</label>
            <input th:value="${user.getBuilding()}" type="text" name="building" class="form-control" placeholder="安居客楼盘"/>
        </div>
        <div class="form-group">
            <label >面积</label>
            <input th:value="${user.getArea()}" type="area" name="area" class="form-control" placeholder="200㎡"/>
        </div>
    <button type="submit" class="btn btn-primary">确认修改</button>
    </div>
</form>
</body>
</html>
ok!运行:
list页面

添加:

添加成功:
修改:

删除:

数据库:
