如何使用NSOperations和NSOperationQueues 第一部分
这篇文章还可以在这里找到 英语
这篇博客是由iOS个人开发者Soheil Moayedi Azarpour发布的。
每个人都会在使用iOS或者Mac app,点击按钮或者输入文本时,有过让人沮丧的经历,突然间,用户交互界面停止了响应。
你真幸运 – 你只能盯着沙漏或者旋转的风火轮一段时间直到能够再次和UI界面交互为止!挺讨厌的,不是吗?
在一款移动端iOS程序中,用户期望你的app可以即时地响应他们的触摸操作,然而当它不响应时,app就会让人觉得反应迟钝,通常会导致不好的评价。
然而说的容易做就难。一旦你的app需要执行多个任务,事情很快就会变得复杂起来。在主运行回路中并没有很多时间去执行繁重的工作,并且还有一直提供可响应的UI界面。
可怜的开发者要怎么做呢?一种方法是通过并发操作将部分任务从主线程中撤离。并发操作意味着你的程序可以在操作中同时执行多个流(或者线程)- 这样,当你执行任务时,交互界面可以保持响应。
一种在iOS中执行并发操作的方法,是使用NSOperation和NSOperationQueue类。在本教程中,你将学习如何使用它们!你会 先创建一款不使用多线程的app,这样它会变得响应非常迟钝。然后改进程序,添加上并行操作 – 并且希望 – 可以提供一个交互响应更好的界面给用户!
在开始阅读这篇教程之前,先阅读我们的 Multithreading and Grand Central Dispatch on iOS for Beginners Tutorial会很有帮助。然而,因为本篇教程比较通俗易懂,所以也可以不必阅读这篇文章。
背景知识
在你学习这篇教程之前,有几个技术概念需要先解决下。
也许你听说过并发和并行操作。从技术角度来看,并发是程序的属性,而并行运作是机器的属性。并行和并发是两种分开的概念。作为程序员,你不能保证你的代码会在能并行执行你的代码的机器上运行。然而,你可以设计你的代码,让它使用并发操作。
首先,有必要定义几个术语:
- 任务:一项需要完成的,简单,单一的任务。
- 线程:一种由操作系统提供的机制,允许多条指令在一个单独的程序中同时执行。
- 进程:一段可执行的代码,它可以由几个线程组成。
注意:在iPhone和Mac中,线程功能是由POSIX Threads API(或者pthreads)提供的,它是操作系统的一部分。这是相当底层的东西,你会发现很容易犯错;也许线程最坏的地方就是那些极难被发现的错误吧!
Foundation 框架包含了一个叫做NSThread的类,他更容易处理,但是使用NSThread管理多个线程仍然是件令人头疼的事情。NSOperation和NSOperationQueue是更高级别的类,他们大大简化了处理多个线程的过程。
在这张图中,你可以看到进程,线程和任务之间的关系:
正如你看到的,一个进程包含多个可执行的线程,而且每个线程可以同时执行多项任务。
在这张图中,线程2执行了读文件的操作,而线程1执行了用户界面相关的代码。这跟你在iOS中构建你的代码很相似 – 主线程应该执行任何与用户界面有关的任务,然后二级线程应该执行缓慢的或者长时间的操作(例如读文件,访问网络,等等。)
NSOperation vs. Grand Central Dispatch (GCD)
你也许听说过 Grand Central Dispatch (GCD)。简而言之,GCD包含语言特性,运行时刻库和系统增强(提供系统性和综合性的提升,从而在iOS和OS X的多核硬件上支持并发操作)。如果你希望更多的了解GCD,你可以阅读我们的Multithreading and Grand Central Dispatch on iOS for Beginners Tutorial教程。
在Mac OS X v10.6和iOS4之前,NSOperation 与 NSOperationQueue 不同于GCD,他们使用了完全不同的机制。从Mac OS X v10.6和iOS4开始,NSOperation 和 NSOperationQueue是建立在GCD上的。作为一种通例,苹果推荐使用最高级别的抽象,然而当评估显示有需要时,会突然降到更低级别。
以下是对两者的快速比较,它会帮助你决定何时何地去使用GCD或者NSOperation和NSOperationQueue;
- GCD是一种轻量级的方法来代表将要被并发执行的任务单位。你并不需要去计划这些任务单位;系统会为你做计划。在块(block)中添加依赖会是一件令人头疼的事情。取消或者暂停一个块会给一个开发者产生额外的工作!:]
- NSOperation和NSOperationQueue 对比GCD会带来一点额外的系统开销,但是你可以在多个操作(operation)中添加附属。你可以重用操作,取消或者暂停他们。NSOperation和 Key-Value Observation (KVO)是兼容的;例如,你可以通过监听NSNotificationCenter去让一个操作开始执行。
初步的工程模型
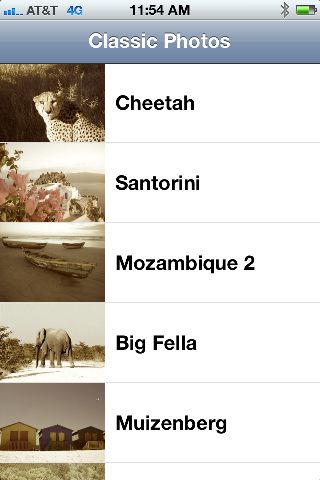
在工程的初步模型中,你有一个由字典作为其数据来源的table view。字典的关键字是图片的名字,每个关键字的值是图片所在的URL地址。本工程的目标是读取字典的内容,下载图片,应用图片滤镜操作,最后在table view中显示图片。
以下是该模型的示意图:
实现 – 你可能会首先想到的方法…
注意:
如果你不想先创建一个非线程版本的工程,而是想直接进入多线程方向,你可以跳过这一节,下载我们在本节中创建的第一版本工程。
所有的图片来自stock.xchng。在数据源中的某些图片是有意命名错误,这样就有例子去测试下载图片失败的情况。
启动Xcode并使用iOSApplicationEmpty Application模版创建一个新工程,然后点击下一步。将它命名为ClassicPhotos。选择Universal, 勾选上Use Automatic Reference Counting(其他都不要选),然后点击下一步。将工程保存到任意位置。
从Project Navigator中选择ClassicPhoto工程。选择Targets ClassicPhotosBuild Phases 然后展开Link Binary with Libraries。使用+按钮添加Core Image framework(你将需要Core Image来做图像滤镜处理)。
在Project Navigator中切换到AppDelegate.h 文件,然后导入ListViewController文件 — 它将会作为root view controller,接下来你会定义它。ListViewController是UITableViewController的子类。
#import "ListViewController.h" |
切换到AppDelegate.m文件,找到application:didFinishLaunchingWithOptions:方法。 Init和alloc一个ListViewController的实例变量。将它包在UINavigationController中,然后设置它为 UIWindow的root view controller.
- (BOOL)application:(UIApplication *)application didFinishLaunchingWithOptions:(NSDictionary *)launchOptions { self.window = [[UIWindow alloc] initWithFrame:[[UIScreen mainScreen] bounds]]; self.window.backgroundColor = [UIColor whiteColor]; /* ListViewController is a subclass of UITableViewController. We will display images in ListViewController. Here, we wrap our ListViewController in a UINavigationController, and set it as the root view controller. */ ListViewController *listViewController = [[ListViewController alloc] initWithStyle:UITableViewStylePlain]; UINavigationController *navController = [[UINavigationController alloc] initWithRootViewController:listViewController]; self.window.rootViewController = navController; [self.window makeKeyAndVisible]; return YES; } |
注意: 如果你之前还没有这样创建过一个用户界面,那么这就是在不需要使用Storyboards或者Interface Builder的情况下,用纯代码形式去创建一个用户界面的方法。
接下来创建一个UITableViewController的子类,然后命名它为ListViewController. 切换到ListViewController.h文件,并对它做以下修改:
//1 #import UIKit/UIKit.h #import CoreImage/CoreImage.h // 2 #define kDatasourceURLString @"http://www.raywenderlich.com/downloads/ClassicPhotosDictionary.plist" // 3 @interface ListViewController : UITableViewController // 4 @property (nonatomic, strong)NSDictionary *photos; // main data source of controller @end |
让我们一段一段地过一遍上面的代码:
- 导入UIKit和Core Image。
- 方便起见,定义kDatasourceURLString为数据源文件所在位置的URL字符串。
- 通过替换NSObject为UITableViewController,让ListViewController继承UITableViewController。
- 定义NSDictionary的一个实例。这会是数据源。
现在,切换到ListViewController.m文件,添加以下代码:
@implementation ListViewController //1 @synthesize photos = _photos; #pragma mark - #pragma mark - Lazy instantiation // 2 - (NSDictionary *)photos { if (!_photos) { NSURL *dataSourceURL = [NSURL URLWithString:kDatasourceURLString]; _photos = [[NSDictionary alloc] initWithContentsOfURL:dataSourceURL]; } return _photos; } #pragma mark - #pragma mark - Life cycle - (void)viewDidLoad { // 3 self.title = @"Classic Photos"; // 4 self.tableView.rowHeight = 80.0; [super viewDidLoad]; } - (void)viewDidUnload { // 5 [self setPhotos:nil]; [super viewDidUnload]; } #pragma mark - #pragma mark - UITableView data source and delegate methods // 6 - (NSInteger)tableView:(UITableView *)tableView numberOfRowsInSection:(NSInteger)section { NSInteger count = self.photos.count; return count; } // 7 - (CGFloat)tableView:(UITableView *)tableView heightForRowAtIndexPath:(NSIndexPath *)indexPath { return 80.0; } - (UITableViewCell *)tableView:(UITableView *)tableView cellForRowAtIndexPath:(NSIndexPath *)indexPath { static NSString *kCellIdentifier = @"Cell Identifier"; UITableViewCell *cell = [tableView dequeueReusableCellWithIdentifier:kCellIdentifier]; if (!cell) { cell = [[UITableViewCell alloc] initWithStyle:UITableViewCellStyleDefault reuseIdentifier:kCellIdentifier]; cell.selectionStyle = UITableViewCellSelectionStyleNone; } // 8 NSString *rowKey = [[self.photos allKeys] objectAtIndex:indexPath.row]; NSURL *imageURL = [NSURL URLWithString:[self.photos objectForKey:rowKey]]; NSData *imageData = [NSData dataWithContentsOfURL:imageURL]; UIImage *image = nil; // 9 if (imageData) { UIImage *unfiltered_image = [UIImage imageWithData:imageData]; image = [self applySepiaFilterToImage:unfiltered_image]; } cell.textLabel.text = rowKey; cell.imageView.image = image; return cell; } #pragma mark - #pragma mark - Image filtration // 10 - (UIImage *)applySepiaFilterToImage:(UIImage *)image { CIImage *inputImage = [CIImage imageWithData:UIImagePNGRepresentation(image)]; UIImage *sepiaImage = nil; CIContext *context = [CIContext contextWithOptions:nil]; CIFilter *filter = [CIFilter filterWithName:@"CISepiaTone" keysAndValues: kCIInputImageKey, inputImage, @"inputIntensity", [NSNumber numberWithFloat:0.8], nil]; CIImage *outputImage = [filter outputImage]; CGImageRef outputImageRef = [context createCGImage:outputImage fromRect:[outputImage extent]]; sepiaImage = [UIImage imageWithCGImage:outputImageRef]; CGImageRelease(outputImageRef); return sepiaImage; } @end |
好的!这里做了很多事情。别害怕 – 以下是对代码原理的解释:
- 对 photos 变量做了Synthesize操作.
- 使用了惰性实例化去加载数据源,比如photos 字典。
- 为view设置了title属性。
- 将table view中的row高度设定为80.0个像素点。
- 当ListViewController被卸载时,将photos变量设置为nil。
- 返回被显示的row数量。
- 这是UITableViewDelegate的可选方法。为了达到更好的视觉效果,将每个row的高度设定为80.0。默认值为44.0。
- 从字典中获取key值,根据key的value值创建NSURL,然后以NSData类型下载图片数据。
- 如果你成功下载完数据,创建image对象,并且使用褐色滤光镜。
- 这个方法对image对象使用了褐色滤光镜。如果你想了解更多关于Core Image filters的内容,你可以阅读Beginning Core Image in iOS 5 Tutorial。
就是这样!试试吧!编译运行工程。很美,褐色的照片 – 但是…他们..看起来…很…慢! 虽然很好看,但是你只能在等待图片加载的时候去吃点零食打发时间了. :]
是时候想想如何提升用户体验了!
线程
每一个应用程序至少有一个主线程。线程的工作就是去执行一系列的指令。在Cocoa Touch中,主线程包含应用程序的主运行回路。几乎所有你写的代码都会在主线程中执行,除非你特别创建了一个单独的线程,并在这个新线程中执行代码。
线程有两个显著的特征:
- 每个线程都有访问你的应用程序资源的同等权限;它包括访问除了局部变量之外的所有的对象。所以,任何对象都可能被任意线程修改,使用并且改变。
- 没有办法可以去预测一个线程会运行多久 — 或者哪个线程会首先完成!
所以,知道这些技术很重要,它们可以去攻克难点,防止意外的错误!:] 以下是对多线程应用时面临的挑战介绍 – 以及一些如何有效解决它们的提示。
- 资源竞争:当每个线程都去访问同一段内存时,会导致所谓的资源竞争问题。当有多个并发线程访问共享数据时,首先访问内存数据的 线程会改变共享数据 – 而且并不能保证哪个线程会首先访问到内存数据。你也许会假设有一个局部变量拥有你的线程最后一次写到共享内存的值,但是另一个线程也许会同时改变了共享内 存的数据,然后你的局部变量就过时了!如果你知道这种情况会存在你的代码中(例如你会从多个线程同时读/写数据),就应该使用互斥锁。互斥代表互相排斥。你可以通过使用 “@synchronized block”将实例变量包围起来,创建一个互斥锁。这样你就可以确保在互斥锁中的代码一次只能被一个线程访问:
 @synchronized (self) {

        myClass.object = value;

      }
在以上代码中“Self”被称为一个“信号量”。当一个线程要范围这段代码时,它会检查其他的线程是否也在访问“self”。如果没有线程在访问“self”,这块代码会被执行;否则这段线程会被限制访问直到这个互斥锁解除为止。
- 原子性:你也许在property声明中见过很多次“nonatomic”。当你将一个property声明为atomic 时,通常会把它包裹在一个@synchronized块中,确保它是线程安全的。当然,这种方法会添加一些额外的系统开销。为了更清楚的解释它,以下是一 个关于atomic property的初步实现:
// If you declare a property as atomic ...

@property (atomic, retain) NSString *myString;


// ... a rough implementation that the system generates automatically,

// looks like this:

- (NSString *)myString {

    @synchronized (self) {


        return [[myString retain] autorelease];


    }


}
在上面的代码中,“retain”和“autorelease”被当做返回值来使用,它们被多个线程访问了,而且你不希望这个对象在多个调用之间被释放了。
所以,你先把它的值retain一下,然后把它放在自动释放池中。你可以在苹果的技术文档里面了解到更多关于 线程安全的内容。只要是大部分iOS程序员不想费心去发掘它的话,都值得去了解下。重要提示:这是一个很好的面试问题!:]
大部分的UIKit properties都不是线程安全的。想看下一个类是否是线程安全的,可以看看API文档。如果API文档没有提到任何关于线程安全的内容,你可以假设这个类是非线程安全的。
按常规,如果你正在执行一个二级的线程,而且你要对UIKit对象做操作,可以使用performSelectorOnMainThread。
- 死锁:一个线程被停滞,无限期地等待永远不会发生的条件。例如,如果两个线程在互相执行synchronized代码,每一个线程就会等待另一个线程完成并且打开锁。但是这种情况永远不会发生,这样两个线程都会成为死锁。
- 困乏时间:这会发生在有太多的线程同时执行,系统会停滞不前。NSOperationQueue有一个属性,让你设置并发线程的数量。
NSOperation API
NSOperation 类有一个相当简短的声明。要定制一个操作,可以遵循以下步骤:
- 继承NSOperation类
- 重写“main”方法
- 在“main”方法中创建一个“autoreleasepool”
- 将你的代码放在“autoreleasepool”中
创建你自己的自动释放池的原因是,你不能访问主线程的自动释放池,所以你应该自己创建一个。以下是一个例子:
#import Foundation/Foundation.h @interface MyLengthyOperation: NSOperation @end |
@implementation MyLengthyOperation - (void)main { // a lengthy operation @autoreleasepool { for (int i = 0 ; i < 10000 ; i++) { NSLog(@"%f", sqrt(i)); } } } @end |
上面的例子代码展示了ARC语法在自动释放池中的使用。你现在必须使用ARC了!:]
在线程操作中,你从来都不能明确知道,一个操作什么时候会开始,要持续多久才能结束。在大多数时候,如果用户滑动离开了页面,你并不想在后台执行一个操作 – 没有任何的理由让你去执行。这里关键是要经常地检查NSOperation类的isCancelled属性。例如,在上面的例子程序中,你会这样做:
@interface MyLengthyOperation: NSOperation @end @implementation MyLengthyOperation - (void)main { // a lengthy operation @autoreleasepool { for (int i = 0 ; i < 10000 ; i++) { // is this operation cancelled? if (self.isCancelled) break; NSLog(@"%f", sqrt(i)); } } } @end |
要取消一个操作,你可以调用NSOperation的cancel方法,展示如下:
// In your controller class, you create the NSOperation // Create the operation MyLengthyOperation *my_lengthy_operation = [[MyLengthyOperation alloc] init]; . . . // Cancel it [my_lengthy_operation cancel]; |
NSOperation类还有其他的方法和属性:
- 开始(start):通常,你不会重写这个方法。重写“start”方法需要相对复杂的实现,你还需要注意像 isExecuting,isFinished,isConcurrent和isReady这些属性。当你将一个操作添加到一个队列当中时(一个 NSOperationQueue的实例,接下来会讨论的),这个队列会在操作中调用“start”方法,然后它会做一些准备和“main”方法的后续操 作。假如你在一个NSOperation实例中调用了“start”方法,如果没有把它添加到一个队列中,这个操作会在main loop中执行。
- 从属性(Dependency):你可以让一个操作从属于其他的操作。任何操作都可以从属于任意数量的操作。当你让操作A从属于操作B时,即使你调用了操作A的“start”方法,它会等待操作B结束后才开始执行。例如:
MyDownloadOperation *downloadOp = [[MyDownloadOperation alloc] init]; // MyDownloadOperation is a subclass of NSOperation MyFilterOperation *filterOp = [[MyFilterOperation alloc] init]; // MyFilterOperation is a subclass of NSOperation [filterOp addDependency:downloadOp]; |
要删除依赖性:
[filterOp removeDependency:downloadOp]; |
- 优先级(Priority):有时候你希望在后台运行的操作并不是很重要的,它可以以较低的优先级执行。可以通过使用“setQueuePriority:”方法设置一个操作的优先级。
[filterOp setQueuePriority:NSOperationQueuePriorityVeryLow];
其他关于设置线程优先级的选择有: NSOperationQueuePriorityLow, NSOperationQueuePriorityNormal, NSOperationQueuePriorityHigh和NSOperationQueuePriorityVeryHigh.
当你添加了操作到一个队列时,在对操作调用“start”方法之前,NSOperationQueue会浏览所有的操作。那些有较高优先级的操作会被先执行。有同等优先级的操作会按照添加到队列中的顺序去执行(先进先出)。
(历史注释:在1997年,火星车中的嵌入式系统遭遇过优先级反转问题,也许这是说明正确处理优先级和互斥锁的最昂贵示例了。想对这一事件的背景知识有更多的了解,可以看这个网址: http://research.microsoft.com/en-us/um/people/mbj/Mars_Pathfinder/Mars_Pathfinder.html ) - Completion block:在NSOperation 类中另一个有用的方法叫setCompletionBlock:。一旦操作完成了,如果你还有一些事情想做,你可以把它放在一个块中,并且传递给这个方法。这个块会在主线程中执行。
[filterOp removeDependency:downloadOp];
其他一些关于处理线程的提示:
- 如果你需要传递一些值和指针到一个线程中,创建你自己的指定初始化方法是一个很好的尝试:
#import Foundation/Foundation.h


@interface MyOperation : NSOperation


-(id)initWithNumber:(NSNumber *)start string:(NSString *)string;


@end
- 如果你的操作需要有一个返回值或者对象,声明一个委托方法是不错的选择。记住委托方法必须在主线程中返回。然而,因为你要继承NSOperation类,你必须先将这个操作类强制转换为NSObject对象。可以按照以下步骤去做:
[(NSObject *)self.delegate performSelectorOnMainThread:(@selector(delegateMethod:)) withObject:object waitUntilDone:NO];
- 要经常检查isCancelled属性。如果操作不需要被执行了,你就不想在后台去运行它了!
- 你并不需要重写“start”方法。然而,如果你决定去重写“start”方法,就必须处理好像isExecuting, isFinished, isConcurrent 和 isReady这些属性。否则你的操作类不会正确的运作。
- 你一旦添加了一个操作到一个队列(NSOperationQueue的一个实例)中,就要负责释放它(如果你不使用ARC的话)。NSOperationQueue 获得操作对象的所有权,调用“start”方法,然后结束时负责释放它。
- 你不能重用一个操作对象。一旦它被添加到一个队列中,你就丧失了对它的所有权。如果你想再使用同一个操作类,就必须创建一个新的实例变量。
- 一个结束的操作不能被重启。
- 如果你取消了一个操作,它不会马上就发生。它会在未来的某个时候某人在“main”函数中明确地检查isCancelled == YES 时被取消掉;否则,操作会一直执行到完成为止。
- 一个操作是否成功地完成,失败了,或者是被取消了,isFinished的值总会被设置为YES。所以千万不要觉得isFinished == YES就表示所有的事情都顺利完成了 — 特别的,如果你在代码里面有从属性(dependencies),就要更加注意!
NSOperationQueue API
NSOperationQueue 也有一个相当简单的界面。它甚至比NSOperation还要简单,因为你不需要去继承它,或者重写任何的方法 — 你可以简单创建一个。给你的队列起一个名字会是一个不错的做法;这样你可以在运行时识别出你的操作队列,并且让调试变得更简单:
NSOperationQueue *myQueue = [[NSOperationQueue alloc] init]; myQueue.name = @"Download Queue"; |
- 并发操作:队列和线程是两个不同的概念。一个队列可以有多个线程。每个队列中的操作会在所属的线程中运行。举个例子你创建一个队列,然后添加三个操作到里面。队列会发起三个单独的线程,然后让所有操作在各自的线程中并发运行。
到底有多少个线程会被创建?这是个很好的问题!:] 这取决与硬件。默认情况下,NSOperationQueue类会在场景背后施展一些魔法,决定如何在特定的平台下运行代码是最好的,并且会尽量启用最大 的线程数量。考虑以下的例子。假设系统是空闲的,并且有很多的可用资源,这样NSOperationQueue会启用比如8个同步线程。下次你运行程序, 系统会忙于处理其他不相关的操作,它们消耗着资源,然后NSOperationQueue只会启用两个同步线程了。 - 并发操作的最大值:你可以设定NSOperationQueue可以并发运行的最大操作数。NSOperationQueue会选择去运行任何数量的并发操作,但是不会超过最大值。
myQueue.MaxConcurrentOperationCount = 3;
如果你改变了主意,想将MaxConcurrentOperationCount设置回默认值,你可以执行下列操作:
myQueue.MaxConcurrentOperationCount = NSOperationQueueDefaultMaxConcurrentOperationCount; - 添加操作:一个操作一旦被添加到一个队列中,你就应该通过传送一个release消息给操作对象(如果使用了手动引用计数,非ARC的话),然后队列会负责开始这个操作。从这点上看,什么时候调用“start”方法由这个队列说了算。
[myQueue addOperation:downloadOp];

[downloadOp release]; // manual reference counting
- 待处理的操作:任何时候你可以询问一个队列哪个操作在里面,并且总共有多少个操作在里面。记住只有那些等待被执行的操作,还有那些正在运行的操作,会被保留在队列中。操作一完成,就会退出队列。
NSArray *active_and_pending_operations = myQueue.operations;

NSInteger count_of_operations = myQueue.operationCount;
- 暂停队列:你可以通过设定setSuspended:YES来暂停一个队列。这样会暂停所有在队列中的操作 — 你不能单独的暂停操作。要重新开始队列,只要简单的setSuspended:NO。
// Suspend a queue

[myQueue setSuspended:YES];

.

.

.

// Resume a queue

[myQueue setSuspended: NO];
- 取消操作:要取消一个队列中的所有操作,你只要简单的调用“cancelAllOperations”方法即可。还记得之前提醒过经常检查NSOperation中的isCancelled属性吗?
原因是“cancelAllOperations”并没有做太多的工作,他只是对队列中的每一个操作调用“cancel”方法 — 这并没有起很大作用!:] 如果一个操作并没有开始,然后你对它调用“cancel”方法,操作会被取消,并从队列中移除。然而,如果一个操作已经在执行了,这就要由单独的操作去识 别撤销(通过检查isCancelled属性)然后停止它所做的工作。
[myQueue cancelAllOperations]; |
- addOperationWithBlock: 如果你有一个简单的操作不需要被继承,你可以将它当做一个块(block)传递给队列。如果你需要从块那里传递回任何数据,记得你不应该传递任何强引用的 指针给块;相反,你必须使用弱引用。而且,如果你想要在块中做一些跟UI有关的事情,你必须在主线程中做。
UIImage *myImage = nil;


// Create a weak reference

__weak UIImage *myImage_weak = myImage;


// Add an operation as a block to a queue

[myQueue addOperationWithBlock: ^ {


    // a block of operation

    NSURL *aURL = [NSURL URLWithString:@"http://www.somewhere.com/image.png"];

    NSError *error = nil;

    NSData *data = [NSData dataWithContentsOfURL:aURL options:nil error:&error];

    If (!error)

        [myImage_weak imageWithData:data];


    // Get hold of main queue (main thread)

    [[NSOperationQueue mainQueue] addOperationWithBlock: ^ {

        myImageView.image = myImage_weak; // updating UI

    }];


}];
重新定义模型
是时候重新定义初步的非线程模型了!如果你仔细看下初步的模型,你会看到有三个线程区域可以改进。通过把这三个区域区分开来,然后把它们各自放在一个单独的线程中,主线程会获得解脱,并且可以保持对用户交互的迅速响应。
注意:如果你不能马上理解为什么你的app运作得这么慢 — 而且有时候这并不明显 — 你应该使用Instruments工具。然而,这需要另一篇教程去讲解它了!:]
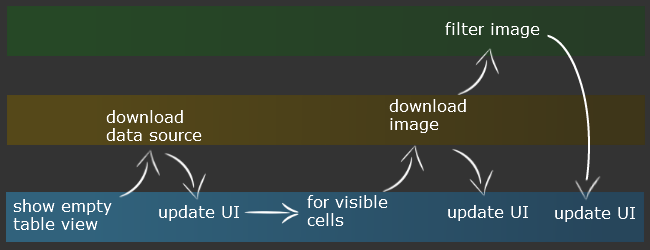
为了摆脱你的程序的瓶颈限制,你需要一个特定的线程去响应用户交互事件,一个线程专门用于下载数据源和图片,还有一个线程用于执行图片滤镜处理。在新的模型中,app在主线程中开始,并且加载一个空白的table view。同时,app会开始另一个线程去下载数据源。
一旦数据源下载完毕,你会告诉table view重新加载自己。这会在主线程中完成。这个时候,table view知道有多少行,而且知道需要显示的图片的URL地址,但是它还没有实际的图片!如果你在这个时候马上开始下载所有的图片,这会非常没有效率,因为 你一下子不需要所有的图片!
怎样可以把它弄得更好?
一个更好的模型就是去下载在当前屏幕可见的row的图片。所以你的代码首先会问table view哪些row是可见的,然后才会开始下载过程。还有,图片滤镜处理会在图片下载完成后才开始。因此,代码应该等待出现有一个待滤镜处理的图片时才开始进行图片滤镜处理。
为了让app的反应变得更加灵敏,代码会在图片下载完毕后马上显示,而不会等待进行滤镜处理。一旦图片的滤镜处理完成,就会更新UI以显示滤镜处理过的图片。以下是整个处理过程的控制流示意图:
为了达到这些目标,你需要去监测图片是否正在下载,或者已经完成了下载,还是图片的滤镜处理已经完成了。你还需要去监测每个操作的状态,以及判断它是一个下载操作还是一个滤镜处理操作,这样你才能在用户滚动table view的时候去做取消,中止或者恢复操作。
好的!现在你准备好开始写代码了!:]
打开之前的工程,添加一个命名为 PhotoRecord的NSObject新子类到工程中。打开PhotoRecord.h文件,然后添加以下代码到头文件中:
#import UIKit/UIKit.h // because we need UIImage @interface PhotoRecord : NSObject @property (nonatomic, strong) NSString *name; // To store the name of image @property (nonatomic, strong) UIImage *image; // To store the actual image @property (nonatomic, strong) NSURL *URL; // To store the URL of the image @property (nonatomic, readonly) BOOL hasImage; // Return YES if image is downloaded. @property (nonatomic, getter = isFiltered) BOOL filtered; // Return YES if image is sepia-filtered @property (nonatomic, getter = isFailed) BOOL failed; // Return Yes if image failed to be downloaded @end |
是不是觉得上面的语法挺熟悉的?每一个property都有一个getter和setter方法。像这样去指定getter方法仅仅是让它的命名更加明确。
切换到PhotoRecord.m文件,然后添加以下代码:
@implementation PhotoRecord @synthesize name = _name; @synthesize image = _image; @synthesize URL = _URL; @synthesize hasImage = _hasImage; @synthesize filtered = _filtered; @synthesize failed = _failed; - (BOOL)hasImage { return _image != nil; } - (BOOL)isFailed { return _failed; } - (BOOL)isFiltered { return _filtered; } @end |
要监测每一个操作的状态,你需要一个单独的类。创建另一个命名为PendingOperations的NSObject新类。切换到PendingOperations.h文件,然后添加以下代码:
#import Foundation/Foundation.h @interface PendingOperations : NSObject @property (nonatomic, strong) NSMutableDictionary *downloadsInProgress; @property (nonatomic, strong) NSOperationQueue *downloadQueue; @property (nonatomic, strong) NSMutableDictionary *filtrationsInProgress; @property (nonatomic, strong) NSOperationQueue *filtrationQueue; @end |
这个头文件也挺简单。你申明了两个字典去监测活跃和等待的下载与滤镜操作。字典的key代表table view row的indexPath,然后字典的value会是两个单独的ImageDownloader和ImageFiltration实例。
注意:你可能会对为什么要监测所有的活跃和等待操作感到好奇。难道不能通过对 [NSOperationQueue operations]的查询来访问它们吗?是的,但是在本工程中,这样做的话效率不是很高。
每次你需要去用有等待操作的行(row)的indexPath去和可见行的indexPath作对比时,你需要使用几个迭代循环,这样的话会是一个 很耗资源的操作。通过申明一个额外的NSDictionary实例,你可以方便的了解等待操作(operations),而不需要执行没有效率的循环操作 (operations)。
切换到PendingOperations.m文件,然后添加以下代码:
@implementation PendingOperations @synthesize downloadsInProgress = _downloadsInProgress; @synthesize downloadQueue = _downloadQueue; @synthesize filtrationsInProgress = _filtrationsInProgress; @synthesize filtrationQueue = _filtrationQueue; - (NSMutableDictionary *)downloadsInProgress { if (!_downloadsInProgress) { _downloadsInProgress = [[NSMutableDictionary alloc] init]; } return _downloadsInProgress; } - (NSOperationQueue *)downloadQueue { if (!_downloadQueue) { _downloadQueue = [[NSOperationQueue alloc] init]; _downloadQueue.name = @"Download Queue"; _downloadQueue.maxConcurrentOperationCount = 1; } return _downloadQueue; } - (NSMutableDictionary *)filtrationsInProgress { if (!_filtrationsInProgress) { _filtrationsInProgress = [[NSMutableDictionary alloc] init]; } return _filtrationsInProgress; } - (NSOperationQueue *)filtrationQueue { if (!_filtrationQueue) { _filtrationQueue = [[NSOperationQueue alloc] init]; _filtrationQueue.name = @"Image Filtration Queue"; _filtrationQueue.maxConcurrentOperationCount = 1; } return _filtrationQueue; } @end |
这里,你重写了一些getter方法去利用惰性实例化,所以你并不需要真的去给实例变量分配内存空间,直到他们被访问为止。你还要给两个队列初始化 和分配内存空间 — 一个用于下载操作,一个用于滤镜处理 — 然后设定他们的属性(properties),所以当你在另外的类中访问他们时,你不需要担心他们的初始化操作。 maxConcurrentOperationCount变量在本教程中设定为1。
现在,是时候处理下载和滤镜处理操作了。创建一个命名为ImageDownloader的NSOperatoin子类。切换到ImageDownloader.h文件,然后添加以下代码:
#import Foundation/Foundation.h // 1 #import "PhotoRecord.h" // 2 @protocol ImageDownloaderDelegate; @interface ImageDownloader : NSOperation @property (nonatomic, assign) id delegate; // 3 @property (nonatomic, readonly, strong) NSIndexPath *indexPathInTableView; @property (nonatomic, readonly, strong) PhotoRecord *photoRecord; // 4 - (id)initWithPhotoRecord:(PhotoRecord *)record atIndexPath:(NSIndexPath *)indexPath delegate:(id) theDelegate; @end @protocol ImageDownloaderDelegate // 5 - (void)imageDownloaderDidFinish:(ImageDownloader *)downloader; @end |
因文字篇幅有限,以上是本篇教程的第一部分,这里是第二部分


