使用uiautomatorviewer和uiautomator来做android的UI测试
来自:http://university.utest.com 作者: 译者:Elaine00
目录
- 简介
- 什么是 Android UI 测试?
- 如何使用uiautomatorviewer来扫描和分析UI组件
- 一步一步带你学uiautomatorviewer
- 如何使用uiautomator API来创建用户界面测试
- 源码
简介
Android UI 测试有两种测试类型, 其中一种白盒测试需要测试人员了解到应用的源码。白盒测试,测试人员可以使用为Android应用设计测试用例。第二类被称为黑盒测试,其中测试人员没有访问应用程序的源代码,但是你需要测试应用程序的行为,当它运行在一台设备。
什么是Android UI测试?
在Android用户界面测试,你要测试的应用程序如何与一个真实的用户交互。UI测试确保应用程序返回响应用户一系列操作的正确的UI输出,如键盘输入或按工具栏,菜单,对话框,图像,和其他用户界面控件。为了实现这一目标,你有两个选择。一是在真实的应用中来使用这个应用,并且尝试各种途径来发现应用的异常表现和Bugs。这种做法显然是费时,容易出错,你可以尝试有限的情况下。
另一种方案是自动化测试。自动化测试涉及到创建的程序来完成测试任务(测试用例)覆盖特定的使用场景,然后使用测试框架来自动地执行测试用例和可重复的方式。
如何使用uiautomatorviewer来扫描和分析UI组件
第一个工具我们要看到的是uiautomatorviewer,一个用来来扫描和分析Android应用程序的UI组件的GUI工具。为了使用uiautomatorviewer,你必须首先下载并安装SDK和根据指示设置ADT束Eclipse IDE。安装后,该工具存在于/tools/文件夹,您可以从命令行输入启动它:uiautomatorviewer。
但是这个工具的用途是什么?使用uiautomatorviewer,你可以检查一个应用的UI来查看应用的布局和组件以及相关的属性。这是非常重要的,特别是当你想构建自动化测试,通过了解各个部件的应用层次的布局,你可以使用uiautomator(在本课程的一部分API)来创建自动化测试。
一步一步带你学uiautomatorviewer
下面我将一步一步带教你如何使用uiautomatorviewer来查看Calculator应用的布局和组件的ID
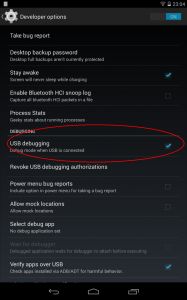
- 首先通过USB接口连接你的设备到PC端:通过“Settings -> Developer options” 打开 USB调试.
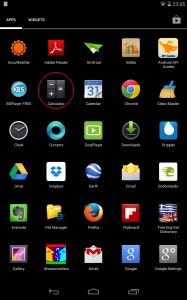
- 打开Calculator应用。
- 通过命令行,输入: uiautomatorviewer (如果路径有问题 ,你可以切换到 /tools/ 目录),这个将打开uiautomatorviewer.
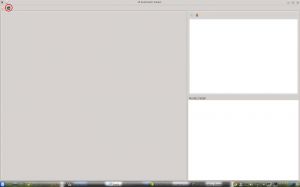
- 通过uiautomatorviewer窗体点击 “Device screenshot” (查看上面.)
- 一个计算机应用的打开窗口将显示出来

- 下面将来查看按钮“7”的ID:点击 “7” (下面第一个截图) ,查看右边的panel来找到 “resource-id” 的值 (下面第二个截图).
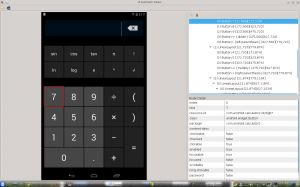
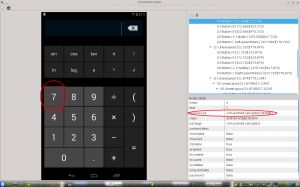
现在你知道了:- 数字“7”的ID ( “com.android.calculator2:id/digit7”).
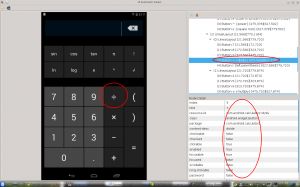
- 如上我们找到数字 “1”的ID (“com.android.calculator2:id/digit1”)
- 找到加号“+”的ID (“com.android.calculator2:id/plus”)
- 找到 “=”的ID (“com.android.calculator2:id/equal”)
- 同时需要注意的是,当你鼠标悬停在应用程序的屏幕的右上方,uiautomatorviewer面板显示视图的层次结构和右下面板显示鼠标下的部件的更多信息。
你现在知道如何使用uiautomator创建一个拥有简单的功能的用户界面测试。在下面的部分中,您将构建一个功能性的UI测试,可以检查应用程序当您添加数字“7”和“1”如何工作。
如何使用uiautomator API来创建用户界面测试
With uiautomator API, you can create functional UI tests without the need to have access to the source code of the application. The uiautomator is a Java library containing APIs to create customized functional UI tests, and an execution engine to automate and run the tests.
使用uiautomator API,您可以创建功能的UI测试并且不需要访问应用程序的源代码。uiautomator 是一个包含java类库的API,可以用来创建定制功能的UI测试并且有一个自动化引擎来执行测试。
要运行uiautomator, 你必须:
- 测试前需要先在测试设备上面安装app.
- 现在通过以下步骤来分析app的UI组件. 记录下你需要测试的组件的属性 (比如, resource-id, 组件的文字, etc).
- Create automated tests to simulate specific user interactions on your application.
- 使用Eclipse,创建一个新的java项目(例如, “MyFirstTest” ).
- 在项目中你需要导入uiautomator相关的类库. 右键点击项目 “Properties” select “Java build path” -> “Libraries” -> “Add library” -> “JUnit” -> “Next” -> “Finish”.
同样可以从 “Properties” 选择“Java build path” -> “Libraries” -> “Add external JARs” ,在platforms目录下选择最新的SDK版本和 uiautomator.jar文件,android.jar文件.
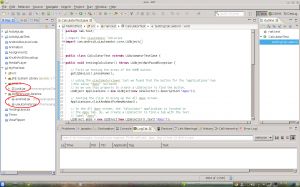
- 使用 uiautomator API, 书写代码(CalculatorTest.java)来测试 Calculator应用.在uiautomator API 下面有很多的java类,你可以使用这些类来写测试用例.你写的 java测试类 (CalculatorTest.java) 必须继承UiAutomatorTestCase, UiAutomatorTestCase是一个提供多种有用方法的基础类,你可以使用API的类来写测试方法测试你的程序如何工作。
注:API中有很多类,但在API中三个最重要的类是:
-
UiDevice -这类表示测试程序开始的时候必须调用getuidevice()这个方法。当你有一个设备的引用,你可以做很多事情了。例如,您可以使用getuidevice().takescreenshot(storepath)来实现设备的截图。你可以使用getUiDevice().pressHome()来点击“Home” ;或getUiDevice().sleep()来使得设备休眠了
UiSelector - 通过这个类,你可以定义你需要测试的布局元素,筛选属性例如as text value, content-description, class名字和状态。例如,获取带有文字 “Bluetooth”的控件 , UiObject button = new UiObject(new UiSelector().text(“Bluetooth”)); 你也可以选择一个组件通过类名,描述和ID。
UiObject - 这个类表示的是简单的UI组件,一旦引用,你可以通过点击代码: UiObject seven = new UiObject(new UiSelector().resourceId(“com.android.calculator2:id/digit7″)); seven.click();, 你可以读取文字:seven.getText();, 或者你可以设置文字, 但是需要先清除文字之后再设置 seven.setText();.
- 编译你的测试用例为一个JAR文件,并且把它安装在您的测试装置与您的应用程序。
在写完测试场景的代码之后,你必须按照以下步骤来 编译你的代码,创建jar文件,并且把文件导入设备。
1. 查看/sdk/tools/目录. (例如: cd /home/angelos/Desktop/adt-bundle-linux-x86-20131030/sdk/tools/ )
2. 输入 /tools/android create uitest-project -n -t 5 -p
(例如: android create uitest-project -n MyFirstTest -t 5 -p /home/angelos/workspace/MyFirstTest/) 注:为了寻找参数t的正确值,列出Android目标列表。
3. Windows 输入: set ANDROID_HOME= <path_to_your_sdk>.
Linux 输入: export ANDROID_HOME= <path_to_your_sdk>.
(例如: export ANDROID_HOME=/home/angelos/Desktop/adt-bundle-linux-x86-20131030/sdk/ )
4. 找到你项目的目录 (例如: cd /home/angelos/workspace/MyFirstTest/ )
5. 输入ant build.
6. 找到 platform-tools目录. (Example: cd /home/angelos/Desktop/adt-bundle-linux-x86-20131030/sdk/platform-tools )
7.把jar导入你的设备(Example: adb push /home/angelos/workspace/MyFirstTest/bin/MyFirstTest.jar /data/local/tmp/ ) - 运行测试并且查看测试结果
为了可以正常运行测试代码,需要先在控制台: adb shell uiautomator runtest MyFirstTest.jar -c nak.test.CalculatorTest. 注: 名字需要与项目名和类名相同 MyFirstTest.jar和nak.test.CalculatorTest. Voila! 接着测试执行过程中可以查看7和1的按钮是发生什么变化的。
- 注意任何错误或测试中发现的缺陷。
现在,你要注意下应用的测试或测试的极端条件下的应用程序的不良表现。你可以写一个你所可以想到的测试场景。

源码
package nak.test;


//Import the uiautomator libraries


import com.android.uiautomator.core.UiObject;


import com.android.uiautomator.testrunner.UiAutomatorTestCase;


import com.android.uiautomator.core.UiSelector;


import com.android.uiautomator.core.UiObjectNotFoundException;


import com.android.uiautomator.core.UiScrollable;


public class CalculatorTest extends UiAutomatorTestCase {


public void testingCalculator() throws UiObjectNotFoundException {


// First we testing the press of the HOME button.


getUiDevice().pressHome();


 // using the uiautomatorviewer tool we found that the button for the "applications" has


 //the value “Apps” (screen9)


 // so we use this property to create a UiSelector to find the button.


UiObject Applications = new UiObject(new UiSelector().description("Apps"));


// testing the click to bring up the All Apps screen.


Applications.clickAndWaitForNewWindow();


// In the All Apps screen, the "Calculator" application is located in


// the Apps tab. So, we create a UiSelector to find a tab with the text


// label “Apps”.


UiObject apps = new UiObject(new UiSelector().text("Apps"));


// and then testing the click to this tab in order to enter the Apps tab.


apps.click();


// All the applications are in a scrollable list


// so first we need to get a reference to that list


UiScrollable ListOfapplications = new UiScrollable(new UiSelector().scrollable(true));


// and then trying to find the application


// with the name Calculator


UiObject Calculator = ListOfapplications.getChildByText(new UiSelector().className(android.widget.TextView.class.getName()),"Calculator");


Calculator.clickAndWaitForNewWindow();


// now the Calculator app is open


// so we can test the press of button "7" using the ID "com.android.calculator2:id/digit7"


//we found by using uiautomatorviewer


UiObject seven = new UiObject(new UiSelector().resourceId("com.android.calculator2:id/digit7"));


seven.click();


// now we test the press of button "+"


UiObject plus = new UiObject(new UiSelector().resourceId("com.android.calculator2:id/plus"));


plus.click();


// and then the press of button "1"


UiObject one = new UiObject(new UiSelector().resourceId("com.android.calculator2:id/digit1"));


one.click();


// we test the press of button "="


UiObject result = new UiObject(new UiSelector().resourceId("com.android.calculator2:id/equal"));


result.click();


//and finally we test the press of "Back" button


getUiDevice().pressBack();


}


}