ai眼底图像分类预处理
Have you ever wondered if you could classify images without any knowledge about deep learning? Nowadays great free libraries exist such as Keras and fastai in Python, or the Intelec AI software that has succeeded in abstracting deep learning so well that anyone can begin their deep learning journey, even if you have only one year of coding experience.
您是否曾经想过是否可以在不了解深度学习的情况下对图像进行分类? 如今伟大的免费图书馆存在诸如Keras和fastai在Python或INTELEC AI已经成功地提取深学习这么好,任何人都可以开始他们的深层学习之旅,即使你有编码经验只有一年的软件。
This article will show you how I could participate in a complex Kaggle competition about Cellular Image Classification, using just pandas and Intelec AI.
本文将向您展示如何仅使用熊猫和Intelec AI参加有关细胞图像分类的复杂Kaggle竞赛。
概述和背景 (Overview and context)
Drugs and medical treatments usually take many years to be developed making them expensive and thus not accessible to the public. Recursion pharmaceuticals Inc. believes in the power of artificial intelligence to reduce the time and the cost of producing new drugs.
药物和医疗方法通常需要花费很多年才能开发出来,因此价格昂贵,因此公众无法获得。 递归制药公司。 相信人工智能可以减少生产新药的时间和成本。
A concrete way to help pharmaceuticals with artificial intelligence would be to be able to classify different cell images having received specific genetic perturbation (called siRNAs). If you can guess the drug, given images, with high accuracy, it means the drug interacts with cells in some way.
帮助具有人工智能的药物的一种具体方法是能够对受到特定遗传干扰(称为siRNA )的不同细胞图像进行分类。 如果您能以给定的图像高度准确地猜测药物,则意味着药物以某种方式与细胞相互作用。
This is the exact problem of our kaggle challenge: Recursion Cellular Image Classification. Given some image, we should be able to predict which siRNA was applied to it.
这是我们kaggle挑战的确切问题:递归细胞图像分类。 给定一些图像,我们应该能够预测对其应用了哪种siRNA 。
了解数据:荧光显微镜 (Understanding the data: fluorescence microscopy)
The principle of fluorescence microscopy is to use different protein that are only fluorescent in a certain spectral color range and that tends to get attached to some specific part of the cell.
荧光显微镜的原理是使用不同的蛋白质,这些蛋白质仅在特定光谱颜色范围内具有荧光,并且倾向于附着在细胞的某些特定部位。
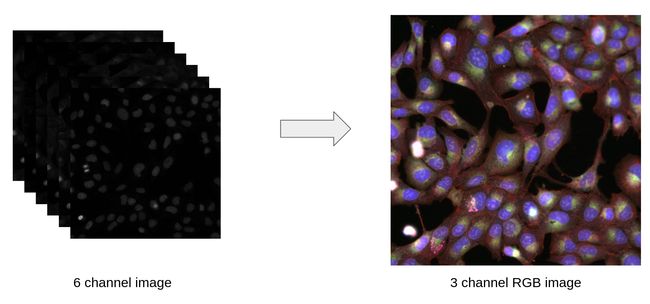
The images above in the left part represent pictures taken from the same camera at the same site through six different spectral color range. This is possible thanks to the principle of fluorescence microscopy. Each frequency is represented as a black and white image. The first goal is to be able to represent them into a single RGB image, as shown in the right part.
左上方的图像代表通过同一相机在同一位置通过六种不同光谱颜色范围拍摄的照片。 这要归功于荧光显微镜的原理。 每个频率都表示为黑白图像。 如右图所示,第一个目标是能够将它们表示为单个RGB图像。
挑战简介 (Introduction to the challenge)
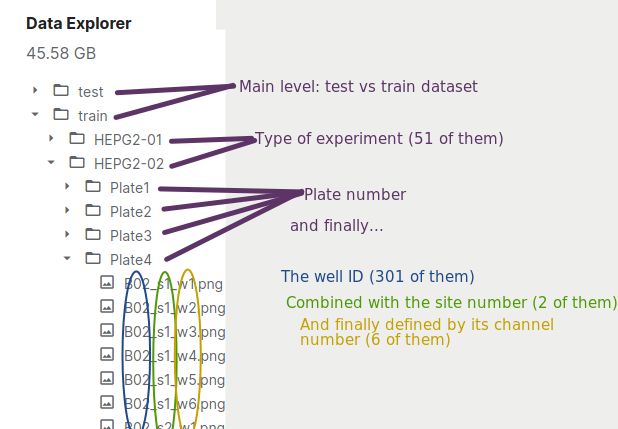
Kaggle released a hard classification challenge: a classification task over more than 750,000 images (representing almost 50 GB) to over eleven hundred possible classes. The image dataset is arranged in the following fashion: there are 51 batches. Each batch has four plates, each of which has 308 filled wells. Each well is monitored at two sites being photographed across six frequencies. That’s a lot! We will see in the next section how to reduce the dataset size, keeping the most relevant components. You can download the data here.
Kaggle提出了艰巨的分类挑战:将超过750,000张图像(代表近50 GB)的分类任务分类为一千一百多种可能的类别。 图像数据集的排列方式如下:共有51批。 每批有四个板,每个板有308个填充Kong。 每个井都在两个站点进行监视,并以六个频率进行拍摄。 好多啊! 我们将在下一部分中看到如何减小数据集大小,同时保持最相关的组件。 您可以在此处下载数据。
This arrangement yield the following tree data structure:
这种安排产生以下树数据结构:
了解数据:看起来像什么?(Understanding the data: What does it look like?)
As mentioned before, each site was photographed across six frequencies (denoted by w1, …, w6 in the picture above). It would be nice to have 3 frequencies only, as if we were dealing with an RGB (Red Green Blue) image, because most state-of-the-art neural networks take as input RGB images, i.e. images that have exactly three channels. There are many ways to reduce some data from a higher to a lower dimension. We will explore two of them.
如前所述,每个站点都是在六个频率上拍摄的(在上图中用w1,…,w6表示)。 最好只具有3个频率,就好像我们正在处理RGB(红绿蓝)图像一样,因为大多数最新的神经网络都将RGB图像作为输入,即具有三个通道的图像。 有很多方法可以将某些数据从高维减少到低维。 我们将探索其中的两个。
First things first, we will use a small and handy library to deal with this particular data created by rxrx.ai. This library will help us to visualize our data in a more meaningful way. You should clone their git repo in the same folder where you expect to run all your scripts to prepare the data. From a terminal, you can execute:
首先,我们将使用一个方便的小型库来处理rxrx.ai创建的特定数据。 该库将帮助我们以更有意义的方式可视化数据。 您应该将它们的git repo克隆到您希望运行所有脚本以准备数据的文件夹中。 在终端上,您可以执行:
git clone https://github.com/recursionpharma/rxrx1-utils
git clone https://github.com/recursionpharma/rxrx1-utils
Then, open a jupyter notebook or a python script and try the following:
然后,打开jupyter笔记本或python脚本,然后尝试以下操作:
sys.path.append('rxrx1-utils')
import rxrx.io as rio


y = rio.load_site_as_rgb(dataset='train', experiment='HUVEC-08',
                         plate=4, well='K09', site=2)


plt.figure(figsize=(8, 8))
plt.axis('off')
_ = plt.imshow(y)
A notebook with all the code is available here.
这里提供了所有代码的笔记本。
To be sure you are understanding correctly the tree structure of the data, try to change the parameters of the load_site_as_rgb function and see if you have an RGB cell image appearing!
为确保您正确理解了数据的树结构,请尝试更改load_site_as_rgb函数的参数,并查看是否出现了RGB单元格图像!

准备数据(Preparing the data)
Since we would like to use the Intelec ai software, we need to stick to some format concerning the data structures and the label file. We will come back later on how we should install it. For now, let’s already create the label file!
由于我们要使用Intelec ai软件,因此我们需要遵循有关数据结构和标签文件的某种格式。 稍后我们将介绍如何安装它。 现在,让我们已经创建标签文件!
# Replace it by your actual path to the unzipped dataset
PATH_DATASET = Path('path/to/dataset')
# If you have your notebook or script at the same level of the dataset,
# you can use a relative path like the one below
#PATH_DATASET = Path('./')


# We'll develop those methods later
methods = ['colormap', 'pca_transform']


# Read the labels
labels = pd.read_csv(PATH_DATASET/'train.csv')


# Keep only columns to be submitted to kaggle
labels = labels[['id_code', 'sirna']]


# add other data from another csv file
labels = pd.concat([labels,
                   pd.read_csv(PATH_DATASET/'train_controls.csv')[['id_code','sirna']]],
                   axis=0)


# Rename it like that for the intelec AI software
labels.columns = ['filename', 'label']


for method in methods:
    # Create the folders
    (PATH_DATASET/method/'train').mkdir(parents=True, exist_ok=True)

    # Save the labels in the correct format
    labels.to_csv(PATH_DATASET/method/'train'/'labels.csv', index=False)


# Load on your notebook the name of the test data
test_data = pd.read_csv(PATH_DATASET/'test.csv')[['id_code']]
test_data.columns = ['filename']
If you want try it yourself, you are not obliged to try both methods below! One is enough!
如果您想自己尝试,则不必尝试以下两种方法! 一个就够了!
Now we can finally give some definitions to our two functions!
现在,我们终于可以对两个函数给出一些定义了!
PCA (PCA)
Principle Component Analysis (PCA) is a common technique to apply dimensionality reduction to some data. An additional library is needed: scikit-learn. The corresponding code is the following:
主成分分析(PCA)是将降维应用于某些数据的常用技术。 需要一个额外的库:scikit-learn。 相应的代码如下:
from sklearn.decomposition import PCA


def pca_transform(dataset, experiment, plate, well, site, PATH_DATASET):
    tensor = np.zeros((512, 512, 6))
    for channel in range(1, 7):
        y = Image.open(PATH_DATASET/dataset/experiment/
                       f"Plate{plate}/{well}_s{site}_w{channel}.png")
        tensor[:, :, channel-1] = y

    # Creates PCA objects from sklearn
    pca = PCA(n_components=3)

    # Apply transformation:
    # One needs to reshape from (512, 512, 6) to (512x512, 6)
    # and then transform the result from (512x512, 3) to (512, 512, 3)
    to3channels = pca.fit_transform(tensor.reshape((-1, 6))).reshape((512, 512, 3))

    # Rescale values from 0 to 1
    to3channels -= to3channels.min()
    to3channels /= to3channels.max()
    return to3channels
Even though PCA usually shows excellent result when embedding data into manifolds in lower dimensions, this might again not be perfectly well suited in this problem because PCA is usually good when it finds linear dependencies between the features (here channels) where it might not be the case with those cell images.
即使PCA通常在将数据嵌入到较小尺寸的流形中时显示出出色的结果,但这可能也不是很完美地适合此问题,因为PCA在发现要素(此处为通道)之间的线性相关性时通常会很好,而在此处可能不是。这些细胞图像的情况。
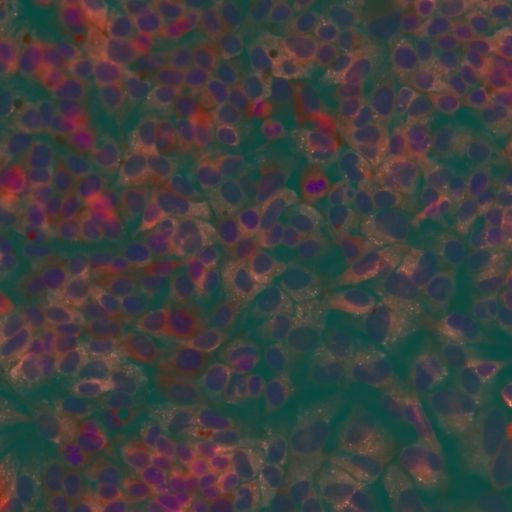
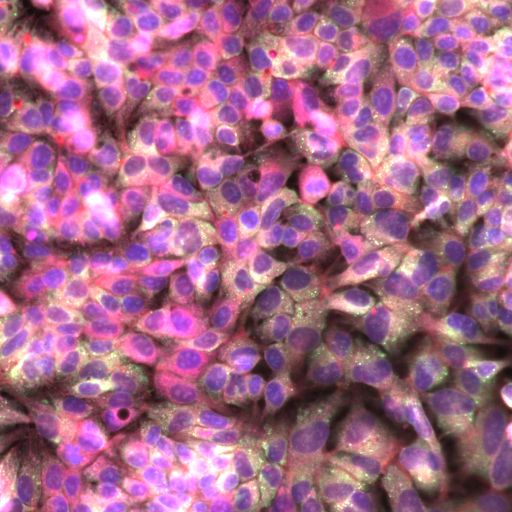
色彩图 (Colormap)
A last idea we could use would be to apply a colormap from each channel to the RGB values. For example, one can imagine that the first channel colors the output image in the red values, the second to the green values, the third to the blue values and the last three to some combination such as magenta or so on. But to know a good colormap policy we should have a deep understanding of the data, which is personally not my case. Fortunately, the rxrx library has this beautiful method called load_site_as_rgb! Remember? What it does is that we need to specify it a cell image and it applies a custom colormap to output a 3-channel image, exactly as we wanted!
我们可以使用的最后一个想法是将每个通道的色图应用到RGB值。 例如,可以想象第一个通道以红色值为输出图像着色,第二个通道以绿色值着色,第三个通道以蓝色值着色,最后三个通道以某种组合(例如洋红色)着色。 但是要知道一个好的色彩映射表策略,我们应该对数据有深刻的了解,这不是我个人的情况。 幸运的是,rxrx库具有一个名为load_site_as_rgb的漂亮方法! 记得? 它要做的是,我们需要为其指定一个单元格图像,并应用自定义颜色图以输出3通道图像,完全符合我们的要求!
def colormap(dataset, experiment, plate, well, site, PATH_DATASET):
    tensor = np.zeros((512, 512, 6))
    for channel in range(1, 7):
        y = Image.open(PATH_DATASET/dataset/experiment/
                       f"Plate{plate}/{well}_s{site}_w{channel}.png")
        tensor[:, :, channel-1] = y

    # Use the custom colormap of rxrx.io
    return rio.convert_tensor_to_rgb(tensor)/255.
One would notice that I lied a bit, we actually use the method convert_tensor_to_rgb, because the other one call their online API and is much slower than if we opened the image ourselves locally.
一个人会发现我撒了谎,我们实际上使用了convert_tensor_to_rgb方法,因为另一个人调用了他们的在线API,并且比我们自己在本地打开映像要慢得多。
You might like to try your own ideas. To keep the code modular to other approaches, I suggest a last method that will let us select any functions as we want:
您可能想尝试自己的想法。 为了使代码与其他方法保持模块化,我建议使用最后一种方法,该方法可以让我们根据需要选择任何函数:
def reduction(by):
    return {'colormap' : colormap,
            'pca_transform' : pca_transform,
            'your own ideas': some_other_function}[by]
Now we need the main loop: Iterate through all data and transform the images into RGB images as mentioned above.
现在我们需要一个主循环:遍历所有数据并将图像转换为RGB图像,如上所述。
METHOD = 'colormap' # Choose between 'colormap' 'pca_transform' or any of your own ideas


# remember labels and test_data are our csv files
for dataset, data in [('train', labels), ('test', test_data)]:
    # The filename tells us exactly what is what
    for experiment, plate, well in map(lambda s: s.split('_'), data['filename']):
        try:
            # choose the fct and then apply it
            y = reduction(by=METHOD)(dataset, experiment, plate, well, 1, PATH_DATASET)

            # create necessary directories
            (PATH_DATASET/METHOD/dataset/'images').mkdir(parents=True, exist_ok=True)

            # save img
            matplotlib.image.imsave(PATH_DATASET/METHOD/dataset/
                                    f"images/{experiment}_{plate}_{well}.png", y)


        except FileNotFoundError as e:
            # Inform that the given site (i.e. 1 in this case) does not exist for this
            # combination of experiment / plate / well
            print(e)
Some remarks concerning the above code:
有关上述代码的一些说明:
- The first line is what you might change if you want to try a specific suggested method (or to try your own idea of course!) 第一行是如果您想尝试特定的建议方法(或尝试自己的想法!)可能会更改的内容。
- One would notice that at line 9 we fixed the site to “1” and are never using the second site. The reason is that we wanted to work with a lighter dataset, this is just a demo, we are not trying to win the kaggle competition (but you can use both sites if you’re motivated!) 有人会注意到,在第9行,我们将站点固定为“ 1”,并且从不使用第二个站点。 原因是我们想使用更轻量的数据集,这只是一个演示,我们并没有试图赢得kaggle竞争(但是如果您有动力,则可以使用两个站点!)
- Because of the fact that data is not completely defined for all combinations, there might be some images that does not exist with site 1, so we use the try-except blocks to avoid the program to crash. 由于并未为所有组合完全定义数据,因此站点1可能不存在某些映像,因此我们使用try-except块来避免程序崩溃。
That’s it folks! I promise, we did the hardest step of our journey! Now that we have our data in a good format, let’s use intelec ai!
就是这样! 我保证,我们迈出了旅程中最艰难的一步! 现在我们的数据格式正确,让我们使用intelec ai !
If you want, you can check out the full notebook here.
如果需要,您可以在此处查看完整的笔记本。
Intelec AI安装 (Intelec AI installation)
Intelec ai can be installed by clicking here.
单击此处可以安装Intelec ai。
You will need docker. If you have some trouble with installing it, I invite you to check out their website.
您将需要docker。 如果您在安装时遇到问题,欢迎您访问他们的网站。
运行第一个模型 (Running its first model)
Here we finally are! Yes I know you are also impatient to train your deep learning model without any code, don’t worry I will show you how to do it.
我们终于到了! 是的,我知道您也急于没有任何代码来训练您的深度学习模型,请不用担心,我将向您展示如何做到这一点。
上载资料 (Upload your data)
First you need to upload your chosen data, than can be either PCA or colormap or any other version of your choice.
首先,您需要上传选择的数据,而不是PCA或颜色图或您选择的任何其他版本。
- Zip your folder. 压缩文件夹。
- Go to the “file explorer” tab of the intelec page. 转到intelec页面的“文件浏览器”选项卡。
- Upload it. 上载它。
- Right click on it to unzip it. 右键单击以将其解压缩。
选择你的型号 (Choose your model)
The free version of Intelec already offers some interesting neural network. Go to the “training” tab. There is a simple and a heavier model for classification tasks. My advice is to take directly the heavier one because this Kaggle challenge is a complex task. The procedure is quite identical, either if you chose the simple or heavier model:
Intelec的免费版本已经提供了一些有趣的神经网络。 转到“培训”标签。 有一个简单而又繁重的分类任务模型。 我的建议是直接采取较重的一项,因为这一Kaggle挑战是一项复杂的任务。 如果选择简单或较重的模型,则过程是完全相同的:
- Give a name to your classifier, e.g. Deep colored cell classifier 给您的分类器起个名字,例如深色细胞分类器
- Choose the folder called “train” which should contains another folder called “images” and your “labels.csv” file选择名为“ train”的文件夹,其中应包含另一个名为“ images”的文件夹和您的“ labels.csv”文件
- You can optionally add a test or validation folder, which I personally didn’t do for this specific task. Intelec will take some part of the training as validation per default otherwise, which is perfectly fine. 您可以选择添加一个测试或验证文件夹,我个人没有为此特定任务执行此操作。 否则,Intelrec将接受一部分培训作为默认验证,否则就很好了。
- You can also set up a shrink factor: the higher, the smaller the resolution, i.e. the faster the model trains but the less the accuracy. My advice is to start with a high value and then slowly decreasing it to see if it is worth it to spend more time on a model. Begin perhaps with 4 because the image resolution is already quite low (512x512x3). In my result, I actually used a shrink factor of 1 because I rented a server for this task, but you definitely don’t need to do the same. 您还可以设置一个缩小因子:越高,分辨率越小,即模型训练的速度越快,但精度越低。 我的建议是从一个高价值开始,然后慢慢降低它,看看花更多时间在模型上是否值得。 可能从4开始,因为图像分辨率已经很低(512x512x3)。 在我的结果中,我实际上使用了收缩因子1,因为我为此任务租用了服务器,但是您绝对不需要这样做。
There you go! you can save this model. Another page should open proposing you to start the training procedure. This might take a while, so be sure that your GPU is correctly set up. You can read this interesting topic if you need advice.
你去! 您可以保存该模型。 将会打开另一页,建议您开始培训过程。 这可能需要一段时间,因此请确保正确设置了GPU。 如果您需要建议,可以阅读此有趣的主题。
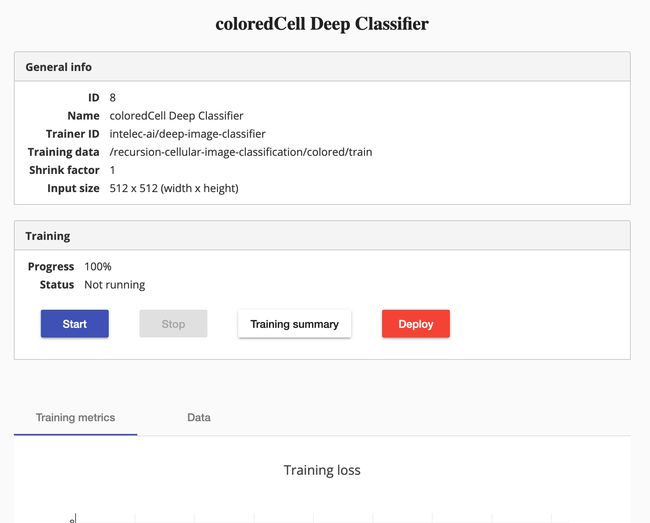
If you see the “Deploy” button in bold red, it means that you successfully trained your classifier, congrats! Of course you might be curious to know how well your training was. Just scroll down a bit and you should see something similar to the next picture. The tab “Training summary” button brings you to further details if you are interested.
如果您看到红色的“部署”按钮为红色粗体,则表示您成功训练了分类器,恭喜! 当然,您可能想知道您的培训水平如何。 向下滚动一点,您将看到与下一张图片相似的内容。 如果您有兴趣,可以使用选项卡“培训摘要”按钮来获得更多详细信息。

To get meaningful metrics, it is really important to always measure your loss on a validation dataset, to be sure you’re not overfitting. You might have specified a test or validation set yourself, but if you didn’t, don’t worry intelec will do it for you anyway.
为了获得有意义的指标,务必始终在验证数据集上衡量损失,以确保您没有过拟合,这一点非常重要。 您可能自己指定了一个测试或验证集,但如果没有指定,请不要担心intelec会为您完成。
Awesome, your model really learned something! We can see how much the loss decreased!
太棒了,您的模特真的学到了一些东西! 我们可以看到损失减少了多少!
If you want to go further, you can deploy the model to predict one or several test images. You can also give it a task to predict an entire folder, this is really useful if you want to participate to the kaggle competition, because almost 20,000 predictions have to be done. A nice video explains how to do all those kind of things. If you’re curious, have a look!
如果您想走得更远,则可以部署模型来预测一个或多个测试映像。 您还可以给它一个任务来预测整个文件夹,如果您想参加kaggle竞赛,这将非常有用,因为必须完成近20,000个预测。 一个不错的视频解释了如何做所有这些事情。 如果您好奇,请看看!
演示地址
结论(Conclusion)
What a journey! We learned so much about how medical industry and pharmaceuticals proceed to develop new products and more importantly how deep learning can come to rescue. Indeed, we didn’t see details of implementation of our neural network’s architecture, but that is the purpose of the intelec AI software: make deep learning accessible to every one. We just needed some understanding of the pandas libraries and a bit of experience about python, and then we were able to tackle a difficult problem such as a classification task over more than one thousand classes.
真是一段旅程! 我们了解了很多有关医疗行业和制药业如何继续开发新产品的知识,更重要的是,深度学习可以如何挽救生命。 确实,我们没有看到神经网络架构的实现细节,但这就是intelec AI软件的目的:使每个人都可以使用深度学习。 我们只需要对pandas库有一些了解,并需要一些有关python的经验,然后我们就可以解决一个难题,例如超过一千个类的分类任务。
翻译自: https://towardsdatascience.com/cellular-image-classification-with-intelec-ai-a-step-by-step-guide-7ebbc804371f
ai眼底图像分类预处理