jquery EasyUI 异步树 treeview,我所做的真正意义上的异步树(单选)
首先,写这篇文章的目的,在于帮助更多人更加轻松地实现客户端Treeview,程序员的时间是宝贵的,在客户端,你可能只需要几行代码就能完全搞定这棵树。
EasyUI易用灵活,但可惜说明文档太简单,网上不少的一些所谓异步树,名为异步,实则是一次性加载了全部的树内容,这样在构建一棵比较大的树的时候,可能会造成效率上的严重影响.
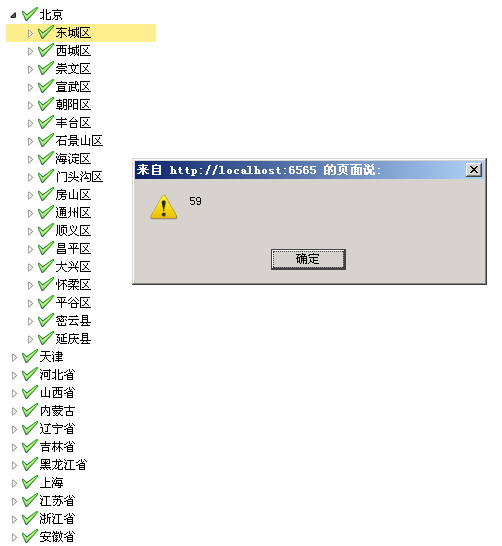
我们的目标,一般是:点击某节点前的"展开"图标====加载该节点下的子节点====下次展开,不用加载,直接展开;点击节点的文字,选定内容,做我们所要做的事情.效果如下图:
于是行动开始,首先,我们要加载EasyUI的核心文件及资源文件,HTML具体代码如下---
 代码
代码

1
<!
DOCTYPE html PUBLIC "-//W3C//DTD XHTML 1.0 Transitional//EN" "http://www.w3.org/TR/xhtml1/DTD/xhtml1-transitional.dtd"
>
2
3 < html xmlns ="http://www.w3.org/1999/xhtml" >
4 < head runat ="server" >
5 < title > Untitled Page </ title >
6 < link rel ="stylesheet" href ="easyui/themes/default/easyui.css" />
7 < link rel ="stylesheet" href ="easyui/themes/icon.css" />
8 < script type ="text/javascript" src ="easyui/jquery-1.4.2.min.js" ></ script >
9 < script type ="text/javascript" src ="easyui/jquery.easyui.min.js" ></ script >
10 < script type ="text/javascript" >
11
12 $( function (){
13 $( ' #tt2 ' ).tree({
14 checkbox: false ,
15 url: ' /common/GetGoupJsonByPid.ashx?pid=0 ' ,
16 onBeforeExpand: function (node,param){
17 $( ' #tt2 ' ).tree( ' options ' ).url = " /common/GetGoupJsonByPid.ashx?pid= " + node.id; // change the url
18 // param.myattr = 'test'; // or change request parameter
19 },
20 onClick: function (node){
21 alert(node.id);
22 }
23 });
24 });
25 </ script >
26 </ head >
27 < body >
28 < form id ="form1" runat ="server" >
29 < div style ="width:150px;" >
30 < ul id ="tt2" >
31 </ ul >
32 </ div >
33 </ form >
34 </ body >
35 </ html >
大家可以看到,这个代码已经是相当简单了,然后, 我们要做的是服务器端的代码返回工作,其实也很简单,核心代码如下:
代码
1
int
parentId
=
-
1
;
//
默认为-1,如果请求参数不正确,将不返回任何值
2 string resultStr = string .Empty;
3 if ( ! string .IsNullOrEmpty(context.Request.QueryString[ " pid " ]))
4 {
5 Int32.TryParse(context.Request.QueryString[ " pid " ], out parentId);
6 }
7 if (parentId >= 0 )
8 {
9 ........ // 此处省略得到数据列表的代码
10 resultStr = "" ;
11 resultStr += " [ " ;
12 foreach (数据类 item in 数据集List <> )
13 {
14 resultStr += " { " ;
15 resultStr += string .Format( " \ " id\ " : \ " { 0 }\ " , \ " text\ " : \ " { 1 }\ " , \ " iconCls\ " : \ " icon - ok\ " , \ " state\ " : \ " closed\ "" , item.Id.ToString(), item.TxtName);
16 resultStr += " }, " ;
17 }
18 resultStr = resultStr.Substring( 0 , resultStr.Length - 1 );
19 resultStr += " ] " ;
20 }
21
22
23 // 最后返回json数据
24 context.Response.Write(resultStr);
25
请注意,以上的服务器端代码,请根据具体数据结构情况进行修改.
好了,这样,我们的工作就完成了.是不是很简单(另一个更简单,更好的Tree插件jquery.simple.tree).具体实现中,还可以根据情况进行多选的设置.
EasyUI代码下载"http://jquery-easyui.wikidot.com/download",我这里用的版本是1.2
如果哪位兄弟用了觉得OK,可以留言,我们一起探讨.