在MVVM模式中打开子窗体(Child Window)
这篇文章主要展示在Silverlight4的应用程序中,用MVVM模式【编者注:如果你对MVVM模式不太理解,请先去熟悉一下关于这方面的资料】怎么打开一个子窗体(Child Window),怎么向子窗体传值,以及怎么从子窗体返回值到主窗体等等
我使用的方法不是严格意义上的MVVM模式,因为我实际上在ViewModel中实例化了子窗体,这通常很不方便的。但是在Google上找了好长时间,仅仅找到了打开子窗体的工具包的向导,我认为最好的方法就是亲自去实现它。我期望最方便且有严格意义上的MVVM的解决方案在SilverLight5中能够实现。
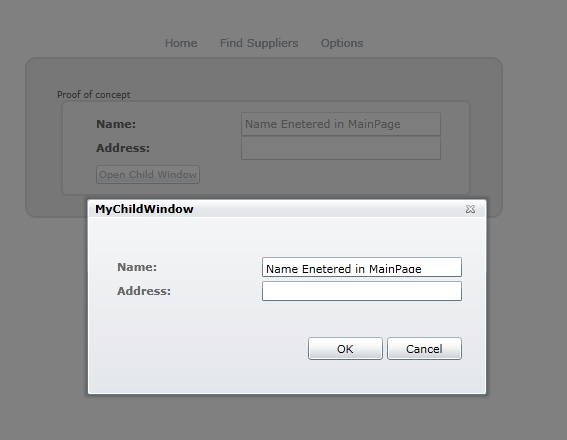
本篇文章只仅仅是一个概念的验证,并且是基于一个最简单的例子。MainPage.xaml文件包含两个TextBox控件,即Name和Address,另外,子窗体和主窗体一样,也有两个的控件。当用户在主窗体输入他们的名字,然后点击按钮,那么子窗体就弹出来。并且显示刚才输入的名字(请看下面的图片)。用户可以在子窗体中输入地址然后点击按钮,返回到主窗体【编者注:子窗体同时关闭】,那么主窗体上的地址框中就会显示刚才在子窗体中输入的地址。【编者注:这样就可以达到主窗体和子窗体之间互相传值】
实现上面的功能是很简单的,仅仅在View Model工程中创建一个子窗体。然后就可以实现子窗体和主窗体之间传递数据。然后创建每一个TextBox建一个属性,为Button创建Command,这是为了打开和关闭子窗体并且传递属性值。需要注意的是子窗体没有ViewModel,所有的需要实现的业务都在主窗体的ViewModel中实现
第一步:在ViewModel工程中创建一个子窗体,把它命名为MyChildWindow.xmal.
第二步:为MainPage创建一个ViewModel层。命名为:MainPage_ViewModel.cs
第三步:通过MainPage_ViewModel.cs来实现 MainPage.xaml.cs和MyChildWindow.xaml.cs 相互传值。【编者注:下面为各个文件的代码】
MainPage.xaml.cs:
 代码
代码

{
public partial class MainPage : UserControl
{
public MainPage()
{
InitializeComponent();
this .DataContext = new MainPage_ViewModel();
}
}
}
MyChildWindow.xaml.cs:
代码
{
public partial class MyChildWindow : ChildWindow
{
public MyChildWindow(MainPage_ViewModel ma)
{
InitializeComponent();
this .DataContext = ma;
}
}
}
第四步:在 MainPage_ViewModel.cs为主窗体每个TextBox建属性和ViewModel
代码
using System.Collections.ObjectModel;
using ViewModel;
namespace ViewModel
{
public class MainPage_ViewModel : INotifyPropertyChanged
{
// Properties of Mainpage
private string myNameVM = "" ;
public string MyNameVM
{
get { return myNameVM; }
set {
myNameVM = value;
RaisePropertyChanged( " myNameVM " );
}
}
private string myAddressVM = "" ;
public string MyAddressVM
{
get { return myAddressVM; }
set
{
myAddressVM = value;
RaisePropertyChanged( " MyAddressVM " );
}
}
// Properties of ChildWindow
private string myNameCW = "" ;
public string MyNameCW
{
get { return myNameCW; }
set
{
myNameCW = value;
RaisePropertyChanged( " MyNameCW " );
}
}
private string myAddressCW = "" ;
public string MyAddressCW
{
get { return myAddressCW; }
set
{
myAddressCW = value;
RaisePropertyChanged( " MyAddressCW " );
}
}
// EventHandler
public event PropertyChangedEventHandler PropertyChanged;
private void RaisePropertyChanged( string propertyname)
{
if (PropertyChanged != null )
{
PropertyChanged( this , new PropertyChangedEventArgs(propertyname));
}
}
}
}
第五步:如果以前没有创建这个,你就必须得在ViewModel中创建一个类DelegateCommand,主要是处理Button的命令。因此,你必须创建这个类。代码如下:
代码
using System.Windows.Input;
namespace ViewModel
{
public class DelegateCommand : ICommand //
{
private Predicate < object > _canExecute;
private Action < object > _method;
public event EventHandler CanExecuteChanged;
public DelegateCommand(Action < object > method)
: this (method, null )
{
}
public DelegateCommand(Action < object > method, Predicate < object > canExecute)
{
_method = method;
_canExecute = canExecute;
}
public bool CanExecute( object parameter)
{
if (_canExecute == null )
{
return true ;
}
return _canExecute(parameter);
}
public void Execute( object parameter)
{
_method.Invoke(parameter);
}
protected virtual void OnCanExecuteChanged(EventArgs e)
{
var canExecuteChanged = CanExecuteChanged;
if (canExecuteChanged != null )
canExecuteChanged( this , e);
}
public void RaiseCanExecuteChanged()
{
OnCanExecuteChanged(EventArgs.Empty);
}
}
}
第六步:在MainPage_ViewModel.cs创建一个Commands,它可以绑定到主窗体和子窗体中的按钮上。
代码
using System.Collections.ObjectModel;
using ViewModel;
namespace ViewModel
{
public class MainPage_ViewModel : INotifyPropertyChanged
{
//Properties of Mainpage
private string myNameVM = "" ;
public string MyNameVM
{
get { return myNameVM; }
set {myNameVM = value;
RaisePropertyChanged("myNameVM" );
}
}
private string myAddressVM = "" ;
public string MyAddressVM
{
get { return myAddressVM; }
set
{ myAddressVM = value;
RaisePropertyChanged("MyAddressVM" );
}
}
//Properties of ChildWindow
private string myNameCW = "" ;
public string MyNameCW
{
get { return myNameCW; }
set
{ myNameCW = value;
RaisePropertyChanged("MyNameCW" );
}
}
private string myAddressCW = "" ;
public string MyAddressCW
{
get { return myAddressCW; }
set
{ myAddressCW = value;
RaisePropertyChanged("MyAddressCW" );
}
}
//When the button is pressed in MainPage, executes method ExecuteOpenChildWindow
private DelegateCommand _openChildWindow;
public DelegateCommand OpenChildWindow
{
get
{
if (_openChildWindow == null )
_openChildWindow = new DelegateCommand(executeOpenChildWindow);
return _openChildWindow;
}
}
// New instance of ChildWindow. Sets the NameProperty of the ChildWindow equal to the Name entered in the MainPage.
MyChildWindow cw;
private void executeOpenChildWindow(object parameter)
{
cw = new MyChildWindow(this );
MyNameCW = MyNameVM;
cw.Show();
}
//When OK-button is pressed in ChildWindow
private DelegateCommand _okChildWindow;
public DelegateCommand OkChildWindow
{
get {
if (_okChildWindow == null )
_okChildWindow = new DelegateCommand(OkSaveChildWindow);
return _okChildWindow;
}
}
//MainPage Address property is set to the value entered in the address textbox in Child Window. Child Window is closed.
private void OkSaveChildWindow(object parameter)
{
MyAddressVM = MyAddressCW;
cw.Close();
}
//EventHandler
public event PropertyChangedEventHandler PropertyChanged;
private void RaisePropertyChanged(string propertyname)
{
if (PropertyChanged != null )
{
PropertyChanged(this, new PropertyChangedEventArgs(propertyname));
}
}
}
}
第七步:在MainPage.xaml 和 MyChildWindow.xaml中分别新增两个TextBox,然后把他们分别绑定到MainPage_ViewModel中的属性上。然后再分别建一个按钮,绑定到Command上。
MainPage.xaml
代码
<Grid Margin="0 10 0 5" Width="350">
<Grid.RowDefinitions>
<RowDefinition Height="*"/>
<RowDefinition Height="*"/>
<RowDefinition Height="*"/>
</Grid.RowDefinitions>
<Grid.ColumnDefinitions>
<ColumnDefinition Width="150"/>
<ColumnDefinition Width="*"/>
</Grid.ColumnDefinitions>
<!--TextBlocks-->
<TextBlock Text="Name:" TextWrapping="Wrap" Margin="5,5,0,5" Grid.Row="0" />
<TextBlock Text="Address:" Grid.Row="1" Grid.Column="0" />
<!--TextBox, where the users enters data. Binds to the properties of MainPage_ViewModel-->
<TextBox Text="{Binding MyNameVM, Mode=TwoWay}" Grid.Row="0" Grid.Column="1"/>
<TextBox Text="{Binding MyAddressVM, Mode=TwoWay}" Grid.Row="1" Grid.Column="1"/>
<Button Content="Open Child Window"
VerticalAlignment ="Center"
HorizontalAlignment ="left"
Width ="auto"
Margin ="5"
Grid.Row ="2"
Command ="{Binding OpenChildWindow}" <!--Binds to CommandDelegate from the ViewModel -->
/>
</Grid>
</StackPanel>
代码
<Grid.RowDefinitions>
<RowDefinition Height="auto"/>
<RowDefinition Height="auto"/>
<RowDefinition Height="205*"/>
</Grid.RowDefinitions>
<Grid.ColumnDefinitions>
<ColumnDefinition Width="150"/>
<ColumnDefinition Width="*"/>
</Grid.ColumnDefinitions>
<TextBlock Text="Name: " Grid.Row="0" />
<TextBlock Text="Address:" Grid.Row="1" Grid.Column="0" />
<!-- TextBoxes are bind to the properties from the ViewModel. -->
<TextBox x:Name="InputName" Text="{Binding MyNameCW, Mode=TwoWay}" Grid.Row="0" Grid.Column="1" Height="20"/>
<TextBox x:Name="OutputAddress" Text="{Binding MyAddressCW, Mode=TwoWay}" Grid.Row="1" Grid.Column="1" Height="20"/>
<!-- Button comand bind to CommandDelegate from ViewModel -->
<Button x:Name="OKButton" Command="{Binding OkChildWindow}" Content="OK" Width="75" Height="23" Margin="0,12,79,0" Grid.Row="2" Grid.Column="1"/>
</Grid>
翻译的不足之处,请多多指教。原文地址http://mariaevert.dk/thesis/?p=710