Vue(四)——全局事件总线, 消息订阅与发布 ,nextTick
博主主页: 糖 -O-
vue专栏:Vue全家桶
上一篇: Vue(三)——脚手架,自定义事件,插槽
希望各位博主多多支持!!!
-
-
- 2.4. 全局事件总线
- 2.5. 消息订阅与发布
- 2.6. nextTick
- 2.7. Vue封装的过度与动画
-
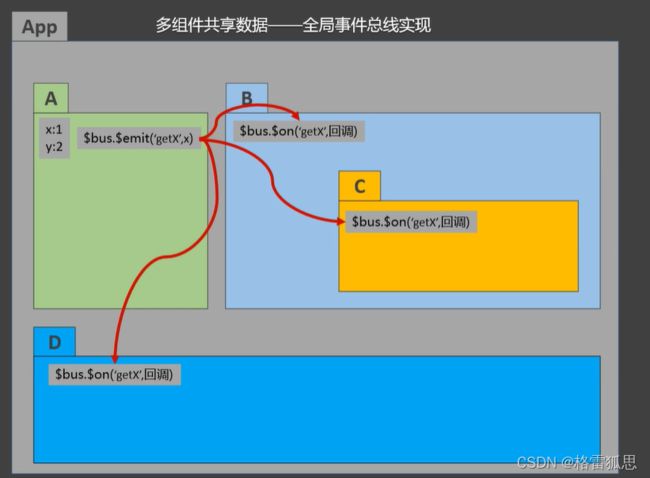
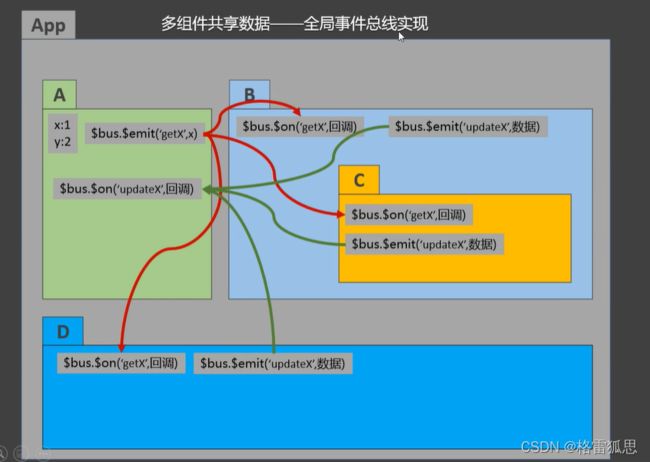
2.4. 全局事件总线
一种组件间通信的方式,适用于任意组件间通信。
-
安装全局事件总线:
new Vue({ ...... beforeCreate() { Vue.prototype.$bus = this //安装全局事件总线,$bus就是当前应用的vm }, ...... }) -
使用事件总线:
-
接收数据:A组件想接收数据,则在A组件中给$bus绑定自定义事件,事件的回调留在A组件自身。
methods(){ demo(data){......} } ...... mounted() { this.$bus.$on('xxxx',this.demo) } -
提供数据:
this.$bus.$emit('xxxx',数据) -
最好在beforeDestroy钩子中,用$off去解绑当前组件所用到的事件。
School.vue
<template>
	<div class="school">
		<h2>学校名称:{{name}}h2>
		<h2>学校地址:{{address}}h2>
	div>
template>

<script>
	export default {
		name:'School',
		data() {
			return {
				name:'尚硅谷',
				address:'北京',
			}
		},
        methods: {
            demo(data) {
                console.log('我是School组件,收到了数据',data)
            }
        }
		mounted() {
			// console.log('School',this)
			this.$bus.$on('hello',this.demo)
		},
		beforeDestroy() {
			this.$bus.$off('hello')
		},
	}
script>

<style scoped>
	.school{
		background-color: skyblue;
		padding: 5px;
	}
style>
Student.vue
<template>
	<div class="student">
		<h2>学生姓名:{{name}}h2>
		<h2>学生性别:{{sex}}h2>
		<button @click="sendStudentName">把学生名给School组件button>
	div>
template>

<script>
	export default {
		name:'Student',
		data() {
			return {
				name:'张三',
				sex:'男',
			}
		},
		mounted() {
			// console.log('Student',this.x)
		},
		methods: {
			sendStudentName(){
				this.$bus.$emit('hello',this.name)
			}
		},
	}
script>

<style lang="less" scoped>
	.student{
		background-color: pink;
		padding: 5px;
		margin-top: 30px;
	}
style>
2.5. 消息订阅与发布
一种组件间通信的方式,适用于任意组件间通信。
-
安装pubsub:
npm i pubsub-js -
引入:
import pubsub from 'pubsub-js' -
接收数据:A组件想接收数据,则在A组件中订阅消息,订阅的回调留在A组件自身。
methods:{ demo(data){......} } ...... mounted() { this.pid = pubsub.subscribe('xxx',this.demo) //订阅消息 } -
提供数据:
pubsub.publish('xxx',数据) -
最好在beforeDestroy钩子中,用
PubSub.unsubscribe(pid)去取消订阅。
School.vue
<template>
	<div class="school">
		<h2>学校名称:{{name}}h2>
		<h2>学校地址:{{address}}h2>
	div>
template>

<script>
	import pubsub from 'pubsub-js'
	export default {
		name:'School',
		data() {
			return {
				name:'尚硅谷',
				address:'北京',
			}
		},
		mounted() {
			// console.log('School',this)
			/* this.$bus.$on('hello',(data)=>{
				console.log('我是School组件,收到了数据',data)
			}) */
			this.pubId = pubsub.subscribe('hello',(msgName,data)=>{
				console.log(this)
				// console.log('有人发布了hello消息,hello消息的回调执行了',msgName,data)
			})
		},
		beforeDestroy() {
			// this.$bus.$off('hello')
			pubsub.unsubscribe(this.pubId)
		},
	}
script>

<style scoped>
	.school{
		background-color: skyblue;
		padding: 5px;
	}
style>
2.6. nextTick
this.$nextTick(回调函数)- 在下一次 DOM 更新结束后执行其指定的回调。
- 当改变数据后,要基于更新后的新DOM进行某些操作时,要在nextTick所指定的回调函数中执行。
this.$nextTick(function(){
	this.$refs.inputTitle.focus()
}
2.7. Vue封装的过度与动画
-
在插入、更新或移除 DOM元素时,在合适的时候给元素添加样式类名。
- 元素进入的样式:
1. v-enter:进入的起点
2. v-enter-active:进入过程中
3. v-enter-to:进入的终点 - 元素离开的样式:
- v-leave:离开的起点
- v-leave-active:离开过程中
- v-leave-to:离开的终点
-
使用
<transition name="hello"> <h1 v-show="isShow">你好啊!h1> transition> -
备注:若有多个元素需要过度,则需要使用:
key值。
- 元素进入的样式:
<template>
	<div>
		<button @click="isShow = !isShow">显示/隐藏button>
		<transition-group name="hello" appear>
			<h1 v-show="!isShow" key="1">你好啊!h1>
			<h1 v-show="isShow" key="2">尚硅谷!h1>
		transition-group>
	div>
template>

<script>
	export default {
		name:'Test',
		data() {
			return {
				isShow:true
			}
		},
	}
script>

<style scoped>
	h1{
		background-color: orange;
	}
	/* 进入的起点、离开的终点 */
	.hello-enter,.hello-leave-to{
		transform: translateX(-100%);
	}
	.hello-enter-active,.hello-leave-active{
		transition: 0.5s linear;
	}
	/* 进入的终点、离开的起点 */
	.hello-enter-to,.hello-leave{
		transform: translateX(0);
	}
style>
使用第三库的具体案例(随便看看,这个不重要)
库的名称:Animate.css
安装:npm i animate.css
引入:import ‘animate.css’
<template>
	<div>
		<button @click="isShow = !isShow">显示/隐藏button>
		<transition-group
			appear
			name="animate__animated animate__bounce"
			enter-active-class="animate__swing"
			leave-active-class="animate__backOutUp"
		>
			<h1 v-show="!isShow" key="1">你好啊!h1>
			<h1 v-show="isShow" key="2">尚硅谷!h1>
		transition-group>
	div>
template>

<script>
	import 'animate.css'
	export default {
		name:'Test',
		data() {
			return {
				isShow:true
			}
		},
	}
script>

<style scoped>
	h1{
		background-color: orange;
	}
style>