微信小程序登录
首先、看下界面和文件

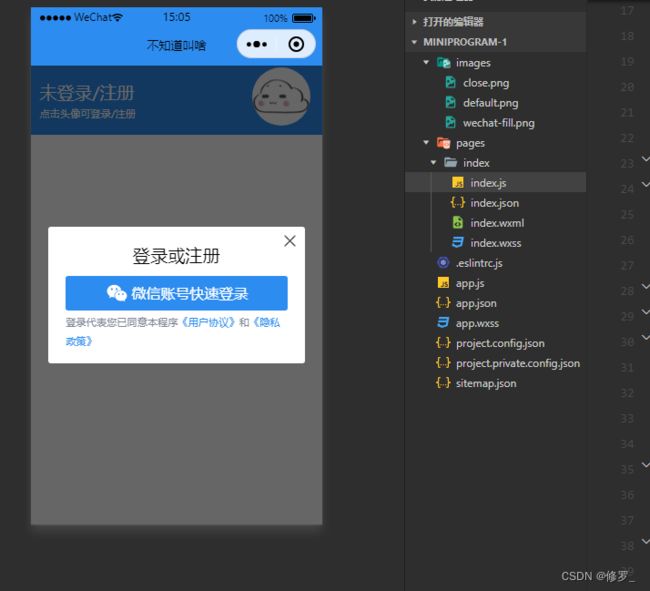
三张图片


这里有张图片、是白色的、看不出来

配置下域名比如说我下面用到了http://127.0.0.1:8000/
那么在微信公众平台 开发管理->开发设置->服务器域名->request合法域名里面添加要使用的域名
index.wxml
<view class="main">
  <view class="top" bindtap="show">
    <view class="login-left">
      <view class="t1">{{userInfo.nickName}}view>
      <view class="t2">{{tip}}view>
    view>
    <image class="avatar" src="{{userInfo.avatarUrl}}">image>
  view>
  <view class="modal" wx:if="{{showLogin}}">
    <view class="modal-window">
      <image bindtap="close" src="../../images/close.png">image>
      <view>
        <view style="width: 100%;text-align: center;font-size:6vw;">登录或注册view>
        <view class="login-btn" bindtap="login">
          <image src="../../images/wechat-fill.png">image>
          微信账号快速登录
        view>
        <view>
          <text class="t4">登录代表您已同意本程序text>
          <text class="t3">《用户协议》text>
          <text class="t4">和text>
          <text class="t3">《隐私政策》text>
        view>
      view>
    view>
  view>
view>
index.wxss
.main {
  height: 100vh;
  width: 100vw;
}

.top {
  width: 100vw;
  padding: 0 3vw;
  height: 15vh;
  display: flex;
  justify-content: center;
  align-items: flex-end;
  background-color: #2d8cf0;
  position: relative;
}

.login {
  display: flex;
}

.login-left {
  position: absolute;
  left: 3vw;
  bottom: 3vh;
}

.avatar {
  width: 20vw;
  height: 20vw;
  border-radius: 100px;
  background-color: white;
  position: absolute;
  right: 10vw;
  bottom: 2vh;
}

.t1 {
  color: white;
  font-size: 6vw;
}

.t2 {
  color: white;
  font-size: 3.5vw;
  margin-top: 0.6vh;
}

.t3 {
  color: #2d8cf0;
  font-size: 3.5vw;
}

.t4 {
  color: #808695;
  font-size: 3.5vw;
}

.modal {
  position: fixed;
  top: 0;
  width: 100vw;
  height: 100vh;
  background: rgba(0, 0, 0, 0.6);
  display: flex;
  justify-content: center;
  align-items: center;
}

.modal-window {
  background: white;
  width: 76vw;
  height: 35vw;
  border-radius: 3px;
  position: relative;
  padding: 6vw;

}

.modal-window>image {
  width: 6vw;
  height: 6vw;
  position: absolute;
  right: 2vw;
  top: 2vw;
}

.login-btn {
  width: 100%;
  display: flex;
  justify-content: center;
  align-items: center;
  background: #2d8cf0;
  color: white;
  height: 12vw;
  border-radius: 3px;
  margin-top: 3vw;
}

.login-btn>image {
  width: 8vw;
  height: 8vw;
  margin-right: 1vw;
}
index.js
Page({

  /**
   * 页面的初始数据
   */
  data: {
    userInfo: {
      avatarUrl: "../../images/default.png",
      country: "",
      province: "",
      city: "",
      gender: 0,
      language: "zh_CN",
      nickName: "未登录/注册"
    },
    encrypted_data:"",
    iv:"",
    tip: "点击头像可登录/注册",
    avatar: "../../images/default.png",
    showLogin: false,
    isLogin: false,
    js_code: ""
  },

  close() {
    this.setData({
      showLogin: false
    });
  },
  show() {
    if (!this.data.isLogin) {
      this.setData({
        showLogin: true
      });
    }
  },
  login() {
    let that = this;
    // 获取微信用户信息
    wx.getUserProfile({
      desc: '完善会员信息',
      lang: 'zh_CN',
      success(res) {
        console.log(res);
        // 存储用户信息
        wx.setStorage({
          key: 'userInfo',
          data: JSON.stringify(res.userInfo),
          success(rs) {
            that.setData({
              userInfo: res.userInfo,
              tip: "欢迎使用本程序",
              isLogin: true,
              encrypted_data:res.encryptedData,
              iv:res.iv
            });
            that.close();
            // 登录获取code
            wx.login({
              timeout: 2000,
              success: (result) => {
                let js_code = result.code;
                that.sendCode(js_code);
                that.setData({ js_code });
              }
            });
          }
        });
      }
    });
  },
  getPhoneNumber(e){
    console.log(e);
  },
  sendCode(js_code) {
    let encrypted_data = this.data.encrypted_data;
    let iv = this.data.iv;
    // 获取session_key
    wx.request({
      url: 'http://127.0.0.1:8000/login?js_code=' + js_code,
      method: "GET",
      success(res) {
        // 获取本地存储session_key
        if (res.data.msg == 'success') {
          wx.request({
            url: 'http://127.0.0.1:8000/get_encrypted_data',
            method:"POST",
            data:{iv,encrypted_data},
            header:{
              "Content-Type":"application/x-www-form-urlencoded;charset=utf-8;"
            },
            success(res){
              console.log(res);
            }
          });
        }
      }
    });
  },
  /**
   * 生命周期函数--监听页面加载
   */
  onLoad(options) {
    let that = this;
    wx.checkSession({
      success: (r2) => {
        if (r2.errMsg == "checkSession:ok") {
          wx.getStorage({
            key: "userInfo",
            success(r3) {
              that.setData({
                userInfo: JSON.parse(r3.data),
                isLogin: true
              });
            }
          });
        }
      },
    });
  }
})
后端用python写了
首先创建个django项目
在项目根目录打开命令行执行python manage.py startapp app01
然后就是这样的

在urls.py里面设置urlpatterns = [path(‘login’,views.login)]
在settings.py
INSTALLED_APPS = [
    'django.contrib.admin',
    'django.contrib.auth',
    'django.contrib.contenttypes',
    'django.contrib.sessions',
    'django.contrib.messages',
    'django.contrib.staticfiles',
    'app01.apps.App01Config',  # 这是要添加的模块
]
一个微信官方的解析代码WXBizDataCrypt.py
import base64
import json
from Crypto.Cipher import AES


class WXBizDataCrypt:
    def __init__(self, app_id, session_key):
        self.appId = app_id
        self.session_key = session_key

    def decrypt(self, encrypted_data, iv):
        # base64 decode
        session_key = base64.b64decode(self.session_key)
        encrypted_data = base64.b64decode(encrypted_data)
        iv = base64.b64decode(iv)

        cipher = AES.new(session_key, AES.MODE_CBC, iv)

        decrypted = json.loads(self._unpad(cipher.decrypt(encrypted_data)))

        if decrypted['watermark']['appid'] != self.appId:
            raise Exception('Invalid Buffer')

        return decrypted

    def _unpad(self, s):
        return s[:-ord(s[len(s) - 1:])]
接着是app01/views.py
import json
from django.http import HttpResponse
import requests
from app01.WXBizDataCrypt import WXBizDataCrypt


# 解析code获得openid和session_key
def login(req):
    try:
        js_code = req.GET.get("js_code")  # 小程序传过来的js_code
        url = "https://api.weixin.qq.com/sns/jscode2session"  # 微信官方的API用于获取openid等信息
        params = {
            "appid": "**********",
            "secret": "**********",
            "js_code": js_code,
            "grant_type": "authorization_code"
        }
        # 解析得到{"session_key": "FaP8AnhlC1TQtXavzZGnxQ==", "openid": "o5ScH5t0hIsE28JKzDLacbd-3Prc"}
        result = requests.get(url, params).json()
        # 这里没有操作数据库、将信息写入文件
        fo = open("public/data.txt", "w")
        fo.write(json.dumps(result))
        fo.close()
        return HttpResponse(json.dumps({"msg": "success"}))
    except:
        return HttpResponse(json.dumps({"msg": "fail"}))


# 解密encrypted_data
def get_encrypted_data(req):
    try:
        # 读取文件
        fo = open('public/data.txt', 'r+')
        result = json.loads(fo.read())
        # 得到session_key
        session_key = result['session_key']
        # 小程序AppId
        app_id = "*******************"
        # 小程序端传过来的数据
        encrypted_data = req.POST.get('encrypted_data')
        iv = req.POST.get('iv')
        # 解密
        pc = WXBizDataCrypt(app_id, session_key)
        back = pc.decrypt(encrypted_data, iv)
        return HttpResponse(json.dumps(back))
    except:
        return HttpResponse(json.dumps({"msg": "fail"}))