读Pyqt4教程,带你入门Pyqt4 _003
编程中的一个重要事情是布局管理,布局管理是如何在窗体上摆放窗口组件。可以有两种方式进行管理:绝对定位或使用布局类。
绝对定位
程序员用像素指定每个控件的位置和尺寸。使用绝对定位时,你必须理解几件事情。
- 如果你调整窗体的大小,组件的尺寸和位置并不会改变
- 在不同的平台上,程序可能看起来不一样
- 改变程序的字体可能破坏布局
- 如果你决定改变你的布局,你必须完全重做你的布局,这将是乏味并且浪费时间的
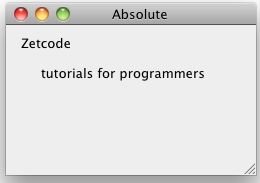
#!/usr/bin/python # -*- coding: utf-8 -*- # absolute.py import sys from PyQt4 import QtGui class Example(QtGui.QWidget): def __init__(self): super(Example, self).__init__() self.initUI() def initUI(self): label1 = QtGui.QLabel('Zetcode', self) label1.move(15, 10) label2 = QtGui.QLabel('tutorials for programmers', self) label2.move(35, 40) self.setWindowTitle('Absolute') self.resize(250, 150) app = QtGui.QApplication(sys.argv) ex = Example() ex.show() sys.exit(app.exec_())
我们简单的调用 move() 方法来定位组件。在我们的 QLabel 例子中,我们用x和y坐标来定位。坐标系统从左上角开始,x值从左到右增长,y值从上到下增长。

图:绝对定位
框布局
使用布局类管理布局更灵活、更实用。这是在窗体上摆放组件的首选方式。基本的布局类是 QHBoxLayout 和 QVBoxLayout ,它们可以横向和纵向排列窗口组件。
假设我们想要摆放两个按钮到右下角。为了创建这样一个布局,我们需要一个水平框和一个垂直框。我们通过增加 延展因素 来创建必要的间隔。
#!/usr/bin/python # -*- coding: utf-8 -*- # boxlayout.py import sys from PyQt4 import QtGui class Example(QtGui.QWidget): def __init__(self): super(Example, self).__init__() self.initUI() def initUI(self): okButton = QtGui.QPushButton("OK") cancelButton = QtGui.QPushButton("Cancel") hbox = QtGui.QHBoxLayout() hbox.addStretch(1) hbox.addWidget(okButton) hbox.addWidget(cancelButton) vbox = QtGui.QVBoxLayout() vbox.addStretch(1) vbox.addLayout(hbox) self.setLayout(vbox) self.setWindowTitle('box layout') self.resize(300, 150) app = QtGui.QApplication(sys.argv) ex = Example() ex.show() sys.exit(app.exec_())
okButton = QtGui.QPushButton("OK") cancelButton = QtGui.QPushButton("Cancel")
这里我们创建两个按钮。
hbox = QtGui.QHBoxLayout() hbox.addStretch(1) hbox.addWidget(okButton) hbox.addWidget(cancelButton)
我们创建一个水平框布局,增加一个延展因素和两个按钮。
vbox = QtGui.QVBoxLayout() vbox.addStretch(1) vbox.addLayout(hbox)
为了创建所需的布局,我们把水平布局放到垂直布局中。
self.setLayout(vbox)
最后,我们设置窗体的主布局。
QGridLayout
最常用的布局类是网格布局,网格布局把空间划分成行和列。我们使用 QGridLayout 类来创建网格布局。
#!/usr/bin/python # -*- coding: utf-8 -*-


# gridlayout1.py


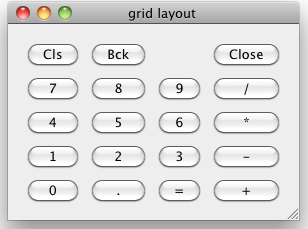
import sys from PyQt4 import QtGui class Example(QtGui.QWidget): def __init__(self): super(Example, self).__init__() self.initUI() def initUI(self): self.setWindowTitle('grid layout') names = ['Cls', 'Bck', '', 'Close', '7', '8', '9', '/', '4', '5', '6', '*', '1', '2', '3', '-', '0', '.', '=', '+'] grid = QtGui.QGridLayout() j = 0 pos = [(0, 0), (0, 1), (0, 2), (0, 3), (1, 0), (1, 1), (1, 2), (1, 3), (2, 0), (2, 1), (2, 2), (2, 3), (3, 0), (3, 1), (3, 2), (3, 3 ), (4, 0), (4, 1), (4, 2), (4, 3)] for i in names: button = QtGui.QPushButton(i) if j == 2: grid.addWidget(QtGui.QLabel(''), 0, 2) else: grid.addWidget(button, pos[j][0], pos[j][1]) j = j + 1 self.setLayout(grid) app = QtGui.QApplication(sys.argv) ex = Example() ex.show() sys.exit(app.exec_())
在该例子中,我们创建了一个按钮格,增加一个 QLabel 窗口组件来填补一个空白。
grid = QtGui.QGridLayout() Here we create a grid layout.
if j == 2: grid.addWidget(QtGui.QLabel(''), 0, 2) else: grid.addWidget(button, pos[j][0], pos[j][1])
调用 addWidget() 方法来把窗口组件加到网格中,参数是部件( widget ),行( row )和列( column )数字。

图:网格布局
组件可以在表格中跨越多列或多行,在下一个例子中我们将演示这个。
#!/usr/bin/python # -*- coding: utf-8 -*-


# gridlayout2.py


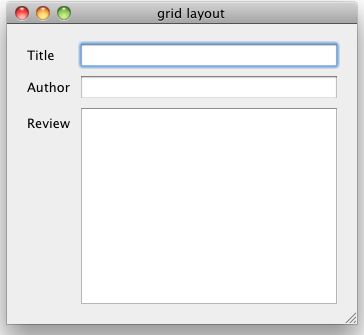
import sys from PyQt4 import QtGui class Example(QtGui.QWidget): def __init__(self): super(Example, self).__init__() self.initUI() def initUI(self): title = QtGui.QLabel('Title') author = QtGui.QLabel('Author') review = QtGui.QLabel('Review') titleEdit = QtGui.QLineEdit() authorEdit = QtGui.QLineEdit() reviewEdit = QtGui.QTextEdit() grid = QtGui.QGridLayout() grid.setSpacing(10) grid.addWidget(title, 1, 0) grid.addWidget(titleEdit, 1, 1) grid.addWidget(author, 2, 0) grid.addWidget(authorEdit, 2, 1) grid.addWidget(review, 3, 0) grid.addWidget(reviewEdit, 3, 1, 5, 1) self.setLayout(grid) self.setWindowTitle('grid layout') self.resize(350, 300) app = QtGui.QApplication(sys.argv) ex = Example() ex.show() sys.exit(app.exec_())
grid.addWidget(reviewEdit, 3, 1, 5, 1)
如果我们增加一个窗口组件到网格中,我们可以提供窗口组件的行跨度和列跨度。在这个例子中,我们设置 reviewEdit 占用5行。

图:表格布局2
PyQt4教程这的部分我们致力于布局管理。

本站文章为 宝宝巴士 SD.Team 原创,转载务必在明显处注明:(作者官方网站: 宝宝巴士 )
转载自【宝宝巴士SuperDo团队】 原文链接: http://www.cnblogs.com/superdo/p/4528022.html