SpringBoot : 一个较完整的SpringBoot项目的目录结构
以前已经聊过如果快速创建Spring Boot基础项目。今天来搞一个较为完整的SpringBoot项目。
下面是我创建的一个Spring Boot项目
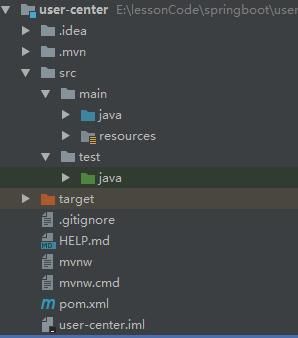
src下main:存放的是代码源文件,java、xml、proeprties等
src下test:通常是我们做单元测试的时候使用。
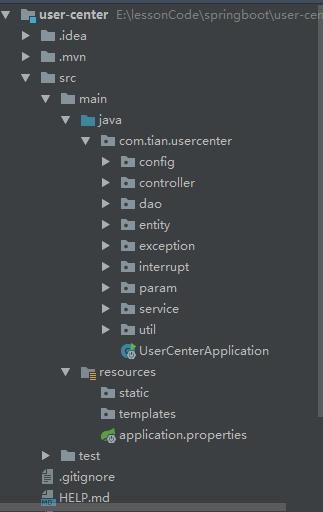
- controller:此目录主要是存放**Controllerde ,比如:UserController.java,也有的项目是把action放在controller目录下,有的是把UserController.java放在action目录下。
- service:这里分接口和实现类,接口在service目录下,接口实现类在service/impl目录下。
- dao:持久层,目前比较流行的Mybatis或者jpa之类的。
- entity:就是数据库表的实体对象。
- param:放的是请求参数和相应参数UserQueryRequest、BaseResponse等
- util:通常是一些工具类,比如说:DateUtil.java、自定义的StringUtil.java
- interrupt:项目统一拦截处理,比如:登录信息,统一异常处理
- exception:自定义异常,异常错误码
- config:配置读取相关,比如RedisConfig.java
启动类和以上包目录同级别。
resources目前下
static:存放的是一些js/css/图片
templates:存放模板引擎文件,比如:user.fl
application.properties文件是存放一些配置文件,有的是application.yml或者application.yaml实质是一样的,就是展示不同而已。

这就是一个较为完整的Spring Boot 项目。
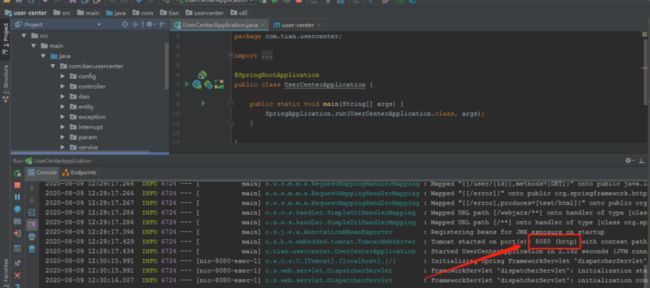
另外还得说一下UserCenterApplication启动类
package com.tian.usercenter;

import org.springframework.boot.SpringApplication;
import org.springframework.boot.autoconfigure.SpringBootApplication;

@SpringBootApplication
public class UserCenterApplication {

    public static void main(String[] args) {
        SpringApplication.run(UserCenterApplication.class, args);
}

}
两个关键点:
- @SpringBootApplication //springBoot注解
- SpringApplication.run(UserCenterApplication.class, args);//main入口
另外再说一下pom文件,先看看内容
    4.0.0

        org.springframework.boot
        spring-boot-starter-parent
        2.0.3.RELEASE


    com.tian
    user-center
    0.0.1-SNAPSHOT
    user-center
    Demo project for Spring Boot


        1.8


            org.springframework.boot
            spring-boot-starter-web


                org.springframework.boot
                spring-boot-maven-plugin
parent项标志着是否使用了Springboot项目,spring Boot 项目必须间接或者直接地继承于spring-boot-starter-parent。
然后就是我们这项目中使用了web。所以多了一个依赖spring-boot-starter-web。
到这里就发现了,pom中就出现两个starter。关于starter后面会细说。
为了便于演示,写了几个类
@RestController()
public class UserController {
@Resource
private UserService userService;
@GetMapping("/user/{id}")
public String queryUserNameById(@PathVariable("id") Integer id){
return userService.queryUserNameById(id);
}
}
public interface UserService {
String queryUserNameById(Integer id);
}
@Service
public class UserServiceImpl implements UserService {
@Override
public String queryUserNameById(Integer id) {
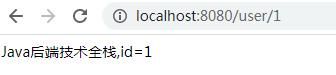
return "Java后端技术全栈,id="+id.toString();
}
}
最后运行启动类
浏览器上输入
http://localhost:8080/user/1
今天分享到此,希望对你有所帮助。
码字不易,烦请点在看+分享,非常感谢!