SpringBoot整合Redis及使用
SpringBoot整合Redis及使用
- 1 Springboot整合Redis
-
- 1.1 相关注解
- 1.2 添加依赖
- 1.3 设置配置文件
- 1.3 新建一个配置类
- 2 使用Redis做缓存
-
- 2.1 添加注解
- 3 往redis中存取数据
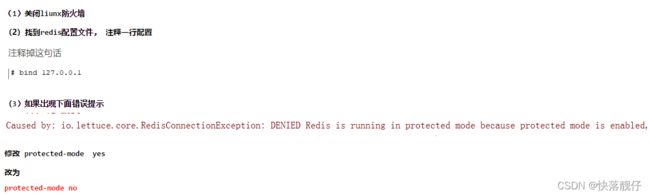
- 4 可能遇到的问题以及解决方法
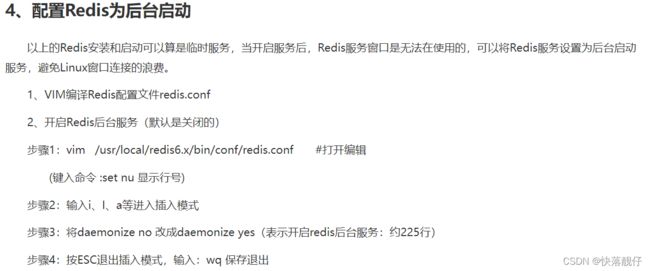
安装和配置redis参考这里 :Redis的安装
1 Springboot整合Redis
1.1 相关注解
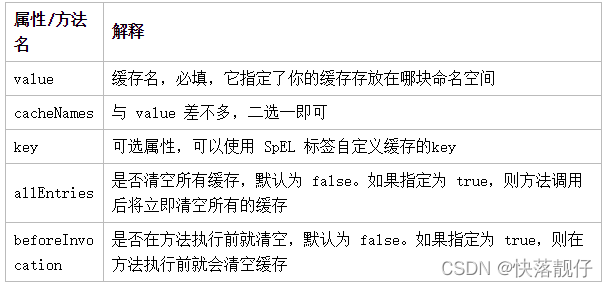
(1)缓存@Cacheable
根据方法对其返回结果进行缓存,下次请求时,如果缓存存在,则直接读取缓存数据返回;如果缓存不存在,则执行方法,并把返回的结果存入缓存中。一般用在查询方法上。
查看源码,属性值如下:

(2)缓存@CachePut
使用该注解标志的方法,每次都会执行,并将结果存入指定的缓存中。其他方法可以直接从响应的缓存中读取缓存数据,而不需要再去查询数据库。一般用在新增方法上。
查看源码,属性值如下:

(3)缓存@CacheEvict
使用该注解标志的方法,会清空指定的缓存。一般用在更新或者删除方法上
查看源码,属性值如下:
1.2 添加依赖
本文使用的springboot版本为2.2.1.RELEASE版本
        <dependency>
            <groupId>org.springframework.bootgroupId>
            <artifactId>spring-boot-starter-data-redisartifactId>
        dependency>


        <dependency>
            <groupId>org.apache.commonsgroupId>
            <artifactId>commons-pool2artifactId>
            <version>2.6.0version>
        dependency>
1.3 设置配置文件
###############redis配置开始
spring.redis.host=192.168.79.131
spring.redis.port=6379
spring.redis.database= 0
spring.redis.timeout=1800000

spring.redis.lettuce.pool.max-active=20
spring.redis.lettuce.pool.max-wait=-1
#最大阻塞等待时间(负数表示没限制)
spring.redis.lettuce.pool.max-idle=5
spring.redis.lettuce.pool.min-idle=0
###############redis配置结束
1.3 新建一个配置类
需要继承CachingConfigurerSupport类
import com.fasterxml.jackson.annotation.JsonAutoDetect;
import com.fasterxml.jackson.annotation.PropertyAccessor;
import com.fasterxml.jackson.databind.ObjectMapper;
import org.springframework.cache.CacheManager;
import org.springframework.cache.annotation.CachingConfigurerSupport;
import org.springframework.cache.annotation.EnableCaching;
import org.springframework.context.annotation.Bean;
import org.springframework.context.annotation.Configuration;
import org.springframework.data.redis.cache.RedisCacheConfiguration;
import org.springframework.data.redis.cache.RedisCacheManager;
import org.springframework.data.redis.connection.RedisConnectionFactory;
import org.springframework.data.redis.core.RedisTemplate;
import org.springframework.data.redis.serializer.Jackson2JsonRedisSerializer;
import org.springframework.data.redis.serializer.RedisSerializationContext;
import org.springframework.data.redis.serializer.RedisSerializer;
import org.springframework.data.redis.serializer.StringRedisSerializer;

import java.time.Duration;

/**
 * @Author XuZhuHong
 * @CreateTime 2021/12/9 17:06
 */
@EnableCaching
@Configuration
public class RedisConfig extends CachingConfigurerSupport {

    @Bean
    public RedisTemplate<String, Object> redisTemplate(RedisConnectionFactory factory) {
        RedisTemplate<String, Object> template = new RedisTemplate<>();
        RedisSerializer<String> redisSerializer = new StringRedisSerializer();
        Jackson2JsonRedisSerializer jackson2JsonRedisSerializer = new Jackson2JsonRedisSerializer(Object.class);
        ObjectMapper om = new ObjectMapper();
        om.setVisibility(PropertyAccessor.ALL, JsonAutoDetect.Visibility.ANY);
        om.enableDefaultTyping(ObjectMapper.DefaultTyping.NON_FINAL);
        jackson2JsonRedisSerializer.setObjectMapper(om);
        template.setConnectionFactory(factory);
        //key序列化方式
        template.setKeySerializer(redisSerializer);
        //value序列化
        template.setValueSerializer(jackson2JsonRedisSerializer);
        //value hashmap序列化
        template.setHashValueSerializer(jackson2JsonRedisSerializer);
        return template;
    }

    @Bean
    public CacheManager cacheManager(RedisConnectionFactory factory) {
        RedisSerializer<String> redisSerializer = new StringRedisSerializer();
        Jackson2JsonRedisSerializer jackson2JsonRedisSerializer = new Jackson2JsonRedisSerializer(Object.class);
        //解决查询缓存转换异常的问题
        ObjectMapper om = new ObjectMapper();
        om.setVisibility(PropertyAccessor.ALL, JsonAutoDetect.Visibility.ANY);
        om.enableDefaultTyping(ObjectMapper.DefaultTyping.NON_FINAL);
        jackson2JsonRedisSerializer.setObjectMapper(om);
        // 配置序列化(解决乱码的问题),过期时间600秒
        RedisCacheConfiguration config = RedisCacheConfiguration.defaultCacheConfig()
                .entryTtl(Duration.ofSeconds(600))
                .serializeKeysWith(RedisSerializationContext.SerializationPair.fromSerializer(redisSerializer))
                .serializeValuesWith(RedisSerializationContext.SerializationPair.fromSerializer(jackson2JsonRedisSerializer))
                .disableCachingNullValues();
        RedisCacheManager cacheManager = RedisCacheManager.builder(factory)
                .cacheDefaults(config)
                .build();
        return cacheManager;
    }
2 使用Redis做缓存
我们把注解添加到方法上后 执行方法时 会先到Redis中去查询 如果有就直接返回Redis中的结果 如果没有 就先查询数据库 然后返回结果 再保存数据到redis中
2.1 添加注解
在需要的方法上添加上对应的注解即可
这里用的Cacheable注解 注解作用查看上面的表格
@Cacheable(key = “‘selectIndexList’”, value = “banner”)//把结果缓存到redis的操作
@Override
    @Cacheable(key = "'selectIndexList'", value = "banner")//把结果缓存到redis的操作
    public List< CrmBanner > selectAllBanner() {
        QueryWrapper< CrmBanner > wrapper = new QueryWrapper<>();
        //降序排序并查询前两条记录
        wrapper.orderByDesc("id");
        wrapper.last("limit 2");

        List< CrmBanner > crmBanners = baseMapper.selectList(null);
        return crmBanners;
    }
3 往redis中存取数据
其实在Boot整合Redis的时候 就做一个一个对象的封装 可以实现直接注入 然后使用即可
对应API请参考官网
//redis的对象可以直接使用
    @Autowired
    private RedisTemplate<String, String> redisTemplate;
4 可能遇到的问题以及解决方法