Android源码分析 (一) SystemServer 进程启动
最近学习进阶解密 总结SystemService启动 加深理解记忆
SystemService启动之前,我们先看一下 Zygote进程做了些什么
Zygote进程
在Android系统中,DVM和ART、应用程序进程以及运行系统的关键服务SystemServer进程都是有Zygote进程来创建的,我们也将它称为孵化器。它通过fork的形式来创建应用程序进程和SystemServer进程,犹豫Zygote进程在启动时会创建DVM或者ART,因此通过fork而创建的应用程序进程和SystemServer进程可以在内部获取一个DVM或者ART的实例副本。Zygote进程启动共做了如下几件事:
1 创建AppRuntime并调用其start方法,启动Zygote进程;
2 创建Java虚拟机并为Java虚拟机注册JNI方法;
3 通过JNI调用ZygoteInit的main函数进入Zygote的Java框架层;
4 通过registerZygoteSocket方法创建服务端Socket,并通过runSelectLoop方法等待AMS的请求来5 创建新的应用程序进程;
6 启动SystemServer进程。
如下是时序图
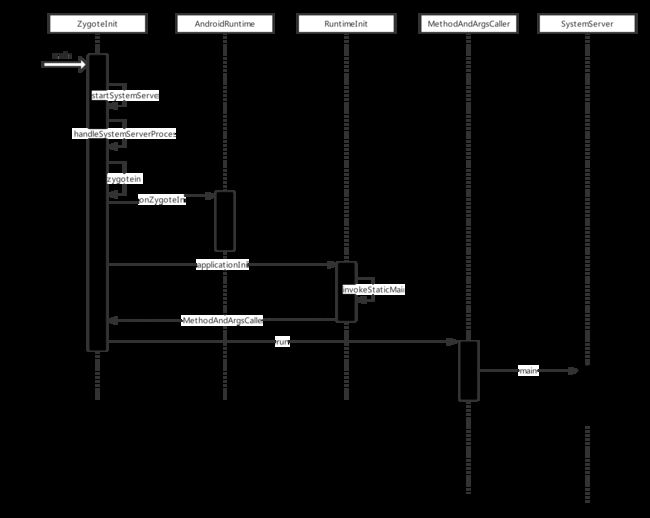
一 Zygote 开创 Java 框架层入口
启动 Zygote 的入口,其实就是 ZygoteInit.java ,我们看它的 main 函数实现。
//com.android.internal.os.ZygoteInit.java
    public static void main(String argv[]) {

	    ....

        try {

            1. 创建服务端的 Socket ,名称为 "zygote"

            zygoteServer.registerServerSocket(socketName);

            if (!enableLazyPreload) {
                bootTimingsTraceLog.traceBegin("ZygotePreload");
                EventLog.writeEvent(LOG_BOOT_PROGRESS_PRELOAD_START,
                    SystemClock.uptimeMillis());

             2 用来预加载资源
                preload(bootTimingsTraceLog);
                EventLog.writeEvent(LOG_BOOT_PROGRESS_PRELOAD_END,
                    SystemClock.uptimeMillis());
                bootTimingsTraceLog.traceEnd(); // ZygotePreload
            } else {
                Zygote.resetNicePriority();
            }

            ...

            if (startSystemServer) {
               3. 启动 SystemServer 进程
                startSystemServer(abiList, socketName, zygoteServer);
            }

            Log.i(TAG, "Accepting command socket connections");
            4. 等待 AMS 请求
            zygoteServer.runSelectLoop(abiList);
						//清理或者关闭对应的 Socket
            zygoteServer.closeServerSocket();
        } catch (Zygote.MethodAndArgsCaller caller) {
            caller.run();
        } catch (Throwable ex) {
            Log.e(TAG, "System zygote died with exception", ex);
            zygoteServer.closeServerSocket();
            throw ex;
        }
    }
ZygoteInit.main() 做了做了四件事
1 创建一个 Server 端为 ”zygote“ 名称的 Socket,用于等待 AMS 请求 Zygote 来创建新的应用程序进程。
2 预处理加载类跟资源。
3 根据 JNI 传递过来的信息来判断是否启动 SystemServer
4 等待 AMS 请求,用于创建新的应用程序进程。
1. zygoteServer.registerServerSocket(socketName);
看下registerServerSocket做了什么
//com.android.internal.os ZygoteServer.java

    void registerServerSocket(String socketName) {
        if (mServerSocket == null) {
            int fileDesc;
           1 拿到 Socket 名称
            final String fullSocketName = ANDROID_SOCKET_PREFIX + socketName;
            try {
                 2. 得到 Socket 环境变量的值
                String env = System.getenv(fullSocketName);

                3. 将 Socket 环境变量的值转换为文件描述符的参数
                fileDesc = Integer.parseInt(env);
            } catch (RuntimeException ex) {
                throw new RuntimeException(fullSocketName + " unset or invalid", ex);
            }

            try {
                4. 创建文件描述符
                FileDescriptor fd = new FileDescriptor();
		        5 Socket 转换出来的信息传递给文件描述符,用于获取具体信息
                fd.setInt$(fileDesc);
                6 创建服务端 Socket
                mServerSocket = new LocalServerSocket(fd);
            } catch (IOException ex) {
                throw new RuntimeException(
                        "Error binding to local socket '" + fileDesc + "'", ex);
            }
        }
    }
registerServerSocket主要做了6件事情
1 拿到拼接之后的 Socket 名称(ANDROID_SOCKET_zygote)
2 把funSocketName Socket 名称转换为系统环境变量的值
3 将 Socket 的系统环境变量的值转换为文件描述符的参数
4 创建 FileDescriptor 文件描述符
5 传入之前文件抓换参数
6 创建LocalServerSocket,并将文件操作符传递出去
最后服务端 Socket 就创建成功了,在这个服务端上并处等待 AMS 请求 zygote 进程来创建新的应用程序进程。
2. 启动 SystemServer 进程
回头在看 ZygoteInit main 函数的注释 3
  //com.android.internal.os ZygoteInit.main->startSystemServer

	private static boolean startSystemServer(String abiList, String socketName, ZygoteServer zygoteServer)
            throws Zygote.MethodAndArgsCaller, RuntimeException {);

        ...

         1. 启动 SystemServer 的参数
        String args[] = {
                "--setuid=1000",
                "--setgid=1000",
                "--setgroups=1001,1002,1003,1004,1005,1006,1007,1008,1009,1010,1018,1021,1023,1032,3001,3002,3003,3006,3007,3009,3010",
                "--capabilities=" + capabilities + "," + capabilities,
                "--nice-name=system_server",
                "--runtime-args",
                "com.android.server.SystemServer", //全类名路径
        };
        ZygoteConnection.Arguments parsedArgs = null;

        int pid;

        try {
            parsedArgs = new ZygoteConnection.Arguments(args);
            ZygoteConnection.applyDebuggerSystemProperty(parsedArgs);
            ZygoteConnection.applyInvokeWithSystemProperty(parsedArgs);


           2创建一个子进程,也就是 SystemServer 进程
            pid = Zygote.forkSystemServer(
                    parsedArgs.uid, parsedArgs.gid,
                    parsedArgs.gids,
                    parsedArgs.debugFlags,
                    null,
                    parsedArgs.permittedCapabilities,
                    parsedArgs.effectiveCapabilities);
        } catch (IllegalArgumentException ex) {
            throw new RuntimeException(ex);
        }

        /* For child process */
        /**
         * 如果当前代码运行在子进程中 ,也就是 SystemServer 进程中
         */
        if (pid == 0) {
            if (hasSecondZygote(abiList)) {
                waitForSecondaryZygote(socketName);
            }
            //关闭 Zygote 进程创建的 Socket
            zygoteServer.closeServerSocket();
           3
            handleSystemServerProcess(parsedArgs);
        }

        return true;
    }
总结startSystemServer 做了些什么
1 用来创建args数组,这个数组用来保存启动SystemServer
2 通过fork函数在当前线程SystemServer进程。
3 Zygote.forkSystemServer 创建的pid为0 已经运行到了SystemServer 进程中
3. zygoteServer.runSelectLoop(abiList);
SystemServer 进程启动成功之后, 会ZygoteInit.Main() 中执行 runSelectLoop 方法
//  com.android.internal.os ZygoteInit.main->runSelectLoop

    void runSelectLoop(String abiList) throws Zygote.MethodAndArgsCaller {
        ArrayList fds = new ArrayList();
        ArrayList peers = new ArrayList();


         1. 添加获得该 Socket 的 fd 字段的值
        fds.add(mServerSocket.getFileDescriptor());
        peers.add(null);


        while (true) {
            StructPollfd[] pollFds = new StructPollfd[fds.size()];
            2 通过遍历将fds的信息转移到pooFds数组中

            for (int i = 0; i < pollFds.length; ++i) {
                pollFds[i] = new StructPollfd();
                pollFds[i].fd = fds.get(i);
                pollFds[i].events = (short) POLLIN;
            }
            try {
                Os.poll(pollFds, -1);
            } catch (ErrnoException ex) {
                throw new RuntimeException("poll failed", ex);
            }


            for (int i = pollFds.length - 1; i >= 0; --i) {

                if ((pollFds[i].revents & POLLIN) == 0) {
                    continue;
                }
                3  如果 i == 0 那么就认为 服务端 Socket 与客户端连接上了,就是与 AMS 建立了连接
                if (i == 0) {

                  4  ZygoteConnection newPeer = acceptCommandPeer(abiList);
                    //将 ZygoteConnection 添加到 Socket 连接列表中
                    peers.add(newPeer);

                    fds.add(newPeer.getFileDesciptor());
                } else {//如果不等于 0 ,那么就说明 AMS 向 Zygote 发送了一个创建应用进程的请求
                 5   调用 ZygoteConnection 的 runOnce 函数来创建一个新的应用进程,并在成功创建后将这个连接从 Socket 连接列表中 peers、fd 列表中关闭
                     */
                    boolean done = peers.get(i).runOnce(this);
                    if (done) {
                        peers.remove(i);
                        fds.remove(i);
                    }
                }
            }
        }
    }
总结 上面的函数
1 mServerSocket 就是我们在 registerZygoteSocket 函数中创建的服务器端 Socket,调用 mServerSocket.getFileDescriptor() 函数用来获得该 Socket 的 fd 字段的值并添加到 fds 列表中。接下来就无限循环用来等待 AMS 请求 Zygote 进程创建的新的应用程序进程。
2 将 fds 信息转存到 pollFds 数组中。
3 对 pollFds 信息进行遍历,如果 i == 0 那么就认为 服务端 Socket 与客户端连接上了,就是与 AMS 建立了连接,否则就说明 AMS 向 Zygote 发送了一个创建应用进程的请求,并在成功创建后将这个连接从 Socket 连接列表中 peers、fd 列表中关闭。
二 SystemServer 进程处理过程
进入处理 SystemServer 是在 ZygoteInit.main() -> startSystemServer() 函数的 handleSystemServerProcess 中
那SystemServer成功启动的了之后那后续做了些什么呢 ?
1 启动Binder线程池。这样就可以与其他进程进行通信;
2 创建SystemServiceManager。其用于对系统的服务进行创建、启动和生命周期管理;
3 启动各种系统服务。BootstrapServices(AMS、PMS等),CoreServices(BatteryService、WebViewUpdateService等),OtherServices(CameraSevice、AudioService、WindowManagerService等)。
//com.android.internal.os ZygoteInit.main

    private static void handleSystemServerProcess(
            ZygoteConnection.Arguments parsedArgs)
            throws Zygote.MethodAndArgsCaller {

        ...

        if (parsedArgs.invokeWith != null) {
            ...
        } else {
            ClassLoader cl = null;
            if (systemServerClasspath != null) {
                 1. 创建了 PathClassLoader
                cl = createPathClassLoader(systemServerClasspath, parsedArgs.targetSdkVersion);

                Thread.currentThread().setContextClassLoader(cl);
            }
                 2. 调用自己的 zygoteInit 函数
                 ZygoteInit.zygoteInit(parsedArgs.targetSdkVersion, parsedArgs.remainingArgs, cl);
        }

        /* should never reach here */
    }
我们来看ZygoteInit.zygoteInit的方法
// com.android.internal.os ZygoteInit

    public static final void zygoteInit(int targetSdkVersion, String[] argv,
            ClassLoader classLoader) throws Zygote.MethodAndArgsCaller {
        if (RuntimeInit.DEBUG) {
            Slog.d(RuntimeInit.TAG, "RuntimeInit: Starting application from zygote");
        }

        Trace.traceBegin(Trace.TRACE_TAG_ACTIVITY_MANAGER, "ZygoteInit");
        RuntimeInit.redirectLogStreams();

        RuntimeInit.commonInit();
        1. 启动 Binder 线程池
        ZygoteInit.nativeZygoteInit();
        2. 进入 SystemServer 的 main 方法
        RuntimeInit.applicationInit(targetSdkVersion, argv, classLoader);
    }
ZygoteInit. zygoteInit的中
1 用于启动 Binder 线程池,这样 SystemServer 就能通过 Binder 与其它进程进行通信
2 反射调用 SystemServer main 函数。
看RuntimeInit.applicationInit
  //com.android.internal.os RuntimeInit.java

	protected static void applicationInit(int targetSdkVersion, String[] argv, ClassLoader classLoader)
            throws Zygote.MethodAndArgsCaller {
				....

        invokeStaticMain(args.startClass, args.startArgs, classLoader);
    }
    private static void invokeStaticMain(String className, String[] argv, ClassLoader classLoader)
            throws Zygote.MethodAndArgsCaller
    {
        Class cl;

        try {
            1.  通过 className(com.android.server.SystemServer )反射得到SystemServer 类
             className 通过 AMS 等其它地方传递过来的,并不是唯一

            cl = Class.forName(className, true, classLoader);
        } catch (ClassNotFoundException ex) {
            throw new RuntimeException(
                    "Missing class when invoking static main " + className,
                    ex);
        }

        Method m;
        try {
             2. 拿到 SystemServer  main 函数
            m = cl.getMethod("main", new Class[] { String[].class });
        } catch (NoSuchMethodException ex) {
            ...
        } catch (SecurityException ex) {
            ...
        }

        int modifiers = m.getModifiers();
        if (! (Modifier.isStatic(modifiers) && Modifier.isPublic(modifiers))) {
           ...
        }

         3. 将 m 、argv 传入 MethodAndArgsCaller,然后抛一个异常,并在 ZygoteInit.main 中进行捕获异常
        throw new Zygote.MethodAndArgsCaller(m, argv);
    }
3位置处异常是在 ZygoteInit.java main 函数进行捕获
//com.android.internal.os ZygoteInit.java


    public static void main(String argv[]) {
				...

            if (startSystemServer) {
               1. 启动 SystemServer 进程
                startSystemServer(abiList, socketName, zygoteServer);
            }

          ....
        2. 捕获异常
        } catch (Zygote.MethodAndArgsCaller caller) {
      	3. 执行 run 函数
            caller.run();
        } catch (Throwable ex) {
            Log.e(TAG, "System zygote died with exception", ex);
            zygoteServer.closeServerSocket();
            throw ex;
        }
    }
现在来看3处的 caller.run();
com.android.internal.os Zygote.java

    public static class MethodAndArgsCaller extends Exception
            implements Runnable {

        public void run() {
            try {
                这里就开始执行 SystemServer main 方法了
                mMethod.invoke(null, new Object[] { mArgs });
            } catch (IllegalAccessException ex) {
                throw new RuntimeException(ex);
            } catch (InvocationTargetException ex) {
                Throwable cause = ex.getCause();
                if (cause instanceof RuntimeException) {
                    throw (RuntimeException) cause;
                } else if (cause instanceof Error) {
                    throw (Error) cause;
                }
                throw new RuntimeException(ex);
            }
        }
    }
我们再看SystemServer.java main()的Main实现
//com.android.server SystemServer.java

    public static void main(String[] args) {
 				//调用内部 run 函数
        new SystemServer().run();
    }
//com.android.server SystemServer.java

    private void run() {
        try {

           ...


             创建 主线程的消息 Looper
            Looper.prepareMainLooper();

            // Initialize native services.
           1. 加载动态库 libandroid_servers .so
            System.loadLibrary("android_servers");

            // Check whether we failed to shut down last time we tried.
            // This call may not return.
            performPendingShutdown();

            // Initialize the system context.

            createSystemContext();


             2. 创建 SystemServiceManager 它会对系统服务进行创建、启动和生命周期管理
            mSystemServiceManager = new SystemServiceManager(mSystemContext);
            mSystemServiceManager.setRuntimeRestarted(mRuntimeRestart);
            LocalServices.addService(SystemServiceManager.class, mSystemServiceManager);
            // Prepare the thread pool for init tasks that can be parallelized
            SystemServerInitThreadPool.get();
        } finally {
            traceEnd();  // InitBeforeStartServices
        }

        // Start services.
        try {
            traceBeginAndSlog("StartServices");
             3. SystemServiceManager启动了 AMS 、PowerMS、PackageMS 等服务
            startBootstrapServices();
            4. 启动了 DropBoxManagerService、BatteryService、UsageStatsService 和 WebViewUpdateService
            startCoreServices();
           5. 启动了CameraService、AlarmManagerService、VrManagerService 等服务。
            startOtherServices();
            SystemServerInitThreadPool.shutdown();
        } catch (Throwable ex) {
            Slog.e("System", "******************************************");
            Slog.e("System", "************ Failure starting system services", ex);
            throw ex;
        } finally {
            traceEnd();
        }

				...

        // Loop forever.
        Looper.loop();
        throw new RuntimeException("Main thread loop unexpectedly exited");
    }
上面代码可以总结如下
1 创建消息 Looper
2 加载动态库 libandroid_servers .so
3 创建 SystemServiceManager 它会对系统服务进行创建、启动和生命周期管理
4 通过 SystemServiceManager 启动 AMS 、PowerMS、PackageMS 等服务
5 启动 DropBoxManagerService、BatteryService、UsageStatsService 和 WebViewUpdateService 等核心服务,他们父类都是 SystemServer
6 启动 CameraService、AlarmManagerService、VrManagerService 等服务