Swift 探索 UICollectionView 之 SupplementaryView 和 Decoration View
本文同步发表于我的微信公众号,扫一扫文章底部的二维码或在微信搜索 HelloWorld杰少 即可关注。
写在开头
大家早上好,又到了每周和大家分享开发心得的时间啦!上周我分享了一篇关于 UICollectionView 自定义布局实现 Cover Flow 的文章(文章直通车),这也是我分享的关于 UICollectionView 系列的第四篇文章了,那今天我还是继续给大家带来 UICollectionView 开发系列的第五篇,这也是该系列计划写的最后一篇啦!当然,如果苹果开发者团队推出了关于 UICollectionView 的新的技术或者是我在开发中发现了新的技术点,我还是会持续更新这个系列,最终的目的是我希望通过这个系列的文章能把 UICollectionView 这个控件的核心技术点汇总齐全,毕竟 UICollectionView 使用的范围太广泛了。
Supplementary View
用过 UITableView 控件的同学肯定都知道我们可以给它的每个 section 加上 headerView 和 footerView,那在 UICollectionView 中是否也能这样操作呢!答案当然是肯定的,在 UICollectionView 控件中我们管这叫 Supplementary View, 翻译过来就是"追加视图",那在 UICollectionView 中该怎么实现给每个 section 安排上 headerView 和 footerView 呢!
在我们具体实现代码逻辑之前呢,我们先来熟悉几个重要的 API 方法,它们分别是:
open func register(_ viewClass: AnyClass?, forSupplementaryViewOfKind elementKind: String, withReuseIdentifier identifier: String)
func collectionView(_ collectionView: UICollectionView, viewForSupplementaryElementOfKind kind: String, at indexPath: IndexPath) -> UICollectionReusableView
func collectionView(_ collectionView: UICollectionView, layout collectionViewLayout: UICollectionViewLayout, referenceSizeForFooterInSection section: Int) -> CGSize
func collectionView(_ collectionView: UICollectionView, layout collectionViewLayout: UICollectionViewLayout, referenceSizeForHeaderInSection section: Int) -> CGSize
第一个方法需要在设置 UICollectionView 的时候,将需要添加到 UICollectionView section 里的 headerView 和 footerView 先注册一下,它里面的三个参数分别代表的是:
- 所要添加视图的类本身,例如 “BaseHeaderView.self”
- 追加视图的类型,是头部视图还是尾部视图,分别用 UICollectionView.elementKindSectionHeader 和 UICollectionView.elementKindSectionFooter 来表示
- 注册视图的标识符,用于 UICollectionView 在加载视图的时候能分辨加载的是 header 还是 footer 还是普通的 cell
第二个方法是 UICollectionViewDataSource 协议里的,返回一个 UICollectionReusableView 对象,实现它用于返回 Supplementary View 的实例,然后 UICollectionView 将其加载;它有三个参数,分别是:
- UICollectionView 对象
- 追加视图类型,用于区别是 header 还是 footer
- IndexPath 对象,用于判断是哪个 section,从而初始化不同的 headerView 和 footerView
第三,第四个方法就比较简单了,用于返回追加视图(headerView,footerView)的尺寸
了解过后,那我们就开始手撸代码吧!
为 UICollectionView 添加 Supplementary View
首先看下效果图:
具体代码逻辑如下,注释已经在代码中添加:
//
//  BaseAPIViewController.swift
//  SwiftScrollBanner
//
//  Created by shenjie on 2021/2/26.
//

import UIKit

class BaseAPIViewController: UIViewController {

    fileprivate var collectionView: UICollectionView!

    override func viewDidLoad() {
        super.viewDidLoad()

        // Do any additional setup after loading the view.
        self.title = "SupplementaryView"

        let flowLayout = UICollectionViewFlowLayout()
        let margin: CGFloat = 20
        let section: CGFloat = 15
        flowLayout.minimumLineSpacing = margin
        flowLayout.minimumInteritemSpacing = margin
        flowLayout.sectionInset = UIEdgeInsets(top: section, left: margin, bottom: section, right: margin)
        flowLayout.scrollDirection = .vertical

        collectionView = UICollectionView(frame: CGRect(x: 0, y: 0, width: self.view.frame.size.width, height: self.view.frame.size.height), collectionViewLayout: flowLayout)
        // 注册 Cell
        collectionView.register(UICollectionViewCell.self, forCellWithReuseIdentifier: "CellID")
        // 注册头部视图
        collectionView.register(BaseHeaderView.self, forSupplementaryViewOfKind: UICollectionView.elementKindSectionHeader, withReuseIdentifier: "headerView")
        // 注册尾部视图
        collectionView.register(BaseFooterView.self, forSupplementaryViewOfKind: UICollectionView.elementKindSectionFooter, withReuseIdentifier: "footerView")

        collectionView.delegate = self
        collectionView.dataSource = self
        self.view.addSubview(collectionView)
    }
}


extension BaseAPIViewController: UICollectionViewDelegateFlowLayout {
    func collectionView(_ collectionView: UICollectionView, layout collectionViewLayout: UICollectionViewLayout, sizeForItemAt indexPath: IndexPath) -> CGSize {
        // 返回 cell 尺寸
        return CGSize(width: 80, height: 120)
    }
}

extension BaseAPIViewController: UICollectionViewDelegate {
    func collectionView(_ collectionView: UICollectionView, didSelectItemAt indexPath: IndexPath) {

    }
}

extension BaseAPIViewController: UICollectionViewDataSource {

    func collectionView(_ collectionView: UICollectionView, numberOfItemsInSection section: Int) -> Int {
        return 8
    }

    func numberOfSections(in collectionView: UICollectionView) -> Int {
        return 4
    }


    // The cell that is returned must be retrieved from a call to -dequeueReusableCellWithReuseIdentifier:forIndexPath:
    func collectionView(_ collectionView: UICollectionView, cellForItemAt indexPath: IndexPath) -> UICollectionViewCell {

        let cell = collectionView.dequeueReusableCell(withReuseIdentifier: "CellID", for: indexPath)
        cell.backgroundColor = UIColor(red:  CGFloat(arc4random()%256)/256.0, green:  CGFloat(arc4random()%256)/256.0, blue:  CGFloat(arc4random()%256)/256.0, alpha: 1)
        return cell
    }

    // 返回追加视图对象,供 UICollectionView 加载
    func collectionView(_ collectionView: UICollectionView, viewForSupplementaryElementOfKind kind: String, at indexPath: IndexPath) -> UICollectionReusableView {

        if kind == UICollectionView.elementKindSectionHeader {
            let headerView: BaseHeaderView = collectionView.dequeueReusableSupplementaryView(ofKind: UICollectionView.elementKindSectionHeader, withReuseIdentifier: "headerView", for: indexPath) as! BaseHeaderView
            return headerView
        } else if kind == UICollectionView.elementKindSectionFooter {
            let footerView: BaseFooterView = collectionView.dequeueReusableSupplementaryView(ofKind: UICollectionView.elementKindSectionFooter, withReuseIdentifier: "footerView", for: indexPath) as! BaseFooterView
            return footerView
        }

        return UICollectionReusableView()
    }

    // 返回追加视图尺寸
    func collectionView(_ collectionView: UICollectionView, layout collectionViewLayout: UICollectionViewLayout, referenceSizeForFooterInSection section: Int) -> CGSize {
        return CGSize(width: collectionView.frame.size.width, height: 50)
    }

    // 返回追加视图尺寸
    func collectionView(_ collectionView: UICollectionView, layout collectionViewLayout: UICollectionViewLayout, referenceSizeForHeaderInSection section: Int) -> CGSize {
        return CGSize(width: collectionView.frame.size.width, height: 50)
    }
}
讲到到这里,我就已经为 UICollectionView 的 section 加上了 headerView 和 footerView,我们可以根据需求来实现样式丰富的追加视图,例如像 App Store 这样的:

Sticky Section Header
Sticky Section Header 是用追加视图实现的一种效果,具体表现为当 UICollectionView 滚动的时候,只要当前 section 的 headerView 向上滚动到最顶部的时候,它就会与屏幕顶部粘住不会隐藏,具体效果如下:
这效果第一眼看上去是不是感觉有点复杂,这效果起码得撸个百来行代码才能实现这效果啊!但是,我可以告诉你,Just two lines of code 就可以解决问题。
在 iOS 9 中,UICollectionViewFlowLayout 引入了 2 个属性,sectionHeadersPinToVisibleBounds 和 sectionFootersPinToVisibleBounds,利用它们可以非常方便的做到固定 header 和 footer 的效果,仅需在上面设置 layout 的逻辑中加入如下俩行代码即可:
flowLayout.sectionHeadersPinToVisibleBounds = true
flowLayout.sectionFootersPinToVisibleBounds = true
具体效果如下:
好了,Supplementary View 的相关内容介绍到这里就结束了,接下来我们来看看 UICollectionView 另外的一个技术点 Decoration View。
Decoration View
Decoration View 翻译过来就是装饰视图,顾名思义,它的作用就是用来美化 UICollectionView,提高用户体验的。如果你的产品经理给你提了一个需求,要求你要为 UICollectionView 的 section 设置背景, 但当你查阅文档的时候,你就会发现 UICollectionView 是无法通过属性设置来为 section 设置不同的背景颜色的。
那 Section 的背景是属于 UICollectionView 的哪一块呢?事实上,它既不是 Cell 视图,也不是 Supplementary View,而是 UICollectionView 的 Decoration View;Decoration View 不同与前两者,它无法通过数据源来设置,而是只能由布局对象来定义和管理。
为了带大家更好的熟悉理解 Decoration View,我在这里教大家现场开发制作一个电子书架!在接下来的内容中,你将会学到以下知识点:
- 如何在 UICollectionView 中创建 Decoration View
- 自定义布局属性,计算 section 的背景图位置和大小
- 实现 UICollectionView 拖拽调整顺序
在我们开始之前先看下效果图:
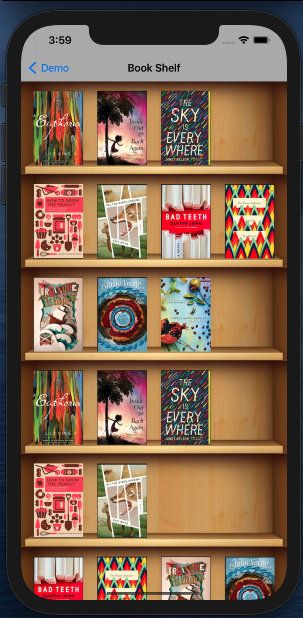
这效果还不错吧!那还等什么,赶紧撸起你的袖子,开始吧~
创建 Decoration View
Decoration View 的创建方式不同于创建 Cell 和 Supplementary View,它只能由布局对象来定义和管理,所以 UICollectionViewLayout 类提供了注册装饰视图的方法:
open func register(_ viewClass: AnyClass?, forDecorationViewOfKind elementKind: String)
通常情况下,在需要用到装饰视图的时候,都会去重写 UICollectionViewFlowLayout,然后在它的子类中去注册装饰视图。
新建一个继承自 UICollectionReusableView 的类,代码如下:
//
//  DecorationView.swift
//  SwiftScrollBanner
//
//  Created by shenjie on 2021/2/26.
//

import UIKit

class DecorationView: UICollectionReusableView {

    fileprivate var bg_imageView = UIImageView()

    override init(frame: CGRect) {
        super.init(frame: frame)
        bg_imageView.frame = bounds
        self.bg_imageView.image = UIImage(named: "bookshelf")
        self.addSubview(bg_imageView)
    }

    required init?(coder: NSCoder) {
        fatalError("init(coder:) has not been implemented")
    }

    override func layoutSubviews() {
        super.layoutSubviews()

    }

    override func apply(_ layoutAttributes: UICollectionViewLayoutAttributes) {
        super.apply(layoutAttributes)

    }
}
并在继承自 UICollectionViewLayout 的子类中注册:
override init() {
        super.init()
        // 注册装饰视图
        self.register(DecorationView.self, forDecorationViewOfKind: "DecorationView")
    }
这样我们就实现了在 UICollectionView 中添加装饰视图。
计算背景图布局属性
为了实现这个书架分层的样式,我们需要为每个 section 设置一个背景图,如:

但是由于每个 section 的坐标位置是不固定的,于是我们就需要在准备阶段将所有 section 的位置和大小计算完毕,可以在 UICollectionViewLayout 的 prepare() 方法中进行计算,相关逻辑我已经在代码中注明,代码如下:
override func prepare() {
        super.prepare()
        // 1.获取 section 数量
        guard let numberOfSections = self.collectionView?.numberOfSections,
              let layoutDelegate = self.collectionView?.delegate as? UICollectionViewDelegateFlowLayout else {
            return
        }

        // 先清除样式
        sectionAttrs.removeAll()

        // 2.计算每个section的装饰视图的布局属性
        for section in 0.. 0,
                  let firstItem = self.layoutAttributesForItem(at: IndexPath(item: 0, section: section)),
                  let lastItem = self.layoutAttributesForItem(at: IndexPath(item: numberOfItems - 1, section: section)) else {
                continue
            }

            // 2.2 获取 section 的内边距
            var sectionInset = self.sectionInset
            if let inset = layoutDelegate.collectionView?(self.collectionView!, layout: self, insetForSectionAt: section) {
                sectionInset = inset
            }

            // 2.3 计算得到该section实际的位置
            var sectionFrame = firstItem.frame.union(lastItem.frame)
            sectionFrame.origin.x = 0
            sectionFrame.origin.y -= sectionInset.top

            // 2.4 计算得到该section实际的尺寸
            if self.scrollDirection == .horizontal {
                sectionFrame.size.width += sectionInset.left + sectionInset.right
                sectionFrame.size.height = self.collectionView!.frame.height
            } else {
                sectionFrame.size.width = self.collectionView!.frame.width
                sectionFrame.size.height += sectionInset.top + sectionInset.bottom
            }

            // 2.5 计算装饰图属性
            let decorations = UICollectionViewLayoutAttributes(forDecorationViewOfKind: "DecorationView", with: IndexPath(item: 0, section: section))
            decorations.frame = sectionFrame
            decorations.zIndex = -1

            self.sectionAttrs.append(decorations)
        }
    }
属性计算好了,紧接着就是在布局更新的时候,要返回我们预先计算好的属性,在 func layoutAttributesForElements(in rect: CGRect) 方法中加入如下代码:
    override func layoutAttributesForElements(in rect: CGRect) -> [UICollectionViewLayoutAttributes]? {
        var attrs = super.layoutAttributesForElements(in: rect)

        // 在当前 rect 区域内过滤 sectionAttrs 数组内的熟悉,只返回与 rect 位置相交的属性
        attrs!.append(contentsOf: self.sectionAttrs.filter {
              return rect.intersects($0.frame)
          })

        return attrs
    }
这样我们就为每个 section 都设置了背景图,到此书架布局就基本完成了,最后加上数据源我们的书架就可以在视图管理器(UIViewController)中呈现了,但是为了更进一步体现 UICollectionView 的强大,我还实现了一个功能,那就是使得书架里的书可以自由拖拽排序,这里就用到了另外一个知识点:手势 UIGestureRecognizer
手势拖拽
在 iOS9 之后,UICollectionView 的属性自带重新排序的效果,这里不得不提 Apple 为 UICollectionView 推出的几个重要方法:
    @available(iOS 9.0, *)
    open func beginInteractiveMovementForItem(at indexPath: IndexPath) -> Bool // returns NO if reordering was prevented from beginning - otherwise YES

    @available(iOS 9.0, *)
    open func updateInteractiveMovementTargetPosition(_ targetPosition: CGPoint)

    @available(iOS 9.0, *)
    open func endInteractiveMovement()

    @available(iOS 9.0, *)
    open func cancelInteractiveMovement()
它们代表的意思分别为:
- 开始交互
- 更新交互位置
- 结束交互
- 取消交互
在为 UICollectionView 添加手势后,根据手势提供的三种状态,分别调用上面的四个方法,来实现拖拽排序;另外,既然 Cell 的顺序会被调整,那我们还得及时的更新数据源,来保证视图刷新后,导致拖拽的结果被还原,具体实现代码如下:
添加手势
        // 添加手势
        let longPressGesture = UILongPressGestureRecognizer(target: self, action: #selector(handleLongGesture(_:)))
        collectionView.addGestureRecognizer(longPressGesture)
手势状态判断
@objc func handleLongGesture(_ gesture: UILongPressGestureRecognizer) {

        switch(gesture.state) {
            case .began:
                guard let selectedIndexPath = self.collectionView.indexPathForItem(at: gesture.location(in: self.collectionView)) else {
                    break
                }
                prevIndexPath = selectedIndexPath
                // 开始交互
                collectionView.beginInteractiveMovementForItem(at: selectedIndexPath)
            case .changed:
                // 更新位置
                if let moveIndexPath:IndexPath = self.collectionView.indexPathForItem(at: gesture.location(in: self.collectionView)) {
                    if prevIndexPath == moveIndexPath {
                        collectionView.updateInteractiveMovementTargetPosition(gesture.location(in: gesture.view!))
                    } else {
                        // 判断书架是否放满
                        if collectionView.numberOfItems(inSection: moveIndexPath.section) < 4 {
                            collectionView.updateInteractiveMovementTargetPosition(gesture.location(in: gesture.view!))
                        } else {
                            break
                        }
                    }
                }
            case .ended:
                // 结束交互
                collectionView.endInteractiveMovement()
            default:
                // 默认取消交互
                collectionView.cancelInteractiveMovement()
        }
    }
更新数据源
    func collectionView(_ collectionView: UICollectionView, canMoveItemAt indexPath: IndexPath) -> Bool {
        return true
    }

    func collectionView(_ collectionView: UICollectionView, moveItemAt sourceIndexPath: IndexPath, to destinationIndexPath: IndexPath) {
        let book = mockData[sourceIndexPath.section].remove(at: sourceIndexPath.row)
        mockData[destinationIndexPath.section].insert(book, at: (destinationIndexPath as NSIndexPath).row)
    }
到这里,拖拽排序的功能就做好了,有了系统提供的方法后,再实现这样的效果就简单多啦!最后,我们来看下最终效果:
最后
关于 UICollectionView 系列的整理,到今天就要短暂的划上一个句号了,在写这个系列之前,我对 UICollectionView 的想法就是:无非就是比 UITableView 稍微复杂一些。但当我真正的去整理它的一些技术点时,我发现它实在是太灵活了,以前觉得追加视图,装饰视图这些东西很简单,几行代码的事情,但事实上,当你想要去实现一些高度自定义的界面的时候,你才会认识到自己的不足,你并没有对这些知识有更深层次的认知,只有再你自己慢慢实现后,你内心才会感慨 “哦, 原来这些 API 可以这样调用,原来这个东西是这样的啊”。最后,按照国际惯例,附上本文的 Demo 工程的地址:
https://github.com/ShenJieSuzhou/SwiftScrollBanner
相关阅读:
UICollectionView 自定义布局实现瀑布流视图
使用 UICollectionView 实现分页滑动效果
使用 UICollectionView 实现首页卡片轮播效果
关注我的技术公众号"HelloWorld杰少",获取更多优质技术文章。