概述
Spring 3.1 引入了激动人心的基于注释(annotation)的缓存(cache)技术,它本质上不是一个具体的缓存实现方案(例如EHCache 或者 OSCache),而是一个对缓存使用的抽象,通过在既有代码中添加少量它定义的各种 annotation,即能够达到缓存方法的返回对象的效果。
Spring 的缓存技术还具备相当的灵活性,不仅能够使用 SpEL(Spring Expression Language)来定义缓存的 key 和各种 condition,还提供开箱即用的缓存临时存储方案,也支持和主流的专业缓存例如 EHCache 集成。
我们以前如何自己实现缓存的呢
这里先展示一个完全自定义的缓存实现,即不用任何第三方的组件来实现某种对象的内存缓存。
场景如下:
这里先展示一个完全自定义的缓存实现,即不用任何第三方的组件来实现某种对象的内存缓存。
首先定义一个实体类:账号类,具备基本的 id 和 name 属性,且具备 getter 和 setter 方法。
public class Account {

    private int id;
    private String name;

    public Account(String name) {
        this.name = name;
    }
    public int getId() {
        return id;
    }
    public void setId(int id) {
        this.id = id;
    }
    public String getName() {
        return name;
    }
    public void setName(String name) {
        this.name = name;
    }

}
然后定义一个缓存管理器,这个管理器负责实现缓存逻辑,支持对象的增加、修改和删除,支持值对象的泛型。如下:
public class CacheContext {

    private Map cache = Maps.newConcurrentMap();

    public T get(String key){
        return  cache.get(key);
    }

    public void addOrUpdateCache(String key,T value) {
        cache.put(key, value);
    }

    // 根据 key 来删除缓存中的一条记录
    public void evictCache(String key) {
        if(cache.containsKey(key)) {
            cache.remove(key);
        }
    }

    // 清空缓存中的所有记录
    public void evictCache() {
        cache.clear();
    }

}
现在我们有了实体类和一个缓存管理器,还需要一个提供账号查询的服务类,此服务类使用缓存管理器来支持账号查询缓存,如下:
@Service
public class AccountService1 {

    private final Logger logger = LoggerFactory.getLogger(AccountService1.class);

    @Resource
    private CacheContext accountCacheContext;

    public Account getAccountByName(String accountName) {
        Account result = accountCacheContext.get(accountName);
        if (result != null) {
            logger.info("get from cache... {}", accountName);
            return result;
        }

        Optional accountOptional = getFromDB(accountName);
        if (!accountOptional.isPresent()) {
            throw new IllegalStateException(String.format("can not find account by account name : [%s]", accountName));
        }

        Account account = accountOptional.get();
        accountCacheContext.addOrUpdateCache(accountName, account);
        return account;
    }

    public void reload() {
        accountCacheContext.evictCache();
    }

    private Optional getFromDB(String accountName) {
        logger.info("real querying db... {}", accountName);
        //Todo query data from database
        return Optional.fromNullable(new Account(accountName));
    }

}
现在我们开始写一个测试类,用于测试刚才的缓存是否有效。
public class AccountService1Test {

    private AccountService1 accountService1;

    private final Logger logger = LoggerFactory.getLogger(AccountService1Test.class);

    @Before
    public void setUp() throws Exception {
        ClassPathXmlApplicationContext context = new ClassPathXmlApplicationContext("applicationContext1.xml");
        accountService1 = context.getBean("accountService1", AccountService1.class);
    }

    @Test
    public void testInject(){
        assertNotNull(accountService1);
    }

    @Test
    public void testGetAccountByName() throws Exception {
        accountService1.getAccountByName("accountName");
        accountService1.getAccountByName("accountName");

        accountService1.reload();
        logger.info("after reload ....");

        accountService1.getAccountByName("accountName");
        accountService1.getAccountByName("accountName");
    }
}
按照分析,执行结果应该是:首先从数据库查询,然后直接返回缓存中的结果,重置缓存后,应该先从数据库查询,然后返回缓存中的结果. 查看程序运行的日志如下:
00:53:17.166 [main] INFO  c.r.s.cache.example1.AccountService - real querying db... accountName
00:53:17.168 [main] INFO  c.r.s.cache.example1.AccountService - get from cache... accountName
00:53:17.168 [main] INFO  c.r.s.c.example1.AccountServiceTest - after reload ....
00:53:17.168 [main] INFO  c.r.s.cache.example1.AccountService - real querying db... accountName
00:53:17.169 [main] INFO  c.r.s.cache.example1.AccountService - get from cache... accountName
可以看出我们的缓存起效了,但是这种自定义的缓存方案有如下劣势:
- 缓存代码和业务代码耦合度太高,如上面的例子,AccountService 中的 getAccountByName()方法中有了太多缓存的逻辑,不便于维护和变更
- 不灵活,这种缓存方案不支持按照某种条件的缓存,比如只有某种类型的账号才需要缓存,这种需求会导致代码的变更
- 缓存的存储这块写的比较死,不能灵活的切换为使用第三方的缓存模块
Spring cache是如何做的呢
一句话介绍就是Spring AOP的动态代理技术。
我们对AccountService1 进行修改,创建AccountService2:
@Service
public class AccountService2 {

    private final Logger logger = LoggerFactory.getLogger(AccountService2.class);

    // 使用了一个缓存名叫 accountCache
    @Cacheable(value="accountCache")
    public Account getAccountByName(String accountName) {

        // 方法内部实现不考虑缓存逻辑,直接实现业务
        logger.info("real querying account... {}", accountName);
        Optional accountOptional = getFromDB(accountName);
        if (!accountOptional.isPresent()) {
            throw new IllegalStateException(String.format("can not find account by account name : [%s]", accountName));
        }

        return accountOptional.get();
    }

    private Optional getFromDB(String accountName) {
        logger.info("real querying db... {}", accountName);
        //Todo query data from database
        return Optional.fromNullable(new Account(accountName));
    }

}
我们注意到在上面的代码中有一行:
@Cacheable(value="accountCache")
这个注释的意思是,当调用这个方法的时候,会从一个名叫 accountCache 的缓存中查询,如果没有,则执行实际的方法(即查询数据库),并将执行的结果存入缓存中,否则返回缓存中的对象。这里的缓存中的 key 就是参数 accountName,value 就是 Account 对象。“accountCache”缓存是在 spring*.xml 中定义的名称。我们还需要一个 spring 的配置文件来支持基于注释的缓存。
这个配置项缺省使用了一个名字叫 cacheManager 的缓存管理器。如果需要Spring缓存可以正常工作,必须配置一个CacheManager。CacheManager实现类你可以配置Spring-context本身提供的SimpleCacheManager和ConcurrentMapCacheManager等。CacheManager简单描述就是用来存放Cache,Cache用于存放具体的key-value值。
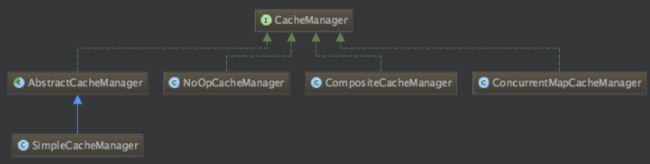
其中SimpleCacheManager这个缓存管理器实现了我们刚刚自定义的缓存管理器的逻辑,它需要配置一个属性 caches,即此缓存管理器管理的缓存集合,除了缺省的名字叫 default 的缓存,我们还自定义了一个名字叫 accountCache 的缓存。
然后我们编写测试程序:
public class AccountService2Test {

    private AccountService2 accountService2;

    private final Logger logger = LoggerFactory.getLogger(AccountService2Test.class);

    @Before
    public void setUp() throws Exception {
        ClassPathXmlApplicationContext context = new ClassPathXmlApplicationContext("applicationContext2.xml");
        accountService2 = context.getBean("accountService2", AccountService2.class);
    }

    @Test
    public void testInject(){
        assertNotNull(accountService2);
    }

    @Test
    public void testGetAccountByName() throws Exception {
        logger.info("first query...");
        accountService2.getAccountByName("accountName");

        logger.info("second query...");
        accountService2.getAccountByName("accountName");
    }
}
上面的测试代码主要进行了两次查询,第一次应该会查询数据库,第二次应该返回缓存,不再查数据库,我们执行一下,看看结果:
01:10:32.435 [main] INFO  c.r.s.c.example2.AccountService2Test - first query...
01:10:32.456 [main] INFO  c.r.s.cache.example2.AccountService2 - real querying account... accountName
01:10:32.457 [main] INFO  c.r.s.cache.example2.AccountService2 - real querying db... accountName
01:10:32.458 [main] INFO  c.r.s.c.example2.AccountService2Test - second query...
可以看出我们设置的基于注释的缓存起作用了,而在 AccountService.java 的代码中,我们没有看到任何的缓存逻辑代码,只有一行注释:@Cacheable(value="accountCache"),就实现了基本的缓存方案,是不是很强大?
如何清空缓存
好,到目前为止,我们的 spring cache 缓存程序已经运行成功了,但是还不完美,因为还缺少一个重要的缓存管理逻辑:清空缓存。当账号数据发生变更,那么必须要清空某个缓存,另外还需要定期的清空所有缓存,以保证缓存数据的可靠性。
为了加入清空缓存的逻辑,我们只要对 AccountService2.java 进行修改,从业务逻辑的角度上看,它有两个需要清空缓存的地方:
- 当外部调用更新了账号,则我们需要更新此账号对应的缓存
- 当外部调用说明重新加载,则我们需要清空所有缓存
我们在AccountService2的基础上进行修改,修改为AccountService3,代码如下:
@Service
public class AccountService3 {

    private final Logger logger = LoggerFactory.getLogger(AccountService3.class);

    // 使用了一个缓存名叫 accountCache
    @Cacheable(value="accountCache")
    public Account getAccountByName(String accountName) {

        // 方法内部实现不考虑缓存逻辑,直接实现业务
        logger.info("real querying account... {}", accountName);
        Optional accountOptional = getFromDB(accountName);
        if (!accountOptional.isPresent()) {
            throw new IllegalStateException(String.format("can not find account by account name : [%s]", accountName));
        }

        return accountOptional.get();
    }

    @CacheEvict(value="accountCache",key="#account.getName()")
    public void updateAccount(Account account) {
        updateDB(account);
    }

    @CacheEvict(value="accountCache",allEntries=true)
    public void reload() {
    }

    private void updateDB(Account account) {
        logger.info("real update db...{}", account.getName());
    }

    private Optional getFromDB(String accountName) {
        logger.info("real querying db... {}", accountName);
        //Todo query data from database
        return Optional.fromNullable(new Account(accountName));
    }
}
我们的测试代码如下:
public class AccountService3Test {


    private AccountService3 accountService3;

    private final Logger logger = LoggerFactory.getLogger(AccountService3Test.class);

    @Before
    public void setUp() throws Exception {
        ClassPathXmlApplicationContext context = new ClassPathXmlApplicationContext("applicationContext2.xml");
        accountService3 = context.getBean("accountService3", AccountService3.class);
    }

    @Test
    public void testGetAccountByName() throws Exception {

        logger.info("first query.....");
        accountService3.getAccountByName("accountName");

        logger.info("second query....");
        accountService3.getAccountByName("accountName");

    }

    @Test
    public void testUpdateAccount() throws Exception {
       // account1会查询db
        Account account1 = accountService3.getAccountByName("accountName1");
        logger.info(account1.toString());
        // account2会查询db
        Account account2 = accountService3.getAccountByName("accountName2");
        logger.info(account2.toString());

        account2.setId(121212);
        accountService3.updateAccount(account2);

        // account1会走缓存
        account1 = accountService3.getAccountByName("accountName1");
        logger.info(account1.toString());
        // account2会查询db
        account2 = accountService3.getAccountByName("accountName2");
        logger.info(account2.toString());

    }

    @Test
    public void testReload() throws Exception {
        accountService3.reload();
        // 这2行查询数据库
        accountService3.getAccountByName("somebody1");
        accountService3.getAccountByName("somebody2");

        // 这两行走缓存
        accountService3.getAccountByName("somebody1");
        accountService3.getAccountByName("somebody2");
    }
}
在这个测试代码中我们重点关注testUpdateAccount()方法,在测试代码中我们已经注释了在update完account2以后,再次查询的时候,account1会走缓存,而account2不会走缓存,而去查询db。
如何按照条件操作缓存
前面介绍的缓存方法,没有任何条件,即所有对 accountService 对象的 getAccountByName 方法的调用都会起动缓存效果,不管参数是什么值。
如果有一个需求,就是只有账号名称的长度小于等于 4 的情况下,才做缓存,大于 4 的不使用缓存。
虽然这个需求比较坑爹,但是抛开需求的合理性,我们怎么实现这个功能呢?可以使用condition属性:
@Cacheable(value="accountCache",condition="#accountName.length() <= 4")// 缓存名叫 accountCache
public Account getAccountByName(String accountName) {
    // 方法内部实现不考虑缓存逻辑,直接实现业务
    return getFromDB(accountName);
}
注意其中的 condition=”#accountName.length() <=4”,这里使用了 SpEL (Spring Expression Language)表达式访问了参数 accountName 对象的 length() 方法,条件表达式返回一个布尔值,true/false,当条件为 true,则进行缓存操作,否则直接调用方法执行的返回结果。
如果有多个参数,如何进行 key 的组合
假设我们希望根据对象相关属性的组合来进行缓存,比如有这么一个场景:
要求根据账号名、密码和是否发送日志查询账号信息
很明显,这里我们需要根据账号名、密码对账号对象进行缓存,而第三个参数“是否发送日志”对缓存没有任何影响。所以,我们可以利用 SpEL 表达式对缓存 key 进行设计。我们为Account类增加一个password 属性, 然后修改AccountService代码:
@Cacheable(value="accountCache",key="#accountName.concat(#password)")
 public Account getAccount(String accountName,String password,boolean sendLog) {
   // 方法内部实现不考虑缓存逻辑,直接实现业务
   return getFromDB(accountName,password);
 }
注意上面的 key 属性,其中引用了方法的两个参数 accountName 和 password,而 sendLog 属性没有考虑,因为其对缓存没有影响。
accountService.getAccount("accountName", "123456", true);// 查询数据库
accountService.getAccount("accountName", "123456", true);// 走缓存
accountService.getAccount("accountName", "123456", false);// 走缓存
accountService.getAccount("accountName", "654321", true);// 查询数据库
accountService.getAccount("accountName", "654321", true);// 走缓存
如何做到:既要保证方法被调用,又希望结果被缓存
根据前面的例子,我们知道,如果使用了 @Cacheable 注释,则当重复使用相同参数调用方法的时候,方法本身不会被调用执行,即方法本身被略过了,取而代之的是方法的结果直接从缓存中找到并返回了。
现实中并不总是如此,有些情况下我们希望方法一定会被调用,因为其除了返回一个结果,还做了其他事情,例如记录日志,调用接口等,这个时候,我们可以用 @CachePut注释,这个注释可以确保方法被执行,同时方法的返回值也被记录到缓存中。
@Cacheable(value="accountCache")
 public Account getAccountByName(String accountName) {
   // 方法内部实现不考虑缓存逻辑,直接实现业务
   return getFromDB(accountName);
 }

 // 更新 accountCache 缓存
 @CachePut(value="accountCache",key="#account.getName()")
 public Account updateAccount(Account account) {
   return updateDB(account);
 }
 private Account updateDB(Account account) {
   logger.info("real updating db..."+account.getName());
   return account;
 }
我们的测试代码如下:
Account account = accountService.getAccountByName("someone");
account.setPassword("123");
accountService.updateAccount(account);
account.setPassword("321");
accountService.updateAccount(account);
account = accountService.getAccountByName("someone");
logger.info(account.getPassword());
如上面的代码所示,我们首先用 getAccountByName 方法查询一个人 someone 的账号,这个时候会查询数据库一次,但是也记录到缓存中了。然后我们修改了密码,调用了 updateAccount 方法,这个时候会执行数据库的更新操作且记录到缓存,我们再次修改密码并调用 updateAccount 方法,然后通过 getAccountByName 方法查询,这个时候,由于缓存中已经有数据,所以不会查询数据库,而是直接返回最新的数据,所以打印的密码应该是“321”。
注意和限制
上面介绍过 spring cache 的原理,即它是基于动态生成的 proxy 代理机制来对方法的调用进行切面,这里关键点是对象的引用问题.
如果对象的方法是内部调用(即 this 引用)而不是外部引用,则会导致 proxy 失效,那么我们的切面就失效,也就是说上面定义的各种注释包括 @Cacheable、@CachePut 和 @CacheEvict 都会失效,我们来演示一下。
public Account getAccountByName2(String accountName) {
   return this.getAccountByName(accountName);
 }

 @Cacheable(value="accountCache")// 使用了一个缓存名叫 accountCache
 public Account getAccountByName(String accountName) {
   // 方法内部实现不考虑缓存逻辑,直接实现业务
   return getFromDB(accountName);
 }
上面我们定义了一个新的方法 getAccountByName2,其自身调用了 getAccountByName 方法,这个时候,发生的是内部调用(this),所以没有走 proxy,导致 spring cache 失效。
@CacheEvict 的可靠性问题
我们看到,@CacheEvict注释有一个属性 beforeInvocation,缺省为 false,即缺省情况下,都是在实际的方法执行完成后,才对缓存进行清空操作。期间如果执行方法出现异常,则会导致缓存清空不被执行。我们演示一下。
// 清空 accountCache 缓存
 @CacheEvict(value="accountCache",allEntries=true)
 public void reload() {
   throw new RuntimeException();
 }
我们的测试代码如下:
accountService.getAccountByName("someone");
accountService.getAccountByName("someone");
try {
     accountService.reload();
} catch (Exception e) {
    //...
}
accountService.getAccountByName("someone");
注意上面的代码,我们在 reload 的时候抛出了运行期异常,这会导致清空缓存失败。上面的测试代码先查询了两次,然后 reload,然后再查询一次,结果应该是只有第一次查询走了数据库,其他两次查询都从缓存,第三次也走缓存因为 reload 失败了。
那么我们如何避免这个问题呢?我们可以用 @CacheEvict 注释提供的 beforeInvocation 属性,将其设置为 true,这样,在方法执行前我们的缓存就被清空了。可以确保缓存被清空。