50.SpringBoot学习笔记--使用外部Servlet容器与JSP支持
嵌入式 Servlet 容器
应用打包成可执行的 jar 包。
- 优点:简单,便捷
- 缺点:
- 默认不支持 JSP
- 优化定制比较复杂
- 使用定制器【ServerProperties、自定义 EmbeddedServletContainerCustomizer】
- 自己编写嵌入式 Servlet 容器的创建工厂【EmbeddedServletContainerFactory】
外置 Servlet 容器
外部安装 Tomcat — 应用以 war 包的方式打包。
创建项目
1、创建项目时,Packaging 选择 War

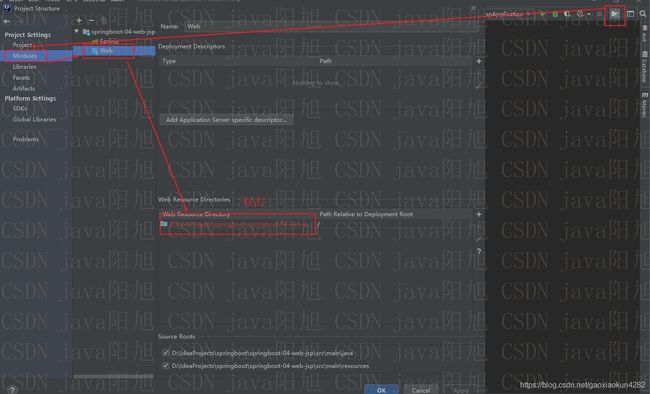
2、按照下面图片的方法,创建 webapp 文件夹


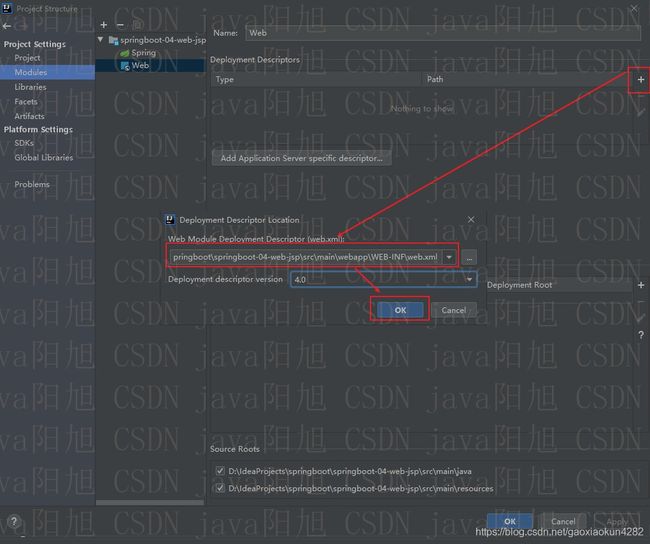
3、按照下面图片的方法,创建 web.xml。其中 web.xml 的创建路径的示例如下:
D:\IdeaProjects\springboot\springboot-04-web-jsp\src\main\webapp\WEB-INF\web.xml
配置项目
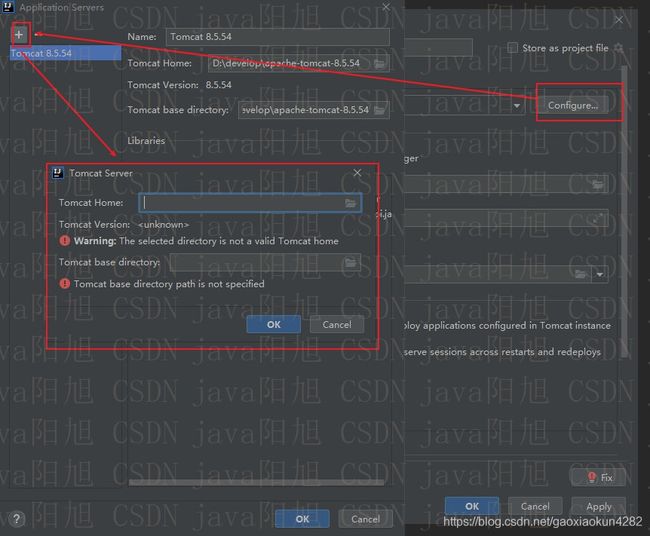
1、Edit Configurations…

2、+ --> Tomcat Server – Local

3、按照下面图片的方法,配置 Tomcat Home (配置好 Tomcat Home 后,Tomcat base directory 会自动填好)
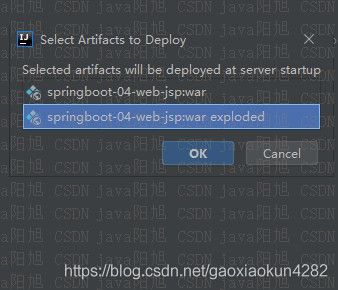
4、Deployment --> + --> Artifact
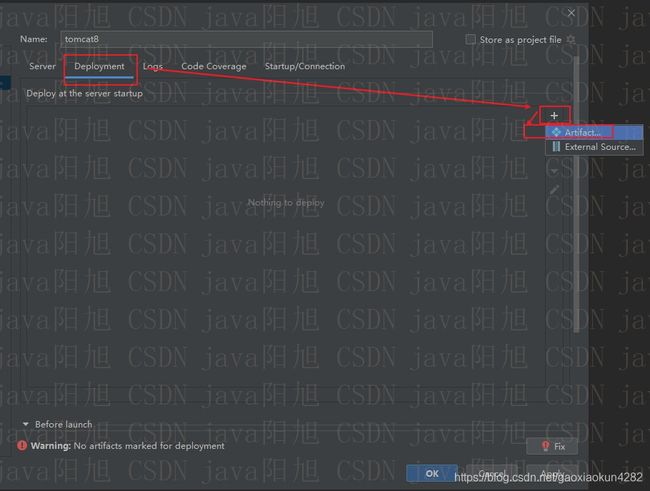
5、选择 exploded 版本
6、配置 Application context

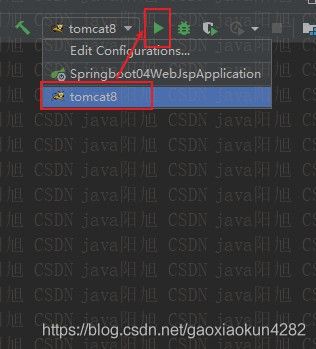
7、选择刚刚配置好的 tomcat8,启动。
开发项目
src\main\webapp\hello.jsp
<%@ page contentType="text/html;charset=UTF-8" language="java" %>


    Title


    Hello JSP
    abc
src\main\webapp\WEB-INF\success.jsp
<%@ page contentType="text/html;charset=UTF-8" language="java" %>


    Title


    SUCCESS
    ${msg}
demo.yangxu.springboot.controller.HelloController
package demo.yangxu.springboot.controller;

import org.springframework.stereotype.Controller;
import org.springframework.ui.Model;
import org.springframework.web.bind.annotation.GetMapping;

@Controller
public class HelloController {


    @GetMapping("/abc")
    public String hello(Model model){

        model.addAttribute("msg","你好");
        return "success";
    }
}
application.properties
#指定视图解析路径前缀
spring.mvc.view.prefix=/WEB-INF/
#指定视图解析后缀
spring.mvc.view.suffix=.jsp
#jsp修改不需要重启
server.servlet.jsp.init-parameters.development=true
总结
1、创建一个 War 项目 (利用 IDEA 创建好目录结构)
2、将嵌入式的 Tomcat 指定为 provided (使用 Spring Initializr 会自动配置好)
<dependency>
    <groupId>org.springframework.bootgroupId>
    <artifactId>spring-boot-starter-tomcatartifactId>
    <scope>providedscope>
dependency>
3、编写一个 SpringBootServletInitializer 的子类,并调用 configure 方法 (使用 Spring Initializr 会自动配置好)
package demo.yangxu.springboot;

import org.springframework.boot.builder.SpringApplicationBuilder;
import org.springframework.boot.web.servlet.support.SpringBootServletInitializer;

public class ServletInitializer extends SpringBootServletInitializer {


    @Override
    protected SpringApplicationBuilder configure(SpringApplicationBuilder application) {

        //传入SpringBoot应用的主程序
        return application.sources(Springboot04WebJspApplication.class);
    }

}
4、启动服务器就可以使用。