读Vue源码(五)—— 响应式数据驱动(上)
主流程
先上例子:
let comp = {
  template: '{{nest.msg}}点击',

  data() {
    return {
      nest: {
        msg: 'Hello Vue'
      }
    }
  },

  methods: {
    change() {
      this.nest.msg = 'Hello World'
    }
  }
}

// eslint-disable-next-line no-new
new Vue({
  el: '#app',
  render: h => h(comp)
})
可能很多小伙伴之前都了解过 Vue.js 实现响应式的核心是利用了 ES5 的 Object.defineProperty,这也是为什么 Vue.js 不能兼容 IE8 及以下浏览器的原因,我们先来对它有个直观的认识。
Object.defineProperty
Object.defineProperty 方法会直接在一个对象上定义一个新属性,或者修改一个对象的现有属性, 并返回这个对象,先来看一下它的语法:
Object.defineProperty(obj, prop, descriptor)
obj 是要在其上定义属性的对象;prop 是要定义或修改的属性的名称;descriptor 是将被定义或修改的属性描述符。比较核心的是 descriptor,它有很多可选键值,具体的可以去参阅它的文档。这里我们最关心的是 get 和 set,get 是一个给属性提供的 getter 方法,当我们访问了该属性的时候会触发 getter 方法;set 是一个给属性提供的 setter 方法,当我们对该属性做修改的时候会触发 setter 方法。
一旦对象拥有了 getter 和 setter,我们可以简单地把这个对象称为响应式对象。那么 Vue.js 把哪些对象变成了响应式对象了呢,接下来我们从源码层面分析,在 Vue 的初始化阶段,_init 方法执行的时候,会执行 initState(vm) 方法,它的定义在 src/core/instance/state.js 中。
initState
export function initState (vm: Component) {
  vm._watchers = []
  const opts = vm.$options
  if (opts.props) initProps(vm, opts.props)
  if (opts.methods) initMethods(vm, opts.methods)
  if (opts.data) {
    initData(vm)
  } else {
    observe(vm._data = {}, true /* asRootData */)
  }
  if (opts.computed) initComputed(vm, opts.computed)
  if (opts.watch && opts.watch !== nativeWatch) {
    initWatch(vm, opts.watch)
  }
}
initState 方法主要是对 props、methods、data、computed 和 wathcer 等属性做了初始化操作。这里我们重点分析 props 和 data,对于其它属性的初始化我们之后再详细分析。先看initProps:
function initProps (vm: Component, propsOptions: Object) {
  const propsData = vm.$options.propsData || {}
  const props = vm._props = {}
  // cache prop keys so that future props updates can iterate using Array
  // instead of dynamic object key enumeration.
  const keys = vm.$options._propKeys = []
  const isRoot = !vm.$parent
  // root instance props should be converted
  if (!isRoot) {
    toggleObserving(false)
  }
  for (const key in propsOptions) {
    keys.push(key)
    const value = validateProp(key, propsOptions, propsData, vm)
    /* istanbul ignore else */
    if (process.env.NODE_ENV !== 'production') {
      const hyphenatedKey = hyphenate(key)
      if (isReservedAttribute(hyphenatedKey) ||
          config.isReservedAttr(hyphenatedKey)) {
        warn(
          `"${hyphenatedKey}" is a reserved attribute and cannot be used as component prop.`,
          vm
        )
      }
      defineReactive(props, key, value, () => {
        if (vm.$parent && !isUpdatingChildComponent) {
          warn(
            `Avoid mutating a prop directly since the value will be ` +
            `overwritten whenever the parent component re-renders. ` +
            `Instead, use a data or computed property based on the prop's ` +
            `value. Prop being mutated: "${key}"`,
            vm
          )
        }
      })
    } else {
      defineReactive(props, key, value)
    }
    // static props are already proxied on the component's prototype
    // during Vue.extend(). We only need to proxy props defined at
    // instantiation here.
    if (!(key in vm)) {
      proxy(vm, `_props`, key)
    }
  }
  toggleObserving(true)
}
props 的初始化主要过程,就是遍历定义的 props 配置。遍历的过程主要做两件事情:一个是调用 defineReactive 方法把每个 prop 对应的值变成响应式,可以通过 vm._props.xxx 访问到定义 props 中对应的属性。对于 defineReactive 方法,我们稍后会介绍;另一个是通过 proxy 把 vm._props.xxx 的访问代理到 vm.xxx 上,我们稍后也会介绍。然后看initData:
function initData (vm: Component) {
  let data = vm.$options.data
  data = vm._data = typeof data === 'function'
    ? getData(data, vm)
    : data || {}
  if (!isPlainObject(data)) {
    data = {}
    process.env.NODE_ENV !== 'production' && warn(
      'data functions should return an object:\n' +
      'https://vuejs.org/v2/guide/components.html#data-Must-Be-a-Function',
      vm
    )
  }
  // proxy data on instance
  const keys = Object.keys(data)
  const props = vm.$options.props
  const methods = vm.$options.methods
  let i = keys.length
  while (i--) {
    const key = keys[i]
    if (process.env.NODE_ENV !== 'production') {
      if (methods && hasOwn(methods, key)) {
        warn(
          `Method "${key}" has already been defined as a data property.`,
          vm
        )
      }
    }
    if (props && hasOwn(props, key)) {
      process.env.NODE_ENV !== 'production' && warn(
        `The data property "${key}" is already declared as a prop. ` +
        `Use prop default value instead.`,
        vm
      )
    } else if (!isReserved(key)) {
      proxy(vm, `_data`, key)
    }
  }
  // observe data
  observe(data, true /* asRootData */)
}
data 的初始化主要过程也是做两件事,一个是对定义 data 函数返回对象的遍历,通过 proxy 把每一个值 vm._data.xxx 都代理到 vm.xxx 上;另一个是调用 observe 方法观测整个 data 的变化,把 data 也变成响应式,可以通过 vm._data.xxx 访问到定义 data 返回函数中对应的属性,observe 我们稍后会介绍。可以看到,无论是 props 或是 data 的初始化都是把它们变成响应式对象,这个过程我们接触到几个函数,接下来我们来详细分析它们。
proxy
首先介绍一下代理,代理的作用是把 props 和 data 上的属性代理到 vm 实例上,这也就是为什么比如我们定义了如下 props,却可以通过 vm 实例访问到它。
let comP = {
  props: {
    msg: 'hello'
  },
  methods: {
    say() {
      console.log(this.msg)
    }
  }
}
我们可以在 say 函数中通过 this.msg 访问到我们定义在 props 中的 msg,这个过程发生在 proxy 阶段:
const sharedPropertyDefinition = {
  enumerable: true,
  configurable: true,
  get: noop,
  set: noop
}

export function proxy (target: Object, sourceKey: string, key: string) {
  sharedPropertyDefinition.get = function proxyGetter () {
    return this[sourceKey][key]
  }
  sharedPropertyDefinition.set = function proxySetter (val) {
    this[sourceKey][key] = val
  }
  Object.defineProperty(target, key, sharedPropertyDefinition)
}
proxy 方法的实现很简单,通过 Object.defineProperty 把 target[sourceKey][key] 的读写变成了对 target[key] 的读写。所以对于 props 而言,对 vm._props.xxx 的读写变成了 vm.xxx 的读写,而对于 vm._props.xxx 我们可以访问到定义在 props 中的属性,所以我们就可以通过 vm.xxx 访问到定义在 props 中的 xxx 属性了。同理,对于 data 而言,对 vm._data.xxxx 的读写变成了对 vm.xxxx 的读写,而对于 vm._data.xxxx 我们可以访问到定义在 data 函数返回对象中的属性,所以我们就可以通过 vm.xxxx 访问到定义在 data 函数返回对象中的 xxxx 属性了。
observe
observe 的功能就是用来监测数据的变化,它的定义在 src/core/observer/index.js 中:
/**
 * Attempt to create an observer instance for a value,
 * returns the new observer if successfully observed,
 * or the existing observer if the value already has one.
 */
export function observe (value: any, asRootData: ?boolean): Observer | void {
  if (!isObject(value) || value instanceof VNode) {
    return
  }
  let ob: Observer | void
  if (hasOwn(value, '__ob__') && value.__ob__ instanceof Observer) {
    ob = value.__ob__
  } else if (
    shouldObserve &&
    !isServerRendering() &&
    (Array.isArray(value) || isPlainObject(value)) &&
    Object.isExtensible(value) &&
    !value._isVue
  ) {
    ob = new Observer(value)
  }
  if (asRootData && ob) {
    ob.vmCount++
  }
  return ob
}
observe 方法的作用就是给非 VNode 的对象类型数据添加一个 Observer,如果已经添加过则直接返回,否则在满足一定条件下去实例化一个 Observer 对象实例。Observer 是一个类,它的作用是给对象的属性添加 getter 和 setter,用于依赖收集和派发更新:
export class Observer {
  value: any;
  dep: Dep;
  vmCount: number; // number of vms that has this object as root $data

  constructor (value: any) {
    this.value = value
    this.dep = new Dep()
    this.vmCount = 0
    def(value, '__ob__', this)
    if (Array.isArray(value)) {
      const augment = hasProto
        ? protoAugment
        : copyAugment
      augment(value, arrayMethods, arrayKeys)
      this.observeArray(value)
    } else {
      this.walk(value)
    }
  }

  /**
   * Walk through each property and convert them into
   * getter/setters. This method should only be called when
   * value type is Object.
   */
  walk (obj: Object) {
    const keys = Object.keys(obj)
    for (let i = 0; i < keys.length; i++) {
      defineReactive(obj, keys[i])
    }
  }

  /**
   * Observe a list of Array items.
   */
  observeArray (items: Array<any>) {
    for (let i = 0, l = items.length; i < l; i++) {
      observe(items[i])
    }
  }
}

export function def (obj: Object, key: string, val: any, enumerable?: boolean) {
  Object.defineProperty(obj, key, {
    value: val,
    enumerable: !!enumerable, // !!把undefined变成false……
    writable: true,
    configurable: true
  })
}
Observer 的构造函数逻辑很简单,首先实例化 Dep 对象,这块稍后会介绍,接着通过执行 def 函数把自身实例添加到数据对象 value 的 __ob__ 属性上,def 的定义在 src/core/util/lang.js 中,是一个非常简单的Object.defineProperty 的封装,这就是为什么我在开发中输出 data 上对象类型的数据,会发现该对象多了一个 __ob__ 的属性。
回到 Observer 的构造函数,接下来会对 value 做判断,对于数组会调用 observeArray 方法,否则对纯对象调用 walk 方法。可以看到 observeArray 是遍历数组再次调用 observe 方法,而 walk 方法是遍历对象的 key 调用 defineReactive 方法,那么我们来看一下这个方法是做什么的。
defineReactive
defineReactive 的功能就是定义一个响应式对象,给对象动态添加 getter 和 setter,它的定义在 src/core/observer/index.js 中:
/**
 * Define a reactive property on an Object.
 */
export function defineReactive (
  obj: Object,
  key: string,
  val: any,
  customSetter?: ?Function,
  shallow?: boolean
) {
  const dep = new Dep()

  const property = Object.getOwnPropertyDescriptor(obj, key)
  if (property && property.configurable === false) {
    return
  }

  // cater for pre-defined getter/setters
  const getter = property && property.get
  const setter = property && property.set
  if ((!getter || setter) && arguments.length === 2) {
    val = obj[key]
  }

  let childOb = !shallow && observe(val)
  Object.defineProperty(obj, key, {
    enumerable: true,
    configurable: true,
    get: function reactiveGetter () {
      const value = getter ? getter.call(obj) : val
      if (Dep.target) {
        dep.depend()
        if (childOb) {
          childOb.dep.depend()
          if (Array.isArray(value)) {
            dependArray(value)
          }
        }
      }
      return value
    },
    set: function reactiveSetter (newVal) {
      const value = getter ? getter.call(obj) : val
      /* eslint-disable no-self-compare */
      if (newVal === value || (newVal !== newVal && value !== value)) {
        return
      }
      /* eslint-enable no-self-compare */
      if (process.env.NODE_ENV !== 'production' && customSetter) {
        customSetter()
      }
      if (setter) {
        setter.call(obj, newVal)
      } else {
        val = newVal
      }
      childOb = !shallow && observe(newVal)
      dep.notify()
    }
  })
}
defineReactive 函数最开始初始化 Dep 对象的实例,接着拿到 obj 的属性描述符,然后对子对象递归调用 observe 方法,这样就保证了无论 obj 的结构多复杂,它的所有子属性也能变成响应式的对象,这样我们访问或修改 obj 中一个嵌套较深的属性,也能触发 getter 和 setter。最后利用 Object.defineProperty 去给 obj 的属性 key 添加 getter 和 setter。而关于 getter 和 setter 的具体实现,我们会在之后介绍。
依赖收集
先上例子:
let comp = {
template: '' +
'{{msg}}' +
'{{msg1}}' +
'' +
'' +
'',
data() {
return {
flag: true,
msg: 'Hello World',
msg1: 'Hello Vue'
}
},
methods: {
change() {
this.msg = Math.random()
},
toggle() {
this.flag = !this.flag
},
}
}
// eslint-disable-next-line no-new
new Vue({
el: '#app',
render: h => h(comp)
})
当触发子组件_render的时候,会调用到data的getter:
export function defineReactive (
  obj: Object,
  key: string,
  val: any,
  customSetter?: ?Function,
  shallow?: boolean
) {
  const dep = new Dep()

  const property = Object.getOwnPropertyDescriptor(obj, key)
  if (property && property.configurable === false) {
    return
  }

  // cater for pre-defined getter/setters
  const getter = property && property.get
  const setter = property && property.set
  if ((!getter || setter) && arguments.length === 2) {
    val = obj[key]
  }

  let childOb = !shallow && observe(val)
  Object.defineProperty(obj, key, {
    enumerable: true,
    configurable: true,
    get: function reactiveGetter () {
      const value = getter ? getter.call(obj) : val
      if (Dep.target) {
        dep.depend()
        if (childOb) {
          childOb.dep.depend()
          if (Array.isArray(value)) {
            dependArray(value)
          }
        }
      }
      return value
    },
    // ...
  })
}
这段代码我们只需要关注 2 个地方,一个是 const dep = new Dep() 实例化一个 Dep 的实例,另一个是在 get 函数中通过 dep.depend 做依赖收集,这里还有个对 childOb 判断的逻辑,我们之后会介绍它的作用。
Dep
Dep 是整个 getter 依赖收集的核心,它的定义在 src/core/observer/dep.js 中:
import type Watcher from './watcher'
import { remove } from '../util/index'

let uid = 0

/**
 * A dep is an observable that can have multiple
 * directives subscribing to it.
 */
export default class Dep {
  static target: ?Watcher;
  id: number;
  subs: Array<Watcher>;

  constructor () {
    this.id = uid++
    this.subs = []
  }

  addSub (sub: Watcher) {
    this.subs.push(sub)
  }

  removeSub (sub: Watcher) {
    remove(this.subs, sub)
  }

  depend () {
    if (Dep.target) {
      Dep.target.addDep(this)
    }
  }

  notify () {
    // stabilize the subscriber list first
    const subs = this.subs.slice()
    for (let i = 0, l = subs.length; i < l; i++) {
      subs[i].update()
    }
  }
}

// the current target watcher being evaluated.
// this is globally unique because there could be only one
// watcher being evaluated at any time.
Dep.target = null
const targetStack = []

export function pushTarget (_target: ?Watcher) {
  if (Dep.target) targetStack.push(Dep.target)
  Dep.target = _target
}

export function popTarget () {
  Dep.target = targetStack.pop()
}
Dep 是一个 Class,它定义了一些属性和方法,这里需要特别注意的是它有一个静态属性 target,这是一个全局唯一 Watcher,这是一个非常巧妙的设计,因为在同一时间只能有一个全局的 Watcher 被计算,另外它的自身属性 subs 也是 Watcher 的数组。
Dep 实际上就是对 Watcher 的一种管理,Dep 脱离 Watcher 单独存在是没有意义的,为了完整地讲清楚依赖收集过程,我们有必要看一下 Watcher 的一些相关实现,它的定义在 src/core/observer/watcher.js 中:
Watcher
let uid = 0

/**
 * A watcher parses an expression, collects dependencies,
 * and fires callback when the expression value changes.
 * This is used for both the $watch() api and directives.
 */
export default class Watcher {
  vm: Component;
  expression: string;
  cb: Function;
  id: number;
  deep: boolean;
  user: boolean;
  computed: boolean;
  sync: boolean;
  dirty: boolean;
  active: boolean;
  dep: Dep;
  deps: Array<Dep>;
  newDeps: Array<Dep>;
  depIds: SimpleSet;
  newDepIds: SimpleSet;
  before: ?Function;
  getter: Function;
  value: any;

  constructor (
    vm: Component,
    expOrFn: string | Function,
    cb: Function,
    options?: ?Object,
    isRenderWatcher?: boolean
  ) {
    this.vm = vm
    if (isRenderWatcher) {
      vm._watcher = this
    }
    vm._watchers.push(this)
    // options
    if (options) {
      this.deep = !!options.deep
      this.user = !!options.user
      this.computed = !!options.computed
      this.sync = !!options.sync
      this.before = options.before
    } else {
      this.deep = this.user = this.computed = this.sync = false
    }
    this.cb = cb
    this.id = ++uid // uid for batching
    this.active = true
    this.dirty = this.computed // for computed watchers
    this.deps = []
    this.newDeps = []
    this.depIds = new Set()
    this.newDepIds = new Set()
    this.expression = process.env.NODE_ENV !== 'production'
      ? expOrFn.toString()
      : ''
    // parse expression for getter
    if (typeof expOrFn === 'function') {
      this.getter = expOrFn
    } else {
      this.getter = parsePath(expOrFn)
      if (!this.getter) {
        this.getter = function () {}
        process.env.NODE_ENV !== 'production' && warn(
          `Failed watching path: "${expOrFn}" ` +
          'Watcher only accepts simple dot-delimited paths. ' +
          'For full control, use a function instead.',
          vm
        )
      }
    }
    if (this.computed) {
      this.value = undefined
      this.dep = new Dep()
    } else {
      this.value = this.get()
    }
  }

  /**
   * Evaluate the getter, and re-collect dependencies.
   */
  get () {
    pushTarget(this)
    let value
    const vm = this.vm
    try {
      value = this.getter.call(vm, vm)
    } catch (e) {
      if (this.user) {
        handleError(e, vm, `getter for watcher "${this.expression}"`)
      } else {
        throw e
      }
    } finally {
      // "touch" every property so they are all tracked as
      // dependencies for deep watching
      if (this.deep) {
        traverse(value)
      }
      popTarget()
      this.cleanupDeps()
    }
    return value
  }

  /**
   * Add a dependency to this directive.
   */
  addDep (dep: Dep) {
    const id = dep.id
    if (!this.newDepIds.has(id)) {
      this.newDepIds.add(id)
      this.newDeps.push(dep)
      if (!this.depIds.has(id)) {
        dep.addSub(this)
      }
    }
  }

  /**
   * Clean up for dependency collection.
   */
  cleanupDeps () {
    let i = this.deps.length
    while (i--) {
      const dep = this.deps[i]
      if (!this.newDepIds.has(dep.id)) {
        dep.removeSub(this)
      }
    }
    let tmp = this.depIds
    this.depIds = this.newDepIds
    this.newDepIds = tmp
    this.newDepIds.clear()
    tmp = this.deps
    this.deps = this.newDeps
    this.newDeps = tmp
    this.newDeps.length = 0
  }
  // ...
}
Watcher 是一个 Class,在它的构造函数中,定义了一些和 Dep 相关的属性:
this.deps = []
this.newDeps = []
this.depIds = new Set()
this.newDepIds = new Set()
其中,this.deps 和 this.newDeps 表示 Watcher 实例持有的 Dep 实例的数组;而 this.depIds 和 this.newDepIds 分别代表 this.deps 和 this.newDeps 的 id Set(这个 Set 是 ES6 的数据结构,它的实现在 src/core/util/env.js 中)。那么这里为何需要有 2 个 Dep 实例数组呢,稍后我们会解释。
Watcher 还定义了一些原型的方法,和依赖收集相关的有 get、addDep 和 cleanupDeps 方法,单个介绍它们的实现不方便理解,我会结合整个依赖收集的过程把这几个方法讲清楚。
过程分析
之前我们介绍当对数据对象的访问会触发他们的 getter 方法,那么这些对象什么时候被访问呢?还记得之前我们介绍过 Vue 的 mount 过程是通过 mountComponent 函数,其中有一段比较重要的逻辑,大致如下:
updateComponent = () => {
  vm._update(vm._render(), hydrating)
}
new Watcher(vm, updateComponent, noop, {
  before () {
    if (vm._isMounted) {
      callHook(vm, 'beforeUpdate')
    }
  }
}, true /* isRenderWatcher */)
当我们去实例化一个渲染 watcher 的时候,首先进入 watcher 的构造函数逻辑,然后会执行它的 this.get() 方法,进入 get 函数,首先会执行:
pushTarget(this)

export function pushTarget (_target: Watcher) {
  if (Dep.target) targetStack.push(Dep.target)
  Dep.target = _target
}
实际上就是把 Dep.target 赋值为当前的渲染 watcher 并压栈(为了恢复用)。接着又执行了:
value = this.getter.call(vm, vm)

// 实际就是执行
vm._update(vm._render(), hydrating)
它会先执行 vm._render() 方法,因为之前分析过这个方法会生成 渲染 VNode,并且在这个过程中会对 vm 上的数据访问,这个时候就触发了数据对象的 getter。那么每个对象值的 getter 都持有一个 dep,在触发 getter 的时候会调用 dep.depend() 方法,也就会执行 Dep.target.addDep(this)。刚才我们提到这个时候 Dep.target 已经被赋值为渲染 watcher,那么就执行到 addDep 方法:
addDep (dep: Dep) {
  const id = dep.id
  if (!this.newDepIds.has(id)) {
    this.newDepIds.add(id)
    this.newDeps.push(dep)  // watcher里加入dep
    if (!this.depIds.has(id)) {
      dep.addSub(this) // dep里加入watcher,双向绑定
    }
  }
}
这时候会做一些逻辑判断(保证同一数据不会被添加多次)后执行 dep.addSub(this),那么就会执行 this.subs.push(sub),也就是说把当前的 watcher 订阅到这个数据持有的 dep 的 subs 中,这个目的是为后续数据变化时候能通知到哪些 subs 做准备。
所以在 vm._render() 过程中,会触发所有数据的 getter,这样实际上已经完成了一个依赖收集的过程。那么到这里就结束了么,其实并没有,在完成依赖收集后,还有几个逻辑要执行,首先是:
if (this.deep) {
  traverse(value)
}
这个是要递归去访问 value,触发它所有子项的 getter,这个之后会详细讲。接下来执行:
popTarget()
popTarget 的定义在 src/core/observer/dep.js 中:
Dep.target = targetStack.pop()
实际上就是把 Dep.target 恢复成上一个状态,因为当前 vm 的数据依赖收集已经完成,那么对应的渲染Dep.target 也需要改变。最后执行:
this.cleanupDeps()

cleanupDeps () {
  let i = this.deps.length
  while (i--) {
    const dep = this.deps[i]
    // 移除新newDeps中已经不存在的dep(就是说,当前的comp已经不再关注的数据)
    if (!this.newDepIds.has(dep.id)) {
      dep.removeSub(this)
    }
  }
  // 把newDeps的数据赋给deps,并清空newDeps
  let tmp = this.depIds
  this.depIds = this.newDepIds
  this.newDepIds = tmp
  this.newDepIds.clear()
  tmp = this.deps
  this.deps = this.newDeps
  this.newDeps = tmp
  this.newDeps.length = 0
}
那么为什么需要做 deps 订阅的移除呢,在添加 deps 的订阅过程,已经能通过 id 去重避免重复订阅了。
考虑到一种场景,我们的模板会根据 v-if 去渲染不同子模板 a 和 b,当我们满足某种条件的时候渲染 a 的时候,会访问到 a 中的数据,这时候我们对 a 使用的数据添加了 getter,做了依赖收集,那么当我们去修改 a 的数据的时候,理应通知到这些订阅者。那么如果我们一旦改变了条件渲染了 b 模板,又会对 b 使用的数据添加了 getter,如果我们没有依赖移除的过程,那么这时候我去修改 a 模板的数据,会通知 a 数据的订阅的回调,这显然是有浪费的。
因此 Vue 设计了在每次添加完新的订阅,会移除掉旧的订阅,这样就保证了在我们刚才的场景中,如果渲染 b 模板的时候去修改 a 模板的数据,a 数据订阅回调已经被移除了,所以不会有任何浪费。
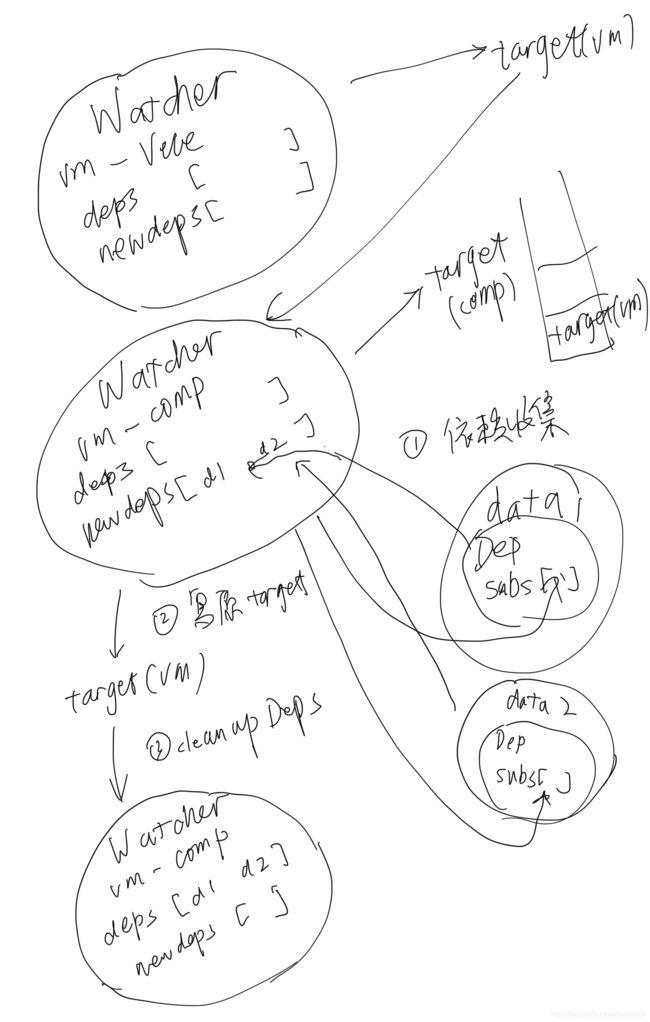
下面简答画了个依赖收集的简图,其实很简单就是互相持有对方引用,然后需要的时候拿出来回调。
派发更新
我们先来回顾一下 setter 部分的逻辑:
export function defineReactive (
  obj: Object,
  key: string,
  val: any,
  customSetter?: ?Function,
  shallow?: boolean
) {
  const dep = new Dep()

  const property = Object.getOwnPropertyDescriptor(obj, key)
  if (property && property.configurable === false) {
    return
  }

  // cater for pre-defined getter/setters
  const getter = property && property.get
  const setter = property && property.set
  if ((!getter || setter) && arguments.length === 2) {
    val = obj[key]
  }

  let childOb = !shallow && observe(val)
  Object.defineProperty(obj, key, {
    enumerable: true,
    configurable: true,
    // ...
    set: function reactiveSetter (newVal) {
      const value = getter ? getter.call(obj) : val
      /* eslint-disable no-self-compare */
      if (newVal === value || (newVal !== newVal && value !== value)) {
        return
      }
      /* eslint-enable no-self-compare */
      if (process.env.NODE_ENV !== 'production' && customSetter) {
        customSetter()
      }
      if (setter) {
        setter.call(obj, newVal)
      } else {
        val = newVal
      }
      childOb = !shallow && observe(newVal)
      dep.notify()
    }
  })
}
setter 的逻辑有 2 个关键的点,一个是 childOb = !shallow && observe(newVal),如果 shallow 为 false 的情况,会对新设置的值变成一个响应式对象;另一个是 dep.notify(),通知所有的订阅者,这是本节的关键,接下来我会带大家完整的分析整个派发更新的过程。
过程分析
当我们在组件中对响应的数据做了修改,就会触发 setter 的逻辑,最后调用 dep.notify() 方法, 它是 Dep 的一个实例方法,定义在 src/core/observer/dep.js 中:
class Dep {
  // ...
  notify () {
  // stabilize the subscriber list first
    const subs = this.subs.slice()
    for (let i = 0, l = subs.length; i < l; i++) {
      subs[i].update()
    }
  }
}
这里的逻辑非常简单,遍历所有的 subs,也就是 Watcher 的实例数组,然后调用每一个 watcher 的 update 方法,它的定义在 src/core/observer/watcher.js 中:
class Watcher {
  // ...
  update () {
    /* istanbul ignore else */
    if (this.computed) {
      // A computed property watcher has two modes: lazy and activated.
      // It initializes as lazy by default, and only becomes activated when
      // it is depended on by at least one subscriber, which is typically
      // another computed property or a component's render function.
      if (this.dep.subs.length === 0) {
        // In lazy mode, we don't want to perform computations until necessary,
        // so we simply mark the watcher as dirty. The actual computation is
        // performed just-in-time in this.evaluate() when the computed property
        // is accessed.
        this.dirty = true
      } else {
        // In activated mode, we want to proactively perform the computation
        // but only notify our subscribers when the value has indeed changed.
        this.getAndInvoke(() => {
          this.dep.notify()
        })
      }
    } else if (this.sync) {
      this.run()
    } else {
      queueWatcher(this)
    }
  }
}
这里对于 Watcher 的不同状态,会执行不同的逻辑,computed 和 sync 等状态的分析我会之后抽一小节详细介绍,在一般组件数据更新的场景,会走到最后一个 queueWatcher(this) 的逻辑,queueWatcher 的定义在 src/core/observer/scheduler.js 中:
const queue: Array<Watcher> = []
let has: { [key: number]: ?true } = {}
let waiting = false
let flushing = false
/**
 * Push a watcher into the watcher queue.
 * Jobs with duplicate IDs will be skipped unless it's
 * pushed when the queue is being flushed.
 */
export function queueWatcher (watcher: Watcher) {
  const id = watcher.id
  if (has[id] == null) {
    has[id] = true
    if (!flushing) {
      queue.push(watcher)
    } else {
      // if already flushing, splice the watcher based on its id
      // if already past its id, it will be run next immediately.
      let i = queue.length - 1
      while (i > index && queue[i].id > watcher.id) {
        i--
      }
      queue.splice(i + 1, 0, watcher)
    }
    // queue the flush
    if (!waiting) {
      waiting = true
      nextTick(flushSchedulerQueue)
    }
  }
}
这里引入了一个队列的概念,这也是 Vue 在做派发更新的时候的一个优化的点,它并不会每次数据改变都触发 watcher 的回调,而是把这些 watcher 先添加到一个队列里,然后在 nextTick 后执行 flushSchedulerQueue。
这里有几个细节要注意一下,首先用 has 对象保证同一个 Watcher 只添加一次;接着对 flushing 的判断,else 部分的逻辑稍后我会讲;最后通过 waiting 保证对 nextTick(flushSchedulerQueue) 的调用逻辑只有一次,另外 nextTick 的实现我之后会抽一小节专门去讲,目前就可以理解它是在下一个 tick,也就是异步的去执行 flushSchedulerQueue。
接下来我们来看 flushSchedulerQueue 的实现,它的定义在 src/core/observer/scheduler.js 中。
let flushing = false
let index = 0
/**
 * Flush both queues and run the watchers.
 */
function flushSchedulerQueue () {
  flushing = true
  let watcher, id

  // Sort queue before flush.
  // This ensures that:
  // 1. 组件的更新由父到子;因为父组件的创建过程是先于子的,所以 watcher 的创建也是先父后子,执行顺序也应该保持先父后子。
  // 2. 用户的自定义 watcher 要优先于渲染 watcher 执行;因为用户自定义 watcher 是在渲染 watcher 之前创建的。
  // 3. 如果一个组件在父组件的 watcher 执行期间被销毁,那么它对应的 watcher 执行都可以被跳过,所以父组件的 watcher 应该先执行。
  queue.sort((a, b) => a.id - b.id)

  // do not cache length because more watchers might be pushed
  // as we run existing watchers
  for (index = 0; index < queue.length; index++) {
    watcher = queue[index]
    if (watcher.before) {
      watcher.before()
    }
    id = watcher.id
    has[id] = null
    watcher.run()
    // in dev build, check and stop circular updates.
    if (process.env.NODE_ENV !== 'production' && has[id] != null) {
      circular[id] = (circular[id] || 0) + 1
      if (circular[id] > MAX_UPDATE_COUNT) {
        warn(
          'You may have an infinite update loop ' + (
            watcher.user
              ? `in watcher with expression "${watcher.expression}"`
              : `in a component render function.`
          ),
          watcher.vm
        )
        break
      }
    }
  }

  // keep copies of post queues before resetting state
  const activatedQueue = activatedChildren.slice()
  const updatedQueue = queue.slice()

  resetSchedulerState()

  // call component updated and activated hooks
  callActivatedHooks(activatedQueue)
  callUpdatedHooks(updatedQueue)

  // devtool hook
  /* istanbul ignore if */
  if (devtools && config.devtools) {
    devtools.emit('flush')
  }
}
这里有几个重要的逻辑要梳理一下,对于一些分支逻辑如 keep-alive 组件相关和之前提到过的 updated 钩子函数的执行会略过。
首先会进行队列排序,排序的目的写在了注释里。
在对 queue 排序后,接着就是要对它做遍历,拿到对应的 watcher,执行 watcher.run()。这里需要注意一个细节,在遍历的时候每次都会对 queue.length 求值,因为在 watcher.run() 的时候,很可能用户会再次添加新的 watcher,这样会再次执行到 queueWatcher,如下:
export function queueWatcher (watcher: Watcher) {
  const id = watcher.id
  if (has[id] == null) {
    has[id] = true
    if (!flushing) {
      queue.push(watcher)
    } else {
      // if already flushing, splice the watcher based on its id
      // if already past its id, it will be run next immediately.
      let i = queue.length - 1
      while (i > index && queue[i].id > watcher.id) {
        i--
      }
      queue.splice(i + 1, 0, watcher)
    }
    // ...
  }
}
可以看到,这时候 flushing 为 true,就会执行到 else 的逻辑,然后就会从后往前找,找到第一个待插入 watcher 的 id 比当前队列中 watcher 的 id 大的位置。把 watcher 按照 id的插入到队列中,因此 queue 的长度发生了变化。
状态恢复,这个过程就是执行 resetSchedulerState 函数,它的定义在 src/core/observer/scheduler.js 中。
const queue: Array<Watcher> = []
let has: { [key: number]: ?true } = {}
let circular: { [key: number]: number } = {}
let waiting = false
let flushing = false
let index = 0
/**
 * Reset the scheduler's state.
 */
function resetSchedulerState () {
  index = queue.length = activatedChildren.length = 0
  has = {}
  if (process.env.NODE_ENV !== 'production') {
    circular = {}
  }
  waiting = flushing = false
}
逻辑非常简单,就是把这些控制流程状态的一些变量恢复到初始值,把 watcher 队列清空。
接下来我们继续分析 watcher.run() 的逻辑,它的定义在 src/core/observer/watcher.js 中。
class Watcher {
  /**
   * Scheduler job interface.
   * Will be called by the scheduler.
   */
  run () {
    if (this.active) {
      this.getAndInvoke(this.cb) // 组件渲染时,cb为noop
    }
  }

  getAndInvoke (cb: Function) {
    const value = this.get()
    if (
      value !== this.value ||
      // Deep watchers and watchers on Object/Arrays should fire even
      // when the value is the same, because the value may
      // have mutated.
      isObject(value) ||
      this.deep
    ) {
      // set new value
      const oldValue = this.value
      this.value = value
      this.dirty = false
      if (this.user) {
        try {
          cb.call(this.vm, value, oldValue)
        } catch (e) {
          handleError(e, this.vm, `callback for watcher "${this.expression}"`)
        }
      } else {
        cb.call(this.vm, value, oldValue)
      }
    }
  }
}
run 函数实际上就是执行 this.getAndInvoke 方法,并传入 watcher 的回调函数。getAndInvoke 函数逻辑也很简单,先通过 this.get() 得到它当前的值,然后做判断,如果满足新旧值不等、新值是对象类型、deep 模式任何一个条件,则执行 watcher 的回调,注意回调函数执行的时候会把第一个和第二个参数传入新值 value 和旧值 oldValue,这就是当我们添加自定义 watcher 的时候能在回调函数的参数中拿到新旧值的原因。
那么对于渲染 watcher 而言,它在执行 this.get() 方法求值的时候,会执行 getter 方法:
updateComponent = () => {
  vm._update(vm._render(), hydrating)
}
所以这就是当我们去修改组件相关的响应式数据的时候,会触发组件重新渲染的原因,接着就会重新执行 patch 的过程。
前面看到,真正的update在 nextTick 后执行所有 watcher 的 run,最后执行它们的回调函数。nextTick 是 Vue 一个比较核心的实现了,下一节我们来重点分析它的实现。
nextTick
在 Vue 源码 2.5+ 后,nextTick 的实现单独有一个 JS 文件来维护它,它的源码并不多,总共也就 100 多行。接下来我们来看一下它的实现,在 src/core/util/next-tick.js 中:
import { noop } from 'shared/util'
import { handleError } from './error'
import { isIOS, isNative } from './env'

const callbacks = []
let pending = false

function flushCallbacks () {
  pending = false
  const copies = callbacks.slice(0)
  callbacks.length = 0
  for (let i = 0; i < copies.length; i++) {
    copies[i]()
  }
}

// Here we have async deferring wrappers using both microtasks and (macro) tasks.
// In < 2.4 we used microtasks everywhere, but there are some scenarios where
// microtasks have too high a priority and fire in between supposedly
// sequential events (e.g. #4521, #6690) or even between bubbling of the same
// event (#6566). However, using (macro) tasks everywhere also has subtle problems
// when state is changed right before repaint (e.g. #6813, out-in transitions).
// Here we use microtask by default, but expose a way to force (macro) task when
// needed (e.g. in event handlers attached by v-on).
let microTimerFunc
let macroTimerFunc
let useMacroTask = false

// Determine (macro) task defer implementation.
// Technically setImmediate should be the ideal choice, but it's only available
// in IE. The only polyfill that consistently queues the callback after all DOM
// events triggered in the same loop is by using MessageChannel.
/* istanbul ignore if */
if (typeof setImmediate !== 'undefined' && isNative(setImmediate)) {
  macroTimerFunc = () => {
    setImmediate(flushCallbacks)
  }
} else if (typeof MessageChannel !== 'undefined' && (
  isNative(MessageChannel) ||
  // PhantomJS
  MessageChannel.toString() === '[object MessageChannelConstructor]'
)) {
  const channel = new MessageChannel()
  const port = channel.port2
  channel.port1.onmessage = flushCallbacks
  macroTimerFunc = () => {
    port.postMessage(1)
  }
} else {
  /* istanbul ignore next */
  macroTimerFunc = () => {
    setTimeout(flushCallbacks, 0)
  }
}

// Determine microtask defer implementation.
/* istanbul ignore next, $flow-disable-line */
if (typeof Promise !== 'undefined' && isNative(Promise)) {
  const p = Promise.resolve()
  microTimerFunc = () => {
    p.then(flushCallbacks)
    // in problematic UIWebViews, Promise.then doesn't completely break, but
    // it can get stuck in a weird state where callbacks are pushed into the
    // microtask queue but the queue isn't being flushed, until the browser
    // needs to do some other work, e.g. handle a timer. Therefore we can
    // "force" the microtask queue to be flushed by adding an empty timer.
    if (isIOS) setTimeout(noop)
  }
} else {
  // fallback to macro
  microTimerFunc = macroTimerFunc
}

/**
 * Wrap a function so that if any code inside triggers state change,
 * the changes are queued using a (macro) task instead of a microtask.
 */
export function withMacroTask (fn: Function): Function {
  return fn._withTask || (fn._withTask = function () {
    useMacroTask = true
    const res = fn.apply(null, arguments)
    useMacroTask = false
    return res
  })
}

export function nextTick (cb?: Function, ctx?: Object) {
  let _resolve
  callbacks.push(() => {
    if (cb) {
      try {
        cb.call(ctx)
      } catch (e) {
        handleError(e, ctx, 'nextTick')
      }
    } else if (_resolve) {
      _resolve(ctx)
    }
  })
  if (!pending) {
    pending = true
    if (useMacroTask) {
      macroTimerFunc()
    } else {
      microTimerFunc()
    }
  }
  // $flow-disable-line
  if (!cb && typeof Promise !== 'undefined') {
    return new Promise(resolve => {
      _resolve = resolve
    })
  }
}
next-tick.js 申明了 microTimerFunc 和 macroTimerFunc 2 个变量,它们分别对应的是 micro task 的函数和 macro task 的函数。对于 macro task 的实现,优先检测是否支持原生 setImmediate,这是一个高版本 IE 和 Edge 才支持的特性,不支持的话再去检测是否支持原生的 MessageChannel,如果也不支持的话就会降级为 setTimeout 0;而对于 micro task 的实现,则检测浏览器是否原生支持 Promise,不支持的话直接指向 macro task 的实现。
next-tick.js 对外暴露了 2 个函数,先来看 nextTick,这就是我们在上一节执行 nextTick(flushSchedulerQueue) 所用到的函数。它的逻辑也很简单,把传入的回调函数 cb 压入 callbacks 数组,最后一次性地根据 useMacroTask 条件执行 macroTimerFunc 或者是 microTimerFunc,而它们都会在下一个 tick 执行 flushCallbacks,flushCallbacks 的逻辑非常简单,对 callbacks 遍历,然后执行相应的回调函数。
这里使用 callbacks 而不是直接在 nextTick 中执行回调函数的原因是保证在同一个 tick 内多次执行 nextTick,不会开启多个异步任务,而把这些异步任务都压成一个同步任务,在下一个 tick 执行完毕。
nextTick 函数最后还有一段逻辑:
if (!cb && typeof Promise !== 'undefined') {
  return new Promise(resolve => {
    _resolve = resolve
  })
}
这是当 nextTick 不传 cb 参数的时候,提供一个 Promise 化的调用,比如:
nextTick().then(() => {})
next-tick.js 还对外暴露了 withMacroTask 函数,它是对函数做一层包装,确保函数执行过程中对数据任意的修改,触发变化执行 nextTick 的时候强制走 macroTimerFunc。比如对于一些 DOM 交互事件,如 v-on 绑定的事件回调函数的处理,会强制走 macro task。
通过这一节对 nextTick 的分析,并结合上一节的 setter 分析,我们了解到数据的变化到 DOM 的重新渲染是一个异步过程,发生在下一个 tick。这就是我们平时在开发的过程中,比如从服务端接口去获取数据的时候,数据做了修改,如果我们的某些方法去依赖了数据修改后的 DOM 变化,我们就必须在 nextTick 后执行。比如下面的伪代码:
getData(res).then(()=>{
  this.xxx = res.data
  this.$nextTick(() => {
    // 这里我们可以获取变化后的 DOM
  })
})
其他注意事项
对象添加属性
对于使用 Object.defineProperty 实现响应式的对象,当我们去给这个对象添加一个新的属性的时候,是不能够触发它的 setter 的,比如:
var vm = new Vue({
  data:{
    a:1
  }
})
// vm.b 是非响应的
vm.b = 2
但是添加新属性的场景我们在平时开发中会经常遇到,那么 Vue 为了解决这个问题,定义了一个全局 API Vue.set 方法,它在 src/core/global-api/index.js 中初始化:
Vue.set = set

/**
 * Set a property on an object. Adds the new property and
 * triggers change notification if the property doesn't
 * already exist.
 */
export function set (target: Array<any> | Object, key: any, val: any): any {
  if (process.env.NODE_ENV !== 'production' &&
    (isUndef(target) || isPrimitive(target))
  ) {
    warn(`Cannot set reactive property on undefined, null, or primitive value: ${(target: any)}`)
  }
  if (Array.isArray(target) && isValidArrayIndex(key)) {
    target.length = Math.max(target.length, key)
    target.splice(key, 1, val)
    return val
  }
  if (key in target && !(key in Object.prototype)) {
    target[key] = val
    return val
  }
  const ob = (target: any).__ob__
  if (target._isVue || (ob && ob.vmCount)) {
    process.env.NODE_ENV !== 'production' && warn(
      'Avoid adding reactive properties to a Vue instance or its root $data ' +
      'at runtime - declare it upfront in the data option.'
    )
    return val
  }
  if (!ob) {
    target[key] = val
    return val
  }
  defineReactive(ob.value, key, val)
  ob.dep.notify()
  return val
}
set 方法接收 3个参数,target 可能是数组或者是普通对象,key 代表的是数组的下标或者是对象的键值,val 代表添加的值。首先判断如果 target 是数组且 key 是一个合法的下标,则之前通过 splice 去添加进数组然后返回,这里的 splice 其实已经不仅仅是原生数组的 splice 了,稍后我会详细介绍数组的逻辑。接着又判断 key 已经存在于 target 中,则直接赋值返回,因为这样的变化是可以观测到了。接着再获取到 target.__ob__ 并赋值给 ob,之前分析过它是在 Observer 的构造函数执行的时候初始化的,表示 Observer 的一个实例,如果它不存在,则说明 target 不是一个响应式的对象,则直接赋值并返回。最后通过 defineReactive(ob.value, key, val) 把新添加的属性变成响应式对象,然后再通过 ob.dep.notify() 手动的触发依赖通知,还记得我们在给对象添加 getter 的时候有这么一段逻辑:
export function defineReactive (
  obj: Object,
  key: string,
  val: any,
  customSetter?: ?Function,
  shallow?: boolean
) {
  // ...
  let childOb = !shallow && observe(val)
  Object.defineProperty(obj, key, {
    enumerable: true,
    configurable: true,
    get: function reactiveGetter () {
      const value = getter ? getter.call(obj) : val
      if (Dep.target) {
        dep.depend()
        if (childOb) {
          childOb.dep.depend()
          if (Array.isArray(value)) {
            dependArray(value)
          }
        }
      }
      return value
    },
    // ...
  })
}
在 getter 过程中判断了 childOb,并调用了 childOb.dep.depend() 收集了依赖,这就是为什么执行 Vue.set 的时候通过 ob.dep.notify() 能够通知到 watcher,从而让添加新的属性到对象也可以检测到变化。这里如果 value 是个数组,那么就通过 dependArray 把数组每个元素也去做依赖收集。
接着说一下数组的情况,Vue 也是不能检测到以下变动的数组:
1.当你利用索引直接设置一个项时,例如:vm.items[indexOfItem] = newValue
2.当你修改数组的长度时,例如:vm.items.length = newLength
对于第一种情况,可以使用:Vue.set(example1.items, indexOfItem, newValue);而对于第二种情况,可以使用 vm.items.splice(newLength)。
我们刚才也分析到,对于 Vue.set 的实现,当 target 是数组的时候,也是通过 target.splice(key, 1, val) 来添加的,那么这里的 splice 到底有什么黑魔法,能让添加的对象变成响应式的呢。
其实之前我们也分析过,在通过 observe 方法去观察对象的时候会实例化 Observer,在它的构造函数中是专门对数组做了处理,它的定义在 src/core/observer/index.js 中。
export class Observer {
  constructor (value: any) {
    this.value = value
    this.dep = new Dep()
    this.vmCount = 0
    def(value, '__ob__', this)
    if (Array.isArray(value)) {
      const augment = hasProto
        ? protoAugment
        : copyAugment
      augment(value, arrayMethods, arrayKeys)
      this.observeArray(value)
    } else {
      // ...
    }
  }
}
这里我们只需要关注 value 是 Array 的情况,首先获取 augment,这里的 hasProto 实际上就是判断对象中是否存在 __proto__,如果存在则 augment 指向 protoAugment, 否则指向 copyAugment,来看一下这两个函数的定义:
/**
 * Augment an target Object or Array by intercepting
 * the prototype chain using __proto__
 */
function protoAugment (target, src: Object, keys: any) {
  /* eslint-disable no-proto */
  target.__proto__ = src
  /* eslint-enable no-proto */
}

/**
 * Augment an target Object or Array by defining
 * hidden properties.
 */
/* istanbul ignore next */
function copyAugment (target: Object, src: Object, keys: Array<string>) {
  for (let i = 0, l = keys.length; i < l; i++) {
    const key = keys[i]
    def(target, key, src[key])
  }
}
protoAugment 方法是直接把 target.__proto__ 原型直接修改为 src,而 copyAugment 方法是遍历 keys,通过 def,也就是 Object.defineProperty 去定义它自身的属性值。对于大部分现代浏览器都会走到 protoAugment,那么它实际上就把 value 的原型指向了 arrayMethods,arrayMethods 的定义在 src/core/observer/array.js 中:
import { def } from '../util/index'

const arrayProto = Array.prototype
export const arrayMethods = Object.create(arrayProto)

const methodsToPatch = [
  'push',
  'pop',
  'shift',
  'unshift',
  'splice',
  'sort',
  'reverse'
]

/**
 * Intercept mutating methods and emit events
 */
methodsToPatch.forEach(function (method) {
  // cache original method
  const original = arrayProto[method]
  def(arrayMethods, method, function mutator (...args) {
    const result = original.apply(this, args)
    const ob = this.__ob__
    let inserted
    switch (method) {
      case 'push':
      case 'unshift':
        inserted = args
        break
      case 'splice':
        inserted = args.slice(2)
        break
    }
    if (inserted) ob.observeArray(inserted)
    // notify change
    ob.dep.notify()
    return result
  })
})
可以看到,arrayMethods 首先继承了 Array,然后对数组中所有能改变数组自身的方法,如 push、pop 等这些方法进行重写。重写后的方法会先执行它们本身原有的逻辑,并对能增加数组长度的 3 个方法 push、unshift、splice 方法做了判断,获取到插入的值,然后把新添加的值变成一个响应式对象,并且再调用 ob.dep.notify() 手动触发依赖通知,这就很好地解释了之前的示例中调用 vm.items.splice(newLength) 方法可以检测到变化。