MyBatis-Plus 学习笔记
MyBatis-Plus 学习笔记
文章目录
- MyBatis-Plus 学习笔记
- 1. 简介
- 1.1 介绍
- 1.2 特性
- 1.3 框架结构
- 2. 快速开始
- 3. 注解
- 3.1 @TableName
- 3.2 @Tableld
- 3.3@TableField
- 3.4 @Version
- 3.5 @EnumValue
- 3.6 @TableLogic
- 3.7 @SqlParser
- 3.8 @KeySequence
- 4. CRUD
- 4.1 增加
- 4.2 删除
- 1. 普通删除
- 2. 逻辑删除
- 3. 说明
- 4. 常见问题
- 4.3 修改
- 1. 根据 id 进行修改
- 2. 条件构造器修改
- 4.4 查询
- 1. 普通查询
- 2. 分页查询
- 3. 条件构造器查询
- 5. 自动填充
- 5.1 修改表结构
- 5.2 同步实体类
- 5.3 编写填充策略
- 5.4 测试
- 5.5 注意事项
- 6. 乐观锁
- 6.1 什么是乐观锁,什么是悲观锁
- 6.2 乐观锁插件
- 6.2.1 插件配置
- 7. 性能分析插件
- 8. 条件构造器
- 8.1 说明
- 8.2 警告
- 8.3 AbstractWrapper
- allEq
- eq
- ne
- gt
- ge
- lt
- le
- between
- noBetween
- like
- notLike
- LikeLeft
- likeRight
- isNull
- isNotNull
- in
- notIn
- inSql
- notInSql
- groupBy
- orderByAsc
- orderByDesc
- orderBy
- having
- func
- or
- and
- nest
- apply
- last
- exists
- notExists
- QueryWrapper
- select
- UpdateWrapper
- 使用 Wrapper 自定义 SQL
- 简单示例
- 9. 代码生成器
1. 简介
1.1 介绍
MyBatus-Plus(简称 MP)是一个 MyBatis 的增强工具,在 MyBatis 的基础上只增强不做改变,为简化开发,提高效率而生。
就像 魂斗罗 中的 1P、2P,基友搭配,效率翻倍。
官网:https://mp.baomidou.com/
github:https://github.com/baomidou/mybatis-plus

1.2 特性
- 无侵入:只做增强不做改变,引入它不会对现有工程产生影响,如丝般顺滑。
- 损耗小:启动即会自动注入基本 CURD ,性能基本无损耗,直接面向对象编程。
- 强大的 CRUD 操作:内置通用 Mapper、通用 Service,仅仅通过少量配置即可实现表单大部分 CRUD 操作,更有强大的条件构造器,满足各类使用需求。
- 支持 Lambada 形式调用:通过 Lambda 表达式,方便的编写各类查询条件,无需再担心字段写错
- 支持主键自动生成:支持多达4中主键策略(内含分布式唯一 ID 生成器 -Sequence),可自由配置,完美解决主键问题
- 支持 ActiveRecord 模式:支持 ActiveRecord 形式调用,实体类只需集成 Model 类即可进行强大的 CRUD 操作
- 支持自定义全局通用操作:支持全局通用方法注入(Write once,user anywhere)
- 内置代码生成器:采用代码或者 Maven 插件可快速生成 Mapper 、Model 、Service、Controller 层代码,支持模板引擎,更有超多自定义配置等您来使用
- 分页插件支持多数据库:支持 MySQL、MariaDB、Oracle、DB2、H2、HSQL、SQLite、Postgre、SQLServer 等多种数据库
- 内置性能分析插件:可输出 Sql 语句以及其执行事件,建议开发测试时启用该功能,能快速揪出慢查询
- 内置全局拦截插件:提供全表 delete、update 操作只能分析阻断,也可以自定义拦截规则,预防误操作
1.3 框架结构

2. 快速开始
环境:
JDK 1.8
Maven 3.6.1
mysql 5.7.27
MyBtisPlus 3.3.2 (MP 3.3.X 版本相比于以前的版本改动了不少,使用时请注意版本号)
idea 2019.3
-
创建一个 SpringBoot 工程项目
-
引入依赖
<dependencies> <dependency> <groupId>mysqlgroupId> <artifactId>mysql-connector-javaartifactId> <version>5.1.46version> dependency> <dependency> <groupId>com.alibabagroupId> <artifactId>druidartifactId> <version>1.1.23version> dependency> <dependency> <groupId>com.baomidougroupId> <artifactId>mybatis-plus-boot-starterartifactId> <version>3.3.2version> dependency> <dependency> <groupId>org.projectlombokgroupId> <artifactId>lombokartifactId> dependency> <dependency> <groupId>org.springframework.bootgroupId> <artifactId>spring-boot-starter-webartifactId> dependency> <dependency> <groupId>org.springframework.bootgroupId> <artifactId>spring-boot-starter-testartifactId> <scope>testscope> dependency> dependencies> <parent> <groupId>org.springframework.bootgroupId> <artifactId>spring-boot-starter-parentartifactId> <version>2.3.0.RELEASEversion> parent> <build> <plugins> <plugin> <groupId>org.apache.maven.pluginsgroupId> <artifactId>maven-compiler-pluginartifactId> <configuration> <source>1.8source> <target>1.8target> <encoding>UTF-8encoding> configuration> plugin> <plugin> <groupId>org.springframework.bootgroupId> <artifactId>spring-boot-maven-pluginartifactId> plugin> plugins> <resources> <resource> <directory>src/main/javadirectory> <includes> <include>**/*.xmlinclude> includes> <filtering>truefiltering> resource> resources> build> -
创建测试所需要的表,并插入测试数据
# 创建表 DROP TABLE IF EXISTS user; CREATE TABLE user ( id BIGINT(20) NOT NULL COMMENT '主键ID', name VARCHAR(30) NULL DEFAULT NULL COMMENT '姓名', age INT(11) NULL DEFAULT NULL COMMENT '年龄', email VARCHAR(50) NULL DEFAULT NULL COMMENT '邮箱', PRIMARY KEY (id) ); #插入数据 DELETE FROM user; INSERT INTO user (id, name, age, email) VALUES (1, 'Jone', 18, '[email protected]'), (2, 'Jack', 20, '[email protected]'), (3, 'Tom', 28, '[email protected]'), (4, 'Sandy', 21, '[email protected]'), (5, 'Billie', 24, '[email protected]'); -
编写实体类
这里使用了 Lombok
@Data @AllArgsConstructor @NoArgsConstructor public class User { private Long id; private String name; private Integer age; private String email; } -
配置数据源
在 application.yml 中配置数据源,这里使用的是 Druid 数据源,也可以使用默认的数据源
spring: datasource: driver-class-name: com.mysql.jdbc.Driver url: jdbc:mysql://localhost:3306/mybatisplus?serverTimezone=UTC&useUnicode=true&characterEncoding=utf-8 password: root username: root # 切换成 Druid 数据源 type: com.alibaba.druid.pool.DruidDataSource #Spring Boot 默认是不注入这些属性值的,需要自己绑定 #druid 数据源专有配置 initialSize: 5 minIdle: 5 maxActive: 20 maxWait: 60000 timeBetweenEvictionRunsMillis: 60000 minEvictableIdleTimeMillis: 300000 validationQuery: SELECT 1 FROM DUAL testWhileIdle: true testOnBorrow: false testOnReturn: false poolPreparedStatements: true #配置监控统计拦截的filters,stat:监控统计、log4j:日志记录、wall:防御sql注入 #如果允许时报错 java.lang.ClassNotFoundException: org.apache.log4j.Priority #则导入 log4j 依赖即可,Maven 地址:https://mvnrepository.com/artifact/log4j/log4j filters: stat,wall,log4j maxPoolPreparedStatementPerConnectionSize: 20 useGlobalDataSourceStat: true connectionProperties: druid.stat.mergeSql=true;druid.stat.slowSqlMillis=500 -
创建 mapper 接口
创建 mapper 接口,并继承 BaseMapper 接口,规定泛型类型
@Repository // 将 mapper 注册到 Spring 容器中 public interface UserMapper extends BaseMapper<User> { } -
在主启动类中扫描接口
在主启动类添加 @MapperScan() 注解,来扫描我们刚刚创建的 mapper 接口
@MapperScan("com.xp.mapper") // 扫描 mapper 接口 @SpringBootApplication public class Application { public static void main(String[] args) { SpringApplication.run(Application.class, args); } } -
测试
编写测试类
@SpringBootTest
public class ApplicationTest {

    @Autowired
    private UserMapper userMapper;

    @Test
    void test(){
        // UserMapper 中的 selectList() 方法的参数为 MyBatisPlus 内置的的条件封装器 wrapper,所以不填写就是无任何条件
        List<User> userList = userMapper.selectList(null);
        for (User user : userList) {
            System.out.println(user);
        }
    }

}
测试结果如下:

-
配置日志
如果我们想要知道 sql 语句的执行情况,我们可以配置日志。想要开启日志功能,只需配置如下配置即可:
其中 log-impl 的值可以是其他的日志,不一定是我下面的,也可以配置 log4j
mybatis-plus:
  configuration:
    log-impl: org.apache.ibatis.logging.stdout.StdOutImpl
3. 注解
除了 MyBatis 原本的注解,MP 还有一些自己的注解
3.1 @TableName
- 描述:表名注解
| 属性 | 类型 | 必须指定 | 默认值 | 描述 |
|---|---|---|---|---|
| value | String | 否 | “” | 表名 |
| schema | String | 否 | “” | schema |
| keepGlobalPrefix | boolean | 否 | false | 是否保持使用全局的 tablePrefix 的值(如果设置了全局 tablePrefix 且自行设置了 value 的值) |
| resultMap | String | 否 | “” | xml 中 resultMap 的 id |
| autoResultMap | boolean | 否 | false | 是否自动构建 resultMap 并使用(如果设置 resultMap 则不会进行 resultMap 的自动构建并注入) |
关于 ‘autoResultMap’ 的说明
mp 会自动构建一个
ResultMap并注入到 mybatis 里(一般用不上)。下面讲两句:因为 mp 底层是 MyBatis ,所以一些 MyBatis 的尝试你要知道,mp 只是帮你注入了常用 crud 到 MyBatis 里,注入之前可以说是动态的(根据你entity的字段以及注解变化而变化),但是注入之后是静态的(等于你写在xml的东西)而对于直接指定typeHandler,MyBatis 只支持你写在两个地方:
- 定义在 resultMap 里,只作用于 select 查询的返回结果封装
- 定义在
insert和updatesql 的{property}里的property后面(例:#{property,typehandler-xxx.xxx.xxx}),只作用域设置值。而除了这两种直接指定typeHandler,MyBatis 有一个全局的扫描你自己的typeHandler包的配置,这是根据你的property的类型去找typeHandler并使用。
3.2 @Tableld
- 描述:主键注解
| 属性 | 类型 | 必须指定 | 默认值 | 描述 |
|---|---|---|---|---|
| value | String | 否 | “” | 主键字段名 |
| type | Enum | 否 | IdType.NONE | 主键类型 |
IdType
| 值 | 描述 |
|---|---|
| AUTO | 数据库 ID 自增 |
| NONE | 无状态,该类型为未设置主键类型(注解里等于跟随全局,全局里约等于 INPUT) |
| INPUT | insert 前自行 set 主键值 |
| ASSIGN_ID | 分配 ID(主键类型为 Number (Long和Integer)或 String)(since 3.3.0),使用接口 IdentifierGenerator 的方法 nextId (默认实现类为 DefaultIdentifierGenerator 雪花算法) |
| ASSIGN_UUID | 分配 UUID ,主键类型为 String(since 3.3.0),使用接口IdentifierGenerator 的方法 nextUUID(默认default方法) |
分布式全局唯一 ID 长整性类型(please use ASSIGN_ID) |
|
32 位 UUID 字符串(please use ASSIGN_UUID) |
|
分布式全局唯一 ID 字符串类型(please user ASSIGN_ID) |
3.3@TableField
- 描述:字段注解(非主键)
| 属性 | 类型 | 必须指定 | 默认值 | 描述 |
|---|---|---|---|---|
| value | String | 否 | “” | 数据库字段名 |
| el | String | 否 | “” | 映射原生 #{...} 逻辑,相当于写在 xml 里的 #{...} |
| exist | boolean | 否 | true | 是否位数据库表字段 |
| condition | String | 否 | “” | 字段 where 实体查询比较条件,有值设置则按设置的值为准,没有则为默认全局的 %s=#{%s} |
| update | String | 否 | “” | 字段 update set 部分注入。例如:update ="%s+1":表示更新时会 set version = version +1(该属性优先级高于 el 属性) |
| insertStrategy | Enum | N | DEFAULT | 举例 NOT_NULL: insert into table_a( |
| updateStrategy | Enum | N | DEFAULT | 举例:IGNORED: update table_a set column=#{columnProperty} |
| whereStrategy | Enum | N | DEFAULT | 举例:NOT_EMPTY: where |
| fill | Enum | 否 | FieldFill.DEAFULT | 字段自动填充策略 |
| select | boolean | 否 | true | 是否进行 select 查询 |
| keepGloabalFormat | boolean | 否 | false | 是否保持使用全局的 format 进行处理 |
| jdbcType | JdbcType | 否 | JdbcType.UNDEFINED | JDBC类型(该默认值不代表会按照该值生效) |
| typeHandler | Class | 否 | UnknownTypeHandler.class | 类型处理器(该默认值不代表会按照该值生效) |
| numericScale | String | 否 | “” | 指定小数点后保留机位 |
关于 ‘jdbcType’ 和 ‘numerucScale’ 的说明:
numericScale只生肖与 update 的 sql。jdbcType和typeHandler如果不配合@TableName#autoResultMap = true一起使用,也只生效于 update 的 sql。对于typeHandler如果你的字段类型和 set 进去的类型为equals关系,则只需要让你的typeHandler让 MyBatis 加载到即可,不需要使用注解
FieldStrategy
| 值 | 描述 |
|---|---|
| IGNORED | 忽略判断 |
| NOT_NULL | 非 NULL 判断 |
| NOT_EMPTY | 非空判断(只对字符串类型字段。其他类型字段依然为非NULL判断) |
| DEFAULT | 追随全局配置 |
FieldFill
| 值 | 描述 |
|---|---|
| DEFAULT | 默认不处理 |
| INSERT | 插入时填充字段 |
| UPDATE | 更新时填充字段 |
| INSERT_UPDATE | 插入和更新时填充字段 |
3.4 @Version
- 描述:乐观锁注解。标记
@Version在字段上
3.5 @EnumValue
- 描述:通过枚举类注解(注解在枚举类字段上)
3.6 @TableLogic
- 描述:表字段逻辑处理注解(逻辑删除)
| 属性 | 类型 | 必须指定 | 默认值 | 描述 |
|---|---|---|---|---|
| value | String | 否 | “” | 逻辑未删除值 |
| delval | String | 否 | “” | 逻辑删除值 |
3.7 @SqlParser
- 描述:租户注解,支持 method 上以及 mapper 接口上
| 属性 | 类型 | 必须指定 | 默认值 | 描述 |
|---|---|---|---|---|
| filter | boolean | 否 | false | true:表示过滤 SQL 解析,即不会进入 ISqlParser 解析链,否则会紧解析链并追加例如 tenant_id 等条件 |
3.8 @KeySequence
- 描述:序列主键策略
oracle - 属性:value、resultMap
| 属性 | 类型 | 必须指定 | 默认值 | 描述 |
|---|---|---|---|---|
| value | String | 否 | “” | 序列名 |
| clazz | Class | 否 | Long.class | id的类型,可以指定 String.class ,这样返回的 Sequence 值是字符串 “1” |
4. CRUD
4.1 增加
MP 中提供了插入的方法 insert()
@SpringBootTest
public class ApplicationTest {

    @Autowired
    private UserMapper userMapper;

    @Test
    void test(){

        System.out.println(userMapper.insert(new User(null, "张三", 18, "[email protected]")));

    }

}
查看我们控制台打印的日志

可以发现,这 id 是我们看不懂的东西,可不是我们真正想要的(主键自增)
那么这个id是怎么生成的呢?
在我们上面的注解中的 @Tableld 有写道,默认是 IdType.NONE。它是自动生成全局唯一的id。
如果我们需要修改成为自增,只需在主键上加@Tableld设置 type 修改成 IdType.AUTO
@Data
@AllArgsConstructor
@NoArgsConstructor
public class User {
	// 设置type=IdType.AUTO,让主键自增
    @TableId(type=IdType.AUTO)
    private Long id;
    private String name;
    private Integer age;
    private String email;

}
需要注意的是,我们要先确定我们的表的主键是已经设置自增的,不然会报错
4.2 删除
1. 普通删除
// 普通删除
@Test
void delete(){
    // 根据id删除
    userMapper.deleteById(7L);
    // 批量删除
    userMapper.deleteBatchIds(Arrays.asList(4L,5L,6L));
    // 通过 map 删除
    Map<String, Object> map = new HashMap<>();
    map.put("name","李四");
    userMapper.deleteByMap(map);
}
2. 逻辑删除
首先,我们先在数据库的表中增加 deleted 字段,默认值为0 .(实际开发中是不允许修改数据库的,只是为了测试方便)
修改实体类,让数据库的表和实体类一一对应,并在 deleted 上添加 @TableLogic 注解(3.3.0版本后可以不需要增加这个注解,只需在配置文件中开启即可)
@Data
@AllArgsConstructor
@NoArgsConstructor
public class User {

    @TableId(type=IdType.AUTO)
    private Long id;
    private String name;
    private Integer age;
    private String email;
    @TableLogic
    private Integer deleted;

}
在 application.yml 中配置逻辑删除
mybatis-plus:
  global-config:
    db-config:
      logic-delete-field: flag # 全局逻辑删除的实体字段名(since 3.3.0,配置后可以不需要在实体类字段上增加注解)
      logic-delete-value: 1 # 逻辑已删除的值 (默认为1)
      logic-not-delete-value: 0 # 逻辑未删除的值 (默认为0)
测试
// 逻辑删除
@Test
void deleteLogic(){
    // 通过 id 进行逻辑删除
    userMapper.deleteById(2);
    // 批量删除
    userMapper.deleteBatchIds(Arrays.asList(1,8,2));
    // 通过 map 删除
    Map<String, Object> map = new HashMap<>();
    map.put("name","李四");
    userMapper.deleteByMap(map);
    // 查询用户,查看查询语句是否发生了变化
    System.out.println(userMapper.selectById(2));
}
3. 说明
只对自动注入的 sql 起效
- 插入:不作限制
- 查找:追加 where 条件过滤掉已删除数据,且使用 wrapper.entity 生成的 where 条件会忽略该字段
- 更新:追加 where 条件防止更新到已删除数据,且使用 wrapper.entity 生成的 where 条件会忽略该字段
- 删除:转变为更新
例如:
- 删除:
update user set deleted=1 where id=1 and deleted=0 - 查找:
select id,name,deleted from user where deleted=0
字段类型支持说明:
- 支持所有数据类型(推荐使用
Integer,boolean,LocalDateTime) - 如果数据库字段使用
dateTime,逻辑未删除值和已删除值支持配置为字符串null,另一个值支持配置为函数来获取值如now()
附录:
- 逻辑删除是为了方便数据恢复和保护数据本身价值等等的一种方案,但实际就是删除。
- 如果你需要频繁查出来看就不应使用逻辑删除,而是以一个状态去表示
4. 常见问题
-
如何 insert?
- 字段在数据库定义默认值(推荐)
- insert 前自己 set 值
- 使用自动填充功能
-
删除接口自动填充功能失效
-
使用
update方法并UpdateWrapper.set(column,value)(推荐) -
使用
update方法并UpdateWrapper.setSql("column=value") -
使用 Sql 注入器 注入
com.baomidou.mybatisplus.extension.injector.methods.LogicDeleteByIdWithFill(推荐)
-
4.3 修改
1. 根据 id 进行修改
@SpringBootTest
public class ApplicationTest {

    @Autowired
    private UserMapper userMapper;

    @Test
    void test(){
        System.out.println(userMapper.updateById(new User(6L, "李四", 3, null)));
    }

}
查看控制台日志输出,我们可以发现 MP 的插入方法是根据条件使用动态 SQL 实现的,这样就节省了我们写动态 SQL 的时间

2. 条件构造器修改
MP 提供了修改操作的条件构造器 UpdateWrapper
@Test
void queryWrapper(){
    // 使用 updateWrapper, sql中的 where 条件在 updateWrapper 中的 Entity 中设置,也即是.setEntity()这个方法设置查询条件
    // 这里的update方法的第一个参数是设置 set 的值,可以为空, updateWrapper 中也可以设置 set 的值
    UpdateWrapper<User> updateWrapper = new UpdateWrapper<>();
    // 这里,setEntity(T entity) 是用来构建 where 后面的条件,若不设置则默认是更改所有的数据
    updateWrapper.set("name","李四").setEntity(new User().setName("张三"));
    userMapper.update(null,updateWrapper);
}
我们查看控制台日志,可以看到 sql 语句和这两个参数的对应关系

4.4 查询
1. 普通查询
@Test
void select(){
    // 根据id查询用户
    User user = userMapper.selectById(1);
    System.out.println(user);

    // 批量查询
    List<User> userList = userMapper.selectBatchIds(Arrays.asList(1, 2, 4, 5));
    userList.forEach(System.out::println);

    // 条件查询之一 map
    Map<String, Object> map = new HashMap<>();
    map.put("name","李四");
    map.put("age","3");
    List<User> users = userMapper.selectByMap(map);
    users.forEach(System.out::println);
}
2. 分页查询
要进行分页查询,我们需要先配置 MP 的分页插件,并将 MP 的分页插件注册到 Spring 容器中
在我们之前写的 MyBatisPlus 配置类 MyBatisPlusConfig 类中增加如下代码:
MyBatisPlusConfig
@Bean
PaginationInterceptor paginationInterceptor(){
    PaginationInterceptor paginationInterceptor = new PaginationInterceptor();
    // 设置请求的页面大于最大页后操作, true调回到首页,false 继续请求  默认false
    // paginationInterceptor.setOverflow(false);
    // 设置最大单页限制数量,默认 500 条,-1 不受限制
    // paginationInterceptor.setLimit(500);
    // 开启 count 的 join 优化,只针对部分 left join
    paginationInterceptor.setCountSqlParser(new JsqlParserCountOptimize(true));
    return paginationInterceptor;
}
测试
// 分页查询
@Test
void selectPage(){
    // 普通分页查询,Page构造器的第一个参数表示第几页,第二个参数表示每页最多多少条数据
    Page<User> page = new Page<>(2,5);
    // 进行分页查询
    Page<User> userPage = userMapper.selectPage(page, null);
    // 获取分页记录
    List<User> userList = userPage.getRecords();
    userList.forEach(System.out::println);
    // 获取总记录数
    System.out.println("总页数:"+page.getTotal());
    // 获取总页数
    long pages = page.getPages();
    System.out.println("总记录数:"+pages);
    // 每页展示最大记录条数
    System.out.println("每页展示最大记录调试:"+page.getSize());
}
3. 条件构造器查询
MP 中提供了查询的条件构造器 QueryWrapper
@Test
void queryWrapper(){
    // 创建 QueryWrapper 对象
    QueryWrapper<User> wrapper = new QueryWrapper<>();
    // 构造条件,wrapper 是链式编程,所以可以构造很多的条件.这里的查询条件是 name=张三 且 age>3
    wrapper.eq("name","张三").gt("age",3);
    // 查询结果
    List<User> userList = userMapper.selectList(wrapper);
    userList.forEach(System.out::println);
}
5. 自动填充
根据阿里巴巴开发手册:所有的数据库表都应该有 gmt_create、gmt_modified 两个字段。且更新数据表记录时,必须同时更新记录对应的 gmt_modified 字段值为当前时间。
MP 已经帮我们做好了自动填充的操作。
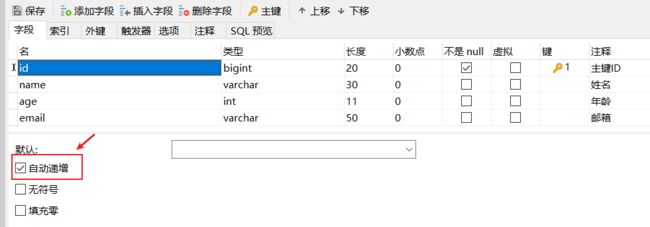
5.1 修改表结构
在我们原本的 User 表中增加 gmt_create 和 gmt_modified 两个字段

5.2 同步实体类
同步实体类,并在实体类上增加注解
@Data
@AllArgsConstructor
@NoArgsConstructor
public class User {

    @TableId(type=IdType.AUTO)
    private Long id;
    private String name;
    private Integer age;
    private String email;
    @TableField(value = "gmt_create",fill = FieldFill.INSERT)
    private Date createTime;
    @TableField(value = "gmt_modified",fill = FieldFill.INSERT_UPDATE)
    private Date modifiedTime;

}
上面的注解介绍中已经有写道,@TableField 这个注解中 fill 属性可以设置自动填充策略
FieldFill 中有4个自动填充策略
public enum FieldFill {
    DEFAULT,		// 默认不处理
    INSERT,			// 插入时自动填充填充
    UPDATE,			// 更新时自动填充
    INSERT_UPDATE;	// 插入或更新时自动填充

    private FieldFill() {
    }
}
5.3 编写填充策略
我们自定义一个元数据处理器 MyMetaObjectHandler,实现 MetaObjectHandler 接口
@Slf4j      // 使用日志
@Component  // 将我们自定义的元数据处理器注册到 Spring 容器中
public class MyMetaObjectHandler implements MetaObjectHandler {
    @Override
    public void insertFill(MetaObject metaObject) {
        log.info("start insert ");
        // 设置插入的填充 参数分别时:第一个为原数据对象,第二个为填充的字段,第三个为填充的内容的Class对象,第四个是填充的内容
        this.strictInsertFill(metaObject,"createTime",Date.class,new Date());
        this.strictInsertFill(metaObject,"modifiedTime",Date.class,new Date());
        // fillStrategy 这个也可以设置自动填充,但是有bug 需要升级到 3.3.1.8-SNAPSHOT版本后
        // this.fillStrategy(metaObject,"modifiedTime",new Date());
    }

    @Override
    public void updateFill(MetaObject metaObject) {
        log.info("start update ");
        // 设置修改的填充
        this.strictUpdateFill(metaObject,"modifiedTime",Date.class,new Date());
   		// fillStrategy 这个也可以设置自动填充,但是有bug 需要升级到 3.3.1.8-SNAPSHOT版本后
        // this.fillStrategy(metaObject,"modifiedTime",Date.class,new Date());
    }
}
5.4 测试
我们先执行增加操作,看下增加操作是否自动填充了
@SpringBootTest
public class ApplicationTest {

    @Autowired
    private UserMapper userMapper;

    @Test
    void test(){
        System.out.println(userMapper.insert(new User(null, "张三", 18, "[email protected]",null,null)));
    }

}
可以发现,我们自定义的元数据处理器已经生效了,并且在执行插入操作的时候,createTime 和 modifiedTime 两个字段都自动填充了现在的时间

我们再执行修改操作
@SpringBootTest
public class ApplicationTest {

    @Autowired
    private UserMapper userMapper;

    @Test
    void test(){
        System.out.println(userMapper.updateById(new User(3L, "李四", 3, null,null,null))));
    }

}
可以发现我们自定义的元数据处理器已经生效,而且自动更新了 modifiedTime 字段的修改时间

5.5 注意事项
- 字段必须声明
@TableField注解,属性fill选择对应策略,该声明告知MyBatis-Plus需要预留注入sql字段 - 填充处理器
MyMetaObjectHandler在 SpringBoot 中需要声明@Component或@Bean注入 - 要想根据注解
FieldFill.xxx和字段名以及字段类型来取分必须使用父类的strictInsertFill或者strictUpdateFill方法 - 不需要根据任何来取分可以使用父类的
fillStrategy方法 - 使用
update(T entity, Wrapper时,想要自动填充,则第一个 entity 不能为空,否则则无法自动填充updateWrapper)
6. 乐观锁
在面试过程中,我们经常会被问到乐观锁,悲观锁。
6.1 什么是乐观锁,什么是悲观锁
什么是悲观锁(Pessimistic Lock):
当要对数据库中的一条数据进行修改的时候,为了避免同时被其他人修改,最好的办法就是直接对该数据进行加锁以防止并发。这种借助数据库所机制,在修改数据之前先锁定,再修改的方式被称之为悲观并发控制【又名“悲观锁”,Perssimistic ,Concurrency Control,缩写“PCC"】
什么是乐观锁(Optimistic Locking):
乐观锁是相对悲观锁而言的,乐观锁假设数据一般情况下不会造成冲突,所以再数据进行提交更新的时候,才会正式对数据的冲突与否进行检测,如果发现冲突了,则返回给用户错误的信息,让用户决定如何去做。
6.2 乐观锁插件
MP 提供了乐观锁插件
意图:当要更新一条记录的时候,希望这条记录没有被别人更新
乐观锁的实现方式:
- 取出记录时,获取当前 version
- 更新时,带上这个 version
- 执行更新时, set version = newVersion where version = oldVersion
- 如果 version 不对,就更更新失败
比如: 更新时的 version=1
update user set name='xp',version = version +1 where id=1 and version=1
如果执行更新操作时,数据已经被修改,即 version 不再是原来的 version =1,则会更新失败
6.2.1 插件配置
-
修改数据表
将我们之前的 User 表添加 version 字段,并设置默认为1

-
将乐观锁插件注册到 Spring 容器中
创建一个 MyBatisPlusConfig 配置类
@Configuration public class MyBatisPlusConfig { @Bean OptimisticLockerInterceptor optimisticLockerInterceptor(){ return new OptimisticLockerInterceptor(); } } -
注解字段(必须要)
修改实体类,给 version 增加注解
@Data @AllArgsConstructor @NoArgsConstructor public class User { @TableId(type=IdType.AUTO) private Long id; private String name; private Integer age; private String email; @TableField(fill = FieldFill.INSERT) private Date createTime; @TableField(fill = FieldFill.INSERT_UPDATE) private Date modifiedTime; @Version private Integer version; }特别说明:
- 支持的数据类型只有:int,Integer,long,Long,Date,TimeStamp,LocalDateTime
- 整数类型下
newVersion = oldVersion + 1 newVersion会回写到entity中- 仅支持
updateById(id)于update(entity,wrapper)方法 - 在
update(entity,wrapper)方法下,wrapper不能再复用!!
-
测试
先模拟乐观锁更新成功,单线程时
// 模拟乐观锁成功
@Test
void test1(){
    // 1.查询用户信息
    User user = userMapper.selectById(2);
    System.out.println(user);
    // 2.修改用户信息
    user.setName("xp01");
    user.setId(2L);
    user.setAge(3);
    // 3.执行更新操作
    userMapper.updateById(user);
}
运行后控制台输出如下:

可以看到,我们原本的版本号是1,执行更新操作后,MP 帮我们将版本号进行 +1 的操作
模拟乐观锁失败,多线程下
// 模拟乐观锁失败,多线程下
@Test
void test2(){
    // 线程1
    User user = userMapper.selectById(2);
    user.setName("xp111");
    user.setId(2L);
    user.setAge(1);
    System.out.println(user);

    // 模拟另一个线程执行插队操作
    User user1 = userMapper.selectById(2);
    user1.setName("xp222");
    user1.setId(2L);
    user1.setAge(2);
    System.out.println(user1);
    userMapper.updateById(user1);

    // 乐观锁失败
    userMapper.updateById(user);
}
运行后控制台输出如下:

我们可以发现,在线程2插队执行更新操作后,线程1 执行更新操作时,MP帮我们自动加上了乐观锁,所以线程1 更新数据失败了
7. 性能分析插件
我们平时的开发中,会遇到一些慢 SQL。
MP 提供了性能分析插件,如果 sql 执行时间超过这个时间就停止运行!
但在 MP 的 3.2 版本后移除了性能分析插件

这里就基于 p6spy 插件来学习,想要是想要使用以前 MP 自带的插件的话得降版本使用
-
引入依赖
<dependency> <groupId>p6spygroupId> <artifactId>p6spyartifactId> <version>3.9.1version> dependency> -
配置 p6spy
在 application.yml 配置中将数据源的 driver-class-name 改成 p6spy 提供的驱动
spring:
  datasource:
    driver-class-name: com.p6spy.engine.spy.P6SpyDriver
    url: jdbc:p6spy:mysql://localhost:3306/mybatisplus?serverTimezone=UTC&useUnicode=true&characterEncoding=utf-8&useSSL=false
在 resources 目录下创建 spy.properties 文件,并配置如下内容:
#3.2.1以上使用 modulelist=com.baomidou.mybatisplus.extension.p6spy.MybatisPlusLogFactory,com.p6spy.engine.outage.P6OutageFactory #3.2.1以下使用或者不配置 #modulelist=com.p6spy.engine.logging.P6LogFactory,com.p6spy.engine.outage.P6OutageFactory # 自定义日志打印 logMessageFormat=com.baomidou.mybatisplus.extension.p6spy.P6SpyLogger #日志输出到控制台 appender=com.baomidou.mybatisplus.extension.p6spy.StdoutLogger # 使用日志系统记录 sql #appender=com.p6spy.engine.spy.appender.Slf4JLogger # 设置 p6spy driver 代理 deregisterdrivers=true # 取消JDBC URL前缀 useprefix=true # 配置记录 Log 例外,可去掉的结果集有error,info,batch,debug,statement,commit,rollback,result,resultset. excludecategories=info,debug,result,commit,resultset # 日期格式 dateformat=yyyy-MM-dd HH:mm:ss # 实际驱动可多个 #driverlist=org.h2.Driver # 是否开启慢SQL记录 outagedetection=true # 慢SQL记录标准 2 秒 outagedetectioninterval=2注意:
- driver-class-name 为 p6spy提供的驱动类
- url 前缀为 jdbc:p6spy 跟着冒号为对应数据库连接地址
- 打印出 sql 为null,在 excludecategories 增加 commit
- 批量操作不打印 sql,去除 excludecategories 中的 batch
- 批量操作打印重复的问题请使用 MybatisPlusLogFactory (3.2.1新增)
- 该插件有性能损耗,不建议生产环境使用
-
简单使用
执行之前查询语句,查看控制台日志输出
控制台中输出了sql语句以及执行时间,查找资料好像没有找到慢 SQL 可以是小输,所以这里无法演示慢SQL 执行时的控制台输出。MP 以前自带的性能分析插件慢SQL标准是可以精确到毫秒级别的

8. 条件构造器
8.1 说明
- 以下出现的第一个入参
boolean condition表示该条件是否加入最后生成的 sql 中 - 以下代码块内的那个方法均为从上往下补全个别 boolean 类型的入参,默认为
true - 以下出现的泛型
Param均为wrapper的子类实例(均具有AbstractWrapper的所有方法) - 以下方法在入参中出现的
R为泛型,在普通 wrapper 中式String,在 LambdaWrapper 中是函数(例:Entity::getId,Entity为实体类,getId为字段id的 get(Method)) - 以下方法入参中
R column均表示数据库字段。当R具体类型为String时则为数据库字段名(字段名是数据库关键字的自己用转义符包裹!)而不是具体实体类数据字段名!!!,另当R具体类型为SFunction时项目 runtime 不支持 eclipse 自家的编译器!!! - 以下举例为使用 普通 wrapper,入参为
map和list的均以json形式表现! - 使用中如果入参
map或者list为空 ,则不会加入最后生成的 sql 中!!!
8.2 警告
不支持以及不赞成在 RPC 调用中把 Wrapper 进行传输
- wrapper 很重
- 传输 wrapper 可以类比为你的 controller 用 map 接受值(开发一时爽,维护火葬场)
- 正确的 RPC 调用模式时写一个 DTO 进行传输,被调用方再根据 DTO 执行响应的操作
- 我们拒绝接收任何关于 RPC 传输 Wrapper 报错相关的 issue 甚至 pr
8.3 AbstractWrapper
说明
QueryWrapper(LambdaQueryWrapper) 和 UpdateWrapper(LambdaUpdateWrapepr)的父类用于生成 sql 的 where 条件,entity 属性也用于生成 sql 的 where 条件
注意:entity 生成的 where 条件与使用各个 api 生成的 where 条件没有任何关联行为
allEq
allEq(Map<R, V> params)
allEq(Map<R, V> params, boolean null2IsNull)
allEq(boolean condition, Map<R, V> params, boolean null2IsNull)
- 全部 eq(或个别isNull)
个别参数说明:
params:key为数据库字段名,value为字段值
null2IsNull:为 true 则再 map 的 value 为 null 时调用 isNull 方法, 为 false 时则忽略value 为 null的
- 例1:
allEq({id:1,name:"老王",age:null})—>id = 1 and name = '老王' and age is null - 例2:
allEq({id:1,name:"老王",age:null}, false)—>id = 1 and name = '老王'
allEq(BiPredicate<R, V> filter, Map<R, V> params)
allEq(BiPredicate<R, V> filter, Map<R, V> params, boolean null2IsNull)
allEq(boolean condition, BiPredicate<R, V> filter, Map<R, V> params, boolean null2IsNull)
个别参数说明:
filter:过滤函数,是否允许字段传入比对条件中
params与 null2IsNull:同上
- 例1:
allEq((k,v) -> k.indexOf("a") >= 0, {id:1,name:"老王",age:null})—>name = '老王' and age is null - 例2:
allEq((k,v) -> k.indexOf("a") >= 0, {id:1,name:"老王",age:null}, false)—>name = '老王'
eq
eq(R column, Object val)
eq(boolean condition, R column, Object val)
- 等于 =
- 例:
eq("name","老王")—>name='老王'
ne
ne(R column, Object val)
ne(boolean condition, R column, Object val)
- 不等于 <>
- 例:
ne("name", "老王")—>name <> '老王'
gt
ge(R column, Object val)
ge(boolean condition, R column, Object val)
- 大于 >
- 例:
gt("age", 18)—>age > 18
ge
ge(R column, Object val)
ge(boolean condition, R column, Object val)
- 大于等于 >=
- 例:
ge("age", 18)—>age >= 18
lt
lt(R column, Object val)
lt(boolean condition, R column, Object val)
- 小于 <
- 例:
lt("age", 18)—>age < 18
le
le(R column, Object val)
le(boolean condition, R column, Object val)
- 小于等于 <=
- 例:
le("age", 18)—>age <= 18
between
between(R column, Object val1, Object val2)
between(boolean condition, R column, Object val1, Object val2)
- BETWEEN 值1 AND 值2
- 例:
between("age", 18, 30)—>age between 18 and 30
noBetween
notBetween(R column, Object val1, Object val2)
notBetween(boolean condition, R column, Object val1, Object val2)
- NOT BETWEEN 值1 AND 值2
- 例:
notBetween("age", 18, 30)—>age not between 18 and 30
like
like(R column, Object val)
like(boolean condition, R column, Object val)
- LIKE ‘%值%’
- 例:
like("name", "王")—>name like '%王%'
notLike
notLike(R column, Object val)
notLike(boolean condition, R column, Object val)
- NOT LIKE ‘%值%’
- 例:
notLike("name", "王")—>name not like '%王%'
LikeLeft
likeLeft(R column, Object val)
likeLeft(boolean condition, R column, Object val)
- LIKE ‘%值’
- 例:
likeLeft("name", "王")—>name like '%王'
likeRight
likeRight(R column, Object val)
likeRight(boolean condition, R column, Object val)
- LIKE ‘值%’
- 例:
likeRight("name", "王")—>name like '王%'
isNull
isNull(R column)
isNull(boolean condition, R column)
- 字段 IS NULL
- 例:
isNull("name")—>name is null
isNotNull
isNotNull(R column)
isNotNull(boolean condition, R column)
- 字段 IS NOT NULL
- 例:
isNotNull("name")—>name is not null
in
in(R column, Collection<?> value)
in(boolean condition, R column, Collection<?> value)
- 字段 IN (value.get(0), value.get(1), …)
- 例:
in("age",{1,2,3})—>age in (1,2,3)
in(R column, Object... values)
in(boolean condition, R column, Object... values)
- 字段 IN (v0, v1, …)
- 例:
in("age", 1, 2, 3)—>age in (1,2,3)
notIn
notIn(R column, Collection<?> value)
notIn(boolean condition, R column, Collection<?> value)
- 字段 NOT IN (value.get(0), value.get(1), …)
- 例:
notIn("age",{1,2,3})—>age not in (1,2,3)
notIn(R column, Object... values)
notIn(boolean condition, R column, Object... values)
- 字段 NOT IN (v0, v1, …)
- 例:
notIn("age", 1, 2, 3)—>age not in (1,2,3)
inSql
inSql(R column, String inValue)
inSql(boolean condition, R column, String inValue)
- 字段 IN ( sql语句 )
- 例:
inSql("age", "1,2,3,4,5,6")—>age in (1,2,3,4,5,6) - 例:
inSql("id", "select id from table where id < 3")—>id in (select id from table where id < 3)
notInSql
notInSql(R column, String inValue)
notInSql(boolean condition, R column, String inValue)
- 字段 NOT IN ( sql语句 )
- 例:
notInSql("age", "1,2,3,4,5,6")—>age not in (1,2,3,4,5,6) - 例:
notInSql("id", "select id from table where id < 3")—>id not in (select id from table where id < 3)
groupBy
groupBy(R... columns)
groupBy(boolean condition, R... columns)
- 分组:GROUP BY 字段, …
- 例:
groupBy("id", "name")—>group by id,name
orderByAsc
orderByAsc(R... columns)
orderByAsc(boolean condition, R... columns)
- 排序:ORDER BY 字段, … ASC
- 例:
orderByAsc("id", "name")—>order by id ASC,name ASC
orderByDesc
orderByDesc(R... columns)
orderByDesc(boolean condition, R... columns)
- 排序:ORDER BY 字段, … DESC
- 例:
orderByDesc("id", "name")—>order by id DESC,name DESC
orderBy
orderBy(boolean condition, boolean isAsc, R... columns)
- 排序:ORDER BY 字段, …
- 例:
orderBy(true, true, "id", "name")—>order by id ASC,name ASC
having
having(String sqlHaving, Object... params)
having(boolean condition, String sqlHaving, Object... params)
- HAVING ( sql语句 )
- 例:
having("sum(age) > 10")—>having sum(age) > 10 - 例:
having("sum(age) > {0}", 11)—>having sum(age) > 11
func
func(Consumer<Children> consumer)
func(boolean condition, Consumer<Children> consumer)
- func 方法(主要方便在出现if…else下调用不同方法能不断链)
- 例:
func(i -> if(true) {i.eq("id", 1)} else {i.ne("id", 1)})
or
or()
or(boolean condition)
拼接 OR
注意事项:
主动调用 or 表示紧接着下一个方法不是用 and 连接!(不调用 or 则默认为使用 and 连接)
- 例:
eq("id",1).or().eq("name","老王")—>id = 1 or name = '老王'
or(Consumer<Param> consumer)
or(boolean condition, Consumer<Param> consumer)
- OR 嵌套
- 例:
or(i -> i.eq("name", "李白").ne("status", "活着"))—>or (name = '李白' and status <> '活着')
and
and(Consumer<Param> consumer)
and(boolean condition, Consumer<Param> consumer)
- AND 嵌套
- 例:
and(i -> i.eq("name", "李白").ne("status", "活着"))—>and (name = '李白' and status <> '活着')
nest
nested(Consumer<Param> consumer)
nested(boolean condition, Consumer<Param> consumer)
- 正常嵌套 不带 AND 或者 OR
- 例:
nested(i -> i.eq("name", "李白").ne("status", "活着"))—>(name = '李白' and status <> '活着')
apply
apply(String applySql, Object... params)
apply(boolean condition, String applySql, Object... params)
-
拼接 sql
注意事项:
该方法可用于数据库函数动态入参得
params对应得前面applySql内部得(index)部分。这样是不会有 sql 注入风险的,反之会有! -
例:
apply("id = 1")—>id = 1 -
例:
apply("date_format(dateColumn,'%Y-%m-%d') = '2008-08-08'")—>date_format(dateColumn,'%Y-%m-%d') = '2008-08-08'") -
例:
apply("date_format(dateColumn,'%Y-%m-%d') = {0}", "2008-08-08")—>date_format(dateColumn,'%Y-%m-%d') = '2008-08-08'")
last
last(String lastSql)
last(boolean condition, String lastSql)
-
无视优化规则直接拼接到 sql 的最后
注意事项:
只能调用一次,多次调用以最后一次为准,有 sql 注入的风险,请谨慎使用
-
例:
last("limit 1")
exists
exists(String existsSql)
exists(boolean condition, String existsSql)
- 拼接 EXISTS ( sql语句 )
- 例:
exists("select id from table where age = 1")—>exists (select id from table where age = 1)
notExists
notExists(String notExistsSql)
notExists(boolean condition, String notExistsSql)
- 拼接 NOT EXISTS ( sql语句 )
- 例:
notExists("select id from table where age = 1")—>not exists (select id from table where age = 1)
QueryWrapper
说明:
继承自 AbstractWrapper,自身的内部属性 entity 也用于生成 where 条件及 LambdaQueryWrapper ,可以通过 new QueryWrapper().lambda() 方法获取
select
select(String... sqlSelect)
select(Predicate<TableFieldInfo> predicate)
select(Class<T> entityClass, Predicate<TableFieldInfo> predicate)
设置查询字段
说明:
以上方法为两类
第二类方法为过滤器查询字段(主键除外),入参不包含 class 的调用前需要
wrapper内的entity属性有值!这两类方法重复调用以最后一次为准
- 例:
select("id", "name", "age") - 例:
select(i -> i.getProperty().startsWith("test"))
UpdateWrapper
说明:
继承自
AbstractWrapper,自身的内部属性entity也用于生成 where 条件及LambdaUpdateWrapper,可以通过new UpdateWrapper().lambda()方法获取!
set
set(String column, Object val)
set(boolean condition, String column, Object val)
- SQL SET 字段
- 例:
set("name", "老李头") - 例:
set("name", "")—>数据库字段值变为空字符串 - 例:
set("name", null)—>数据库字段值变为null
setSql
setSql(String sql)
- 设置 SET 部分 SQL
- 例:
setSql("name = '老李头'")
lambda
获取 LambdaWrapper
在QueryWrapper中是获取LambdaQueryWrapper
在UpdateWrapper中是获取LambdaUpdateWrapper
使用 Wrapper 自定义 SQL
需求来源:
再使用了
mybatis-plus之后,自定义 SQL 的同时也想使用wrapper的便利应该怎么办?在mybatis-plus版本3.0.7得到了完美解决。版本需要大于或等于3.0.7,以下两种方案取其一即可
Service.java
mysqlMapper.getAll(Wrappers.<MysqlData>lambdaQuery().eq(MysqlData::getGroup, 1));
Mapper.xml
<select id="getAll" resultType="MysqlData">
	SELECT * FROM mysql_data ${ew.customSqlSegment}
select>
简单示例
条件构造器的例子上面 CRUD 中有部分了,下面再写几个例子来找点感觉
@SpringBootTest
public class WrapperTest {

    @Autowired
    UserMapper userMapper;

    // 查询 name 不为空的,并且邮箱不为空,年龄大于12的用户
    @Test
    void test1(){
        // 创建 QueryWrapper
        QueryWrapper<User> wrapper = new QueryWrapper<>();
        // 构建条件,wrapper是链式编程,所以可以一直 .下去
        // isNotNull 有两个重载方法,下面调用的这个方法的第一个参数表示的是数据库表中的字段名
        // gt 用来拼接 > 条件,第一个参数为数据库表中的字段名,第二个是 > 号后的值
        wrapper
                .isNotNull("name")
                .isNotNull("email")
                .gt("age",3);
        // 执行查询操作,输出查询结果
        userMapper.selectList(wrapper).forEach(System.out::println);
    }

    // 查询名字等于李四的,且年龄小于30的用户
    @Test
    void test2(){
        QueryWrapper<User> wrapper = new QueryWrapper<>();
        // eq 拼接 = 条件,第一个参数为数据库表中的字段名,第二个是 = 后的值
        // lt 拼接 < 条件,第一个参数为数据库表中的字段名,第二个是 《 后的值
        wrapper
                .eq("name","李四")
                .lt("age",30);
        // selectOne 查询一个结果,如果返回多个结果,使用 selectMaps 或 selectList
        System.out.println(userMapper.selectOne(wrapper));
    }

    // 查询年龄再 20-30 岁之间的用户
    @Test
    void test3(){
        QueryWrapper<User> wrapper = new QueryWrapper<>();
        // between 拼接 between and 条件,第一个参数表示数据库中的字段名,第二个参数为最小值,第三个参数为最大值
        wrapper.between("age",20,30);
        userMapper.selectList(wrapper).forEach(System.out::println);
    }

    // 模糊查询
    // 名字当中不包含 张 的,且是 李 开头的用户
    @Test
    void test4(){
        QueryWrapper<User> wrapper = new QueryWrapper<>();
        // notLike 拼接 not like 条件,第一个参数为数据库表中的字段名,第二个是 not like 后的值,它会自动拼接 %  % 比如这里是 %张%
        // likeRight ,拼接 like 条件,第一个参数为数据库表中的字段名,第二个是 like后的值,它会再第二个参数后拼接 % 比如这里是 李%
        wrapper
                .notLike("name","张")
                .likeRight("name","李");

        List<Map<String, Object>> maps = userMapper.selectMaps(wrapper);
        maps.forEach(System.out::println);
    }

    // 查询用户 id 小于2 的用户
    @Test
    void test5(){
        QueryWrapper<User> wrapper = new QueryWrapper<>();
        // inSql 在 in 条件后拼接 sql 语句,比如下面的这个执行后的语句为
        // SELECT id,name,age,email,create_time,modified_time,version,deleted FROM user WHERE deleted=0 AND (id IN (select id from user where id < 2))
        wrapper.inSql("id","select id from user where id < 2");
        userMapper.selectList(wrapper).forEach(System.out::println);
    }

    // 通过 id 进行排序
    @Test
    void test6(){
        QueryWrapper<User> wrapper = new QueryWrapper<>();
        // orderByDesc sql 在末尾添加降序排序,参数是可变参数,参数都是数据库中字段名
        wrapper.orderByDesc("id");
        userMapper.selectList(wrapper).forEach(System.out::println);
    }

}
Wrapper 十分重要,我们需要执行复杂 sql 语句时需要使用到,可以多加练习,找到规律来使用 Wrapper ,这样会让你的开发更加快速高效
9. 代码生成器
AutoGenerator 是 MyBatis-Plus 的代码生成器,通过 AutoGenerator 可以快速生成 Entity、Mapper、Mapper XML、Service、Controller 等各个模块的代码,极大的提升了开发效率。
也就是说,MP 的代码生成器可以节省我们写很多重复繁琐的代码,快速搭建项目。
-
创建 user 表,或者使用我们刚刚的 user 表
如果是用刚刚的 user 表,最好加上注释,这样我们等下自动生成 Swagger 注解时就可以看到很明显的效果
DROP TABLE IF EXISTS `user`; CREATE TABLE `user` ( `id` bigint(20) NOT NULL AUTO_INCREMENT COMMENT '主键ID', `name` varchar(30) CHARACTER SET utf8mb4 COLLATE utf8mb4_general_ci NULL DEFAULT NULL COMMENT '姓名', `age` int(11) NULL DEFAULT NULL COMMENT '年龄', `email` varchar(50) CHARACTER SET utf8mb4 COLLATE utf8mb4_general_ci NULL DEFAULT NULL COMMENT '邮箱', `modified_time` datetime(6) NULL DEFAULT NULL COMMENT '修改时间', `create_time` datetime(6) NULL DEFAULT NULL COMMENT '创建时间', `version` int(1) NULL DEFAULT 1 COMMENT '版本号(乐观锁)', `deleted` int(1) NULL DEFAULT 0, PRIMARY KEY (`id`) USING BTREE ) ENGINE = InnoDB AUTO_INCREMENT = 9 CHARACTER SET = utf8mb4 COLLATE = utf8mb4_general_ci ROW_FORMAT = Dynamic; INSERT INTO `user` VALUES (1, '张三', 3, '[email protected]', '2020-07-31 14:10:17.902000', '2020-07-31 14:01:47.161240', 1, 0); INSERT INTO `user` VALUES (2, '李四', 18, '[email protected]', '2020-07-31 14:10:17.902000', '2020-07-31 14:01:47.161240', 4, 0); INSERT INTO `user` VALUES (8, '王五', 18, '[email protected]', '2020-07-31 14:10:17.902000', '2020-07-31 14:01:47.161240', 1, 0); -
创建一个新的 SpringBoot 项目
-
引入依赖
引入的核心依赖是
mybatis-plus-boot-starter、mysql-connector-java、mybatis-plus-generator、velocity-engine-core。只要存在这四个依赖,则可以使用代码生成器。数据源可以使用 Spring默认的,这里使用 Druid。数据库连接驱动也不一定是要MySQL的。<dependencies> <dependency> <groupId>mysqlgroupId> <artifactId>mysql-connector-javaartifactId> <version>5.1.46version> dependency> <dependency> <groupId>com.alibabagroupId> <artifactId>druidartifactId> <version>1.1.23version> dependency> <dependency> <groupId>com.baomidougroupId> <artifactId>mybatis-plus-boot-starterartifactId> <version>3.3.2version> dependency> <dependency> <groupId>org.projectlombokgroupId> <artifactId>lombokartifactId> dependency> <dependency> <groupId>com.baomidougroupId> <artifactId>mybatis-plus-generatorartifactId> <version>3.3.2version> dependency> <dependency> <groupId>io.springfoxgroupId> <artifactId>springfox-swagger-uiartifactId> <version>2.9.2version> dependency> <dependency> <groupId>io.springfoxgroupId> <artifactId>springfox-swagger2artifactId> <version>2.9.2version> dependency> <dependency> <groupId>org.apache.velocitygroupId> <artifactId>velocity-engine-coreartifactId> <version>2.2version> dependency> <dependency> <groupId>org.springframework.bootgroupId> <artifactId>spring-boot-starter-webartifactId> dependency> <dependency> <groupId>org.springframework.bootgroupId> <artifactId>spring-boot-starter-testartifactId> <scope>testscope> dependency> dependencies> -
配置 application.xml
配置数据源
spring: datasource: driver-class-name: com.mysql.jdbc.Driver url: jdbc:mysql://localhost:3306/mybatisplus?serverTimezone=UTC&useUnicode=true&characterEncoding=utf-8 password: root username: root # 切换成 Druid 数据源 type: com.alibaba.druid.pool.DruidDataSource #Spring Boot 默认是不注入这些属性值的,需要自己绑定 #druid 数据源专有配置 initialSize: 5 minIdle: 5 maxActive: 20 maxWait: 60000 timeBetweenEvictionRunsMillis: 60000 minEvictableIdleTimeMillis: 300000 validationQuery: SELECT 1 FROM DUAL testWhileIdle: true testOnBorrow: false testOnReturn: false poolPreparedStatements: true #配置监控统计拦截的filters,stat:监控统计、log4j:日志记录、wall:防御sql注入 #如果允许时报错 java.lang.ClassNotFoundException: org.apache.log4j.Priority #则导入 log4j 依赖即可,Maven 地址:https://mvnrepository.com/artifact/log4j/log4j filters: stat,wall,log4j maxPoolPreparedStatementPerConnectionSize: 20 useGlobalDataSourceStat: true connectionProperties: druid.stat.mergeSql=true;druid.stat.slowSqlMillis=500 -
编写代码生成器
根据步骤,先创建代码生成器对象。然后 全局配置 => 配置数据源 => 包的配置 => 策略配置
@Test void myBatisPlusGenerator(){ // 创建 AutoGenerator 对象 AutoGenerator autoGenerator = new AutoGenerator(); // 1. 设置全局配置 GlobalConfig globalConfig = new GlobalConfig(); globalConfig .setOutputDir(System.getProperty("user.dir")+"/src/main/java") // 设置输出的路径 .setOpen(false) // 是否打开目录 .setIdType(IdType.AUTO) // 设置主键策略 .setAuthor("xp") // 自动设置作者名 .setFileOverride(false) // 是否覆盖 .setEntityName("") // 设置entity 实体类名字 .setControllerName("%sController") // 设置Controller名字 .setServiceName("%sService") // 设置Service 接口名字 .setServiceImplName("%sServiceImpl")// 设置Service 接口实现类名字 .setMapperName("%sMapper") // 设置Mapper 接口名字 .setBaseResultMap(true) // 是否创建resultMap .setSwagger2(true); // 设置开启 swagger2 注解 autoGenerator.setGlobalConfig(globalConfig); // 将全局配置注入到代码生成器中 // 2. 配置数据源 DataSourceConfig sourceConfig = new DataSourceConfig(); sourceConfig .setDbType(DbType.MYSQL) .setDriverName("com.mysql.jdbc.Driver") .setUrl("jdbc:mysql://localhost:3306/ebook?useUnicode=true&useSSL=false&characterEncoding=utf8") .setUsername("root") .setPassword("root"); autoGenerator.setDataSource(sourceConfig); // 将数据源配置注入到代码生成器中 // 3. 包配置 PackageConfig packageConfig = new PackageConfig(); packageConfig .setParent("com.xp"); // 设置父包名 autoGenerator.setPackageInfo(packageConfig);// 将包配置注入到代码生成器中 // 配置 xml 自动输出路径 String templatePath = "/templates/mapper.xml.vm"; // 配置模板引擎路径 InjectionConfig cfg = new InjectionConfig() { @Override public void initMap() { // to do nothing } }; // 自定义输出配置 List<FileOutConfig> focList = new ArrayList<>(); // 自定义配置会被优先输出 focList.add(new FileOutConfig(templatePath) { @Override public String outputFile(TableInfo tableInfo) { // 自定义输出文件名 , 如果你 Entity 设置了前后缀、此处注意 xml 的名称会跟着发生变化!! return System.getProperty("user.dir") +"/src/main/resources/mapper/" + "/" + tableInfo.getEntityName() + "Mapper" + StringPool.DOT_XML; } }); cfg.setFileOutConfigList(focList); autoGenerator.setCfg(cfg); // 配置模板 TemplateConfig templateConfig = new TemplateConfig(); // 配置自定义输出模板 templateConfig.setXml(null); // 取消默认的 xml 路径 autoGenerator.setTemplate(templateConfig); // 将模板注入到代码生成器中 autoGenerator.setTemplateEngine(new VelocityTemplateEngine()); // 将模板引擎注入到代码生成器中 // 4. 配置策略 StrategyConfig strategyConfig = new StrategyConfig(); TableFill createTime = new TableFill("create_time", FieldFill.INSERT); TableFill modifiedTime = new TableFill("modified_time", FieldFill.INSERT_UPDATE); strategyConfig //.setTablePrefix("ebook_") // 去掉表名前缀 .setInclude("user") // 设置需要映射的表名 .setRestControllerStyle(true) // Controller 添加 RestController 注解 .setEntityLombokModel(true) // 是否使用 lombok .setEntityTableFieldAnnotationEnable(true) // 是否生成实体时,生成字段注解 .setVersionFieldName("version") // 设置乐观锁版本字段 .setTableFillList(Arrays.asList(createTime,modifiedTime)) // 设置自动填充规则 .setLogicDeleteFieldName("deleted") // 设置逻辑删除字段 .setNaming(NamingStrategy.underline_to_camel) // 数据库映射到实体类的名字为驼峰命名 .setColumnNaming(NamingStrategy.underline_to_camel); // 字段名映射驼峰命名 autoGenerator.setStrategy(strategyConfig); // 将配置策略注入到代码生成器中 // 5. 执行代码生成器 autoGenerator.execute(); } -
运行代码生成器
运行代码生成器,然后我们会发现我们的项目多出了包和类,如下图:

点进去类里,我们会发现它里面已经帮我们全部写好了
-
编写 Controller 接口
在我们自动生成的 UserController 类中增加一个hello 的接口
/** ** 前端控制器 *
* * @author xp * @since 2020-08-01 */ @RestController @RequestMapping("/user") public class UserController { @Autowired UserService userService; @RequestMapping("/hello") public String hello(){ return userService.getById(2).toString(); } } -
测试访问接口
我们通过浏览器访问我们刚刚编写好的接口,输出我们数据库中的信息则代表代码生成器已经自动生成成功了
