Springboot+SpringSecurity+Thymeleaf实战(附源码),shi上最简单的SpringSecurity权限框架
先看效果
在没有认证的时候登陆是这样的
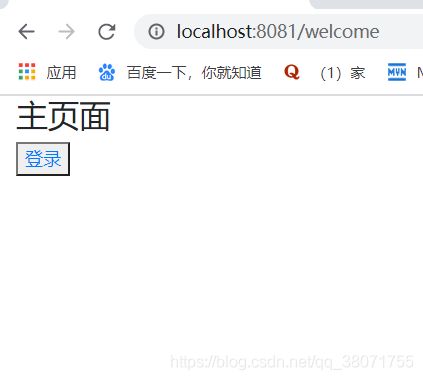
点击登陆之后,点击登陆我之后,下次登陆就回直接使用账号密码。

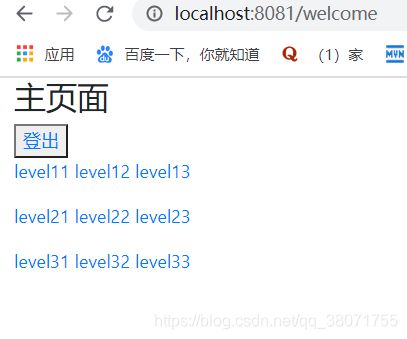
登陆成功之后,这是拥有全部权限的账号密码情况下,登陆按钮消失,登出按钮显示出来,显示所有的页面
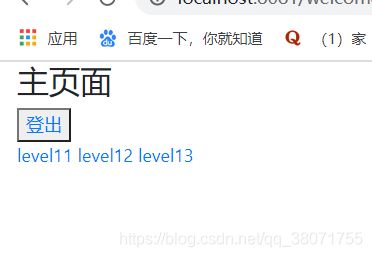
登陆只有一个权限的,只显示权限可以看的到的页面。点击登出,回退到登陆页面,并且清除数据。
开始
废话少说,直接上干的。
使用东西:Springboot、SpringSecurity、Thymeleaf
实现功能:登陆验证、权限验证、记住我、根据验证显示按钮、根据权限去验证可查看的内容。
直接在类中硬编码的账号密码(未使用数据库),我将在最后附上源码。
首先
架构是这样婶儿的,了解spingboot,一眼就懂,不多BB
个人认为SpringSecurity比shiro简单很多,不,简单太多了,最主要的核心代码在SecurityConfig。
引用到的jar包
        //springsecurity4整合thymeleaf的包

            org.thymeleaf.extras
            thymeleaf-extras-springsecurity4
            3.0.2.RELEASE

        //thymeleaf包

            org.springframework.boot
            spring-boot-starter-thymeleaf

        //security包

            org.springframework.boot
            spring-boot-starter-security
            2.3.1.RELEASE


            org.springframework.boot
            spring-boot-starter-web
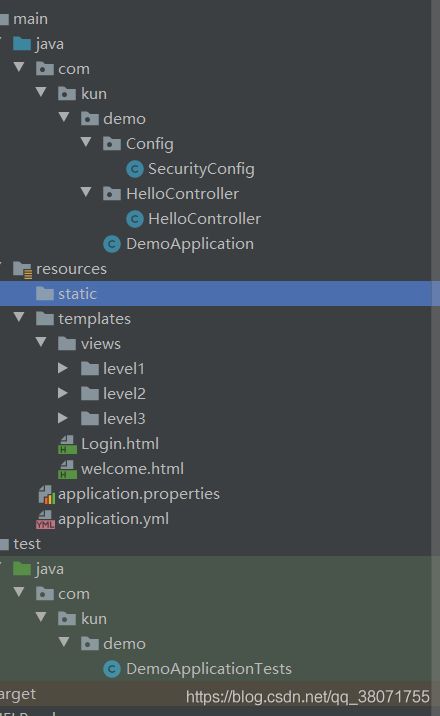
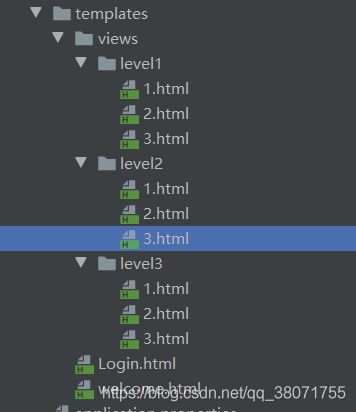
根据以下目录创建页面,内容随意,也可以直接使用我的静态,你问我好看吗,当~然不好看,白嫖还要什么自行车
在主要页面需要引入thymeleaf和Security的依赖,千万记得,不然不能使用,别问我咋知道的。
Login页面中是单纯的登陆表单
Welcome页面是主页面,主要功能是指向每个页面,
其他123页面随意,只是自己知道内容即可
上面整理好之后,就可以写Controller了
@Controller
public class HelloController {

    @RequestMapping("/toLogin")
    public String helloword(){
        return "Login";
    }

    @RequestMapping({"/welcome"})
    public String welcome(){
        return "welcome";
    }


    @RequestMapping("/level1/{id}")
    public String level1(@PathVariable("id") int id){
        return "views/level1/"+id;
    }

    @RequestMapping("/level2/{id}")
    public String level2(@PathVariable("id") int id){
        return "views/level2/"+id;
    }

    @RequestMapping("/level3/{id}")
    public String level3(@PathVariable("id") int id){
        return "views/level3/"+id;
    }

}
以上都是环境了,接下来,重点来了,上文说,最关键的是SecurityConfig中,于是我把用法和注解都写在注释中了,注意Security的是链式编程,就是你一个方法在不结束的情况下可以加and()一直点直到结束加上;就完成了。
@EnableWebSecurity // 开启WebSecurity模式 继承Security的父类
public class SecurityConfig extends WebSecurityConfigurerAdapter {

    //授权的规则
    @Override
    protected void configure(HttpSecurity http) throws Exception {
        //具体不知道干啥用的
        http.authorizeRequests()
                //设置主页面可全部访问,具体方法为permitAll
                .antMatchers("/welcome").permitAll()
                //只要有vip1的权限就可以访问/level1/* 下的所有接口
                .antMatchers("/level1/*").hasRole("vip1")
                .antMatchers("/level2/*").hasRole("vip2")
                .antMatchers("/level3/*").hasRole("vip3");
        //开启登录认证
        http.formLogin()
                //自定义的登录页面中上传的指定上来的账号,可以根据数据库的名自己定义
                .usernameParameter("username")
                //自定义的登录页面中上传的密码
                .passwordParameter("password")
                //自定义指定自己要登录的页面
                .loginPage("/toLogin")
                //处理登录页面的接口,我这里是直接用的SpringSecurity提供的
                .loginProcessingUrl("/login")
                //登录成功后跳转的位置
                .defaultSuccessUrl("/welcome");
        //关闭Security提供的CSRF防止共计
        http.csrf().disable();
        //自定义登出成功后跳转的页面
        http.logout().logoutSuccessUrl("/toLogin");
        //rememberMe记住我功能 //后面是定义记住我上传上来的name
        http.rememberMe().rememberMeParameter("remember");
    }

    //认证
    @Override
    protected void configure(AuthenticationManagerBuilder auth) throws Exception {
        //使用认证
        // inMemoryAuthentication()是在内存中认证
        // 正常应该在数据库中认证
        // 从SpringSecurity5开始密码就必须加密,提供了很多方法我这里使用的是BCryptPasswordEncoder
        auth.inMemoryAuthentication().passwordEncoder(new BCryptPasswordEncoder())
                 .withUser("wangkun").password(new BCryptPasswordEncoder().encode("123123")).roles("vip1","vip2","vip3")
                 .and()
                 .withUser("admin").password(new BCryptPasswordEncoder().encode("123123")).roles("vip1","vip2")
                 .and()
                 .withUser("root").password(new BCryptPasswordEncoder().encode("123123")).roles("vip1");
    }
}
最后要注意的点是在html页面中的几个写法,就是在整合SpringSecurity和thymeleaf中用于判断是否登陆,或者登陆上之后有没有权限看到自己能看到的东西,我也把解释写入注释中了。
OK,这就完了。
乾坤未定,你我皆为黑马!
加油。