多线程(三):ReentrantLock NonfairSync FairSync
结构
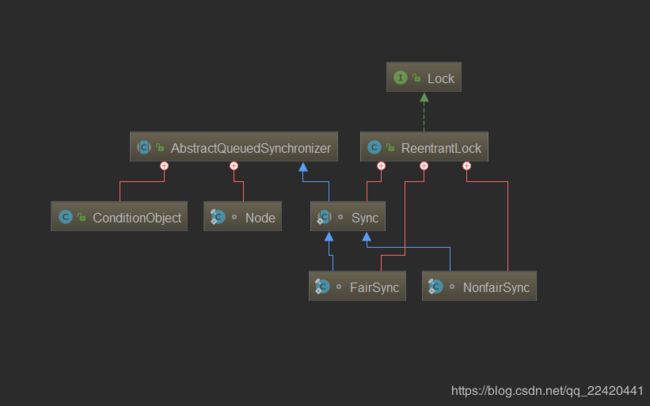
首先看看ReentranLock结构,它实现Lock接口,也拥有Sync ,NonfairSync, FairSync三个内部类,
( NonfairSync, FairSync )-----继承-------> Sync ------继承-------> AbstractQueuedSynchronizer
NonfairSync ,FairSync 重写了AQS 的 tryAcquire
构造方式:
public ReentrantLock() {
    sync = new NonfairSync();
}
public ReentrantLock(boolean fair) {
    sync = fair ? new FairSync() : new NonfairSync();
}
ReentrantLock 默认实现非公平锁,构造为true时才构造公平锁
Nonfair.lock

ReentrantLock.class
public void lock() {
sync.acquire(1);
}
AQS.class
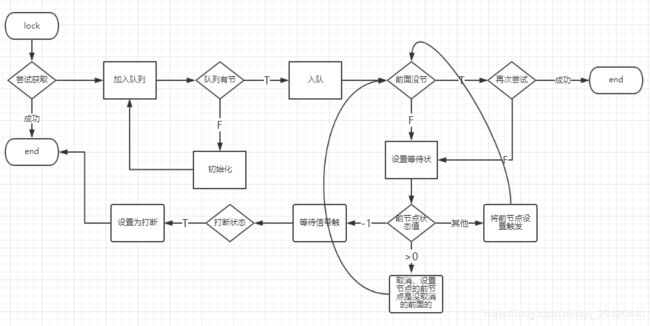
public final void acquire(int arg) {
// 尝试获取不成功 并且加入队发现线程被打断了,
// 设置当前线程打断了
if (!tryAcquire(arg) &&
acquireQueued(addWaiter(Node.EXCLUSIVE), arg))
selfInterrupt();
}非公平锁上锁时,调用sync的acquire,sync的acquire实则继承AQS的acquire方法,
获取:先尝试获取,不成功再加入等待队
最终的实现tryAcquire 就是ReetranLock.Sync.nonfairTryAcquire方法
 final boolean nonfairTryAcquire(int acquires) {
            // 当前线程
            final Thread current = Thread.currentThread();
            // 获取AQS状态值
            int c = getState();
            if (c == 0) {
                // 没锁,cas ,直接获取锁
                if (compareAndSetState(0, acquires)) {
                    // 将当前线程设置为锁的拥有线程
                    setExclusiveOwnerThread(current);
                    return true;
                }
            }
            else if (current == getExclusiveOwnerThread()) {
                // 当前线程就是拥有锁的线程 (重入) 记录重入次数 ++
                int nextc = c + acquires;
                if (nextc < 0)
                    // overflow
                    throw new Error("Maximum lock count exceeded");
                // 更新状态值
                setState(nextc);
                return true;
            }
            return false;
        }
加入等待队列
acquireQueued(addWaiter(Node.EXCLUSIVE), arg)
Node.EXCLUSIVE = null 标记 独占模式节点

private Node addWaiter(Node mode) {
        Node node = new Node(mode);

         for (;;) {
            //获取尾节点
            Node oldTail = tail;

            if (oldTail != null) {
            // 尾节点不为空 证明当前队列有值


                // 将尾节点(tail)设置为node的前节点
                node.setPrevRelaxed(oldTail);

                // cas 将尾节点设置为node
                if (compareAndSetTail(oldTail, node)) {
                    // 之前尾节点的下一个节点指向 node
                    oldTail.next = node;
                    // 处理成功 返回node
                    return node;
                }
            } else {
            // 队列为空 初始化队
                initializeSyncQueue();
            }
        }
    }


 // 初始化同步队列
    private final void initializeSyncQueue() {
        Node h;
        if (HEAD.compareAndSet(this, null, (h = new Node())))
            tail = h;
    }
final boolean acquireQueued(final Node node, int arg) {
try {
boolean interrupted = false;
for (;;) {
// 节点的上一个节点
final Node p = node.predecessor();
// 上一节点指向头节点 并且 再一次尝试获取
if (p == head && tryAcquire(arg)) {
// 此时获取成功
setHead(node);
p.next = null; // help GC
// 没有被打断
return interrupted;
}
if (shouldParkAfterFailedAcquire(p, node) &&
parkAndCheckInterrupt())
// 尝试失败--->阻塞 ---->继续验证是否被打断
interrupted = true;
}
} catch (Throwable t) {
// 发生了异常 取消尝试
cancelAcquire(node);
throw t;
}
}
// 节点的上一个节点
final Node predecessor() throws NullPointerException {
Node p = prev;
if (p == null)
throw new NullPointerException();
else
return p;
}
// 尝试失败后是否阻塞
private static boolean shouldParkAfterFailedAcquire(Node pred, Node node) {
int ws = pred.waitStatus;
if (ws == Node.SIGNAL)
/*
* 前节点已经是等待触发状态
*/
return true;
if (ws > 0) {
/*
* 前节点取消了排队
*/
do {
node.prev = pred = pred.prev;
} while (pred.waitStatus > 0);
// 寻找没取消的前。。。前节点
pred.next = node;
} else {
// 将上一节点设置为等待触发
pred.compareAndSetWaitStatus(ws, Node.SIGNAL);
}
return false;
}从源码中看出 作者编程一般使用 && 来判断是否进行下一步
用死循环递归

1.尝试获取 成功就结束了,不成功:加入队列;
2.先加入等待队列,
1)队列操作:
队列有节点,直接入队,将当天节点设置为尾节点,
队列没节点,初始化一个空队列,首尾相同 head = tail ,进行上面操作。
2)再次尝试,设置等待状态 ,去除取消的节点,判断当前被打断
再次尝试:如果这是前面没有节点了,也就是头节点是当前节点的前置节点,再次尝试获取
设置等待状态(判断前节点状态):等待触发-->判断被打断;取消--->设置节点的前节点是未取消的前面节点;初始或其他状态-->将前节点设置为等待触发 ,然后在进行上面操作循环。
判断被打断: