SpringMVC笔记一: 被HelloWorld虐了
1.1. Introduction
Spring Web MVC is the original web framework built on the Servlet API
and included in the Spring Framework from the very beginning. The
formal name “Spring Web MVC” comes from the name of its source module
spring-webmvc but it is more commonly known as “Spring MVC“.
从官方的描述来看,Spring MVC 是建立在Servlet层上的web 框架。
通俗来说,Spring为展现层提供的基于MVC设计理念的优秀Web框架,是目前最主流的MVC框架之一。
1.2.
SpringMVC_Helloworld
参考:https://blog.csdn.net/love_java_cc/article/details/76359815
pass:这是历史最艰辛的HelloWorld,个人感觉在配置上的坑有点多,有空要去多熟悉IDEA,Maven等的使用。
- 导入jar包。
- 修改web.xml中配置。用来正常启动DispatcherServlet。
- 修改dispatcher-servlet.xml,用来配置HandlerMapping,用来找到Handler
- 编写Handler类(请求处理类)
- 编写视图。
1.
如果没有完整导入一下的包的话,运行Tomcat服务器时会报
[2017-01-08 04:40:33,100] Artifact jspRun:war exploded: Artifact is being deployed, please wait...
08-Jan-2017 16:40:33.570 严重 [RMI TCP Connection(3)-127.0.0.1] org.apache.catalina.core.ContainerBase.addChildInternal ContainerBase.addChild: start:
等字样的错误。这时要去查看你Tomcat服务器的Log,里面有详细的报错信息。日志文件的位置在控制台的输出信息的最前面:
E:\apache-tomcat-8.5.32\bin\catalina.bat run
[2018-08-25 10:06:00,116] Artifact SpringMVC-01:war exploded: Server is not connected. Deploy is not available.
Using CATALINA_BASE:   "C:\Users\kaixin\.IntelliJIdea2016.3\system\tomcat\Unnamed_SpringMVC-01"
还有一种情况是你虽然导入了包,但没有放到正确的位置。


2.
我们刚新建完项目的目录结构如下:
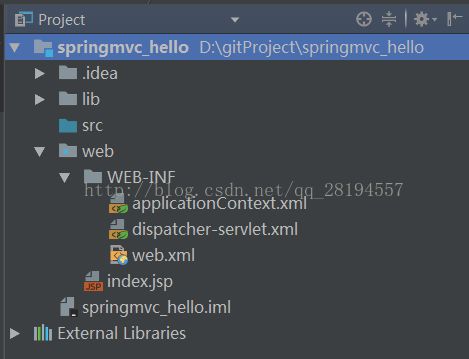
完整目录结构如下:

web.xml是用来启动DispatcherServlet。系统默认配置如下:
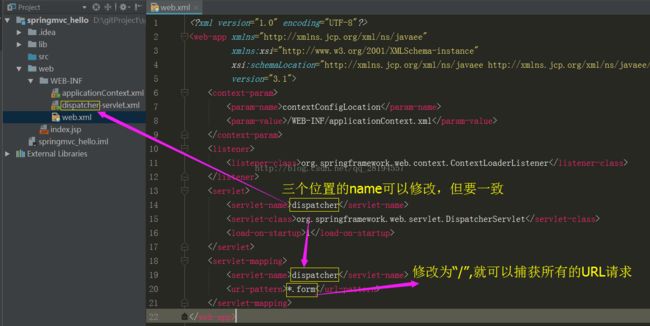
更改后(只需要修改一个地方,将url-pattern地方修改成“/”,用来捕获所有URL请求。):
<web-app xmlns="http://xmlns.jcp.org/xml/ns/javaee"
         xmlns:xsi="http://www.w3.org/2001/XMLSchema-instance"
         xsi:schemaLocation="http://xmlns.jcp.org/xml/ns/javaee http://xmlns.jcp.org/xml/ns/javaee/web-app_3_1.xsd"
         version="3.1">
    <context-param>
        <param-name>contextConfigLocationparam-name>
        <param-value>/WEB-INF/applicationContext.xmlparam-value>
    context-param>
    <listener>
        <listener-class>org.springframework.web.context.ContextLoaderListenerlistener-class>
    listener>
    <servlet>
        <servlet-name>dispatcherservlet-name>
        <servlet-class>org.springframework.web.servlet.DispatcherServletservlet-class>
        <load-on-startup>1load-on-startup>
    servlet>
    <servlet-mapping>
        <servlet-name>dispatcherservlet-name>
        <url-pattern>/url-pattern>
    servlet-mapping>
web-app>
3.修改 dispatcher-servlet.xml 文件
<beans xmlns="http://www.springframework.org/schema/beans"
       xmlns:context="http://www.springframework.org/schema/context"
       xmlns:xsi="http://www.w3.org/2001/XMLSchema-instance"
       xsi:schemaLocation="
        http://www.springframework.org/schema/beans
        http://www.springframework.org/schema/beans/spring-beans-3.0.xsd
        http://www.springframework.org/schema/context
        http://www.springframework.org/schema/context/spring-context-3.0.xsd">


    <context:component-scan base-package="com.spring.mvc" />

    <bean class="org.springframework.web.servlet.view.InternalResourceViewResolver">


       <property name="prefix">
            <value>/WEB-INF/views/value>
        property>


        <property name="suffix">
            <value>.jspvalue>
        property>

    bean>

beans>
4.编写处理请求的处理器,并标识为处理器。(就是在src目录下写个类处理请求)
package com.spring.mvc;

import org.springframework.stereotype.Controller;
import org.springframework.ui.ModelMap;
import org.springframework.web.bind.annotation.RequestMapping;
import org.springframework.web.bind.annotation.RequestMethod;

@Controller
public class MyController {
    @RequestMapping(value="/hello",method = RequestMethod.GET)
    public String printWelcome(ModelMap model) {
        System.out.println("Hello World");
        return "hello";
    }
}
5.写一个hello.jsp,用户请求后,我们要回应用户的请求,呈现一个视图给用户。
<%--
  Created by IntelliJ IDEA.
  User: kaixin
  Date: 2018/8/25
  Time: 9:39
  To change this template use File | Settings | File Templates.
--%>
<%@ page contentType="text/html;charset=UTF-8" language="java" %>
<html>
<head>
    <title>Titletitle>
head>
<body>
    <h2>Success!!!h2>
body>
html>
Tomcat服务器配置那些就不谈了,run后控制台正常


分析
- 用户点击超链接,发出非静态请求,服务器把请求交给Tomcat容器,Tomcat会在web.xml中servlet-mapping标签中找到与超链接地址(
标签)中对应的servlet 。
并通过servlet-name 在servlet标签中找到该servlet处理类。在SpringMVC中该处理类为org.springframework.web.servlet.DispatcherServlet. - DispatcherServlet 根据 HandlerMapping 来选择并且调用适当的控制器Controller(这里说的Controller就是上文的MyController类,功能:用来请求处理,转发到特定的jsp页面的。)
并根据RequestMapping确定请求所对应的处理方法。
MyController会返回一个逻辑视图给DispatchServlet, DispatchServlet通过ViewResolver 将逻辑视图变为真正的视图。其中HandlerMapping ,ViewResolver 都是在xxx-servlet中配置的。
换句话说,xxx-servlet包含了如何找到指定url请求的处理类,如何把处理类返回的逻辑视图变成实际视图。
2.常用注解
2.1.
@RequestMapping简介:
参考文章:https://blog.csdn.net/walkerJong/article/details/7994326
@RequestMapping一般被用在处理请求类中,用来处理请求地址映射(即为处理类指定可以处理哪些URL请求)可用于类或方法上。用于类上,表示类中的所有响应请求的方法都是以该地址作为父路径。(相对于根目录)
注解有六个属性:
value——-url
支持Ant风格,value的uri值为以下三类
A) 可以指定为普通的具体值;
B) 可以指定为含有某变量的一类值(URI Template Patterns with Path Variables);
C) 可以指定为含正则表达式的一类值( URI Template Patterns with Regular Expressions);
method——请求方式
params——–请求参数
heads———请求头
consumes,produces
index.jsp:(用户发起超链接请求的界面)
<%@ page contentType="text/html;charset=UTF-8" language="java" %>
<html>
<head>
    <title>hello worldtitle>
head>
<body>
    <form action="TestRequest/submit" method="post">
        <input type="submit" value="post on data">
        <table>
            <tr>
                <td>用户名:td>
                <td><input type="text" name="username" value=""/>td>
            tr>
            <tr>
                <td>密码:td>
                <td><input type="password" name="password" value="" />td>
            tr>
        table>
    form>
    <br><br>
    <a href="TestRequest/helloworld">Hello Worlda>
    <br><br>
    <a href="success">Success!!a>
body>
html>
TestController类用来测试一下@RequestMapping 的几个属性:value,method,params,headers
@RequestMapping("/TestRequest")
@Controller
public class TestController {
    /*
     * 处理器类下可以定义多个处理方法,处理来自/TestRequest下的请求
     */
    @RequestMapping(value = "/helloworld",method = RequestMethod.GET)
    public String hello(){
        System.out.println("Hello World");
        return "hello";
    }

    @RequestMapping(value = "/submit",method = RequestMethod.POST,
            params ={"username=kai","age!=13"},headers ={"Accept-Language: zh-CN,zh;q=0.9"} )
    public String submit(){
        System.out.println("submit");
        return "hello";
    }
}
2.1.
@PathVariable简介:
@PathVariable映射URL绑定的占位符。(正是因为此特性,才支持Restful风格的编程,里程碑!!!)
//@PathVariable获取URL中的占位符数据的值
@RequestMapping(value = "/testPathVarible/{id}")
    public String testvar(@PathVariable("id") Integer myid ){
        System.out.println("testPathVarible "+myid);
        return "success";
    }
2.2.
@RequestParam简介:
首先明确一下它与@PathVariable的区别:
@RequestParam 是从request里面拿取值,用?param= value的形式;
@PathVariable 是从一个URI模板里面来填充 …/value
    /*
     * @RequestParam来映射请求参数,value值为参数名
     * 使用 required 表示参数是否必传,defaultValue 设置默认值
     */
    @RequestMapping(value = "/testParam/{id}",method = RequestMethod.GET)
    public String testVariable(@PathVariable("id") Integer myid,
                               @RequestParam(value = "username") String un,
                               @RequestParam(value = "age",required = false,defaultValue ="0") Integer age){
        System.out.println("testParam order id= "+myid+" username:"+un+"age: "+age);
        return "success";
    }