Mybatis及Spring及SpringMVC框架解析(全)
MyBatis
-历史

	持久层技术解决方案

		1.JDBC技术-->Connection、PreparedStatement、ResultSet

		2.Spring的JdbcTemplate-->Spring中对Jdbc的简单封装

		3.Apache的DBUtils-->它和Spring的JdbcTemplate很像,也是对Jdbc的简单封装

	以上这些都不是框架(JDBC是规范、Spring的JdbcTemplate和Apache的DBUtils都只是工具类)

-介绍须知

	1.mybatis是一个持久层框架,用Java编写,它使用ORM四项实现了结果集的封装。

	2.它封装了jdbc操作的很多细节,使开发者只需要关注sql语句本身,而无需关注注册驱动,创建连接等烦
	杂过程

-生词须知

	ORM : Object Relational Mapping 对象关系映射。简单来说,就是把数据库表和实体类及实体类
	的属性对应起来,让开发者操作实体类就实现操作数据库表

-环境搭建

	1.创建maven工程并导入坐标

	2.创建实体类和Mapper的接口

	3.创建Mybatis 的主配置文件

	4.创建映射配置文件
简单示例
-
步骤一 (创建maven工程并导入坐标)
<dependencies> <dependency> <groupId>org.mybatis</groupId> <artifactId>mybatis</artifactId> <version>3.4.5</version> </dependency> <dependency> <groupId>mysql</groupId> <artifactId>mysql-connector-java</artifactId> <version>5.1.43</version> </dependency> <dependency> <groupId>log4j</groupId> <artifactId>log4j</artifactId> <version>1.2.12</version> </dependency> <dependency> <groupId>junit</groupId> <artifactId>junit</artifactId> <version>4.10</version> </dependency> </dependencies> -
步骤二 (创建实体类和Mapper的接口)
public class User implements Serializable {

	   private int id ;
	   private String username;
public interface IUserMapper { /** * 查询所有操作 * @return */ List<User> findAll(); } -
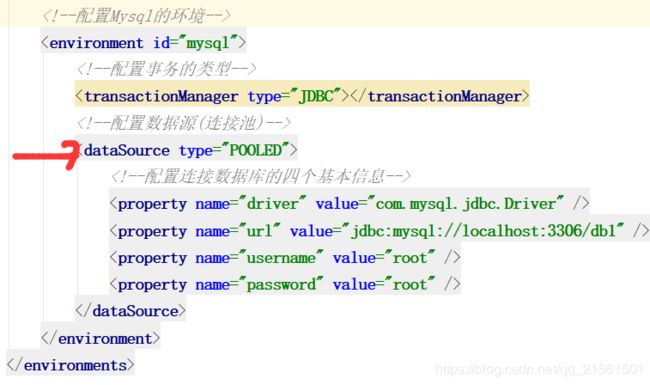
步骤三 (创建Mybatis 的主配置文件)
<configuration> <!--配置环境--> <environments default="mysql"> <!--配置Mysql的环境--> <environment id="mysql"> <!--配置事务的类型--> <transactionManager type="JDBC"></transactionManager> <!--配置数据源(连接池)--> <dataSource type="POOLED"> <!--配置连接数据库的四个基本信息--> <property name="driver" value="com.mysql.jdbc.Driver" /> <property name="url" value="jdbc:mysql://localhost:3306/db1" /> <property name="username" value="root" /> <property name="password" value="root" /> </dataSource> </environment> </environments> <mappers> <mapper resource="Mybatis/IuserMapper.xml" /> </mappers> </configuration> -
步骤四 (创建映射配置文件)
<mapper namespace="com.Mapper.IUserMapper" > <select id="findAll" resultType="com.Pojo.User" > select * from usr </select> </mapper> -
测试
    InputStream in = Resources.getResourceAsStream("mybatis/MapperConfig.xml");
    //创建SqlSessionFactory工厂
    SqlSessionFactoryBuilder builder = new SqlSessionFactoryBuilder();
    SqlSessionFactory factory = builder.build(in);
    //使用工厂生产SqlSession对象
    SqlSession session = factory.openSession();
    //使用SqlSession创建Mapper接口的代理对象
    UserMapper userMapper = session.getMapper(UserMapper.class);
    //使用代理对象执行方法
    List<mybatis_user> users = userMapper.findAll();
    for (mybatis_user muser : users){
        System.out.println(muser);
    }
    session.close();
    in.close();
Mybatis配置文件
-
基础含义
-前言 1.mybatis的配置文件包含了会深深影响mybatis行为的设置和属性信息 2.官方推荐该配置文件命名mybatis-config.xml -掌握方面 properties、settings、typeAliases、enveronments、mappers -
全配置文件列表
configuaratoin (配置) 1. properties (属性) 2. settings (设置) 3. typeAliases (类型别名) 4. typeHandlers (类型处理器) 5. objectFactory (对象工厂) 6. plugins (插件) 7. environments (环境配置) 1. environment (环境变量) 1. transactionManager (事务管理器) 2. dataSource (数据源) 8. databaseIdProvider (数据库厂商标识) 9. mappers (映射器) -
配置明细
properties

	含义

		开发者可通过properties属性来实现引用配置文件。这些属性都是可外部配置

		且可动态替换的
[注]
[注]
1.如果两个配置文件有同一个字段,优先使用外部配置文件的
2.可以直接引入外部配置文件,properties子元素中可以增加一些属性配置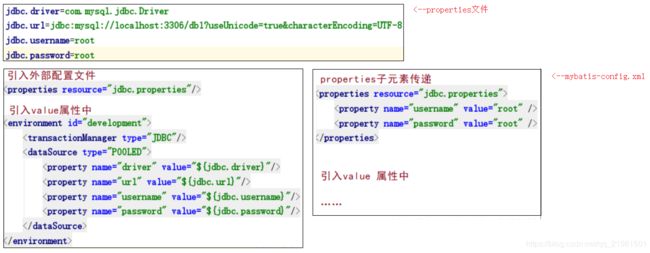
typeAliases (类型别名)

	含义

		类型别名是为java类型设置一个短的名字,存在的意义仅在于用来减少类完全限定名的冗余

	java内置内建类型别名

		它们都不区分大小写,注意对基本类型名称重复采用的特殊命名风格

			别名   		映射的类型

			_byte		byte
			_long		long
			_int		int
			_integer	int
			_double		double
			_float		float
			_boolean	boolean
			string		String
			byte		Byte
			long		Long
			short		Short
			int			Integer
			Integer		Integer
			double		Double
			float		Float
			boolean		Boolean
			date		Date
			object		Object
			map			Map
			hashmap		HashMap
			list		List
			arraylist	ArrayList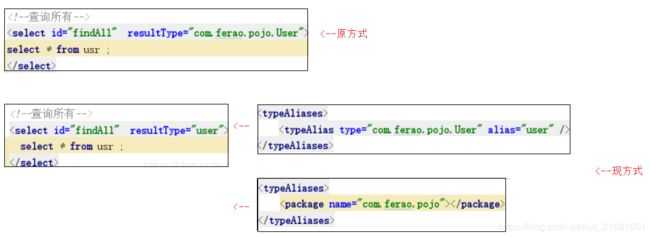
[注]
方法二种每一个在包中的Java bean,在没有注解的情况下,会使用bean的首字母小写的非限定类名来作为它的别名。若有注解,则别名为其注解值。(实体类上使用注解:@Alias(“user”))setting (设置) 含义 这是Mybatis中极为重要的调整设置,它们会改变Mybatis的运行时行为
mappers(映射器)

	含义

		MapperRegistry:注册绑定我们的Mapper文件

	方式1:

			<mappers>
			   <mapper resource="com/ferao/mapper/UserMapper.xml"/>
			</mappers>

	方式二:

			<mappers>
			   <mapper class="com.ferao.mapper.UserMapper" />
			</mappers>

			注--------------------------------------->

				-->使用class文件绑定注册,接口和它的Mapper配置文件必须同名且接口

				-->且它的Mapper配置文件必须在同一个包下
			<---------------------------------------
	方式三:

			<mappers>
			   <package name="com.ferao.mapper"></package>
			</mappers>

			注---------------------------------------->

				-->扫描包进行注入绑定方式,接口和它的Mapper配置文件必须同名

				-->且接口和它的Mapper配置文件必须在同一个包下
			<---------------------------------------
Mybatis参数深入
-
参数一:parameterType(输入类型)
种类

	1.传递简单类型

	2.传递pojo对象

		mybaits使用ognl 表达式解析对象字段的值,#{}或者${}括号中的值为pojo属性名称

	3.传递pojo包装对象

		开发中通过pojo传递查询条件,查询条件是综合的查询条件,不仅包括用户查询条件还包括其
		他的查询条件(比如将用户购买商品消息也作为查询条件),这时可以使用包装对象传递输入
		pojo类参数。中包含pojo。

OGNL表达式

	含义

		object Graphic Navigation Language (对象图导航语言)

		它是通过对象的取值方法来获取数据。在写法上把gat给省略了。

		比如:我们获取用户的名称

		类中的写法:user.getUsername();

		OGNL表达式写法:user.username

		那么,mybatis中为什么能直接写username,而不用user呢:

		因为在parameterType中已经提供了属性所属的类,所以此时不需要写对象名
[注]
pojo对象简写方式:lombok的使用 -
参数二:resultType(输出类型)
-返回一般数据类型(单条)

	含义 --> 比如要根据Id属性获得数据库中的某个字段值

	步骤一 : mapper(dao)接口

		String getStuNameById(Integer id);

	步骤二 : Mapper.xml 映射文件

		<select id="getStuNameById" resultType="string">
		      select username from t_student where id = #{id}
		</select>

-返回 JavaBean 类型(单条)

	含义 --> 比如根据某个字段获得数据库中的信息,把查询的结果信息封装成某个javaBean类型的数据

	步骤一 : mapper(dao)接口

		Student getStuById(Integer id);

	步骤二 : Mapper.xml 映射文件

		  <select id="getStuById" resultType="student">
		      select * from t_student where id = #{id}
		  </select>

-返回List类型(多条)

	含义 --> 有时候开发者查询的数据不止一条,比如,模糊查询,全表查询等,这时候返回的数据可能

			不止一条数据,对于多数据的处理可以存放在List集合中

	步骤一 : mapper(dao) 接口

  		List<Student> getAllStus();

	步骤二 : Mapper.xml  映射文件

	   <!--注意这里的 resultType 返回值类型是集合内存储数据的类型,不是 'list'-->
	   <select id="getAllStus" resultType="student">
	       select * from t_student
	   </select>

-返回Map类型

	含义 --> mybatis支持将查询的数据封装成Map

			1.如果查询的结果是一条,开发者可以把查询的数据以(表字段名,对应的值)方式存入到map中

			步骤一 : mapper(dao)接口

				Map<String, Object> getStuAsMapById(Integer id);

			步骤二 : Mapper.xml  映射文件

				<!-- 注意这里的 resultType 返回值类型是 'map'-->
				 <select id="getStuAsMapById" resultType="map">
				     select * from t_student where id = #{id}
				 </select>

			2. 如果查询的结果是多条数据,我们也可以把查询的数据以{表中某一字段名, JavaBean}方式来封装成Map

			步骤一 : mapper(dao)接口]

				// 查询所有学生的信息,把数据库中的 'id' 字段作为 key,对应的 value 封装成 Student 对象
				// @MapKey 中的值表示用数据库中的哪个字段名作 key
				@MapKey("id")
				Map<Integer, Student> getAllStusAsMap();

			步骤二 : Mapper.xml  映射文件

				<!--注意 resultType 返回值类型,不再是 'map',而是 Map 的 value 对应的 JavaBean 类型-->
				<select id="getAllStusAsMap" resultType="student">
				    select * from t_student
				</select>

			3.返回map集合时返回的类型是List<Map<String, Object>>

			步骤一 : mapper(dao)接口]

				List<Map<String, Object>> getAllStuAsMapById(Integer id);

			步骤二 : Mapper.xml  映射文件

			    <!--查询多条-->
			    <select id="getAllStuAsMapById"  parameterType="int" resultType="map">
			      select * from usr
			    </select>
ResultMap (输出pojo对象)
-
基础内容
-问题描述 数据库字段名和实体类属性不相同,无法映射到值,输出为Null -分析 1.mybatis会根据这些查询的列名,将列名转化为小写(数据库不区分大小写)去对应实体类中查 询相应列名的set方法设值,由于找不到setUserName(),所以会返回Null值 2.要明确与Java对象对应的列不是数据库中表的列名,而是查询后结果集的列名 -作用 1.建立sql查询结果字段与实体属性的映射关系信息 2.查询的结果集转换为java对象,方便进一步操作 3.将结果集中的列与Java对象中的属性对应起来并值填充进去 -解决方案 方案一 --> 为列名指定别名,别名和Java实体类的属性名一致 方案二 --> 使用结果集映射ResultMap [推荐] -
问题展示

-
方案展示
方案一 -->为列名指定别名,别名和Java实体类的属性名一致 <select id="findAll" resultType="user"> select id,username as usernames from usr ; </select> 方案二 --> 使用结果集映射ResultMap [推荐] <resultMap id="UserMap" type="User"> <!--id为主键--> <id column="id" property="id" /> <!--column 是数据库表的名称,property是对应实体类的属性名--> <result column="username" property="usernames" /> </resultMap> <!--查询所有--> <select id="findAll" resultMap="UserMap"> select id,username from usr ; </select> -
标签列表
<!--column不做限制,可以为任意表的字段,而property须为type 定义的pojo属性--> <resultMap id="" type=""> <id column="" jdbcType="" property="" /> <result column="" jdbcType="" property=""/> <association property="" javaType=""> <id column="" jdbcType="" property=""/> <result column="" jdbcType="" property=""/> </association> <!-- 集合中的property须为oftype定义的pojo对象的属性--> <collection property="pojo的集合属性" ofType="集合中的pojo对象"> <id column="集合中pojo对象对应的表的主键字段" jdbcType="字段类型" property="集合中pojo对象的主键属性" /> <result column="可以为任意表的字段" jdbcType="字段类型" property="集合中的pojo对象的属性" /> </collection> </resultMap> -
标签描述
	resultMap 标签 -->

		type --> 指开发者需要映射到的类对象

		id   --> 表示reslutMap在select标签中使用时,id的名称

	id标签--> 设置主键时使用,使用此标签配置映射关系(可能不止一个)

		column   --> 表的主键字段,或者可以为查询语句中的别名字段
		jdbcType --> 字段类型
		property --> 映射pojo对象的主键属性

	result标签 --> 属性用于配置映射关系时使用

		column   --> 表的一个字段(可以为任意表的一个字段)
		jdbcType --> 字段类型
		property --> 映射到pojo对象的一个属性(须为type定义的pojo对象中的一个属性)

	association标签 -->

		property --> pojo的一个对象属性
		javaType --> pojo关联的pojo对象

		id标签-->

			column   --> 关联pojo对象对应表的主键字段
			jdbcType --> 字段类型
			property --> 关联pojo对象的主席属性

		result标签 -->

			column   --> 任意表的字段
			jdbcType --> 字段类型
			property --> 关联pojo对象的属性

		select   -->表示所需要的哪个类的查询语句
		column   -->从resultMap中传过去用作查询参数
		ofType   -->集合属性中的对象(可以不写)

	collection标签 -->

		property --> 表示pojo类集合中的属性
		select   -->表示所需要的哪个类的查询语句
		column   -->从resultMap中传过去用作查询的参数
		ofType   -->集合属性中的对象(可以不写)
标签详解 id & result 示例 <id property="id" column="post_id"/> <result property="subject" column="post_subject"/> 含义 这些是结果映射最基本的内容,id和result都将一个列的值映射到一个简单的数据类型 的属性或字段。这两者之间的唯一不同是,id表示的结果将是对象的标识属性,这些在 比较对象实例时用到,这样可以提高整体的性能,尤其是缓存和嵌套结果映射的时候
动态sql(动态查询)
-
基础内容
-含义 指根据不同的条件生成不同的sql语句. 所谓的动态sql,本质还是sql语句,只是开发者可以在sql层面,去执行一个逻辑代码 -准备 数据库环境 --> 建工程--> 导包配置 --> 编写实体Pojo类--> 略 -mapper接口 List<User> queryUser(Map map); -
IF语句
<select id="queryUser" parameterType="map" resultType="user"> select * from usr where 1=1 <if test="id != null" > and id =#{id} </if> <if test="username != null" > and username = #{username} </if> </select> -
Where 语句
		<select id="queryUser" parameterType="map" resultType="user">

	      select * from usr

		      <where>

			      <if test="id != null" >

			          id =#{id}

			      </if>

			      <if test="username != null" >

			          and username = #{username}

			      </if>

		      </where>

	    </select>
[注]
where 元素只会在至少有一个子元素的条件返回sql子句的情况下,才去插入"where" 子句,而且,若语句的开头为"and" 或"or",where 元素会将它们去除 -
choose,when,otherwise
		<select id="queryUser" parameterType="map" resultType="user">

	      select * from usr

	      <where>

	          <choose>

	              <when test="id != null" >

	                  id =#{id}

	              </when>

	              <when test="username != null" >

	                  and username = #{username}

	              </when>

	              <otherwise>

	                  and id= 4

	              </otherwise>

	          </choose>

	      </where>

	    </select>
[注]
有时不想应用到所有的条件语句,而只想从中择其一项,针对这种情况,Mybatis提供了choose元素,它有点像java中的switch语句 -
set 语句
		<update id="updateUsr" parameterType="map">

		        update usr

		        <set>

		            <if test="username !=null">

		                username =#{username}

		            </if>

		        </set>

		        where id = #{id}

		</update>
[注]
这里set元素会动态前置set关键字,同时也会删除掉无关的逗号,因为用了条件语句之后很可能就会生成的sql后面留下这些逗号(因为用的是if元素,若最后一个if没有匹配上而前面的匹配上,sql语句的最后就会有一个逗号遗留)
标签
-
基础内容
-含义 定义常量及作用于引用 -场景 当多种类型的查询语句的查询字段或者查询条件形同时,可以将其定义为常量,方便调用。 为求<select>标签结构清晰,也可将sql语句分解 -
示例
<!-- 查询字段 --> <sql id="Base_Column_List"> ID,MAJOR,BIRTHDAY,AGE,NAME,HOBBY </sql> <!-- 查询条件 --> <sql id="Example_Where_Clause"> where 1=1 <trim suffixOverrides=","> <if test="id != null and id !=''"> and id = #{id} </if> <if test="major != null and major != ''"> and MAJOR = #{major} </if> <if test="birthday != null "> and BIRTHDAY = #{birthday} </if> <if test="age != null "> and AGE = #{age} </if> <if test="name != null and name != ''"> and NAME = #{name} </if> <if test="hobby != null and hobby != ''"> and HOBBY = #{hobby} </if> <if test="sorting != null"> order by #{sorting} </if> <if test="sort!= null and sort != ''"> order by ${sort} ${order} </if> </trim> </sql><!-- 查询所有,不分页 --> <select id="selectAll" resultMap="BaseResultMap"> SELECT <include refid="Base_Column_List" /> FROM student <include refid="Example_Where_Clause" /> </select> <!-- 分页查询 --> <select id="select" resultMap="BaseResultMap"> select * from ( select tt.*,rownum as rowno from ( SELECT <include refid="Base_Column_List" /> FROM student <include refid="Example_Where_Clause" /> ) tt <where> <if test="pageNum != null and rows != null"> and rownum <![CDATA[<=]]>#{page}*#{rows} </if> </where> ) table_alias where table_alias.rowno>#{pageNum} </select> <!-- 根据条件删除 --> <delete id="deleteByEntity" parameterType="java.util.Map"> DELETE FROM student <include refid="Example_Where_Clause" /> </delete>-对应标签 include -含义 用于引用定义的常量
mybatis分页
-
基础内容
-含义

	减少数据的处理量

-方式

	方式一: limit分页

		须知语法 :

			select * from user limit startIndex,pageSize;
			select * from user limit 3;   #[0,n]
	方式二 : PageHelper分页插件

		-引入依赖

			<dependency>
		         <groupId>com.github.pagehelper</groupId>
		         <artifactId>pagehelper</artifactId>
		         <version>4.0.0</version>
		    </dependency>

			-->由于使用了sql 解析工具,所以maven也引入了 jsqlparser.jar

		-MyBatis-config.xml配置拦截器插件


			<plugins>

			    <plugin interceptor="com.github.pagehelper.PageHelper">

			        <property name="dialect" value="mysql"/>

			    </plugin>

			</plugins>

			-->新版拦截器是 com.github.pagehelper.PageInterceptor

			-->com.github.pagehelper.PageHelper 现在是一个特殊的 dialect 实现类,
			   是分页插件的默认实现类,提供了和以前相同的用法

			-->设置数据库类型 Oracle,Mysql,MariaDB,SQLite,Hsqldb,PostgreSQL 六种
				数据库

			-->dialect默认情况下会使用 PageHelper 方式进行分页

		-重要细节

			1.只有紧跟在PageHelper.startPage方法后的第一个Mybatis的查询(Select)方
			法会被分页

			2.对于带有for update的sql,会抛出运行时异常,对于这样的sql建议手动分页,毕
			竟这样的sql需要重视

			3.分页插件不支持嵌套结果映射,由于嵌套结果方式会导致结果集被折叠,因此分页查询
			的结果在折叠后总数会减少,所以无法保证分页结果数量正确。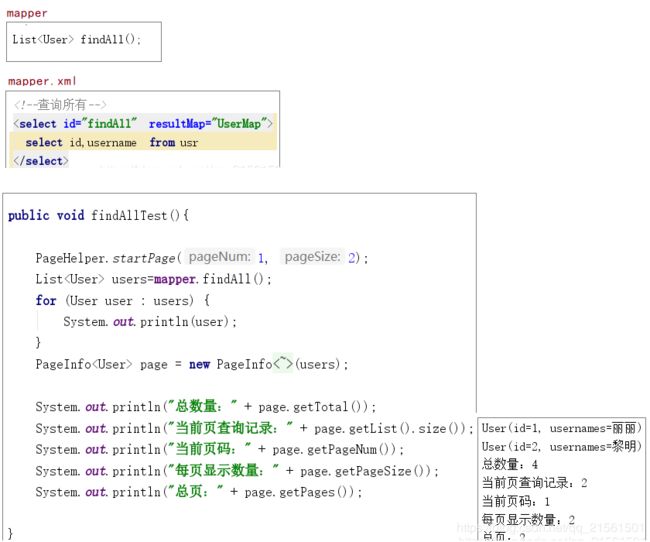
连接池
我们在实际开发中都会使用连接池
因为它可以减少我们获取连接所消耗的时间
mybatis中的连接池
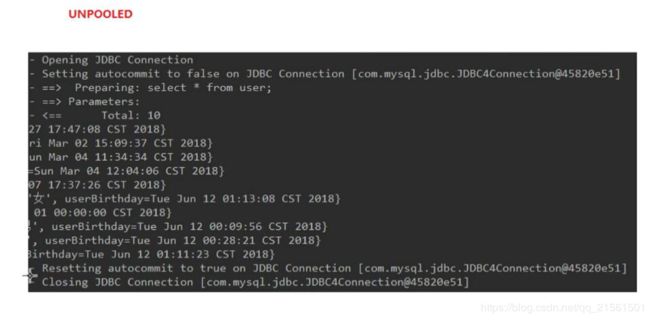
mybatis连接池提供了3种方式的配置:
- 配置的位置:
- 主配置文件SqlMapConfig.xml中的dataSource标签,type属性就是表达采用何种连接池方式
 2. type属性的取值:
- POOLED
*采用传统的javax.sql.DataSource规范中的连接池,mybatis中有针对规范的实现 - UNPOOLED
*采用传统的获取连接的方式,虽然也实现javax.sql.DataSource接口,但是并没有使用连接池技术 - JNDI 采用服务器提供的JNDI技术实现,来获取DataSource对象,不同的服务器所能拿到DataSource是不一样的
注意:如果不是web活着maven的war工程,是不能使用的
如下图:可观察出POOLED它是从池中获取一个连接来用
UNPOOLED每次创建一个新的连接来用
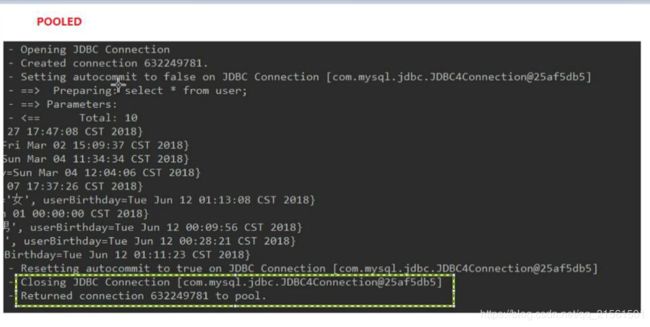
- POOLED
- 主配置文件SqlMapConfig.xml中的dataSource标签,type属性就是表达采用何种连接池方式
五、mybatis缓存
须知

	缓存

		1.存在内存中的临时数据

		2.将用户经常查询的数据放在缓存(内存)中,用户去查询数据就不用从磁盘上(关系型数据库数据文件)

		  查询,从缓存中查询,从而提高查询效率,解决了高并发系统的性能问题

	优点

		减少和数据库的交互次数,减少系统开销,提高系统效率

	使用前提

		经常查询并且不经常改变的数据

	mybatis缓存

		mybatis包含一个非常强大的查询缓存特性,它可以非常方便地定制和配置缓存。缓存可以极大的提升

		查询效率。

		mybatis系统中默认定义了两级缓存:一级缓存和二级缓存。

		-默认情况下,只有一级缓存开启(sqlSession级别的缓存,也称为本地缓存)

		-二级缓存需要手动开启和配置,它是基于namespace级别的缓存。

		-为了提高扩展性,Mybatis定义了缓存接口Cache。操作者可以通过实现Cache接口来自定义二级缓存

	一级缓存

		含义

			一级缓存也叫本地缓存:

		内容

			与数据库同一次会话期间查询到的数据会放在本地缓存中

			以后如果需要获取相同的数据,直接从换缓存中拿,没必须再去查询数据库
Spring
是一个轻量级的容器,用于管理业务相关对象的。其两大内核:Ioc(控制反转)、aop(面向切面编程)
-
spring容器启动三种方式
-轮廓 在web项目中,启动spring容器的方式有三种 ContextLoaderListener、ContextLoadServlet、ContextLoaderPlugin -方式 -监听方式:web.xml <context-param> <param-name>contextConfigLocation</param-name> <param-value>/WEB-INF/classes/applicationContext-*.xml</param-value> </context-param> <listener> <listener-class>org.springframework.web.context.ContextLoaderListener </listener-class> </listener> 注:还可以通过<import resource="classpath:/spring/spring-xxx.xml"/>的方式 把其他的配置引进来 -servlet方式:web.xml <servlet> <servlet-name>context</servlet-name> <servlet-class>org.springframework.web.context.ContextLoaderServlet</servlet-class> <load-on-startup>1</load-on-startup> </servlet> 注:这种方式在spring3.0以后不再支持,建议使用监听方式 -通过plugin配置方式:web.xml <plug-in className="org.springframework.web.struts.ContextLoaderPlugIn"> <set-property property="contextConfigLocation" value="/WEB-INF/applicationContext.xml,/WEB-INF/action-servlet.xml" /> </plug-in> 注:该方式适用于spring与strust等整合,在struts-config.xml里面配置一个 ContextLoaderPlugIn,用于spring的初始化工作 -
ioc(控制反转)
-
含义
将对象的创建过程交给容器,让容器管理对象的生命周期,如创建,初始化,销毁等。

它包括依赖注入(Dependency,简称DI)和依赖查找(Dependency Lookup)

目的是削减计算机程序的耦合(接触我们代码中的依赖关系)
生词理解
耦合:程序间的依赖关系包括:类间的依赖、方法间的依赖
解耦:降低程序间的依赖关系,实际开发中应该做到,编译器不依赖,运行时才依赖
解耦的思路:
1.使用反射来创建对象,而避免使用new关键字
2.通过读取配置文件来获取要创建的对象全限定类名 -
思路图
 [注] 设计模式深入:Ferao…图解设计模式深入
 -
使用
使用方法 通过SpringIoc核心容器接口:ApplicationContext 常用实现类 ClassPathXmlApplicationContext 它可以加载类路径下的配置文件 FileSystemXmlApplicationContext 它可以加载磁盘任意路径下的配置文件(必须有访问权限) AnnotationConfigApplicationContext 它是用于读取注解创建容器的 示例 ApplicationContext ac = new ClassPathXmlApplicationContext("Spring/bean.xml"); -
bean管理细节
含义 把对象的创建交给Spring来管理即要知道Spring对bean的管理细节 -创建bean的方式 默认构造器创建 在spring的配置文件中使用bean标签,配置以id 和class 属性后,且没有其他属性和 标签时,采用的就是默认构造函数创建bean对象,此时如果类中没有默认构造函数,则对 象无法创建 <bean id = "userService" class="com.ferao.Service.UserService"></bean> 普通工厂中的方法 使用普通工厂中的方法创建对象(使用某个类中的方法创建对象,并存入spring 容器) <bean id= "instanceFactory" class="com.ferao.InstanceFactory"></bean> <bean id= "userService" factory-bean="instanceFactory" factory-method="getUserService"></bean> 工厂中的静态方法 创建对象(使用某个类中的静态方法创建对象,并存入Spring容器) <bean id= "userService" factory-bean="com.ferao.Factory.InstanceFactory" factory-method="getUserService"></bean> -bean作用范围 含义:scope属性用于指定bean的作用范围 scope取值 singleton 单例的(默认值) protorype 多例的 request 作用于web应用的请求范围 session 作用于web应用的会话范围 global-session 作用于集群环境的会话范围(全局会话范围),当不是集群环境时,它就是session -bean生命周期 单例对象 出生:当容器创建时对象出生 活着:只要容器还在,对象一直活着 死亡:容器销毁,对象消亡 总结:单例对象的生命周期和容器相同 多例对象 出生:当我们使用对象时spring框架为我们创建 活着:对象只要是在使用过程中就一直活着 死亡:当对象长时间不用,且没有别的对象引用时,由java的垃圾回收机制回收 -
依赖注入
含义

	在当前类需要用到其他类的对象,由spring为我们提供,我们只需要在配置文件

	中说明,依赖关系的维护称之为依注入

可注入的数据

	基本类型和String
	其他bean类型(在配置文件中或者注解配置过的bean)
	复杂类型/集合类型

注入的方式

	使用构造函数提供
	使用set方法提供
	使用注解提供

示例

	构造函数注入

		标签:constructor-arg

		出现位置:bean标签的内部

		标签的属性

			type:用于指定要注入的数据的类型,该类型也是构造函数中某个或某些参数的类型
			index:用于指定要注入的数据给构造函数中指定索引位置的参数赋值
			name:用于指定给构造函数中指定名称的参数赋值
			========以上三个用于指定给构造函数中哪个参数赋值
			value:用于指定其他的bean类型的数据,它指的就是spring的ioc核心容器中出现过的bean对象

		优势

			bean对象中,注入数据是必须的操作,否则对象无法创建成功

		弊端

			改变了bean对象的实例化方式,使我们在创建对象时,如果用不到这些数据,也必须提供

	Set方法注入

		标签:property

		出现位置:bean标签内

		标签的属性

			name: 用于指定注入时所调用的set方法名称
			value: 用于提供基本类型和String类型的数据
			ref:  用于指定其他的bean 类型的值,它指的就是spring的ioc核心容器中出现过的bean对象

		优势

			创建对象时没有明确的限制,可以直接使用默认构造函数

		弊端

			如果有某个成员必须有值,则获取对象时有可能set方法没有执行

	注解注入

		注解配置和xml配置要实现的功能都是一样的,都是降低程序间的耦合,只是配
		置的形式不一样。配置文件的内容可以总结下面四个方面,注解方式则也一一对
		应配置文件的以下四个方面

		- 创建容器对象

			它们的作用就和在xml配置文件中编写一个`<bean>`标签实现的功能是一样的

		- 注入数据的

			它们的作用就和在xml配置文件中的`<bean>`标签中写一个`<property>`标签是一样的

		- 改变作用范围的

			它们的作用集合在`<bean>`标签中使用scope属性实现的功能是一样的

		- 和生命周期相关

			它们的作用就和在`<bean>`标签中使用init-method和destroy-method的作用是一样的

		创建容器示例

			@Component

				作用:用于把当前类对象存入spring容器中

				属性:

					value:用于指定bean的id,当我们不写时,它的默认值是当前类名,且首字母小写

				注意:

					Controller、Service、Repository以上三个注解它们
					的作用和属性和Component是一模一样的它们三个是Spring
					框架为我们提供明确的三层使用的注解,使我们的三层对象更
					加清晰

		注入数据示例

			@Autowired

				位置:变量、方法

				作用:

					自动按照类型注入:只要容器中有唯一的一个bean对象类型和
					要注入的变量类型匹配,就可以注入成功

			@Qualifier

				作用:

					在按照类中注入的基础上再按照名称注入。它是给类成员注入时
					不能单独使用,但是在给方法参数注入时可以.用于指定注入的


				属性:value	,用于指定注入的bean的id

			@Resource

				作用:

					直接按照bean的id注入,它可以单独使用

				属性:name   ,用于指定bean的id

			重要细节

			-Autowired注解与Resource注解的区别

			相同点

				Resource的作用相当于Autowired,均可在字段或属性的setter方法上

			不同点

				1. 提供方:Autowired是由org.springframework.beans.factory.annotation.Autowired提供,换句话说就是由spring提供
				  Resource是由javax.annotation.Resource提供,即j2ee提供,且jdk1.6及以上

				2. 注入方式:Autowired只按照byType注入;
				   Resource默认按byName自动注入,也提供按照byType注入

				3. 属性:Autowired:按照类型装配依赖对象,默认情况下它要求依赖
				   对象必须存在,如果允许Null值,可以设置它requested属性为
				   false。如果开发者想要使用按名称装配,可以结合Qualifier注
				   解一起使用。
				   Resource:有两个重要的属性:name和type.name属性指定
				   byName,如果没有指定Name属性,当注解标注在字段上,即默
				   认取字段的名称作为bean名称寻找依赖对象。当注解标注在属性
				   的setter方法上,即默认取属性名作为bean名称寻找依赖对象,
				   需要注意的是,Resource如果没有指定name属性,并且按照默
				   认的名称找不到依赖对象时,Resource注解会回退到按类型装
				   配。但一旦指定了Name属性,就只能按照名称装配了

			========以上三个注入都只能注入其他bean类型的数据,而基本类型
			和String类型无法使用上述注解实现,以外,集合类型的注入只能通过
			xml来实现

				@Value

					作用:用于注入基本类型和String类型的数据

					属性:value		用于指定数据的值,它可以使用spring中spEL(也就是spring的el表达式)

			作用范围

				scope

					作用:用于指定bean的作用范围

					属性:value:指定范围的取值,常用取值:singletion prototype


-
-
aop
含义

	aop面向切面编程(Aspect Oriented Programming) ,通过编译方式和运行期动态代理实现

	程序功能的统一维护的一种技术。即利用aop可以对业务逻辑的各个部分进行隔离,从而使得业务逻

	辑各部分之间的耦合度降低,提高程序的可重用、可维护性,同时提高开发效率

aop在spring中作用

	提供声明式事务		允许用户自定义切面

	横关注点				跨越应用程序多个模块的方法或功能,即是与我们业务逻辑无关的,
						但是我们需要关注的部分,就是横切关注点。如日志,安全,缓存,
						事务等等

	切面(aspect)			横切关注点被模块化的特殊对象。即,它是一个类

	通知(advice )		切面必须要完成的工作。即它是类中的一个方法

	目标(target)			被通知对象

	代理(proxy)			向目标对象应用通知之后创建的对象

	切入点(pointCut)		切面通知执行的地点的定义

	连接点(jointPoint)	与切入点匹配的执行点

五种类型的Advice

	通知类型		连接点		实现接口

	前置通知		方法前		org.springframework.aop.MethodBeforeAdvice

	后置通知		方法后		org.springframework.aop.AfterReturningAdvice

	环绕通知		方法前后		org.aop.alliance.intercept.MethodInterceptor

	异常抛出通知	方法抛出异常	org.springframework.aop.ThrowsAdvice

	引介通知		类中增加新的方法属性
							org.springframework.aop.IntroductionInterceptor
Spring实现aop

	步骤1:使用aop织入需要导入aspectjweaver包

				<dependency>
		            <groupId>org.springframework</groupId>
		            <artifactId>spring-context</artifactId>
		            <version>4.2.4.RELEASE</version>
		        </dependency>

				<dependency>
            		<groupId>org.aspectj</groupId>
            		<artifactId>aspectjweaver</artifactId>
           		 	<version>1.9.4</version>
        		</dependency>

	步骤2:

		方式1:通过spring api 实现

			步骤1:编写业务接口和实现接口
			步骤2: 编写增强类,可编写两个,一个前置增强,一个后置增强
			步骤3:spring文件中注册,并实现aop切入实现,注意导入约束

		方法2:自定义类来实现aop

			步骤1:编写业务接口和实现类
			步骤2:编写普通的一个类,类内有两个方法(before,after)
			步骤3:spring文件中注册,并实现aop切入实现,注意导入约束
方式1

<beans xmlns="http://www.springframework.org/schema/beans"
       xmlns:xsi="http://www.w3.org/2001/XMLSchema-instance"
       xmlns:context="http://www.springframework.org/schema/context"
       xmlns:aop="http://www.springframework.org/schema/aop"
       xsi:schemaLocation="http://www.springframework.org/schema/beans
	   http://www.springframework.org/schema/beans/spring-beans.xsd
	   http://www.springframework.org/schema/context
	   http://www.springframework.org/schema/context/spring-context.xsd
	   http://www.springframework.org/schema/aop
       http://www.springframework.org/schema/aop/spring-aop.xsd">

	 <bean id="before"  class="com.ferao.springaop.original.advice.BeforeAdvice"></bean>
	 <bean id="after" class="com.ferao.springaop.original.advice.AfterAdvice"></bean>
	 <bean id="userService" class="com.ferao.springaop.original.aop_user.UserServiceImpl"></bean>

	  <!-- 配置切面 -->
	  <aop:config>
	  <!-- 配置切点 -->
	  <!--<aop:pointcut expression="execution(* com.ferao.springaop.original.aop_user.UserServiceImplServiceImpl.add())" id="mypoint"/>-->
	  <aop:pointcut expression="execution(* com.ferao.springaop.original.aop_user.UserServiceImpl.*(..))" id="mypoint"/>
	  <!-- 通知 -->
      <aop:advisor advice-ref="before" pointcut-ref="mypoint"/>
	  <aop:advisor advice-ref="after" pointcut-ref="mypoint"/>
	  </aop:config>
Aspectj切入点语法定义 须知 在使用spring框架配置AOP的时候,不管是通过xml配置文件还是注解的方式都需要定义 pointcut“切入点”,例如定义切入点表达式 execution(*com.sample.service.impl..*.*(..)) execution()是最常用的切点函数,其语法如下所示 整个表达式可以分为五个部分: 1.excution():表达式主体 2.第一个*号:表示返回类型,*表示所有的类型 3.包名:表示需要拦截的包名,后面的两个句点表示当前包和当前包的所有子包, com.sample.service.impl包,子孙包下所有类的方法 4.第二*号:表示类名,*号表示所有的类 5.*(..):最后这个星号表示方法名,*号表示所有的方法,后面括弧里面表示方法和参数 ,两个句点表示任何参数思路图:

方式2

<?xml version="1.0" encoding="UTF-8"?>
<beans xmlns="http://www.springframework.org/schema/beans"
       xmlns:xsi="http://www.w3.org/2001/XMLSchema-instance"
       xmlns:context="http://www.springframework.org/schema/context"
       xmlns:aop="http://www.springframework.org/schema/aop"
       xsi:schemaLocation="http://www.springframework.org/schema/beans
    http://www.springframework.org/schema/beans/spring-beans.xsd
    http://www.springframework.org/schema/context
    http://www.springframework.org/schema/context/spring-context.xsd
    http://www.springframework.org/schema/aop
    http://www.springframework.org/schema/aop/spring-aop.xsd">

    <bean id="log" class="com.cutClass.logCut" />
    <bean id="userService" class="com.aop_user.UserServiceImpl"></bean>
    <aop:config>
        <!--自定义切面,ref 要引入的类-->
        <aop:aspect ref="log">
            <!--切入点-->
            <aop:pointcut id="diyPonitcut" expression="execution(* com.aop_user.UserServiceImpl.*(..))" />
            <!--通知-->
            <aop:before pointcut-ref="diyPonitcut" method="before" />
            <aop:after pointcut-ref="diyPonitcut" method="after" />
        </aop:aspect>
    </aop:config>

</beans>
方式3
方式 注解方式实现aop 步骤 1.编写切面类 2.配置文件开启aop注解支持@Aspect//标注这个类是一个切面 @Component public class AnnotationPointCut { @Before("execution(* com.unfair.service.ServiceImpl.*.*(..))") public void before(){ System.out.println("ferao aop before anntation success .."); } @After("execution(* com.unfair.service.ServiceImpl.*.*(..))") public void after(){ System.out.println("ferao aop after anntation success .."); } //在环绕增强中,可以给定一个参数,代表要获取处理切入的点 @Around("execution(* com.unfair.service.ServiceImpl.*.*(..))") public void around(ProceedingJoinPoint jp) throws Throwable { System.out.println("ferao aop around1 anntation success .."); Signature signature = jp.getSignature(); //获取签名 System.out.println(signature); //执行方法 Object proceed = jp.proceed(); System.out.println("ferao aop around2 anntation success .."); System.out.println(proceed); } }<!--开启aop注解支持 JDK(默认proxy-target-class="false") cglib(proxy-target-class="true")--> <aop:aspectj-autoproxy proxy-target-class="true"/> -
Spring注解
-
PropertyPlaceholderConfigurer(获取变量)
-全路径

	org.springframework.beans.factory.config.PropertyPlaceholderConfigurer类

-作用

	1.将properties(key/value形式)文件中一些动态设定的值(value),在xml中替换为占位该键

	($key$)的值。

	而properties文件可以根据客户需求,自定义一些相关的参数,这样的设计可提供程序的灵活性。

	2.在spring中,使用PropertyPlaceholderConfigurer可以在xml配置文件中加入外部属性,

	当然也可以指定外部文件的编码

-示例

	-引入单一外部属性文件

	<bean id="propertyConfigurerForAnalysis" class="org.springframework.beans.factory.config.PropertyPlaceholderConfigurer">
	    <property name="location">
	        <value>classpath:/spring/include/dbQuery.properties</value>
	    </property>
	    <property name="fileEncoding">
	        <value>UTF-8</value>
	    </property>
	</bean>

	-引入多个外部属性文件

	<bean id="propertyConfigurer" class="org.springframework.beans.factory.config.PropertyPlaceholderConfigurer">
	    <property name="locations">
	        <list>
	            <value>classpath:/spring/include/jdbc-parms.properties</value>
	            <value>classpath:/spring/include/base-config.properties</value>
	            <value>classpath*:config/jdbc.properties</value>
	        </list>
	    </property>
	</bean>

-总结

	根据示例案例可以看出,PropertyPlaceholderConfigurer起的作用是将占位符指向数据库

	配置信息放在bean中定义的工具
案例
properties文件

	url=jdbc:mysql://localhost:3306/db1?useUnicode=true&characterEncoding=UTF-8&zeroDateTimeBehavior=round;
	user=root
	password=root

beans.xml

	<bean id="propertyConfigurer" class="org.springframework.beans.factory.config.PropertyPlaceholderConfigurer">
		<property name="order" value="1" />
        <property name="systemPropertiesModeName" value="SYSTEM_PROPERTIES_MODE_OVERRIDE" />
        <property name="ignoreResourceNotFound" value="true" />
        <property name="fileEncoding" value="UTF-8" />
        <property name="locations">
            <list>
                <value>classpath:runtime.properties</value>
            </list>
        </property>
        <property name="placeholderPrefix" value="@[" />
        <property name="placeholderSuffix" value="]" />
    </bean>

    <!-- 数据库连接池 -->
    <bean id="dataSource" class="com.mchange.v2.c3p0.ComboPooledDataSource">
        <!-- 配置连接池属性 -->
        <property name="driverClass" value="com.mysql.jdbc.Driver"/>
        <property name="jdbcUrl" value="@[url]"/>
        <property name="user" value="@[user]"/>
        <property name="password" value="@[password]"/>
[注]
1.order属性代表其加载顺序
2.ignoreResourceNotFound是否忽略找不到的resource,如果配置多个resource,则需要设置为true
3.ignoreUnresolvablePlaceholders是否忽略不可解析的Placeholder,如果配置多个PropertyPlaceholderConfigurer,则需设置为true
4.一定要在properties文件中&写为&因为在xml文件中不识别&,必须是& -
@Configuration(用户定义配置类)
含义

	从spring3.0,开始出现用户定义配置类(@Configuration),可替换xml配置文件

	被注解的类内部包含一个或多个被@bean注解的方法,这些注解将会被

	AnnotationConfigApplicationContext或AnnotationConfigWebApplicationContext

	类进行扫描,用于构建bean定义,初始化Spring容器

分析

	1.@Configuration标注在类上,相当于把该类作为spring的xml配置文件中的<beans>,

	 作为spring容器,类比可查如下代码
@Configuration public class TestConfiguration { public TestConfiguration() { System.out.println("TestConfiguration容器启动初始化。。。"); } }<?xml version="1.0" encoding="UTF-8"?> <beans xmlns="http://www.springframework.org/schema/beans" xmlns:xsi="http://www.w3.org/2001/XMLSchema-instance" xmlns:context="http://www.springframework.org/schema/context" xmlns:jdbc="http://www.springframework.org/schema/jdbc" xmlns:jee="http://www.springframework.org/schema/jee" xmlns:tx="http://www.springframework.org/schema/tx" xmlns:util="http://www.springframework.org/schema/util" xmlns:task="http://www.springframework.org/schema/task" xsi:schemaLocation=" http://www.springframework.org/schema/beans http://www.springframework.org/schema/beans/spring-beans-4.0.xsd http://www.springframework.org/schema/context http://www.springframework.org/schema/context/spring-context-4.0.xsd http://www.springframework.org/schema/jdbc http://www.springframework.org/schema/jdbc/spring-jdbc-4.0.xsd http://www.springframework.org/schema/jee http://www.springframework.org/schema/jee/spring-jee-4.0.xsd http://www.springframework.org/schema/tx http://www.springframework.org/schema/tx/spring-tx-4.0.xsd http://www.springframework.org/schema/util http://www.springframework.org/schema/util/spring-util-4.0.xsd http://www.springframework.org/schema/task http://www.springframework.org/schema/task/spring-task-4.0.xsd" default-lazy-init="false"> </beans>public class TestMain { public static void main(String[] args) { // @Configuration注解的spring容器加载方式,用AnnotationConfigApplicationContext替换ClassPathXmlApplicationContext ApplicationContext context = new AnnotationConfigApplicationContext(TestConfiguration.class); // 如果加载spring-context.xml文件: // ApplicationContext context = new // ClassPathXmlApplicationContext("spring-context.xml"); } } -
@Bean(返回值作bean对象)
作用

	用于把当前方法的返回值作为bean对象存入spring的容器中

属性

	name

		用于指定bean的id ,当不写时,默认值是当前方法的名称

细节

	当我们使用注解配置方法时,如果方法有参数,Spring 框架会去容器中查找有没有可用的
	bean对象。查找的方式和Autowrited注解是一样的
-
@ComponentScan(指定扫描位置)
作用 用于通过注解指定spring在创建容器时要扫描的包 属性 value 它和beanPackages的作用是一样的,都是用于指定创建容器时要扫描的包我们使用此注解就等 同于在xml中配置了 <context:component-scan base-package="com.tt"></context:component-scan> -
@RestControllerAdvice
含义

	在spring3.2中新增的注解,用于定义@ExceptionHandler、@InitBinder、

	@ModelAttribute,使得在所有controller中接收到的请求都经过被此注解所标注的类中请求

作用位置

	类前

重要细节

	@ExceptionHandler该注解处于被@RestControllerAdvice标注的类中时,该项目所有请求存

	在异常时都经过该注解来处理,属性value指定需要拦截的异常类型,value可省略不写

	如拦截exception,只需写@ExceptionHandler(value=MyException.class)
@RestControllerAdvice public class ControllerAdvice { /** * 应用到所有@RequestMapping注解方法,在其执行之前初始化数据绑定器 * @param binder */ @InitBinder public void initBinder(WebDataBinder binder) {} /** * 把值绑定到Model中,使全局@RequestMapping可以获取到该值 * @param model */ @ModelAttribute public void addAttributes(Model model) { model.addAttribute("author", "ferao-system"); } /** * 全局异常捕捉处理 * @param ex * @return */ @ResponseBody @ExceptionHandler(value = Exception.class) public Map errorHandler(Exception ex) { Map map = new HashMap(); map.put("code", 100); map.put("msg", ex.getMessage()); return map; } }
-
SpringMVC
是一种基于Java的实现MVC设计模型的请求驱动类型的轻量级Web框架,是SpringFrameWork的后续产品。它通过一套注解,让一个简单的java类成为处理请求的控住器,而无须实现任何接口,同时它还支持RESTful编程风格。

-
入门程序示例


-
示例分析
流程一:

	启动服务器,加载一些配置文件

		1. DispatcherServlet 对象创建

		2. springmvc.xml被加载

		3. HelloController创建对象

流程二:

	发送请求,后台处理请求

细节注意

	 <mvc:annotation-driven>在springmvc的各个组件中,处理器映射器,处理器适配器、视图
	 解析器称为springmvc的三大组件。使用 <mvc:annotation-driven>自动加载
	 RequestMappingHandlerMapping(处理器映射器)和
	 RequestMappingHandlerAdapter(处理器适配器),
	 可用在springmvc.xml,配置文件中使用,
	 <mvc:annotation-driven>替代注解处理器和适配器的配置。即它就相当于在xml中配置了
	 bean 组件

-
springmvc常见注解:
-
@requestMapping
作用范围

	1. 作用在类上:第一级的访问目录

	2. 作用在方法上:第二级的访问目录

属性

	1. path : 指定请求路径的url

	2. value :用于指定请求的URL。它和path属性的作用是一样的

	3. method:用于指定请求的方式

	4. params:用于指定限制请求参数的条件,它支持简单的表达式,要求请求参数的key
	   和value必须和配置一模一样

	5. headers :发送的请求中必须包含的请求头
简单举例

-
@RequestParam
作用

	把请求中指定名称的参数给控制器中的形参赋值

属性

	1. value:请求参数中的名称

	2. requested :请求参数中否必须提供此参数,默认值:true,表示必须提供,如果不
	   提供将报错

	3. defaultValue:设置默认值

使用情景

	1. 无属性:`test(@RequestParam String name)` :

		没有name 参数会报错,(也可以设置required = false)

	2. 含属性:`test(@RequestParam("userName") String name)` :

		name 参数换为userName。

	3. 不使用`RequestParam`:`test(String name)`

		如果没有name 参数也不会报错
简单举例
@RequestMapping("/findByPage") public String findByPage(Customer customer, @RequestParam(value = "pageCode", required = false, defaultValue = "1") int pageCode, @RequestParam(value = "pageSize", required = false, defaultValue = "2") int pageSize, Model model) { // 回显数据 model.addAttribute("page", customerService.findByPage(customer, pageCode, pageSize)); return "page/list"; ``` -
@Model
 作用

	Model是每次请求中都存在的默认参数,利用其addAttribute()方法即可将服务器的值传递
	到jsp页面中,在jsp页面利${message}即可取出其中的值
简单举例
User user = userService.login(username); if (user != null) { if (user.getPassword().equals(password)) { //登录成功 return "page/page"; } else { model.addAttribute("message", "登录失败"); return "page/loginInfo"; } } else { model.addAttribute("message", "你输入的用户名或密码有误"); return "page/loginInfo"; } -
@RequestBody
含义

	1.@RequestBody 用于获取请求体内容,直接使用得到是key=value &key=value 结构的数据
	2.主要用来接收前端传递给后端的json字符串中的数据
	3.Get方式无请求体,所以使用@RequestBody接收数据时前端不能使用get方式提交数
	   据,而是使用post方式进行提交
	4.在后端的同一个接收方法内,@RequestBody与@RequestParam()可以同时使用
	5.@RquestBody最多只能有一个,而@RequestParam()可以有多个

属性

	requested ,是否必须有请求体。默认值是true 。当取值为true时,get请求方式会报错。
	           如果取值为false,get请求得到是null

注意

	1.在ajax请求往往传的是json对象,可用JSON.Stringify(data) 方式将对象变成字符串
	。同时ajax请求的时候也要指定dataType"json",contentType:"application/json"这样者
	就可以轻易的将一个对象或List传到Java端使用@RequestBody即可绑定对象或者List

	2.当@RequestParam()和@RequestBody同时使用,@RequestParam()指定的参数可以是
	  普通元素、数组、集合、对象等等。换句话说,如果参数放在请求体中传入后台,后台
	  用@RequestBody才能接收到;如果不是放在请求体中,后台接收参数时用
	  @RequestParam来接收,或者,两者都不写也能接收
简单举例

-
@PathVaribale
作用

	用于绑定url中的占位符。例如:请求url中/delete/{id} ,这个{id} 就是url占位符。
	url支持占位符是spring3.0之后加入的。是springmvc支持[RestFul-风格]url的一个
	重要标志

属性

	value : 用于指定url中占位符名称

	required :是否必须提供占位符

[注]
1.RestFul-风格点击这里
2. springmvc的@RequestMapping注解能够处理HTTP请求的方法,比如GET、POST、PUT、DELETE以及PATCH
3. 所有地址栏请求默认都是HTTP GET请求类型
4. 方法级别的注解辩题有如下几个:组合注解
@GetMaping
@PostMapping
@PutMapping
@DeleteMapping
@PatchMapping -
@RequestHeader
属性

	value:提供消息头名称

	required:是否必须有此消息头

作用

	用于获取请求消息头
[注]
在实际开发中一般不怎么用 -
@CookieValue
- 属性:
value:指定cookie的名称
required:是否必须有此cookie - 作用:
用于把指定cookie名称的值传入控制器方法参数
- 属性:
-
@ResponseBody
- 作用:这个类的所有方法返回的数据直接写给浏览器(如果是对象转为json数据)


- 作用:这个类的所有方法返回的数据直接写给浏览器(如果是对象转为json数据)
-
@ModelAttribute
属性

	value : 用于获取数据的key。key可以是pojo的属性名称,也可以是Map结构的key

作用

	该注解是springmvc4.3版本以后新加入的,它可以用于修饰方法和参数。

	出现在方法上,表示当前方法会在控制器的方法执行之前,先执行,它可以修饰没有返回值的
	           方法,也可以修饰具体返回值的方法

    出现在参数上,获取指定的数据给参数赋值

应用场景

	当表单提交数据不是完整的实体类数据时,保证没有提交数据的字段使用数据库对象原来的
	数据

	例如:我们在编辑一个用户时,用户有一个创建信息字段,该字段的值是不允许被修改的,
	在提交表单数据是肯定没有此字段的内容,一旦更新会把该字段内容置为null,此时就可以
	使用此注解解决问题
简单示例
@ModelAttribute
public void showUser(){
    System.out.println("ModelAttribute success");
}

@RequestMapping(value = "/testModelAttribute" ,
method = RequestMethod.POST)
public String testModelAttribute(PostUser user ){

System.out.println(user);

return "test";
}


控制台

	ModelAttribute success
	PostUser{username='12', password='12', money='12'}
-
-
请求参数的绑定
-
绑定机制:
- 表单提交的数据都是k=v格式的 username= haha&password=123
- Springmvc的参数绑定过程是把表单提交的请求参数,作为控制器中方法的参数进行绑定的。
- 要求:提交表单的name和参数的名称是相同的
-
支持的数据类型
- 基本数据类型和字符串类型
- 实体类型(javabean)
- 集合数据类型(List、map集合等)
-
基本数据类型和字符串类型
- 提交表单的Name和参数的名称是相同的
- 区分大小写
-
实体类型(javabean)
- 提交表单的name和javabean中的属性名称需要一致
- 如果一个javabean类中包含其他的引用类型,那么表单的name属性需要编写成:对象.属性,例如:address.name
表单代码

	<form action="saveAccount" method="post" >

	姓名:<input type="text" name="username" /> <br/>
	密码:<input type="text" name="password" /> <br/>
	金额:<input type="text" name="money" /> <br/>
	<input type="submit" value="提交" />

	</form>


POJO代码

	private  String username;
	private String password;
	private String money;

controller层代码

	//请求参数绑定测试

	@RequestMapping("/saveAccount")
    public String saveAccount(Account account){
    System.out.println(account);
    return "success";
	}

控制台

	Acount{...}
注意:此时输入中文参数无法接收到,需要在web.xml中设置编码格式过滤器

-
-
数据处理及结果跳转方式
-
数据处理
含义

	数据处理分为两部分,处理提交数据、数据显示到前端

处理提交数据

	1.提交的的域名和处理方法的参数名一致

	2.提交的的域名和处理方法的参数名不一致

	3.提交的是一个对象

数据显示到前端

	1.通过ModelAndView

		可以存储数据的同时,可以进行设置返回的逻辑视图,进行控制展示层的跳转

	2.通过ModelMap

		继承了LinkedMap,除了实现了自身的一些方法,同样继承LinkedMap的方法和特性

	3.通过Model

		只有寥寥几个方法只适合用于存储数据,简化了新手对于Model对象的操作和理解
1.提交的的域名和处理方法的参数名一致
	提交的数据

		http://localhost:8080/hello?name=Ferao

	处理方法

		@RequestMapping("/hello")
	    public void hello(String name){
	        System.out.println(name);
	    }

	后台输出:Ferao
2.提交的的域名和处理方法的参数名不一致
	提交的数据

		http://localhost:8080/hello?username=Ferao

	处理方法

		@RequestMapping("/hello")
	    public void hello(@RequestParam("username") String name){
	        System.out.println(name);
	    }

	后台输出:Ferao
3.提交的是一个对象
	要求

		提交的表单域和对象的属性名一致,参数使用对象即可

	实体类

		public class PostUser {
    		private String username;
    		private String password;
    		private String money;
    		//构造
    		//get/set
    		//toStirng()
    	}

	提交的数据

		http://localhost:8080/hello?username=Ferao&password=1&money=100

	处理方法

		@RequestMapping("/hello")
    	public String hello(PostUser user){
        	System.out.println(user );
        	return "test";
    	}
1.数据显示到前端–>ModelAndView
    @RequestMapping("/t2")
    public ModelAndView test2(){
        ModelAndView modelAndView = new ModelAndView();
        modelAndView.addObject("msg","t1 success");
        modelAndView.setViewName("test");
        return modelAndView;
    }
2.数据显示到前端–>Model
@PostMapping("/user/sysUser") public String sysUsers(User user,Model model){ if (user.getUsername()!=null){ model.addAttribute("msg","ferao"); model.addAttribute("users", Arrays.asList(user.getUsername(),user.getAge())); System.out.println(user); //转发 return "User-Messege"; }else { //springmvc重定向 return "redirect:/index2.html"; } } -
结果跳转
-
ModelAndView
设置ModelAndView对象,根据view的名称,和视图解析器跳转到指定的页面

页面:{视图解析器前缀} + viewName +{视图解析器后缀}

如下返回页面:项目名/WEB-INF/pages/test.jsp
-
SpringMVC
通过springmvc进行跳转,有两种分类分别为需视图解析器和无需视图解析器

无视图解析器:测试前需要将视图解析器注释掉

需视图解析器:重定向,本身不需要视图解析器,本质就是重新请求一个新的地方,需注意路径问题
		    可以重定向到另一个请求实现。
有视图解析器
	@RequestMapping("/rsm2/t1")
	public String test1(){
	   //转发
	   return "test";
	}

	@RequestMapping("/rsm2/t2")
	public String test2(){
	  //重定向
	  return "redirect:/index.jsp";
	  //hello.do为另一个请求
	  //return "redirect:hello.do";
	}
[注]
重定向,不需要视图解析器,本质是重新请求一个新地方
重定向的页面不可以在web-inf下,因无权限访问
可以重定向到另一个请求上去
-
-
-
springmvc文件上传
前言 文件上传是项目开发中最常见的功能之一,springmvc可以很好的支持文件上传,但是springmvc 上下文默认没有装配multipartResolver,因此默认情况下其不能处理文件上传工作,如果想要 使用spring的文件上传功能,则需要在上下文中配置multipartResolver。 前端表单要求 1.form表单的enctype取值必须是multipart/form-data (默认值是:application/x-www-form-urlencoded) enctype:是表单请求正文的类型 2.form表单的method属性取值必须是post 3.提供一个文件选择域<input type="file" /> 文件上传原理分析 当form表单的enctype取值不是默认值后,request.getParameter()将失效 enctype="application/x-www-form-urlencoded"时,form表单的正文内容是: key=value&key=value&key=value 当form表单的enctype取值为Mutilpart/form-data时,请求正文内容就变成: 每一部分都是mime类型描述的正文 -------------------------------------7dwerfgasasertaera (分界符) Content-Disposition: form-data;name="userName" (协议头) 原理说明 application/x-www-form-urlencoded默认方式只处理表单域中的value属性值,采用这种 编码方式的表单会将表单域中的值处理成URL编码方式 Mutilpart/form-data这种编码方式以二进制流的方式来处理表单数据,这种编码方式会把文件 域指定文件的内容也封装到请求参数中,不会对字符编码 注:text/plain:除了把空格转换为"+"号外,其他字符都不做编码处理,这种方式使用直接 通过表单发送邮件。 springmvc为文件上传提供了直接的支持,这种支持是即用即插的MutilpartResolver实现的 springmvc使用apache Commons FileUpload技术实现了一个MutilpartResolver实现类 CommonsMultipartResolver。因此springmvc的文件上传还需要依赖Apache Commons FileUpload的组件 实现文件上传 步骤一:导包 <dependency> <groupId>commons-fileupload</groupId> <artifactId>commons-fileupload</artifactId> <version>1.3.3</version> </dependency> <dependency> <groupId>javax.servlet</groupId> <artifactId>javax.servlet-api</artifactId> <version>4.0.1</version> </dependency> <注> 1.省略了spring及springmvc的Jar 2.commons-fileUpload会自动导入io依赖包 步骤二:配置bean <!--文件上传配置--> <bean id="multipartResolver" class="org.springframework.web.multipart.commons.CommonsMultipartResolver"> <!-- 请求的编码格式,必须和jSP的pageEncoding属性一致,以便正确读取表单的内容,默认为ISO-8859-1 --> <property name="defaultEncoding" value="utf-8"/> <!-- 上传文件大小上限,单位为字节(10485760=10M) --> <property name="maxUploadSize" value="10485760"/> <property name="maxInMemorySize" value="40960"/> </bean> <注> 这个配置是spring容器中配置的 这个bean的id必须为multipartResolver,否则上传文件会报400的错误 步骤三:前端页面 <form action="/upload" method="post" enctype="multipart/form-data"> 选择文件:<input type="file" name="file" /><br /> <input type="submit" value="上传文件" /> </form> 步骤四:编写Controller //@RequestParam("file") 将name=file控件得到的文件封装成CommonsMultipartFile 对象 //批量上传CommonsMultipartFile则为数组即可 @RequestMapping("/upload") public String fileUpload(@RequestParam("file") CommonsMultipartFile file , HttpServletRequest request) throws IOException { //获取文件名 : file.getOriginalFilename(); String uploadFileName = file.getOriginalFilename(); //如果文件名为空,直接回到首页! if ("".equals(uploadFileName)){ return "redirect:/index.jsp"; } System.out.println("上传文件名 : "+uploadFileName); //上传路径保存设置 String path = request.getServletContext().getRealPath("/upload"); //如果路径不存在,创建一个 File realPath = new File(path); if (!realPath.exists()){ realPath.mkdir(); } System.out.println("上传文件保存地址:"+realPath); InputStream is = file.getInputStream(); //文件输入流 OutputStream os = new FileOutputStream(new File(realPath,uploadFileName)); //文件输出流 //读取写出 int len=0; byte[] buffer = new byte[1024]; while ((len=is.read(buffer))!=-1){ os.write(buffer,0,len); os.flush(); } os.close(); is.close(); return "redirect:/index.jsp"; } 步骤四:编写Controller(方法二) /* * 采用file.Transto 来保存上传的文件 */ @RequestMapping("/upload2") public String fileUpload2(@RequestParam("file") CommonsMultipartFile file, HttpServletRequest request) throws IOException { //上传路径保存设置 String path = request.getServletContext().getRealPath("/upload"); File realPath = new File(path); if (!realPath.exists()){ realPath.mkdir(); } //上传文件地址 System.out.println("上传文件保存地址:"+realPath); //通过CommonsMultipartFile的方法直接写文件(注意这个时候) file.transferTo(new File(realPath +"/"+ file.getOriginalFilename())); return "redirect:/index.jsp"; } <注> 采用file.Transto 来保存上传的文件 -
拓展 : 表单form:form标签
含义 springmvc提供了一组类似jstl的标签,可供开发者简化开发 使用步骤 1.导入标签库 <%@ taglib uri="http://www.springframework.org/tags/form" prefix="form" %> 2.测试示例<form:form action="${pageContext.request.contextPath }/emp" method="post" modelAttribute="employee"> <input type="hidden" name="_method" value="put"/> <form:hidden path="empId"/> <table align="center"> <tr> <td colspan="2" align="center">编辑员工</td> </tr> <tr> <td>姓名</td> <td> <form:input path="empName"/> </td> </tr> <tr> <td>社会保险号</td> <td>${requestScope.employee.ssn }</td> </tr> <tr> <td>所在部门</td> <td> <form:select path="department.deptId" items="${requestScope.deptList }" itemValue="deptId" itemLabel="deptName"/> </td> </tr> <tr> <td colspan="2" align="center"> <input type="submit" value="更新"/> </td> </tr> </table> </form:form>标签属性 1.action属性 和html标签中的form标签的action属性作用一致,用来设置表单提交的url地址。如果 form:form标签省略action属性,那么会使用当前表单所在页面的url地址作为action 属性的值 2.modelAttribute属性 该标签无论是执行保存还是更新操作,都要从请求域中读取模型数据。如果没有设置 modelAttribute属性那么就以command为属性名从请求域中读取。如果找不到则会抛出异常 。所以如果想要form:form标签正常工作一定要将一个模型对象保存到请求域中,哪怕是保存 数据是一个空对象保存。 3.path