Win10安装TensorFlow-GPU版本
安装环境:Win10家庭版+GTX1650+python3.6+cuDNN:7.4+CUDA:9.0+tensorflow1.13.1
本来安装的TensorFlow2.1.0,然而出现了cuda/cudnn版本和tensorflow版本不一致的问题,报错为:‘Could not load dynamic library 'cudart64_101.dll',建议参考:https://www.tensorflow.org/install/install_sources#tested_source_configurations,最后改为安装tensorflow1.13.1。
TensorFlow 有两个版本:CPU 版本和 GPU 版本。GPU 版本需要 CUDA 和 cuDNN 的支持,CPU 版本则不需要。
1.首先安装Anaconda3
Anaconda指的是一个开源的Python发行版本,其包含了conda、Python等180多个科学包及其依赖项。里面所包含的Jupyter Notebook是数据挖掘领域中最热门的工具。
下载
- 进入Anaconda的官网进行下载或学习。
- 使用清华大学开源软件镜像站点(推荐使用)下载安装。
安装注意:
(1)到达此页面时勾选第一项,不然需要自己手动添加环境变量,非常麻烦

(2)安装VSCode

其它选项直接下一步即可安装完成。
2.安装CUDA+CUDNN
(1)TensorFlow GPU 版本需要 CUDA 和 cuDNN 的支持,确认你的显卡支持 CUDA:https://developer.nvidia.com/cuda-gpus
(2)选择自己的显卡型号安装最新驱动:https://www.nvidia.cn/Download/index.aspx?lang=cn
(3)安装 Visual Studio ,因为CUDA需要Visual Studio的支持:https://www.visualstudio.com/zh-hans/
(4)CUDA下载,查看cuda/cudnn版本和tensorflow版本对应关系,避免出现cuda/cudnn版本和tensorflow版本不一致的现象发生:https://www.tensorflow.org/install/install_sources#tested_source_configurations
安装了cuda9.0:https://developer.nvidia.com/cuda-90-download-archive
(5)下载 cuDNN7.4:https://developer.nvidia.com/rdp/cudnn-download
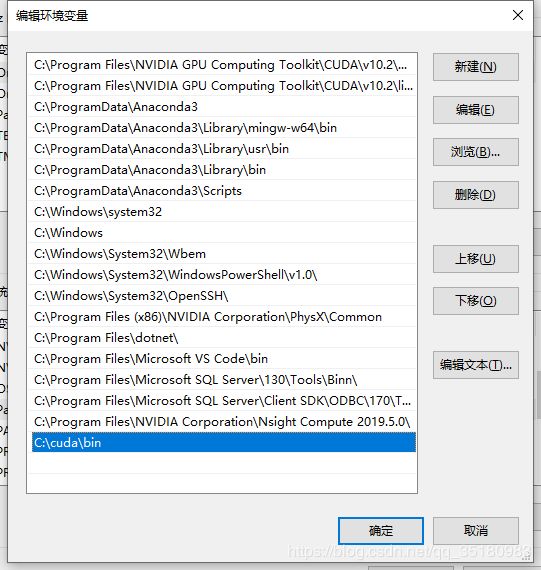
下载完成后解压到目录,把对应的目录地址添加到path环境变量:
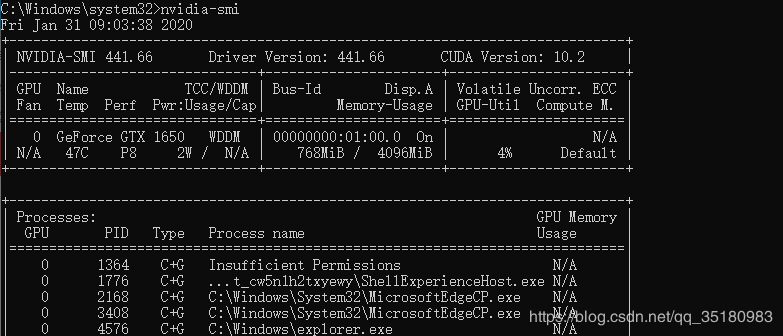
(6)检查是否CUDA是否正常
win+R ——>输入:nvidia-smi
——>输入:nvcc -V

——>输入: cd C:\Program Files\NVIDIA GPU Computing Toolkit\CUDA\v9.0\extras\demo_suite
执行 bandwidthTest.exe

3.安装TensorFlow-GPU版本
这里安装的是tensorflow1.13.1,打开Anaconda Promopt 输入:
conda create -n tensorflow python=3.6
conda activate tensorflow
pip install tensorflow-gpu==1.13.1

等待安装即可。
4.测试TensorFlow-GPU
python

>>>import tensorflow as tf
>>>sess = tf.Session(config=tf.ConfigProto(log_device_placement=True))
>>>print(tf.test.is_gpu_available())
结果如下:
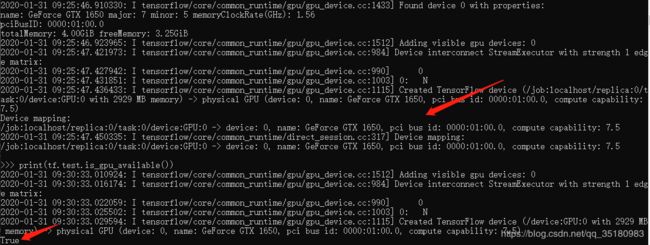
安装成功。
关于安装期间遇到的一些问题:
(1) socket. timeout: The read operation timed out
这是网络问题,可以换用清华的源
然而清华的源也出问题:

加个参数,使用 pip --defaul t-timeout=100 install tensorf1ow-gpu 安装即可。
其他问题和解决方法如下截图:


卸载Tensorflow:pip uninstall tensorflow-gpu(如果有新建环境,先激活再卸载)