spring笔记(基础+aop)-尚硅谷
1、p标
xmlns:p="http://www.springframework.org/schema/p"
- <bean id="person" class="com.myclass.Person" p:age="21" p:tool-ref="tool"/>
- public class Person
- {
- private int age;
- private Tool tool;
- public void setAge(int age)
- {
- this.age=age;
- }
- public void setTool(Tool tool)
- {
- this.tool=tool;
- }
- 其余代码省略
- }
2、util标签
xmlns:util="http://www.springframework.org/schema/util"
- <util:list id="list">
- <value>listValue1value>
- <value>listValue2value>
- util:list>
- <util:map id="map">
- <entry key="key1">
- <value>mapValue1value>
- entry>
- <entry key="key2">
- <value>mapValue2value>
- entry>
- util:map>
- <util:set id="set">
- <value>setValue1value>
- <value>setValue2value>
- util:set>
3、自动装配
默认是no,不启用自动装配!default-autowire 的类型有byName,byType,constructor;
byName:通过名称进行自动匹配;
byType:根据类型进行自动匹配;
constructor:和byType 类似,只不过它是根据构造方法注入而言的,根据类型,自动注入;
建议:自动装配机制慎用,它屏蔽了装配细节,容易产生潜在的错误;
- <beans xmlns="http://www.springframework.org/schema/beans"
- xmlns:xsi="http://www.w3.org/2001/XMLSchema-instance"
- xsi:schemaLocation="http://www.springframework.org/schema/beans
- http://www.springframework.org/schema/beans/spring-beans.xsd"
- default-autowire="byType">
class="com.test.spring.AutowireTest1" autowire="byName">
4、bean之间的关系:继承、依赖
继承
这里说的继承和java的继承是不一样的,不是父类子类。但思想很相似,是父bean和子bean
1、父bean是一个实例时。它本身是一个完整的bean
2、父bean是模板,抽象bean,不能被实例化,只是来被继承。
当遇到一个类要实例化出很多相似的bean对象时,如下,看起来是不是很不简洁
1     <bean id="address1" class="com.guigu.spring.autowire.Address"
2     p:city="BeiJing" p:street="yihuan">bean>
3     <bean id="address2" class="com.guigu.spring.autowire.Address"
4     p:city="BeiJing" p:street="erhuan">bean>
方法① 两个bean除了p:street不一样,其他都一样。可以把一个作为父bean,其它的继承这个bean
1      <bean id="address1" class="com.guigu.spring.autowire.Address"
2      p:city="BeiJing" p:street="yihuan">bean>
3      <bean id="address2"  p:street="erhuan" parent="address1">bean>
4    // address2等价于:
5    //  <bean id="address2"" class="com.guigu.spring.autowire.Address"
6    //  p:city="BeiJing" p:street="erhuan">bean>
这里,第二个就继承了第一个bean,用parent属性,只写自己独有的属性或要覆盖的属性即可。
方法②把相同属性提取出来,做一个抽象bean,专门用来继承
1 <bean id="address1" class="com.guigu.spring.autowire.Address"
2     p:city="BeiJing" p:street="yihuan" abstract="true">bean>
3 <bean id="address2" p:street="erhuan" parent="address1">bean>
这样,address2也继承了address1。address1设置了abstract="true",就不能实例化,否则抛异常。
也可以写成这样:
1  <bean id="address1" p:city="BeiJing" p:street="yihuan" abstract="true">bean>
2  <bean id="address2" class="com.guigu.spring.autowire.Address" p:street="erhuan" parent="address1">bean>
和上面的不同就是把class属性拿出去了。当很多不是同一个类的bean要继承父bean时,就要这样,在子bean写自己所在的class。
这样写还有一点是,这个父bean一定不能实例化,因为它没有class属性,实例化会跑异常。那就一定要写abstract属性,让spring不实例化它。
依赖---depends-on
用Person类的例子

 1 public class Person {
 2     private String name;
 3     private Car car;
 4
 5     public String getName() {
 6         return name;
 7     }
 8     public void setName(String name) {
 9         this.name = name;
10     }
11     public Car getCar() {
12         return car;
13     }
14     public void setCar(Car car) {
15         this.car = car;
16     }
17     @Override
18     public String toString() {
19         return "Person [name=" + name + ", car=" + car + "]";
20     }
21 }
有一个属性Car没有配置,那实例化后,它就是null。
1  <bean id="person" class="com.guigu.spring.autowire.Person"
2      p:name="Evan">bean>
有时,我们需要让某个属性必须存在,就像必填项一样。 用depends-on 依赖
1   <bean id="person" class="com.guigu.spring.autowire.Person"
2       p:name="Evan" depends-on="car">bean>
这样表示,实例化person一定要依赖car,没有配置car会抛异常
1  <bean id="car" class="com.guigu.spring.autowire.Car" p:brand="Audi" p:price="200000">bean>
2  <bean id="person" class="com.guigu.spring.autowire.Person"
3        p:name="Evan" depends-on="car">bean>
这样,依赖的car存在,就可以正常实例化了
5、scope
6、外部文件配置数据源
- xmlns:context="http://www.springframework.org/schema/context"
<context:property-placeholder location="classpath:db.properties"/>
<bean id="dataSource" class="org.apache.commons.dbcp.BasicDataSource" destroy-method="close">
<property name="driverClassName" value="${mysql.driver}"/>
<property name="url" value="${mysql.url}"/>
<property name="username" value="${mysql.user}"/>
<property name="password" value="${mysql.password}"/>
bean>
properties内容:
mysql.driver=com.mysql.jdbc.Driver
mysql.url=jdbc:mysql://localhost:3306/xxx
mysql.user=xxx
mysql.password=xxx
7、SpEL支持的运算符号
Spring表达式语言(简称SpEL):是一个支持运行时查询和操作对象图的强大的表达式语言。
语法类似于EL:SpEL使用 #{…} 作为限定符,所有在大框号中的字符都将被认为是SpEL
SpEL为bean的属性进行动态赋值提供了便利
通过SpEL可以实现:
- 通过bean的id对bean进行引用
- 调用方法以及引用对象中的属性
- 计算表达式的值
- 正则表达式的匹配
SpEL:字面值
字面值的表示:
- 整数:< property name=”count” value=”#{5}”/>
- 小数:< property name=”frequency” value=”#{89.7}”/>
- 科学计数法:< property name=”capacity” value=”#{1e4}”/>
- String可以使用单引号或者双引号作为字符串的界定符号:< property name=”name” value=”#{Chuck}”/>或< property name=’name’ value=’#{“Chuck”}’>
- Boolean:< property name=”enabled” value=”#{false}”/>
此处使用SpEL的意义不大
SpEL:引用Bean、属性和方法
- 引用其他对象:
<property name="car" value="#{car}">property>- 1
- 2
- 引用其他对象的属性:
<property name="city" value="#{address.city}">property>- 1
- 2
- 调用其他方法,还可以链式操作:
        <property name="suffix" value="#{sequenceGenerator2.toString()}">


<property name="suffix" value="#{sequenceGenerator2.toString().toUpperCase()}">- 1
- 2
- 3
- 4
- 5
- 调用静态方法或静态属性:
通过 T() 调用一个类的静态方法,它将返回一个 Class Object,然后再调用相应的方法或属性:
<property name="tyrePerimeter" value="#{T(java.lang.Math).PI*80}">property>- 1
- 2
算数运算符:+, -, *, /, %, ^:

加号还可以用作字符串连接:

比较运算符: <, >, ==, <=, >=, lt, gt, eq, le, ge

逻辑运算符号: and, or, not, |

if-else 运算符:?: (ternary), ?: (Elvis)

if-else 的变体

正则表达式:matches

8、生命周期
Spring IOC 容器对 Bean 的生命周期进行管理的过程:
- 通过构造器或工厂方法创建 Bean 实例- 为 Bean 的属性设置值和对其他 Bean 的引用
- 调用 Bean 的初始化方法
- Bean 可以使用了
- 当容器关闭时, 调用 Bean 的销毁方法
在 Bean 的声明里设置 init-method 和 destroy-method 属性, 为 Bean 指定初始化和销毁方法.

创建 Bean 后置处理器
Bean 后置处理器允许在调用初始化方法前后对 Bean 进行额外的处理.
Bean 后置处理器对 IOC 容器里的所有 Bean 实例逐一处理, 而非单一实例. 其典型应用是: 检查 Bean 属性的正确性或根据特定的标准更改 Bean 的属性.
对Bean 后置处理器而言, 需要实现 BeanPostProcessor 接口. 在初始化方法被调用前后, Spring 将把每个 Bean 实例分别传递给上述接口的以下两个方法:

配置后置处理器:

实现 BeanPostProcessor 接口:
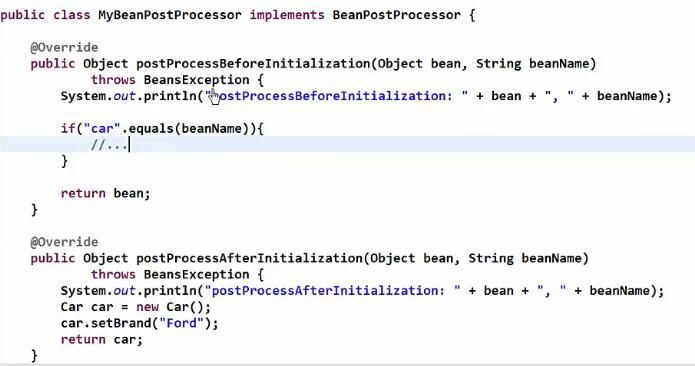
添加 Bean 后置处理器后 Bean 的生命周期
Spring IOC 容器对 Bean 的生命周期进行管理的过程:
- 通过构造器或工厂方法创建 Bean 实例
- 为 Bean 的属性设置值和对其他 Bean 的引用
- 将 Bean 实例传递给 Bean 后置处理器的 postProcessBeforeInitialization 方法
- 调用 Bean 的初始化方法
- 将 Bean 实例传递给 Bean 后置处理器的 postProcessAfterInitialization方法
- Bean 可以使用了
- 当容器关闭时, 调用 Bean 的销毁方法
9、通过工厂方法配置Bean
调用静态工厂方法创建 Bean
调用静态工厂方法创建 Bean是将对象创建的过程封装到静态方法中. 当客户端需要对象时, 只需要简单地调用静态方法, 而不同关心创建对象的细节.
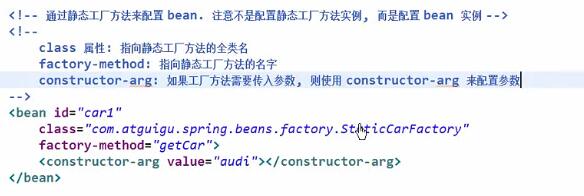
要声明通过静态方法创建的 Bean, 需要在 Bean 的 class 属性里指定拥有该工厂的方法的类, 同时在 factory-method 属性里指定工厂方法的名称. 最后, 使用

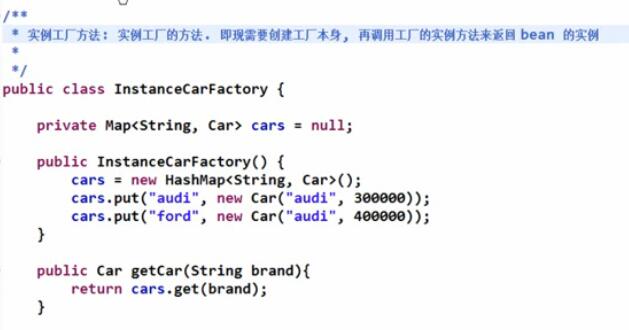
调用实例工厂方法创建 Bean
实例工厂方法: 将对象的创建过程封装到另外一个对象实例的方法里. 当客户端需要请求对象时, 只需要简单的调用该实例方法而不需要关心对象的创建细节.
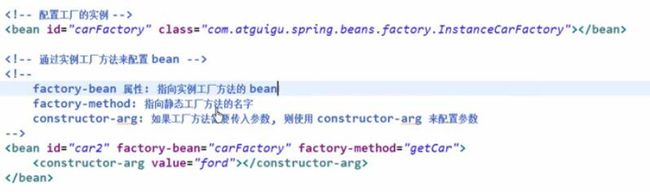
要声明通过实例工厂方法创建的 Bean
在 bean 的 factory-bean 属性里指定拥有该工厂方法的 Bean
在 factory-method 属性里指定该工厂方法的名称
使用 construtor-arg 元素为工厂方法传递方法参数
10、通过FactoryBean配置Bean
什么时候使用用FactoryBean?
FactoryBean接口:

自定义FactoryBean:


xml配置文件:

11、通过注解配置Bean
一、组件扫描
组件扫描(component scanning): Spring 能够从 classpath 下自动扫描, 侦测和实例化具有特定注解的组件.
特定组件包括:
@Component: 基本注解, 标识了一个受 Spring 管理的组件
@Respository: 标识持久层组件
@Service: 标识服务层(业务层)组件
@Controller: 标识表现层组件
对于扫描到的组件, Spring 有默认的命名策略: 使用非限定类名, 第一个字母小写. 也可以在注解中通过 value 属性值标识组件的名称
![]()
当在组件类上使用了特定的注解之后, 还需要在 Spring 的配置文件中声明
base-package 属性指定一个需要扫描的基类包,Spring 容器将会扫描这个基类包里及其子包中的所有类.
当需要扫描多个包时, 可以使用逗号分隔.
如果仅希望扫描特定的类而非基包下的所有类,可使用 resource-pattern 属性过滤特定的类,示例:


二、组件装配
构造器, 普通字段(即使是非 public), 一切具有参数的方法都可以应用@Authwired 注解
默认情况下, 所有使用 @Authwired 注解的属性都需要被设置. 当 Spring 找不到匹配的 Bean 装配属性时, 会抛出异常, 若某一属性允许不被设置, 可以设置 @Authwired 注解的 required 属性为 false

默认情况下, 当 IOC 容器里存在多个类型兼容的 Bean 时, 通过类型的自动装配将无法工作. 此时可以在 @Qualifier 注解里提供 Bean 的名称. Spring 允许对方法的入参标注 @Qualifiter 已指定注入 Bean 的名称

@Authwired 注解也可以应用在数组类型的属性上, 此时 Spring 将会把所有匹配的 Bean 进行自动装配.
@Authwired 注解也可以应用在集合属性上, 此时 Spring 读取该集合的类型信息, 然后自动装配所有与之兼容的 Bean.
@Authwired 注解用在 java.util.Map 上时, 若该 Map 的键值为 String, 那么 Spring 将自动装配与之 Map 值类型兼容的 Bean, 此时 Bean 的名称作为键值
@Resource 注解要求提供一个 Bean 名称的属性,若该属性为空,则自动采用标注处的变量或方法名作为 Bean 的名称
@Inject 和 @Autowired 注解一样也是按类型匹配注入的 Bean, 但没有 reqired 属性
12、spring依泛型赖注入


13、AOP
AOP 的好处
- 每个事物逻辑位于一个位置, 代码不分散, 便于维护和升级
- 业务模块更简洁, 只包含核心业务代码.
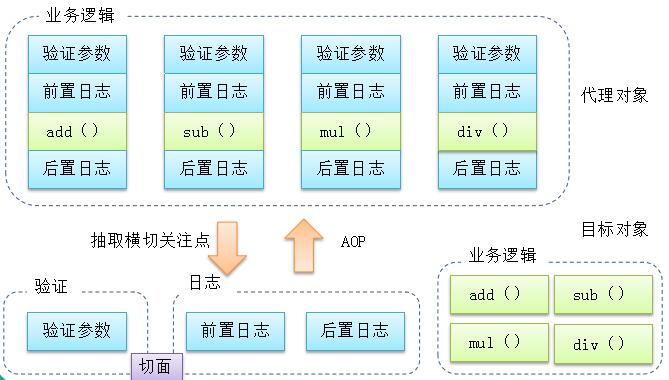
AOP 术语
- 切面(Aspect): 横切关注点(跨越应用程序多个模块的功能)被模块化的特殊对象
- 通知(Advice): 切面必须要完成的工作
- 目标(Target): 被通知的对象
- 代理(Proxy): 向目标对象应用通知之后创建的对象
- 连接点(Joinpoint):程序执行的某个特定位置:如类某个方法调用前、调用后、方法抛出异常后等。连接点由两个信息确定:方法表示的程序执行点;相对点表示的方位。例如 ArithmethicCalculator#add() 方法执行前的连接点,执行点为 ArithmethicCalculator#add(); 方位为该方法执行前的位置
- 切点(pointcut):每个类都拥有多个连接点:例如 ArithmethicCalculator 的所有方法实际上都是连接点,即连接点是程序类中客观存在的事务。AOP 通过切点定位到特定的连接点。类比:连接点相当于数据库中的记录,切点相当于查询条件。切点和连接点不是一对一的关系,一个切点匹配多个连接点,切点通过 org.springframework.aop.Pointcut 接口进行描述,它使用类和方法作为连接点的查询条件。
动态代理模拟aop
接口不变。写一个实现类ArithmeticCalculatorImpl.java 这个实现类只关注业务,没有需要打印的内容
|
1
2
3
4
5
6
7
8
9
10
11
12
13
14
15
16
17
18
19
20
21
22
23
24
25
26
27
28
29
|
package
com.spring.aop.helloworld;
public
class
ArithmeticCalculatorImpl
implements
ArithmeticCalculator{
@Override
public
int
add(
int
i,
int
j) {
int
result = i + j;
return
result;
}
@Override
public
int
sub(
int
i,
int
j) {
int
result = i - j;
return
result;
}
@Override
public
int
mul(
int
i,
int
j) {
int
result = i * j;
return
result;
}
@Override
public
int
div(
int
i,
int
j) {
int
result = i / j;
return
result;
}
}
|
ArithmeticCaculatorLogginProxy.java
|
1
2
3
4
5
6
7
8
9
10
11
12
13
14
15
16
17
18
19
20
21
22
23
24
25
26
27
28
29
30
31
32
33
34
35
36
37
38
39
40
41
42
43
44
45
46
47
48
|
package
com.spring.aop.helloworld;
import
java.lang.reflect.InvocationHandler;
import
java.lang.reflect.Method;
import
java.lang.reflect.Proxy;
import
java.util.Arrays;
public
class
ArithmeticCaculatorLogginProxy {
//要代理的对象
private
ArithmeticCalculator target;
public
ArithmeticCaculatorLogginProxy(ArithmeticCalculator target){
this
.target = target;
}
public
ArithmeticCalculator getLoggingProxy() {
ArithmeticCalculator proxy =
null
;
//代理对象由哪一个类加载器负责加载
ClassLoader loader = target.getClass().getClassLoader();
//代理对象的类型,即其中有哪些方法
Class[] interfaces =
new
Class[]{ArithmeticCalculator.
class
};
//当调用代理对象其中的方法时,该执行的代码
InvocationHandler h =
new
InvocationHandler() {
/**
* proxy:正在返回的代理对象,一般情况下,在invoke方法中都不适用该对象
* method:正在被调用的方法
* args:调用方法时,传入的参数
*/
@Override
public
Object invoke(Object proxy, Method method, Object[] args)
throws
Throwable {
//下面这句执行的时候又会调用invoke方法,所以会出现死循环导致内存溢出
//System.out.println(proxy.toString());
String methodName = method.getName();
//日志
System.out.println(
"The method "
+ methodName +
" begins with"
+ Arrays.asList(args));
System.out.println(
"Invoke..."
);
//执行方法
Object result = method.invoke(target, args);
//日志
System.out.println(
"The method"
+ methodName +
" ends with "
+ result);
return
result;
}
};
proxy = (ArithmeticCalculator) Proxy.newProxyInstance(loader, interfaces, h);
return
proxy;
}
}
|
main方法
|
1
2
3
4
5
6
7
8
9
|
ArithmeticCalculator target =
new
ArithmeticCalculatorImpl();
ArithmeticCalculator proxy =
new
ArithmeticCaculatorLogginProxy(target).getLoggingProxy();
proxy.add(
1
,
5
);
|
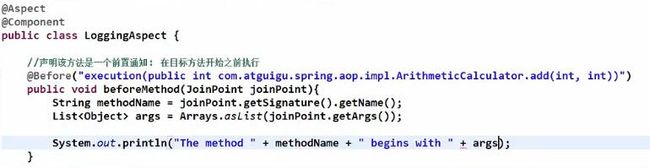
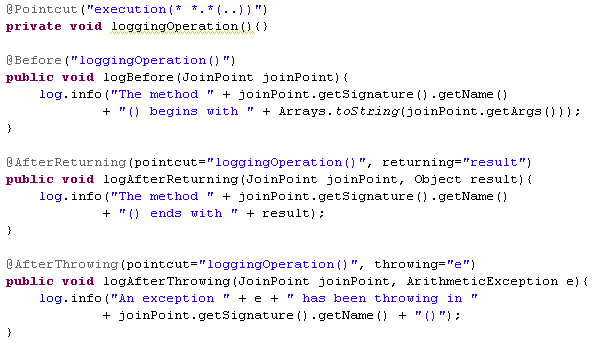
通知
在 Spring 中启用 AspectJ 注解支持
- 要在 Spring 应用中使用 AspectJ 注解, 必须在 classpath 下包含 AspectJ 类库: aopalliance.jar、aspectj.weaver.jar 和 spring-aspects.jar
- 将 aop Schema 添加到
根元素中 - 要在 Spring IOC 容器中启用 AspectJ 注解支持, 只要在 Bean 配置文件中定义一个空的 XML 元素
- 当 Spring IOC 容器侦测到 Bean 配置文件中的
用 AspectJ 注解声明切面
- 要在 Spring 中声明 AspectJ 切面, 只需要在 IOC 容器中将切面声明为 Bean 实例. 当在 Spring IOC 容器中初始化 AspectJ 切面之后, Spring IOC 容器就会为那些与 AspectJ 切面相匹配的 Bean 创建代理.
- 在 AspectJ 注解中, 切面只是一个带有 @Aspect 注解的 Java 类.
- 通知是标注有某种注解的简单的 Java 方法.
- AspectJ 支持 5 种类型的通知注解:
- @Before: 前置通知, 在方法执行之前执行
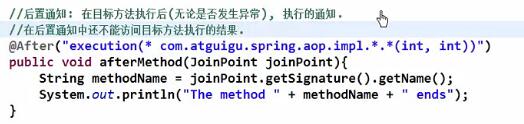
- @After: 后置通知, 在方法执行之后执行
- @AfterRunning: 返回通知, 在方法返回结果之后执行
- @AfterThrowing: 异常通知, 在方法抛出异常之后
- @Around: 环绕通知, 围绕着方法执行
前置通知
前置通知使用 @Before 注解, 并将切入点表达式的值作为注解值.
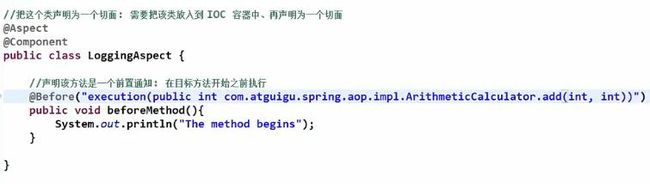
利用方法签名编写 AspectJ 切入点表达式
- execution * com.atguigu.spring.ArithmeticCalculator.*(..): 匹配 ArithmeticCalculator 中声明的所有方法,第一个 * 代表任意修饰符及任意返回值. 第二个 * 代表任意方法. .. 匹配任意数量的参数. 若目标类与接口与该切面在同一个包中, 可以省略包名.
- execution public * ArithmeticCalculator.*(..): 匹配 ArithmeticCalculator 接口的所有公有方法.
- execution public double ArithmeticCalculator.*(..): 匹配 ArithmeticCalculator 中返回 double 类型数值的方法
- execution public double ArithmeticCalculator.*(double, ..): 匹配第一个参数为 double 类型的方法, .. 匹配任意数量任意类型的参数
- execution public double ArithmeticCalculator.*(double, double): 匹配参数类型为 double, double 类型的方法.
合并切入点表达式

让通知访问当前连接点的细节
后置通知
一个切面可以包括一个或者多个通知
返回通知
- 无论连接点是正常返回还是抛出异常, 后置通知都会执行. 如果只想在连接点返回的时候记录日志, 应使用返回通知代替后置通知
- 在返回通知中, 只要将 returning 属性添加到 @AfterReturning 注解中, 就可以访问连接点的返回值. 该属性的值即为用来传入返回值的参数名称.
- 必须在通知方法的签名中添加一个同名参数. 在运行时, Spring AOP 会通过这个参数传递返回值.
- 原始的切点表达式需要出现在 pointcut 属性中

异常通知
- 只在连接点抛出异常时才执行异常通知
- 将 throwing 属性添加到 @AfterThrowing 注解中, 也可以访问连接点抛出的异常. Throwable 是所有错误和异常类的超类. 所以在异常通知方法可以捕获到任何错误和异常.
- 如果只对某种特殊的异常类型感兴趣, 可以将参数声明为其他异常的参数类型. 然后通知就只在抛出这个类型及其子类的异常时才被执行.

环绕通知
- 环绕通知是所有通知类型中功能最为强大的, 能够全面地控制连接点. 甚至可以控制是否执行连接点.
- 对于环绕通知来说, 连接点的参数类型必须是 ProceedingJoinPoint . 它是 JoinPoint 的子接口, 允许控制何时执行, 是否执行连接点.
- 在环绕通知中需要明确调用 ProceedingJoinPoint 的 proceed() 方法来执行被代理的方法. 如果忘记这样做就会导致通知被执行了, 但目标方法没有被执行.
- 注意: 环绕通知的方法需要返回目标方法执行之后的结果, 即调用 joinPoint.proceed(); 的返回值, 否则会出现空指针异常


指定切面的优先级
在同一个连接点上应用不止一个切面时, 除非明确指定, 否则它们的优先级是不确定的.
切面的优先级可以通过实现 Ordered 接口或利用 @Order 注解指定.
实现 Ordered 接口, getOrder() 方法的返回值越小, 优先级越高.
若使用 @Order 注解, 序号出现在注解中


重用切入点定义
- 在编写 AspectJ 切面时, 可以直接在通知注解中书写切入点表达式. 但同一个切点表达式可能会在多个通知中重复出现.
- 在 AspectJ 切面中, 可以通过 @Pointcut 注解将一个切入点声明成简单的方法. 切入点的方法体通常是空的, 因为将切入点定义与应用程序逻辑混在一起是不合理的.
- 切入点方法的访问控制符同时也控制着这个切入点的可见性. 如果切入点要在多个切面中共用, 最好将它们集中在一个公共的类中. 在这种情况下, 它们必须被声明为 public. 在引入这个切入点时, 必须将类名也包括在内. 如果类没有与这个切面放在同一个包中, 还必须包含包名.
- 其他通知可以通过方法名称引入该切入点.
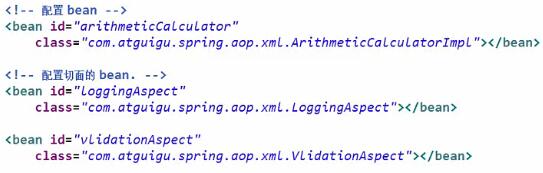
基于 XML 的配置声明切面
- 除了使用 AspectJ 注解声明切面, Spring 也支持在 Bean 配置文件中声明切面. 这种声明是通过 aop schema 中的 XML 元素完成的.
- 正常情况下, 基于注解的声明要优先于基于 XML 的声明. 通过 AspectJ 注解, 切面可以与 AspectJ 兼容, 而基于 XML 的配置则是 Spring 专有的. 由于 AspectJ 得到越来越多的 AOP 框架支持, 所以以注解风格编写的切面将会有更多重用的机会.
声明切面
- 当使用 XML 声明切面时, 需要在
根元素中导入 aop Schema - 在 Bean 配置文件中, 所有的 Spring AOP 配置都必须定义在
- 切面 Bean 必须有一个标示符, 供
声明切入点
- 切入点使用
- 切入点必须定义在
- 定义在
- 定义在
- 基于 XML 的 AOP 配置不允许在切入点表达式中用名称引用其他切入点.
声明通知
- 在 aop Schema 中, 每种通知类型都对应一个特定的 XML 元素.
- 通知元素需要使用
来引用切入点, 或用 直接嵌入切入点表达式. method 属性指定切面类中通知方法的名称.

14、使用 JdbcTemplate和NamedParameterJdbcTemplate
作为了解即可,主要还是关注在sql语句的使用和orm的框架habernate,mybaties
重点:
1,学习如何引用外部资源文件和配置数据源
<context:component-scan base-package="com.hgh.spring.jdbc">context:component-scan>

<context:property-placeholder location="classpath:db.property"/>


<bean id="dataSource" class="com.mchange.v2.c3p0.ComboPooledDataSource">
    <property name="user" value="${jdbc.user}">property>
    <property name="password" value="${jdbc.password}">property>
    <property name="jdbcUrl" value="${jdbc.url}">property>
    <property name="driverClass" value="${jdbc.driver}">property>
bean>- 1
- 2
- 3
- 4
- 5
- 6
- 7
- 8
- 9
- 10
- 11
- 12
2,学习使用org.springframework.jdbc.core.JdbcTemplate的一些基本用法,实现增删改查,重点在批量:jdbcTemplate.batchUpdate(sql, list);和BeanPropertyRowMapper实现数据库到java类的映射
    @Test
    public void testQueryForOne(){
        String sql = "select id , last_name,email from employee where id=?";
        RowMapper rowMapper = new BeanPropertyRowMapper(Employee.class);
        Employee employee = jdbcTemplate.queryForObject(sql, rowMapper, 1);
        System.out.println(employee);

} - 1
- 2
- 3
- 4
- 5
- 6
- 7
- 8
重点3:使用NamedParameterJdbcTemplate实现别名.
    /**
     * 可以为参数起名字.
     * 1. 好处: 若有多个参数, 则不用再去对应位置, 直接对应参数名, 便于维护
     * 2. 缺点: 较为麻烦.
     */
    @Test
    public void testNamedParameterJdbcTemplate(){
        String sql = "insert into employee(email,last_name) values(:email,:last_name) ";
        Map map = new HashMap();
        map.put("email", "[email protected]");
        map.put("last_name", "hgh41213");
        namedParameterJdbcTemplate.update(sql, map);
} - 1
- 2
- 3
- 4
- 5
- 6
- 7
- 8
- 9
- 10
- 11
- 12
- 13
aplicationcontext.xml
<beans xmlns="http://www.springframework.org/schema/beans"
    xmlns:xsi="http://www.w3.org/2001/XMLSchema-instance"
    xmlns:aop="http://www.springframework.org/schema/aop"
    xmlns:context="http://www.springframework.org/schema/context"
    xmlns:jdbc="http://www.springframework.org/schema/jdbc"
    xsi:schemaLocation="http://www.springframework.org/schema/jdbc http://www.springframework.org/schema/jdbc/spring-jdbc-4.0.xsd
        http://www.springframework.org/schema/aop http://www.springframework.org/schema/aop/spring-aop-4.0.xsd
        http://www.springframework.org/schema/beans http://www.springframework.org/schema/beans/spring-beans-3.2.xsd
        http://www.springframework.org/schema/context http://www.springframework.org/schema/context/spring-context-4.0.xsd">


<context:component-scan base-package="com.hgh.spring.jdbc">context:component-scan>

<context:property-placeholder location="classpath:db.property"/>


<bean id="dataSource" class="com.mchange.v2.c3p0.ComboPooledDataSource">
    <property name="user" value="${jdbc.user}">property>
    <property name="password" value="${jdbc.password}">property>
    <property name="jdbcUrl" value="${jdbc.url}">property>
    <property name="driverClass" value="${jdbc.driver}">property>
bean>


<bean id="jdbcTemplate" class="org.springframework.jdbc.core.JdbcTemplate">
    <property name="dataSource" ref="dataSource">property>
bean>

<bean id="namedParameterJdbcTemplate"
class="org.springframework.jdbc.core.namedparam.NamedParameterJdbcTemplate">
    <constructor-arg ref="dataSource">constructor-arg>
bean>
beans>
- 1
- 2
- 3
- 4
- 5
- 6
- 7
- 8
- 9
- 10
- 11
- 12
- 13
- 14
- 15
- 16
- 17
- 18
- 19
- 20
- 21
- 22
- 23
- 24
- 25
- 26
- 27
- 28
- 29
- 30
- 31
- 32
- 33
- 34
- 35
JDBCTest
package com.hgh.spring.jdbc;

import static org.junit.Assert.*;

import java.sql.SQLException;
import java.util.ArrayList;
import java.util.HashMap;
import java.util.List;
import java.util.Map;

import javax.sql.DataSource;

import org.junit.Test;
import org.springframework.context.ApplicationContext;
import org.springframework.context.support.ClassPathXmlApplicationContext;
import org.springframework.jdbc.core.BeanPropertyRowMapper;
import org.springframework.jdbc.core.JdbcTemplate;
import org.springframework.jdbc.core.RowMapper;
import org.springframework.jdbc.core.namedparam.NamedParameterJdbcTemplate;

public class JDBCTest {

    private ApplicationContext ac = null;
    private JdbcTemplate jdbcTemplate=null;
    private EmployeeDao employeeDao;
    private NamedParameterJdbcTemplate namedParameterJdbcTemplate;

    {
        ac = new ClassPathXmlApplicationContext("aplicationcontext.xml");
        jdbcTemplate = (JdbcTemplate) ac.getBean("jdbcTemplate");
        employeeDao = (EmployeeDao) ac.getBean("employeeDao");
        namedParameterJdbcTemplate = (NamedParameterJdbcTemplate) ac.getBean("namedParameterJdbcTemplate");
    }
    /**
     * 可以为参数起名字.
     * 1. 好处: 若有多个参数, 则不用再去对应位置, 直接对应参数名, 便于维护
     * 2. 缺点: 较为麻烦.
     */
    @Test
    public void testNamedParameterJdbcTemplate(){
        String sql = "insert into employee(email,last_name) values(:email,:last_name) ";
        Map map = new HashMap();
        map.put("email", "[email protected]");
        map.put("last_name", "hgh41213");
        namedParameterJdbcTemplate.update(sql, map);
    }
/**
     * 测试DAO的调用方法
     */
    @Test
    public void testGetEmployee(){
        System.out.println(employeeDao.getEmployee(2));
    }

    @Test
    public void testForOne(){
        String sql = "select count(id) from employee";
        Long count = jdbcTemplate.queryForObject(sql, Long.class);
        System.out.println(count);
    }

    /**
     * 查到实体类的集合
     * 注意调用的不是 queryForList 方法
     */
    @Test
    public void testQueryForList(){
        String sql = "SELECT id, last_name, email FROM employee WHERE id < ?";
        RowMapper rowMapper = new BeanPropertyRowMapper<>(Employee.class);
        List employees = jdbcTemplate.query(sql, rowMapper,5);

        System.out.println(employees);
    }


    /**
     * 从数据库中获取一条记录, 实际得到对应的一个对象
     * 注意不是调用 queryForObject(String sql, Class requiredType, Object... args) 方法!
     * 而需要调用 queryForObject(String sql, RowMapper rowMapper, Object... args)
     * 1. 其中的 RowMapper 指定如何去映射结果集的行, 常用的实现类为 BeanPropertyRowMapper
     * 2. 使用 SQL 中列的别名完成列名和类的属性名的映射. 例如 last_name lastName
     * 3. 不支持级联属性. JdbcTemplate 到底是一个 JDBC 的小工具, 而不是 ORM 框架
     */
    @Test
    public void testQueryForOne(){
        String sql = "select id , last_name,email from employee where id=?";
        RowMapper rowMapper = new BeanPropertyRowMapper(Employee.class);
        Employee employee = jdbcTemplate.queryForObject(sql, rowMapper, 1);
        System.out.println(employee);

    }
    /**
     * 执行批量更新: 批量的 INSERT, UPDATE, DELETE
     * 最后一个参数是 Object[] 的 List 类型: 因为修改一条记录需要一个 Object 的数组, 那么多条不就需要多个 Object 的数组吗
     */
    @Test
    public void testBathUpdate(){
        List list = new ArrayList();
        String sql = "insert into employee(email,last_name) values(?,?)";
        list.add(new Object[]{"11","[email protected]"});
        list.add(new Object[]{"12","[email protected]"});
        list.add(new Object[]{"13","[email protected]"});
        list.add(new Object[]{"14","[email protected]"});
        jdbcTemplate.batchUpdate(sql, list);
    }

    /**
     * 执行 INSERT, UPDATE, DELETE
     */
    @Test
    public void testInsert(){
        String sql2 = "insert into employee(email,last_name) values('hgh33','[email protected]')";
        String sql = "update employee set email=? where id=?";
        jdbcTemplate.update(sql,"qq.qq.com",1);
        jdbcTemplate.update(sql2);
    }

    @Test
    public void test() {
        DataSource dataSource = ac.getBean(DataSource.class);
        try {
            System.out.println(dataSource.getConnection());
        } catch (SQLException e) {
            // TODO Auto-generated catch block
            e.printStackTrace();
        }
    }


}
- 1
- 2
- 3
- 4
- 5
- 6
- 7
- 8
- 9
- 10
- 11
- 12
- 13
- 14
- 15
- 16
- 17
- 18
- 19
- 20
- 21
- 22
- 23
- 24
- 25
- 26
- 27
- 28
- 29
- 30
- 31
- 32
- 33
- 34
- 35
- 36
- 37
- 38
- 39
- 40
- 41
- 42
- 43
- 44
- 45
- 46
- 47
- 48
- 49
- 50
- 51
- 52
- 53
- 54
- 55
- 56
- 57
- 58
- 59
- 60
- 61
- 62
- 63
- 64
- 65
- 66
- 67
- 68
- 69
- 70
- 71
- 72
- 73
- 74
- 75
- 76
- 77
- 78
- 79
- 80
- 81
- 82
- 83
- 84
- 85
- 86
- 87
- 88
- 89
- 90
- 91
- 92
- 93
- 94
- 95
- 96
- 97
- 98
- 99
- 100
- 101
- 102
- 103
- 104
- 105
- 106
- 107
- 108
- 109
- 110
- 111
- 112
- 113
- 114
- 115
- 116
- 117
- 118
- 119
- 120
- 121
- 122
- 123
- 124
- 125
- 126
- 127
- 128
- 129
- 130
- 131
- 132
- 133
EmployeeDao
package com.hgh.spring.jdbc;

import org.springframework.beans.factory.annotation.Autowired;
import org.springframework.jdbc.core.BeanPropertyRowMapper;
import org.springframework.jdbc.core.JdbcTemplate;
import org.springframework.jdbc.core.RowMapper;
import org.springframework.stereotype.Repository;

@Repository
public class EmployeeDao {

    @Autowired
    private JdbcTemplate jdbcTemplate;

    public Employee getEmployee(Integer id){
        String sql ="select id,email,last_name from employee where id=?";
        RowMapper rowMapper = new BeanPropertyRowMapper(Employee.class);
        Employee employee = jdbcTemplate.queryForObject(sql, rowMapper,id);

        return employee;
    }
}
- 1
- 2
- 3
- 4
- 5
- 6
- 7
- 8
- 9
- 10
- 11
- 12
- 13
- 14
- 15
- 16
- 17
- 18
- 19
- 20
- 21
- 22
- 23
Employee
package com.hgh.spring.jdbc;

public class Employee {

    private int id;
    private String email;
    private String lastName;
    public int getId() {
        return id;
    }
    public void setId(int id) {
        this.id = id;
    }
    public String getEmail() {
        return email;
    }
    public void setEmail(String email) {
        this.email = email;
    }
    public String getLastName() {
        return lastName;
    }
    public void setLastName(String lastName) {
        this.lastName = lastName;
    }
    public Employee() {
        super();
        // TODO Auto-generated constructor stub
    }
    @Override
    public String toString() {
        return "Employee [id=" + id + ", email=" + email + ", lastName="
                + lastName + "]";
    }

}