九步用树莓派开发板实现QT工程项目
最近要完成一项试验,需要大气压传感器、温度传感器、气体传感器搭建项目装置,自然要请出树莓派了,毕竟可以快速实现传感器数据采集和人机界面。下图是新到的raspberryPi 3B+、32G TF卡、7寸1024*600触摸屏。

第一步:下载和安装Raspbian
到官网https://www.raspberrypi.org/downloads/raspbian/去下载Raspbian最新镜像,先下载BT种子再用迅雷下要快很多。
Raspbian Stretch with desktop and recommended software镜像5.1G,推荐的软件对QT开发并没有用。我选择Raspbian Stretch with desktop镜像,3.2G大小。
都说要格式化一下,我直接用Win32DiskImager.exe烧写并没有发生问题。
为了接7寸触摸屏,参考了 树莓派对7寸显示屏设置参数(1024*600)的分辨率 和 树莓派3b+ raspberry 设置HDMI 分辨率1024*600去黑边方法 ,但黑边依旧,文字模糊,改成下面就好了:
disable_overscan=1
overscan_left=0
overscan_right=0
overscan_top=0
overscan_bottom=0
framebuffer_width=1024
framebuffer_height=600

hdmi_force_hotplug=1

max_usb_current=1
hdmi_group=2
hdmi_mode=87

#hdmi_cvt=

hdmi_cvt=1024 600 60 6 0 0 0
接上鼠标和键盘,设置语言为中文;更改用户名和登录密码,先用缺省值;设置WIFI;等待更新软件完成。
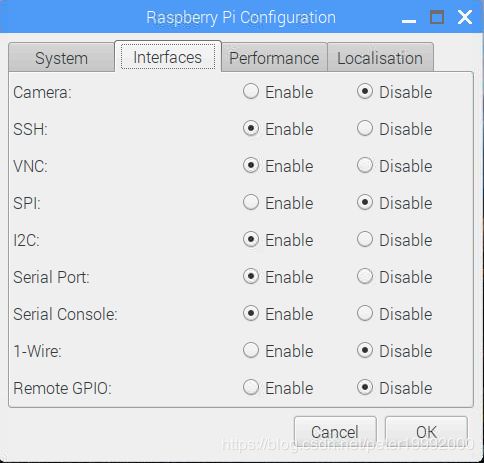
第二步:安装RealVNC的VNC Viewer和FileZilla
在主菜单的首选项中选中Raspberry Pi Configuration,按下图配置好,重启一下树莓派。。在PC机上安装windows版VNC Viewer和FileZilla,这样就可在PC上看到树莓派的屏幕和进行文件传输了。
第三步:配置小企鹅输入法Fcitx快捷键
为了避免在VNC Viewer输入中文时与PC机的输入法中英文激活键冲突,需要修改Fcitx的中英文切换快捷键。在主菜单的首选项中选中Fcitx配置,点击“切换激活/非激活输入法”缺省的“Ctrl+Space”,换成自己喜欢的快捷键,我的是“Ctrl+Alt+Space”。
第四步:配置树莓派禁止休眠、屏幕常亮
图形界面需要常亮显示,按树莓派禁止休眠、屏幕常亮一文的方法设置,重启。
第五步:树莓派上安装QT
参考 树莓派下简单安装配置QT5 一文,因为前面已更新系统,直接安装QT的2个包即可。
如果配置时自动检测不到cmake,参考 新手上路——树莓派3B+安装cmake 一文。
通过主菜单->编程->QT Creator右键添加QT桌面快捷方式。
第六步:wiringPi安装
参考 树莓派安装WiringPi库 安装I2C库和wiringPi库。
第七步:C++代码
hello.pro
#-------------------------------------------------
#
# Project created by QtCreator 2019-03-23T09:18:57
#
#-------------------------------------------------

QT       += core gui

greaterThan(QT_MAJOR_VERSION, 4): QT += widgets

TARGET = hello
TEMPLATE = app

# The following define makes your compiler emit warnings if you use
# any feature of Qt which as been marked as deprecated (the exact warnings
# depend on your compiler). Please consult the documentation of the
# deprecated API in order to know how to port your code away from it.
DEFINES += QT_DEPRECATED_WARNINGS

DEFINES += QT_NO_DEBUG_OUTPUT

# You can also make your code fail to compile if you use deprecated APIs.
# In order to do so, uncomment the following line.
# You can also select to disable deprecated APIs only up to a certain version of Qt.
#DEFINES += QT_DISABLE_DEPRECATED_BEFORE=0x060000    # disables all the APIs deprecated before Qt 6.0.0


SOURCES += main.cpp\
        mainwindow.cpp \
    bmp180a.cpp \
    uart.cpp

HEADERS  += mainwindow.h \
    bmp180a.h \
    uart.h

FORMS    += mainwindow.ui

LIBS    += -lm
LIBS    += -lwiringPi
mainwindow.cpp
#include "mainwindow.h"
#include "ui_mainwindow.h"
#include
#include
#include

MainWindow::MainWindow(QWidget *parent) :
    QMainWindow(parent),
    ui(new Ui::MainWindow)
{
    ui->setupUi(this);

    wiringPiSetup();
    pCO2_uart = new Uart(QString("/dev/ttyUSB0"),9600);

    fTimer=new QTimer(this);
    fTimer->stop();
    fTimer->setInterval(1000);
    fTimer->start();

    connect(fTimer,SIGNAL(timeout()),this,SLOT(on_timer_timeout()));
}

MainWindow::~MainWindow()
{
    delete ui;
}

void MainWindow::on_pushButton_clicked()
{
    close();
}

void MainWindow::on_timer_timeout()
{
    float t = bmp180.bmp180_temperature();
    long p = bmp180.bmp180_pressure();
    ui->label_T->setText(QString::number(t));
    ui->label_P->setText(QString::number(p));

    if(pCO2_uart->isOpen())
    {
        pCO2_uart->loopRead();
        QString rev = pCO2_uart->recvData;
        int ipos = rev.indexOf("Z ");
        if(ipos>=0 && rev.length()> ipos+7)
        {
            QString CO2_data = rev.mid(ipos+2,5);
            int idata  = CO2_data.toInt();
            ui->label_CO2->setText(QString::number(idata));
        }
    }
}
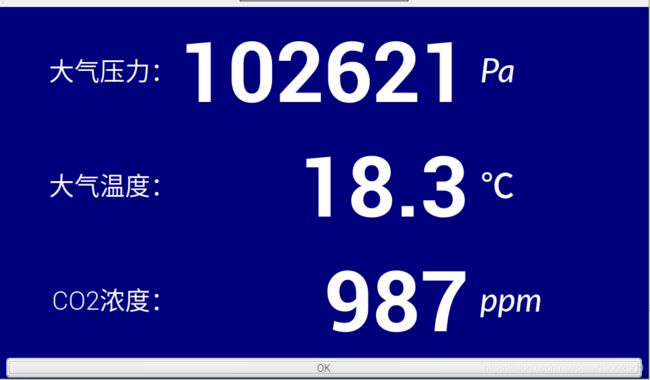
第八步:运行结果
第九步:建立程序自启动与桌面快捷方式
参考 树莓派3b+指南(十七)程序自启动与桌面快捷方式 即可。