搭建一个完整的微服务项目
一.项目技术架构
1.技术栈
前台技术
Node.js、Npm、Vue.js、WebPack、Vue Cli、Element UI
后台架构
微服务架构:按照功能拆分N多个服务,每个服务可以独立技术选型,独立开发,独立部署,独立运维.,单个服务使用基于ssm的springboot,服务间通过spring cloud协调。
2.后端项目微服务原型搭建
2.1 项目基本模块搭建
hrm-parent
hrm-basic-parent //项目基本模块
hrm-basic-utils //公共工具模块
hrm-basic-common //公共代码模块
hrm-support-parent //springcloud微服务支持模块
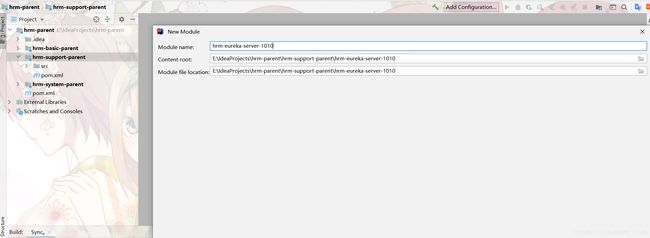
hrm-eureka-server-1010
hrm-gateway-zuul-1020
hrm-config-server-1030
hrm-system-parent
hrm-systemmanage-common //针对系统管理服务公共代码如:domain,query
hrm-systemmanage-service-2010 //针对于系统管理的微服务
2.1.1 hrm-parent的搭建
Maven结构
先在顶层父模块进行设置管理依赖包和版本号以及一些公共的jar包。

    org.springframework.boot
    spring-boot-starter-parent
    2.0.5.RELEASE


    UTF-8
    UTF-8
    1.8
    Finchley.SR1


        junit
        junit
        4.12


            org.springframework.cloud
            spring-cloud-dependencies
            ${spring-cloud.version}
            pom
            import


SpringCloud组件之五大神兽:
服务注册发现——Netflix Eureka :  帮我们服务的通信地址的
客服端负载均衡——Netflix Ribbon\Feign : 解决网络通信的
断路器——Netflix Hystrix :解决微服务故障的
服务网关——Netflix Zuul :微服务的大门(安保部门)
分布式配置——Spring Cloud Config :统一管理微服务的配置
2.1.2.Eureka注册中心
Eureka是netflix的一个子模块,也是核心模块之一,Eureka是一个基于REST的服务,用于定位服务,以实现云端中间层服务发现和故障转移。服务注册与发现对于微服务架构来说是非常重要的,有了服务发现和注册,只需要使用服务的标识符,就可以访问到服务,而不需要修改服务,而不需要修改服务调用的配置文件了,功能类似于dubbo的注册中心,比如zookeeper。
2.1.2.1创建项目
在hrm-parent里面的hrm-support-parent进行模块化搭建注册中心
在注册中心的pom.xml导包
            org.springframework.cloud
            spring-cloud-starter-netflix-eureka-server
配置yml
server:
  port: 1010
eureka: #Eureka的配置
  instance:
    hostname: localhost #主机
  client: #对Eureka客户端配置
    registerWithEureka: false #注册中心自己 , 不准向注册中心自己注册
    fetchRegistry: false #注册中心不需要 获取服务的通信地址清单
    serviceUrl: #注册中心 服务的注册地址
      #defaultZone: http://${eureka.instance.hostname}:${server.port}/eureka/
      defaultZone: http://localhost:1010/eureka/
在配置类上写上相应注解之后main启动
@SpringBootApplication
@EnableEurekaClient
public class EurekaServerApplication1010 {
    public static void main(String[] args) {
        SpringApplication.run(EurekaServerApplication1010.class);
    }
}

2.1.3.config-server
创建网关项目
导包
            org.springframework.cloud
            spring-cloud-starter-netflix-eureka-client


            org.springframework.boot
            spring-boot-starter-web


            org.springframework.cloud
            spring-cloud-config-server
配置yml文件
eureka:
  client:
    serviceUrl:
      defaultZone: http://localhost:1010/eureka/ #注册中心服务端的注册地址
  instance:
    prefer-ip-address: true #使用ip进行注册
    instance-id: config-server:1030  #服务注册到注册中心的id
server:
  port: 1030
#应用的名字
spring:
  application:
    name: config-server
  #码云配置
  cloud:
    config:
      server:
        git:
          uri: https://gitee.com/lxx/xx.git  #你的仓库地址(gtihub、gtilab、码云)
          username: [email protected]  #你的仓库的账户
          password: xxx #你账户的密码
          search-paths: hrm-parent/configfiles #从git 仓库的哪个目录找配置文件
配置类打上注解
@SpringBootApplication
@EnableConfigServer
public class ConfigServerApplication1030 {
    public static void main(String[] args) {
        SpringApplication.run(ConfigServerApplication1030.class);
    }
}
启动之后测试
http://localhost:1030/application-zuul-dev.yml 能读取配置文件,配置中心就ok了
2.1.4.Zuul GateWay
创建项目
导包
            org.springframework.cloud
            spring-cloud-starter-netflix-eureka-client


            org.springframework.cloud
            spring-cloud-starter-netflix-zuul


            org.springframework.boot
            spring-boot-starter-web


            org.springframework.cloud
            spring-cloud-starter-config
配置application-zuul-dev.yml文件,上传你的仓库。
server:
  port: 1020
#应用的名字
spring:
  application:
    name: zuul-gateway
zuul:
  ignored-services: "*"   #禁止使用服务名字进行访问
  prefix: "/hrm" #统一的前缀
  routes: #配置路由,指定服务的访问路径
    pay-server: "/pay/**"
    course-server: "/course/**"
    system-server: "/system/**"
    redis-server: "/redis/**"
ribbon:
  ConnectTimeout: 250 # 连接超时时间(ms)
  ReadTimeout: 2000 # 通信超时时间(ms)
  OkToRetryOnAllOperations: true # 是否对所有操作重试
  MaxAutoRetriesNextServer: 2 # 同一服务不同实例的重试次数
  MaxAutoRetries: 1 # 同一实例的重试次数
hystrix:
  command:
    default:
      execution:
        isolation:
          thread:
            timeoutInMillisecond: 3000 # 熔断超时时长:3000ms
配置bootstrap.yml文件
spring:
  cloud:
    config:
      uri: http://localhost:1030
      name:  application-zuul
      profile: dev    #环境  组成完整的文件名
在配置类配置
@SpringBootApplication
@EnableZuulProxy
public class ZuulServerApplication1020 {
    public static void main(String[] args) {
        SpringApplication.run(ZuulServerApplication1020.class);
    }
}
启动之后能从你的仓库拿到你配置文件启动就ok了(如果报错,例如端口8080或者其他都是没有从你仓库拿到你的配置文件)。
2.1.5 system-2010(步骤同上,差不多)
创建项目
导包
            org.springframework.cloud
            spring-cloud-starter-netflix-eureka-client


            org.springframework.boot
            spring-boot-starter-web


            org.springframework.cloud
            spring-cloud-starter-config
在application-system-dev.yml配置之后上传你的仓库
eureka:
  client:
    serviceUrl:
      defaultZone: http://localhost:1010/eureka/ #注册中心服务端的注册地址
  instance:
    prefer-ip-address: true #使用ip进行注册
    instance-id: system-server:2010  #服务注册到注册中心的id
server:
  port: 2010
#应用的名字
spring:
  application:
    name: system-server
配置bootstrap.yml文件
spring:
  cloud:
    config:
      uri: http://localhost:1030
      name:  application-system
      profile: dev    #环境  组成完整的文件名
在配置类打上注解并启动,启动成功就OK
@SpringBootApplication
public class SystemServerApplication2010 {
    public static void main(String[] args) {
        SpringApplication.run(SystemServerApplication2010.class);
    }
}
在hrm-basic-parent里面创建hrm-code-generate(代码生成)
创建项目
导包
            com.baomidou
            mybatis-plus-boot-starter


            org.apache.velocity
            velocity-engine-core
            2.0


            mysql
            mysql-connector-java
创建代码生成的类
package com.tys.hrm;

import com.baomidou.mybatisplus.generator.AutoGenerator;
import com.baomidou.mybatisplus.generator.InjectionConfig;
import com.baomidou.mybatisplus.generator.config.*;
import com.baomidou.mybatisplus.generator.config.converts.MySqlTypeConvert;
import com.baomidou.mybatisplus.generator.config.po.TableInfo;
import com.baomidou.mybatisplus.generator.config.rules.DbType;
import com.baomidou.mybatisplus.generator.config.rules.NamingStrategy;

import java.util.*;
/**
 * Created by CDHong on 2018/4/6.
 */
//代码生成的主类
public class GenteratorCode {

    //运行main方法就可以生成代码了
    public static void main(String[] args) throws InterruptedException {
        //用来获取Mybatis-Plus.properties文件的配置信息
        //不要加后缀
        ResourceBundle rb = ResourceBundle.getBundle("mybatiesplus-config-course");
        AutoGenerator mpg = new AutoGenerator();
        // 全局配置
        GlobalConfig gc = new GlobalConfig();
        gc.setOutputDir(rb.getString("OutputDir"));
        gc.setFileOverride(true);
        gc.setActiveRecord(true);// 开启 activeRecord 模式
        gc.setEnableCache(false);// XML 二级缓存
        gc.setBaseResultMap(true);// XML ResultMap
        gc.setBaseColumnList(false);// XML columList
        gc.setAuthor(rb.getString("author"));
        mpg.setGlobalConfig(gc);
        // 数据源配置
        DataSourceConfig dsc = new DataSourceConfig();
        dsc.setDbType(DbType.MYSQL);
        dsc.setTypeConvert(new MySqlTypeConvert());
        dsc.setDriverName("com.mysql.jdbc.Driver");
        dsc.setUsername(rb.getString("jdbc.user"));
        dsc.setPassword(rb.getString("jdbc.pwd"));
        dsc.setUrl(rb.getString("jdbc.url"));
        mpg.setDataSource(dsc);
        // 策略配置
        StrategyConfig strategy = new StrategyConfig();
        strategy.setTablePrefix(new String[] { "t_" });// 此处可以修改为您的表前缀
        strategy.setNaming(NamingStrategy.underline_to_camel);// 表名生成策略
        strategy.setInclude(new String[]{"t_course_type"}); // 需要生成的表 :
        mpg.setStrategy(strategy);
        // 包配置
        PackageConfig pc = new PackageConfig();
        pc.setParent(rb.getString("parent")); //基本包 cn.itsource.system
        pc.setController("web.controller");
        pc.setService("service");
        pc.setServiceImpl("service.impl");
        pc.setEntity("domain");
        pc.setMapper("mapper");
        mpg.setPackageInfo(pc);

        // 注入自定义配置,可以在 VM 中使用 cfg.abc 【可无】
        InjectionConfig cfg = new InjectionConfig() {
            @Override
            public void initMap() {
                Map map = new HashMap();
                map.put("abc", this.getConfig().getGlobalConfig().getAuthor() + "-rb");
                this.setMap(map);
            }
        };

        List focList = new ArrayList();


        // 调整 controller 生成目录演示
        focList.add(new FileOutConfig("/templates/controller.java.vm") {
            @Override
            public String outputFile(TableInfo tableInfo) {
                //controller输出完整路径
                return rb.getString("OutputDir")+ "/com/tys/hrm/course/web/controller/" + tableInfo.getEntityName() + "Controller.java";
            }
        });
        // 调整 query 生成目录演示
        focList.add(new FileOutConfig("/templates/query.java.vm") {
            @Override
            public String outputFile(TableInfo tableInfo) {
                //query输出完整路径
                return rb.getString("OutputDirBase")+ "/com/tys/hrm/course/query/" + tableInfo.getEntityName() + "Query.java";
            }
        });
        // 调整 domain 生成目录演示 , 你的domain到底要输出到哪儿????,你的domain怎么输出
        focList.add(new FileOutConfig("/templates/entity.java.vm") {
            @Override
            public String outputFile(TableInfo tableInfo) {
                //domain输出完整路径
                return rb.getString("OutputDirBase")+ "/com/tys/hrm/course/domain/" + tableInfo.getEntityName() + ".java";
            }
        });

        // 调整 xml 生成目录演示
        focList.add(new FileOutConfig("/templates/mapper.xml.vm") {
            @Override
            public String outputFile(TableInfo tableInfo) {
                return rb.getString("OutputDirXml")+ "/com/tys/course/mapper/" + tableInfo.getEntityName() + "Mapper.xml";
            }
        });
        cfg.setFileOutConfigList(focList);
        mpg.setCfg(cfg);

        // 自定义模板配置,可以 copy 源码 mybatis-plus/src/main/resources/templates 下面内容修改,
        // 放置自己项目的 src/main/resources/templates 目录下, 默认名称一下可以不配置,也可以自定义模板名称
        TemplateConfig tc = new TemplateConfig();
        tc.setService("/templates/service.java.vm");
        tc.setServiceImpl("/templates/serviceImpl.java.vm");
        tc.setEntity(null);
        tc.setMapper("/templates/mapper.java.vm");
        tc.setController(null);
        tc.setXml(null);
        // 如上任何一个模块如果设置 空 OR Null 将不生成该模块。
        mpg.setTemplate(tc);
        // 执行生成
        mpg.execute();
    }
}
创建mybatiesplus-config-course.properties文件
#此处为本项目src所在路径(代码生成器输出路径),注意一定是当前项目所在的目录哟
#mapper,servier,controller输出目录
OutputDir=E:/IdeaProjects/hrm/hrm-parent/hrm-course-parent/hrm-course-service-2020/src/main/java

#mapper.xml SQL映射文件目录
OutputDirXml=E:/IdeaProjects/hrm/hrm-parent/hrm-course-parent/hrm-course-service-2020/src/main/resources

#domain,query输出的目录
OutputDirBase=E:/IdeaProjects/hrm/hrm-parent/hrm-course-parent/hrm-course-common/src/main/java
#设置作者
author=tys
#自定义包路径
parent=com.tys.hrm.course
#数据库连接信息
jdbc.driver=com.mysql.jdbc.Driver
jdbc.url=jdbc:mysql:///hrm-course
jdbc.user=root
jdbc.pwd=123456
然后去system模块添加依赖包
在hrm-system-common导包
            com.tys
            hrm-basic-common


            com.baomidou
            mybatis-plus-boot-starter
            2.2.0
因为生成的mapper、service、controller需连接数据库,所以hrm-system-service-2010也要导包
            com.tys
            hrm-system-common


            mysql
            mysql-connector-java


            com.alibaba
            druid
            1.1.11


            com.tys
            hrm-basic-utils
让后直接点代码生成类的main方法自动生成代码,这样,domain、query、mapper、service、controller都创建完成了
2.1.6 course-server(步骤同system,差不多)
创建完成之后,用代码生成器生成course的所有。
2.2.接口文档Swagger
在创建的所有代码生成的服务(system、course)导包 和网关zuul服务也到入swagger包
        io.springfox
        springfox-swagger2
        2.9.2


        io.springfox
        springfox-swagger-ui
        2.9.2
在这些包里面创建swagger的类创建接口文档
import org.springframework.context.annotation.Bean;
import org.springframework.context.annotation.Configuration;
import springfox.documentation.builders.ApiInfoBuilder;
import springfox.documentation.builders.PathSelectors;
import springfox.documentation.builders.RequestHandlerSelectors;
import springfox.documentation.service.ApiInfo;
import springfox.documentation.service.Contact;
import springfox.documentation.spi.DocumentationType;
import springfox.documentation.spring.web.plugins.Docket;
import springfox.documentation.swagger2.annotations.EnableSwagger2;

@Configuration
@EnableSwagger2
public class Swagger2 {
    @Bean
    public Docket createRestApi() {
        return new Docket(DocumentationType.SWAGGER_2)
                .apiInfo(apiInfo())
                .select()
                //对外暴露服务的包,以controller的方式暴露,所以就是controller的包.
                .apis(RequestHandlerSelectors.basePackage("com.tys.hrm.course.web.controller"))
                .paths(PathSelectors.any())
                .build();
    }
    private ApiInfo apiInfo() {
        return new ApiInfoBuilder()
                .title("平台服务api")
                .description("平台服务接口文档说明")
                .contact(new Contact("yhptest", "", "[email protected]"))
                .version("1.0")
                .build();
    }
}
然后重新启动,访问http://localhost:2020/swagger-ui.html、http://localhost:2010/swagger-ui.html
在zuul创建一个配置config包,创建swagger类
package com.tys.hrm.config;

import org.springframework.context.annotation.Primary;
import org.springframework.stereotype.Component;
import springfox.documentation.swagger.web.SwaggerResource;
import springfox.documentation.swagger.web.SwaggerResourcesProvider;

import java.util.ArrayList;
import java.util.List;

@Component
@Primary
public class DocumentationConfig implements SwaggerResourcesProvider {
    @Override
    public List get() {
        List resources = new ArrayList<>();
        resources.add(swaggerResource("系统管理", "/hrm/system/v2/api-docs", "2.0"));
        resources.add(swaggerResource("课程管理", "/hrm/course/v2/api-docs", "2.0"));
        return resources;
    }
    private SwaggerResource swaggerResource(String name, String location, String version) {
        SwaggerResource swaggerResource = new SwaggerResource();
        swaggerResource.setName(name);
        swaggerResource.setLocation(location);
        swaggerResource.setSwaggerVersion(version);
        return swaggerResource;
    }
}
package com.tys.hrm.config;

import org.springframework.context.annotation.Bean;
import org.springframework.context.annotation.Configuration;
import springfox.documentation.builders.ApiInfoBuilder;
import springfox.documentation.service.ApiInfo;
import springfox.documentation.service.Contact;
import springfox.documentation.spi.DocumentationType;
import springfox.documentation.spring.web.plugins.Docket;
import springfox.documentation.swagger2.annotations.EnableSwagger2;

@Configuration
@EnableSwagger2
public class SwaggerConfig {
    @Bean
    public Docket createRestApi() {
        return new Docket(DocumentationType.SWAGGER_2)
                .apiInfo(apiInfo());
    }
    private ApiInfo apiInfo() {
        return new ApiInfoBuilder()
                .title("资源管理系统")
                .description("资源管理系统接口文档说明")
                .termsOfServiceUrl("http://localhost:1020")
                .contact(new Contact("yphtest", "", "[email protected]"))
                .version("1.0")
                .build();
    }
}
然后重启zuul服务,访问http://localhost:1020/swagger-ui.html
2.3.elementui+vue
前端启动 npm run dev
因为前后端分离,访问后台会出现跨域问题,跨越配置-在zuul进行配置(所有前端统一入口)。
import org.springframework.context.annotation.Bean;
import org.springframework.context.annotation.Configuration;
import org.springframework.web.cors.CorsConfiguration;
import org.springframework.web.cors.UrlBasedCorsConfigurationSource;
import org.springframework.web.filter.CorsFilter;

@Configuration
public class GlobalCorsConfig {
    @Bean
    public CorsFilter corsFilter() {
        //1.添加CORS配置信息
        CorsConfiguration config = new CorsConfiguration();
        //1) 允许的域,不要写*,否则cookie就无法使用了
        config.addAllowedOrigin("http://127.0.0.1:6001");
config.addAllowedOrigin("http://localhost:6001");
        //2) 是否发送Cookie信息
        config.setAllowCredentials(true);
        //3) 允许的请求方式
        config.addAllowedMethod("OPTIONS");
        config.addAllowedMethod("HEAD");
        config.addAllowedMethod("GET");
        config.addAllowedMethod("PUT");
        config.addAllowedMethod("POST");
        config.addAllowedMethod("DELETE");
        config.addAllowedMethod("PATCH");
        // 4)允许的头信息
        config.addAllowedHeader("*");
        //2.添加映射路径,我们拦截一切请求
        UrlBasedCorsConfigurationSource configSource = new
                UrlBasedCorsConfigurationSource();
        configSource.registerCorsConfiguration("/**", config);
        //3.返回新的CorsFilter.
        return new CorsFilter(configSource);
    }
}
配置之后重启zuul服务。刷新前端就能访问了。
2.4.redis+feign
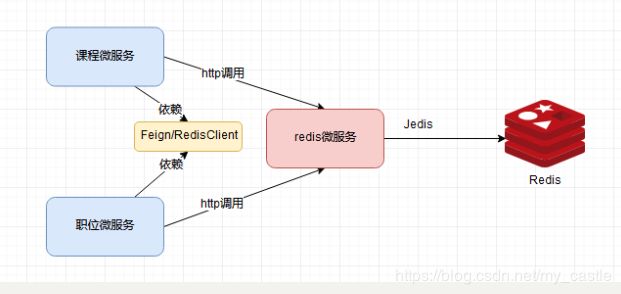
2.4.1.搭建项目结构
hrm-redis-parent
	hrm-redis-client
	hrm-redis-service-2030
2.4.1.1 redis
搭建 hrm-redis-service-2030 导入依赖
            org.springframework.cloud
            spring-cloud-starter-netflix-eureka-client


            org.springframework.boot
            spring-boot-starter-web


            org.springframework.cloud
            spring-cloud-starter-config


            redis.clients
            jedis


            com.tys
            hrm-basic-utils
准备Redis工具类
配置文件 redis.properties
redis.host=127.0.0.1
redis.port=6379
redis.password=123456
redis.timeout=5000
RedisUtil
import redis.clients.jedis.Jedis;
import redis.clients.jedis.JedisPool;
import redis.clients.jedis.JedisPoolConfig;

import java.io.IOException;
import java.util.Properties;

/**
 * 获取连接池对象
 */
public enum RedisUtils {
    INSTANCE;
    static JedisPool jedisPool = null;
    static {
        //1 创建连接池配置对象
        JedisPoolConfig config = new JedisPoolConfig();
        //2 进行配置-四个配置
        config.setMaxIdle(1);//最小连接数
        config.setMaxTotal(11);//最大连接数
        config.setMaxWaitMillis(10 * 1000L);//最长等待时间
        config.setTestOnBorrow(true);//测试连接时是否畅通
        //3 通过配置对象创建连接池对象
        Properties properties = null;
        try {
            properties = new Properties();            properties.load(RedisUtils.class.getClassLoader().getResourceAsStream("redis.properties"));
        } catch (IOException e) {
            e.printStackTrace();
        }
        String host = properties.getProperty("redis.host");
        String port = properties.getProperty("redis.port");
        String password = properties.getProperty("redis.password");
        String timeout = properties.getProperty("redis.timeout");
        jedisPool = new JedisPool(config, host, Integer.valueOf(port),Integer.valueOf(timeout), password);
    }
    //获取连接
    public Jedis getSource() {
        return jedisPool.getResource();
    }
    //关闭资源
    public void closeSource(Jedis jedis) {
        if (jedis != null) {
            jedis.close();
        }
    }
    /**
     * 设置字符值
     *
     * @param key
     * @param value
     */
    public void set(String key, String value) {
        Jedis jedis = getSource();
        jedis.set(key, value);
        closeSource(jedis);
    }
    /**
     * 设置
     * @param key
     * @param value
     */
    public void set(byte[] key, byte[] value) {
        Jedis jedis = getSource();
        jedis.set(key, value);
        closeSource(jedis);
    }
    /**
     *
     * @param key
     * @return
     */
    public byte[]  get(byte[] key) {
        Jedis jedis = getSource();
        try {
            return jedis.get(key);
        } catch (Exception e) {
            e.printStackTrace();
        } finally {
            closeSource(jedis);
        }
        return null;
    }
    /**
     * 设置字符值
     *
     * @param key
     */
    public String get(String key) {
        Jedis jedis = getSource();
        try {
            return jedis.get(key);
        } catch (Exception e) {
            e.printStackTrace();
        } finally {
            closeSource(jedis);
        }
        return null;
    }
}
编写RedisController
/**
 * redis的接口
 */
@RestController
@RequestMapping("/redis")
public class RedisController {

    @GetMapping("/get/{key}")
    public AjaxResult get(@PathVariable("key")String key){
        String result = RedisUtils.INSTANCE.get(key);
        return AjaxResult.me().setResultObj(result);
    }
    @PostMapping("/set")
    public AjaxResult set(@RequestParam("key")String key,@RequestParam("value")String value){
        RedisUtils.INSTANCE.set(key,value);
        return AjaxResult.me();
    }
    @PostMapping("/setex")
    public AjaxResult setex(@RequestParam("key")String key,
                          @RequestParam("value")String value,
                          @RequestParam("seconds")int seconds){
        RedisUtils.INSTANCE.setex(key,value,seconds);
        return AjaxResult.me();
    }
}
配置application-redis-dev.yml,配置成功上传仓库
eureka:
  client:
    serviceUrl:
      defaultZone: http://localhost:1010/eureka/ #注册中心地址
  instance:
    prefer-ip-address: true #使用ip地址注册
    instance-id: redis-service  #指定服务的id
server:
  port: 2030
spring:
  application:
    name: redis-service
再配合bootstrap.yml
spring:
  cloud:
    config:
      uri: http://localhost:1030
      name:  application-redis
      profile: dev    #环境  组成完整的文件名
2.4.1.2 feign
hrm-redis-feign导包
            org.springframework.cloud
            spring-cloud-starter-openfeign


            com.tys
            hrm-basic-utils
再里面写一个feign接口
//value属性:调用目标服务的服务名
@FeignClient(value = "redis-server")
public interface RedisFeignClient {

    //设置值
    @PostMapping("/redis/set")
    AjaxResult set(@RequestParam("key")String key, @RequestParam("value")String value);

    @GetMapping("/redis/get/{key}")
    AjaxResult get(@PathVariable("key")String key);
}
在需要缓存的地方依赖hrm-redis-feign项目
在这个微服务类开启配置
@SpringBootApplication
@MapperScan("com.tys.hrm.course.mapper")
@EnableTransactionManagement
@EnableFeignClients("com.tys.hrm.feignclients")
public class CourseServerApplication2020 {

    public static void main(String[] args) {
        SpringApplication.run(CourseServerApplication2020.class);
    }
    /**
     * 分页插件
     */
    @Bean
    public PaginationInterceptor paginationInterceptor() {
        return new PaginationInterceptor();
    }
}
修改这个服务的service.iml的增删改查方法,添加缓存
package com.tys.hrm.course.service.impl;

import com.alibaba.fastjson.JSON;
import com.baomidou.mybatisplus.service.impl.ServiceImpl;
import com.tys.hrm.constants.RedisKeyConstants;
import com.tys.hrm.course.domain.CourseType;
import com.tys.hrm.course.mapper.CourseTypeMapper;
import com.tys.hrm.course.service.ICourseTypeService;
import com.tys.hrm.feignclients.RedisFeignClient;
import com.tys.hrm.util.AjaxResult;
import org.springframework.beans.factory.annotation.Autowired;
import org.springframework.stereotype.Service;

import java.io.Serializable;
import java.util.ArrayList;
import java.util.List;

/**
 *
 * 课程目录 服务实现类
 *
 *
 * @author tys
 * @since 2020-02-17
 */
@Service
public class CourseTypeServiceImpl extends ServiceImpl implements ICourseTypeService {

    @Autowired
    private RedisFeignClient redisFeignClient;

    //重置Redis中的课程分类
    private  List resetRedisForCourseType(){
        // 如果Reids没有就从Mysql中查
        List courseTypes = baseMapper.selectList(null);
        //  Mysql查到之后同步一份到Redis
        redisFeignClient.set(RedisKeyConstants.COURSE_TYPE, JSON.toJSONString(courseTypes));
        return courseTypes;
    }

    @Override
    public boolean insert(CourseType entity) {

        boolean insertSucess = super.insert(entity);
        resetRedisForCourseType();
        return insertSucess;
    }

    @Override
    public boolean deleteById(Serializable id) {

        boolean deleteSucess = super.deleteById(id);
        resetRedisForCourseType();
        return deleteSucess;
    }

    @Override
    public boolean updateById(CourseType entity) {

        boolean updateSuccess = super.updateById(entity);
        resetRedisForCourseType();
        return updateSuccess;
    }

    @Override
    public List treeData() {
        List courseTypes = null;
        // 查询课程分类的时候先查询Redis
        AjaxResult ajaxResult = redisFeignClient.get(RedisKeyConstants.COURSE_TYPE);
        //判断是否有结果
        if(ajaxResult.isSuccess() && null != ajaxResult.getResultObj()){
            //Redis中有数据
            //如果Redis有就直接返回、
            String jsonFromRedis = ajaxResult.getResultObj().toString();
            //存在redis中的数据 ,要不要有层级结构 :放没有处理过的list
            courseTypes = JSON.parseArray(jsonFromRedis , CourseType.class);
        }else{
            courseTypes = resetRedisForCourseType();
        }
        //1.查询所有的课程类型
        //List courseTypes = baseMapper.selectList(null);
        //2.先过滤出一级分类
        //用来封装一级分类,当然每个一级分类的children中有其子分类
        List primaryCourseType = new ArrayList<>();
        for(CourseType courseType : courseTypes){
            //如果pid==0,那么就是一级分类
            if(courseType.getPid().longValue() == 0){
                primaryCourseType.add(courseType);//1037
            }else{
                //2.如果不是一级分类,就要知道自己的父分类,装到自己的父分类的 children
                //courseType :当前分类,根据当前分类的pid 就是父分类的id
                CourseType currentPrimaryCourseType = null; //1037
                for(CourseType pcourseType : courseTypes ){
                    if(courseType.getPid().longValue() == pcourseType.getId().longValue()){
                        //如果当前分类(courseType)的pid 和某个分类的id相等,那么这个某个分类就是当前分类的父分类
                        currentPrimaryCourseType = pcourseType;
                        break;
                    }
                }
                if(currentPrimaryCourseType != null){
                    //3.如果找到了父分类,就把当前分类加入父分类的children中
                    currentPrimaryCourseType.getChildren().add(courseType);
                }
            }
        }
        return primaryCourseType;
    }
}
重启这个微服务和redis服务,开启redis
redis-server.exe redis.windows.conf
然后去测试,第一次进数据库查询,并缓存到redis中,第二次查询则直接进缓存,其他操作 增删改 操作之后,进行更新缓存。
在feign接口打上注解,调用托底类
@FeignClient(value = "redis-server",fallbackFactory = RedisFeignFallbackFactory.class)
在feign接口实现方法 重写方法
package com.tys.hrm.fallback;

import com.tys.hrm.feignclients.RedisFeignClient;
import com.tys.hrm.util.AjaxResult;
import feign.hystrix.FallbackFactory;
import org.springframework.stereotype.Component;
@Component
public class RedisFeignFallbackFactory implements FallbackFactory {

    @Override
    public RedisFeignClient create(Throwable throwable) {
        return new RedisFeignClient() {
            //托底方法
            @Override
            public AjaxResult set(String key, String value) {
                throwable.printStackTrace();
                return AjaxResult.me().setSuccess(false).setMessage("Redis服务不可用["+throwable.getMessage()+"]");
            }
            @Override
            public AjaxResult get(String key) {
                throwable.printStackTrace();
                return AjaxResult.me().setSuccess(false).setMessage("Redis服务不可用["+throwable.getMessage()+"]");
            }
        };
    }
}
2.4.1.3 fastdfs
导包
        org.springframework.cloud
        spring-cloud-starter-netflix-eureka-client


            org.springframework.boot
            spring-boot-starter-web


            org.springframework.cloud
            spring-cloud-starter-config


            com.tys
            hrm-basic-utils


            io.springfox
            springfox-swagger2


            io.springfox
            springfox-swagger-ui


            org.csource
            fastdfs-client-java


                    org.slf4j
                    slf4j-log4j12


            commons-io
            commons-io
导入工具类fastdfs
package com.tys.hrm.utils;

import org.csource.common.NameValuePair;
import org.csource.fastdfs.*;

public class FastDfsApiOpr {

    public static String CONF_FILENAME  = FastDfsApiOpr.class.getClassLoader()
            .getResource("fdfs_client.conf").getFile();


    /**
     * 上传文件
     * @param file
     * @param extName
     * @return
     */
    public static  String upload(byte[] file,String extName) {

        try {
            ClientGlobal.init(CONF_FILENAME);

            TrackerClient tracker = new TrackerClient();
            TrackerServer trackerServer = tracker.getTrackerServer();
            //TrackerServer trackerServer = tracker.getConnection();
            StorageServer storageServer = null;

            StorageClient storageClient = new StorageClient(trackerServer, storageServer);
            NameValuePair nvp [] = new NameValuePair[]{
                    new NameValuePair("age", "18"),
                    new NameValuePair("sex", "male")
            };
            String fileIds[] = storageClient.upload_file(file,extName,nvp);

            System.out.println(fileIds.length);
            System.out.println("组名:" + fileIds[0]);
            System.out.println("路径: " + fileIds[1]);
            return  "/"+fileIds[0]+"/"+fileIds[1];

        } catch (Exception e) {
            e.printStackTrace();
            return  null;
        }
    }
    /**
     * 上传文件
     * @param extName
     * @return
     */
    public static  String upload(String path,String extName) {

        try {
            ClientGlobal.init(CONF_FILENAME);

            TrackerClient tracker = new TrackerClient();
            TrackerServer trackerServer = tracker.getTrackerServer();
            //TrackerServer trackerServer = tracker.getConnection();
            StorageServer storageServer = null;
            StorageClient storageClient = new StorageClient(trackerServer, storageServer);
            String fileIds[] = storageClient.upload_file(path, extName,null);

            System.out.println(fileIds.length);
            System.out.println("组名:" + fileIds[0]);
            System.out.println("路径: " + fileIds[1]);
            return  "/"+fileIds[0]+"/"+fileIds[1];

        } catch (Exception e) {
            e.printStackTrace();
            return  null;
        }
    }

    /**
     * 下载文件
     * @param groupName
     * @param fileName
     * @return
     */
    public static byte[] download(String groupName,String fileName) {
        try {

            ClientGlobal.init(CONF_FILENAME);

            TrackerClient tracker = new TrackerClient();
            TrackerServer trackerServer = tracker.getTrackerServer();
            //TrackerServer trackerServer = tracker.getConnection();
            StorageServer storageServer = null;

            StorageClient storageClient = new StorageClient(trackerServer, storageServer);
            byte[] b = storageClient.download_file(groupName, fileName);
            return  b;
        } catch (Exception e) {
            e.printStackTrace();
            return  null;
        }
    }

    /**
     * 删除文件
     * @param groupName
     * @param fileName
     */
    public static void delete(String groupName,String fileName){
        try {
            ClientGlobal.init(CONF_FILENAME);

            TrackerClient tracker = new TrackerClient();
            TrackerServer trackerServer = tracker.getTrackerServer();
            //TrackerServer trackerServer = tracker.getConnection();
            StorageServer storageServer = null;

            StorageClient storageClient = new StorageClient(trackerServer,
                    storageServer);
            int i = storageClient.delete_file(groupName,fileName);
            System.out.println( i==0 ? "删除成功" : "删除失败:"+i);
        } catch (Exception e) {
            e.printStackTrace();
            throw  new RuntimeException("删除异常,"+e.getMessage());
        }
    }
}
直接复制swagger
创建web.controller层
package com.tys.hrm.web.controller;

import com.tys.hrm.util.AjaxResult;
import com.tys.hrm.utils.FastDfsApiOpr;
import org.apache.commons.io.FilenameUtils;
import org.springframework.web.bind.annotation.*;
import org.springframework.web.multipart.MultipartFile;

import java.io.IOException;

//文件统一处理
@RestController
@RequestMapping("/fastdfs")
public class FastDfsController {

    //文件上传
    @PostMapping("/upload")
    public AjaxResult upload(MultipartFile file) throws Exception {

        //把文件上传到Fastdfs云服务器
        try {
            //原生的文件名:a.jpg :commons-io
            String extension = FilenameUtils.getExtension(file.getOriginalFilename());

            String filePath = FastDfsApiOpr.upload(file.getBytes() , extension);
            return AjaxResult.me().setResultObj(filePath);
        } catch (Exception e) {
            e.printStackTrace();
            return AjaxResult.me().setSuccess(false).setMessage("文件上传失败");
        }
    }

    @DeleteMapping("/remove")
    public AjaxResult delete(@RequestParam("path") String path) throws Exception{
        try{
            /*把组名前面的/去掉
             * substring(int beginIndex) 返回字符串的子字符串。
             * substring(int beginIndex, int endIndex) beginIndex起始索引(包含)索引从0开始。endIndex结束索引(不包括).
             * indexOf() 方法可返回某个指定的字符串值在字符串中首次出现的位置。
             * */
            String pathTmp = path.substring(1);
            //得到groupName
            String groupName =  pathTmp.substring(0, pathTmp.indexOf("/"));
            //得到fileName
            String fileName = pathTmp.substring(pathTmp.indexOf("/")+1);
            System.out.println(groupName);
            System.out.println(fileName);
            FastDfsApiOpr.delete(groupName, fileName);
            return  AjaxResult.me();
        }catch (Exception e){
            e.printStackTrace();
            return AjaxResult.me().setSuccess(false).setResultObj("删除失败!" + e.getMessage());
        }
    }
}
设置fastDFS配置文件(fdfs_client.conf)
connect_timeout = 2
network_timeout = 30
charset = UTF-8
http.tracker_http_port = 80
http.anti_steal_token = no
http.secret_key = FastDFS1234567890

tracker_server=118.25.154.214:22122  #服务器配置了fastDFS的IP

connection_pool.enabled = true
connection_pool.max_count_per_entry = 500
connection_pool.max_idle_time = 3600
connection_pool.max_wait_time_in_ms = 1000