- SpringSecurity概述
- 框架核心组件
- 核心组件
- 过滤器总结
- SpringSecurity测试环境部署
- 导入依赖
- 创建静态页面
- 创建控制器
- Springboot整合SpringSecurity
- 导入依赖
- 创建SpringSecurity配置类
- 设置用户访问权限不足的跳转页面
- 注销功能
- SpringSecurity 整合 Thymeleaf
- 记住我功能
- 自定义登录页面
- SpringSecurity 整合 数据库
SpringSecurity概述
Spring Security 是针对Spring项目的安全框架,也是Spring Boot底层安全模块默认的技术选型,他可以实现强大的Web安全控制,对于安全控制,我们仅需要引入 spring-boot-starter-security 模块,进行少量的配置,即可实现强大的安全管理!
需要牢记的几个类:
- WebSecurityConfigurerAdapter:自定义Security策略
- AuthenticationManagerBuilder:自定义认证策略
- @EnableWebSecurity:开启WebSecurity模式
Spring Security的两个主要目标是 “认证” 和 “授权”(访问控制)
“授权” (Authorization)
授权发生在系统成功验证您的身份后,最终会授予您访问资源(如信息,文件,数据库,资金,位置,几乎任何内容)的完全权限。
这个概念是通用的,而不是只在Spring Security 中存在。
“认证”(Authentication)
身份验证是关于验证您的凭据,如用户名/用户ID和密码,以验证您的身份。
身份验证通常通过用户名和密码完成,有时与身份验证因素结合使用。
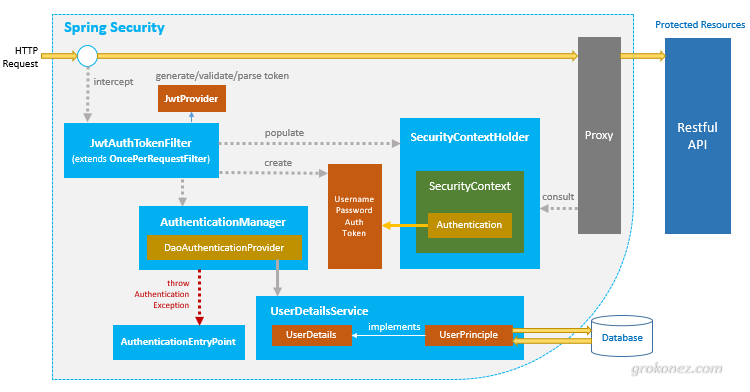
框架核心组件
核心组件
- SecurityContextHolder:提供对SecurityContext的访问
- SecurityContext:持有Authentication对象和其他可能需要的信息
- AuthenticationManager: 其中可以包含多个AuthenticationProvider
- ProviderManager:对象为AuthenticationManager接口的实现类
- AuthenticationProvider: 主要用来进行认证操作的类 调用其中的authenticate()方法去进行认证操作
- Authentication:Spring Security方式的认证主体
- GrantedAuthority:对认证主题的应用层面的授权,含当前用户的权限信息,通常使用角色表示
- UserDetails:构建Authentication对象必须的信息,可以自定义,可能需要访问DB得到
- UserDetailsService:通过username构建UserDetails对象,通过loadUserByUsername根据userName获取UserDetail对象 (可以在这里基于自身业务进行自定义的实现 如通过数据库,xml,缓存获取等)

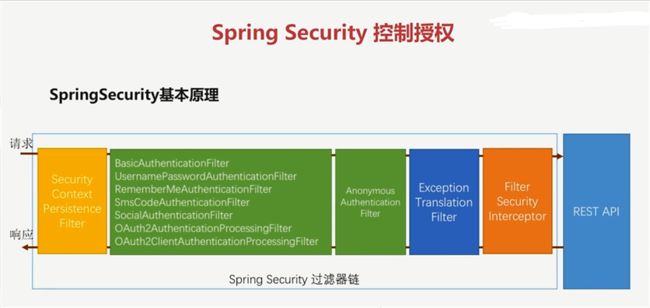
过滤器总结
- WebAsyncManagerIntegrationFilter
- SecurityContextPersistenceFilter
- HeaderWriterFilter
- CorsFilter
- LogoutFilter
- RequestCacheAwareFilter
- SecurityContextHolderAwareRequestFilter
- AnonymousAuthenticationFilter
- SessionManagementFilter
- ExceptionTranslationFilter
- FilterSecurityInterceptor
- UsernamePasswordAuthenticationFilter
- BasicAuthenticationFilter
SpringSecurity测试环境部署
导入依赖
导入 thymeleaf依赖
    org.springframework.boot
    spring-boot-starter-thymeleaf
在application.properties 中关闭 thymeleaf 缓存
spring.thymeleaf.cache=false
创建静态页面
创建过个静态页面供SpringSecurity控制访问
分别在template目录下创建文件夹 views,在views中创建三个 level01、level02、level03包,然后分别在每个包下创建三个静态页面1.html、2.html、3.html
然后在每个静态页面填写不同的内容加以区分
1.html
    Title


    level01-1.html

    返回主页
创建 index.html
Title
hello SpringSecurity
创建控制器
创建Controller 实现对各个页面的跳转操作
package com.jason.controller;

import org.springframework.stereotype.Controller;
import org.springframework.web.bind.annotation.PathVariable;
import org.springframework.web.bind.annotation.RequestMapping;

/**
 * @authot jason_yan
 * @date 2020/6/18-9:08
 */
@Controller
public class IndexController {

    @RequestMapping({"/","/index"})
    public String index(){
        return "index";
    }

    @RequestMapping("/level01/{id}")
    public String level1(@PathVariable("id") int id){
        return "views/level01/"+id;
    }

    @RequestMapping("/level02/{id}")
    public String level2(@PathVariable("id") int id){
        return "views/level02/"+id;
    }

    @RequestMapping("/level03/{id}")
    public String level3(@PathVariable("id") int id){
        return "views/level03/"+id;
    }
}
Springboot整合SpringSecurity
导入依赖
    org.springframework.boot
    spring-boot-starter-security
此时启动服务器时,SpringSecurity 会拦截所有的请求,用户必须登录SpringSecurity 的 默认登录页面,才可以访问其他资源
账号:user
密码:控制台自动生成
创建SpringSecurity配置类
SecurityConfig配置类继承WebSecurityConfigurerAdapter
重写两个方法:
configure(HttpSecurity http):进行用户授权(验证某个用户是否有权限执行某个操作)
configure(AuthenticationManagerBuilder auth):进行用户认证(检测登录用户是否合法)
在配置类上添加 @EnableWebSecurity的作用:
1: 加载WebSecurityConfiguration配置类, 配置安全认证策略。
2: 加载AuthenticationConfiguration, 配置了认证信息。
package com.jason.controller.config;

import org.springframework.security.config.annotation.authentication.builders.AuthenticationManagerBuilder;
import org.springframework.security.config.annotation.web.builders.HttpSecurity;
import org.springframework.security.config.annotation.web.builders.WebSecurity;
import org.springframework.security.config.annotation.web.configuration.EnableWebSecurity;
import org.springframework.security.config.annotation.web.configuration.WebSecurityConfigurerAdapter;

/**
 * @authot jason_yan
 * @date 2020/6/18-9:54
 */
@EnableWebSecurity
public class SecurityConfig extends WebSecurityConfigurerAdapter {

    @Override
    protected void configure(HttpSecurity http) throws Exception {

        // 设置请求资源的权限(授权)
        http
                .authorizeRequests() // 对请求进行授权
                .antMatchers("/").permitAll() // 设置首页任何人都可访问
                .antMatchers("/level01/**").hasRole("doctor") // 指定要设置权限信息的地址和授权角色
                .antMatchers("/level02/**").hasRole("master") // 两个*代表目录的深度(任意深度)
                .antMatchers("/level03/**").hasRole("teacher")
                .and()
                .formLogin(); // 设置未授权的请求跳转 到 登录表单页面

    }

    @Override
    protected void configure(AuthenticationManagerBuilder auth) throws Exception {

        // 模拟假数据
        auth.inMemoryAuthentication()
                .withUser("zs").password("111").roles("doctor")
                .and()
                .withUser("ls").password("222").roles("master")
                .and()
                .withUser("ww").password("333").roles("teacher");
    }
}
测试以上配置:
1、当请求首页上的链接时,会跳转到SpringSecurity 默认登录页面,因为我们没有相应的权限访问该资源————.formLogin() 实现本次跳转
2、可以使用 zs、ls、ww等用户进行登录
3、登录成功后无法访问相对应的角色资源:报错 java.lang.IllegalArgumentException: There is no PasswordEncoder mapped for the id "null"
解决上述问题:在登录过程中,SpringSecurity处理的密码不能是明文密码,所以我们的密码需要 在认证方法中 进行对密码进行加密
@Override
protected void configure(AuthenticationManagerBuilder auth) throws Exception {

    BCryptPasswordEncoder bCryptPasswordEncoder = new BCryptPasswordEncoder();
    // 模拟假数据
    auth.inMemoryAuthentication()
        .passwordEncoder(bCryptPasswordEncoder) // 设置加密方式
        .withUser("zs").password(bCryptPasswordEncoder.encode("111")).roles("doctor")
        .and()
        .withUser("ls").password(bCryptPasswordEncoder.encode("222")).roles("master")
        .and()
        .withUser("ww").password(bCryptPasswordEncoder.encode("333")).roles("teacher");
}
以上即可实现相应的用户 访问相应的资源
设置用户访问权限不足的跳转页面
在SecurityConfig配置类的configure(HttpSecurity http)方法中
添加 当用户权限不足时 的访问路径
@Override
protected void configure(HttpSecurity http) throws Exception {

    // 设置请求资源的权限(授权)
    http
        .authorizeRequests() // 对请求进行授权
        ...
        .formLogin(); // 设置未授权请求跳转的登录表单页面

    http.exceptionHandling().accessDeniedPage("/no/auth"); // 用有访问权限的角色被访问拒绝后跳转的路径

}
控制器 实现跳转
@RequestMapping("/no/auth")
public String noAuth(){
    return "views/no-auth";
}
在views目录下创建 跳转的页面 no-auth.html
    Title


    您的权限不足以访问此资源

    返回主页
注销功能
在 SecurityConfig 配置类的 configure(HttpSecurity http) 方法中
开启注销功能
@Override
protected void configure(HttpSecurity http) throws Exception {

    ...

    http.logout()		//开启用户退出登录的功能
        .logoutSuccessUrl("/");	//设置成功退出登录后前往首页

    // 下方无代码

}
在index.html页面中添加 退出登录的请求链接地址
hello SpringSecurity
...