@Autowired用法详解
- 首先要知道另一个东西,default-autowire,它是在xml文件中进行配置的,可以设置为byName、byType、constructor和autodetect;比如byName,不用显式的在bean中写出依赖的对象,它会自动的匹配其它bean中id名与本bean的set**相同的,并自动装载。
- @Autowired是用在JavaBean中的注解,通过byType形式,用来给指定的字段或方法注入所需的外部资源。
- 两者的功能是一样的,就是能减少或者消除属性或构造器参数的设置,只是配置地方不一样而已。
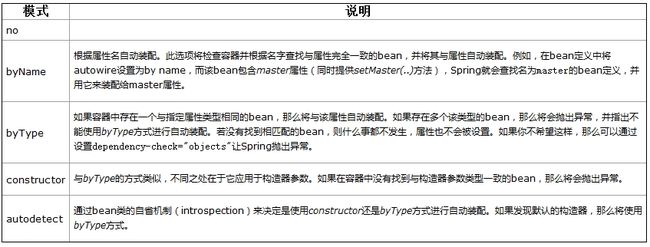
- autowire四种模式的区别:
- 先看一下bean实例化和@Autowired装配过程:
-
一切都是从bean工厂的getBean方法开始的,一旦该方法调用总会返回一个bean实例,无论当前是否存在,不存在就实例化一个并装配,否则直接返回。(Spring MVC是在什么时候开始执行bean的实例化过程的呢?其实就在组件扫描完成之后)
-
实例化和装配过程中会多次递归调用getBean方法来解决类之间的依赖。
-
Spring几乎考虑了所有可能性,所以方法特别复杂但完整有条理。
-
@Autowired最终是根据类型来查找和装配元素的,但是我们设置了
-
下面通过@Autowired来说明一下用法
-
Setter 方法中的 @Autowired
你可以在 JavaBean中的 setter 方法中使用 @Autowired 注解。当 Spring遇到一个在 setter 方法中使用的 @Autowired 注解,它会在方法中执行 byType 自动装配。
这里是 TextEditor.java 文件的内容:
package com.tutorialspoint;
import org.springframework.beans.factory.annotation.Autowired;
public class TextEditor {
   private SpellChecker spellChecker;
   @Autowired
   public void setSpellChecker( SpellChecker spellChecker ){
      this.spellChecker = spellChecker;
   }
   public SpellChecker getSpellChecker( ) {
      return spellChecker;
   }
   public void spellCheck() {
      spellChecker.checkSpelling();
   }
}
下面是另一个依赖的类文件 SpellChecker.java 的内容:
package com.tutorialspoint;
public class SpellChecker {
   public SpellChecker(){
      System.out.println("Inside SpellChecker constructor." );
   }
   public void checkSpelling(){
      System.out.println("Inside checkSpelling." );
   }
}
下面是 MainApp.java 文件的内容:
package com.tutorialspoint;
import org.springframework.context.ApplicationContext;
import org.springframework.context.support.ClassPathXmlApplicationContext;
public class MainApp {
   public static void main(String[] args) {
      ApplicationContext context = new ClassPathXmlApplicationContext("Beans.xml");
      TextEditor te = (TextEditor) context.getBean("textEditor");
      te.spellCheck();
   }
}
下面是配置文件 Beans.xml:
一旦你已经完成的创建了源文件和 bean 配置文件,让我们运行一下应用程序。如果你的应用程序一切都正常的话,这将会输出以下消息:
Inside SpellChecker constructor.
Inside checkSpelling.
- 属性中的 @Autowired
你可以在属性中使用 @Autowired 注解来除去 setter 方法。当时使用 为自动连接属性传递的时候,Spring 会将这些传递过来的值或者引用自动分配给那些属性。所以利用在属性中 @Autowired 的用法,你的 TextEditor.java 文件将变成如下所示:
package com.tutorialspoint;
import org.springframework.beans.factory.annotation.Autowired;
public class TextEditor {
   @Autowired
   private SpellChecker spellChecker;
   public TextEditor() {
      System.out.println("Inside TextEditor constructor." );
   }
   public SpellChecker getSpellChecker( ){
      return spellChecker;
   }
   public void spellCheck(){
      spellChecker.checkSpelling();
   }
}
下面是配置文件 Beans.xml:
一旦你在源文件和 bean 配置文件中完成了上面两处改变,让我们运行一下应用程序。如果你的应用程序一切都正常的话,这将会输出以下消息:
Inside TextEditor constructor.
Inside SpellChecker constructor.
Inside checkSpelling.
- 构造函数中的 @Autowired
你也可以在构造函数中使用 @Autowired。一个构造函数 @Autowired 说明当创建 bean 时,即使在 XML 文件中没有使用 元素配置 bean ,构造函数也会被自动连接。让我们检查一下下面的示例。
这里是 TextEditor.java 文件的内容:
package com.tutorialspoint;
import org.springframework.beans.factory.annotation.Autowired;
public class TextEditor {
   private SpellChecker spellChecker;
   @Autowired
   public TextEditor(SpellChecker spellChecker){
      System.out.println("Inside TextEditor constructor." );
      this.spellChecker = spellChecker;
   }
   public void spellCheck(){
      spellChecker.checkSpelling();
   }
}
下面是配置文件 Beans.xml:
一旦你在源文件和 bean 配置文件中完成了上面两处改变,让我们运行一下应用程序。如果你的应用程序一切都正常的话,这将会输出以下消息:
Inside TextEditor constructor.
Inside SpellChecker constructor.
Inside checkSpelling.
- @Autowired 的(required=false)选项
默认情况下,@Autowired 注解意味着依赖是必须的,它类似于 @Required 注解,然而,你可以使用 @Autowired 的 (required=false) 选项关闭默认行为。
即使你不为 age 属性传递任何参数,下面的示例也会成功运行,但是对于 name 属性则需要一个参数。你可以自己尝试一下这个示例,因为除了只有 Student.java 文件被修改以外,它和 @Required 注解示例是相似的。
package com.tutorialspoint;
import org.springframework.beans.factory.annotation.Autowired;
public class Student {
   private Integer age;
   private String name;
   @Autowired(required=false)
   public void setAge(Integer age) {
      this.age = age;
   }
   public Integer getAge() {
      return age;
   }
   @Autowired
   public void setName(String name) {
      this.name = name;
   }
   public String getName() {
      return name;
   }
}
Quote:
http://my.oschina.net/HeliosFly/blog/203902
http://wiki.jikexueyuan.com/project/spring/annotation-based-configuration/spring-autowired-annotation.html