Spring Boot 中内置Tomcat如何加载项目?Current ClassLoader的概念浅析
在java web开发中,相较于传统的Spring,Spring Boot带来的一大好处是其内置的Servlet容器。在这个特性的帮助下,使得开发无需额外配置外部的Servlet容器,只需要一个Application类即可启动一个内置容器,这在微服务的开发,部署中尤为重要,带来了更多地便利性。
Apache Tomcat 作为大多数公司使用的Servlet容器,同时也是Spring Boot的默认内置容器。
在传统的外置Tomcat的情况下,我们通常把我们需要部署的项目放在/webapp目录下,这样Tomcat就可以检测到我们的项目进行加载部署。但是在Spring Boot中,这一步又是如何完成的呢?
tomcat类加载器
对Tomcat稍有理解的开发人员应该知道,Tomcat内部实现了自己的类加载器,用来打破双亲委派机制。
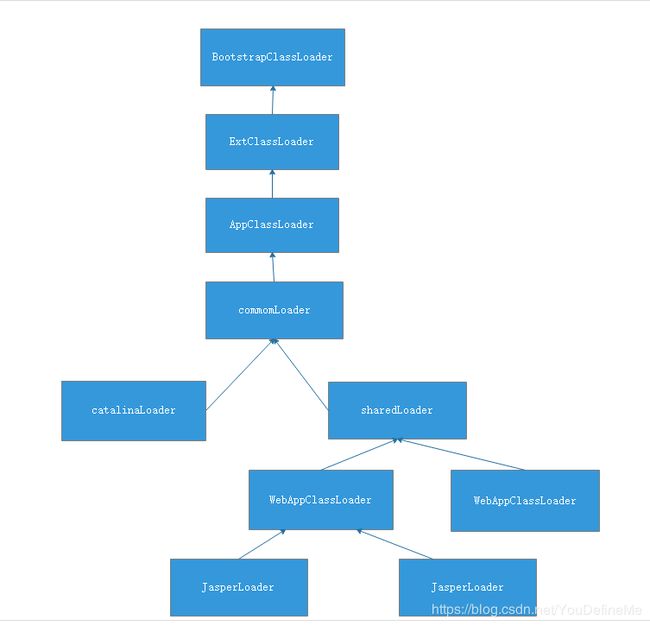
上图就是一个Tomcat启动后的类加载器图。
其中最顶层的BootStrapClassLoader,ExtClassLoader,AppClassLoader是java自身的类加载器。而其后的加载器则全部是Tomcat自己实现的类加载器。
这里不花费太多的篇幅来论述这些加载器的原理,源码讲解,只简单的说一下。
可以看到上图中,commomLoader,catalinaLoader,sharedLoader的首字母没有大写,这是由于他们实际上并不是一个新类,他们的实现都是JDK中的URLClassLoader,他们只是作为Tomcat中的一个类的属性存在,分别负责加载不同路径的Class。但是在Tomcat 6.x后,Tomcat的开发者们把这3个不同的路径合并成了一个一个文件夹,既lib 文件夹。基于此,在默认的情况下,这3个loader实际上是指向同一个引用。
WebAppClassLoader加载的就是我们实际的应用的Class文件,它可以有多个。
更底层的JasperLoader对应的是JSP编译后的Class文件,每一个JSP对应一个JasperLoader。
在这个架构中,WebAppClassLoader的上层都是遵循双亲委派机制的,他们的实现是为了加载一些Tomcat自身需要的Class,或者所有webApp都需要的Class。WebAppClassLoader这个加载器重写了方法,打破了双亲委派机制。到达这个类加载器时,它会首先判断能否使用自身加载,只有在无法使用自身去加载的时候才会把这个任务抛向更上层。至于JasperLoader的出现是为了实现JSP的热加载,每个JSP对应一个JasperLoader,当检测到一个JSP进行了修改,Tomcat就会把这个JSP对应的JasperLoader的抛弃,重新新建一个JasperLoader加载这个JSP,以此来实现热加载。
Spring Boot 的内置Tomcat如何加载我们的项目
这里需要区分两种情况,打成jar包时如何加载?不打包直接运行Application时如何加载?
1.不打包直接运行Application时如何完成加载?
在这种情况下,我们可以直接追溯 run 方法的源码,这里直接贴上核心代码。
   protected void prepareContext(Host host, ServletContextInitializer[] initializers) {
        File docBase = this.getValidDocumentRoot();
        docBase = docBase != null ? docBase : this.createTempDir("tomcat-docbase");
        TomcatEmbeddedContext context = new TomcatEmbeddedContext();
        context.setName(this.getContextPath());
        context.setDisplayName(this.getDisplayName());
        context.setPath(this.getContextPath());
        context.setDocBase(docBase.getAbsolutePath());
        context.addLifecycleListener(new FixContextListener());
        // 1.把当前类的ClassLoader传进去
        context.setParentClassLoader(this.resourceLoader != null ? this.resourceLoader.getClassLoader() : ClassUtils.getDefaultClassLoader());
        this.resetDefaultLocaleMapping(context);
        this.addLocaleMappings(context);

        try {
            context.setUseRelativeRedirects(false);
        } catch (NoSuchMethodError var7) {
        }

        SkipPatternJarScanner.apply(context, this.tldSkip);
        // 2.也是把当前类的ClassLoder传进去,这个参数会作用于 parentClassLoader
        WebappLoader loader = new WebappLoader(context.getParentClassLoader());
        // 3.这个是SpringBoot实现的一个WebApp类加载器,这个类最终会被实例化,作为这个Context的WebAppClassLoder
        loader.setLoaderClass(TomcatEmbeddedWebappClassLoader.class.getName());
        loader.setDelegate(true);
        context.setLoader(loader);
        if (this.isRegisterDefaultServlet()) {
            this.addDefaultServlet(context);
        }

        if (this.shouldRegisterJspServlet()) {
            this.addJspServlet(context);
            this.addJasperInitializer(context);
            context.addLifecycleListener(new TomcatEmbeddedServletContainerFactory.StoreMergedWebXmlListener());
        }

        ServletContextInitializer[] initializersToUse = this.mergeInitializers(initializers);
        this.configureContext(context, initializersToUse);
        host.addChild(context);
        this.postProcessContext(context);
    }
这里再贴一下 WebappLoader 中创建ClassLoader的核心代码
 private WebappClassLoaderBase createClassLoader() throws Exception {
 	  /** 1.结合上图的注释3看,这里实例化的是TomcatEmbeddedWebappClassLoader
 	   *    Spring Boot实现的WebAppClassLoader的子类
 	   */
        Class clazz = Class.forName(this.loaderClass);
        WebappClassLoaderBase classLoader = null;
        // 2.这里的ParentClassLoader在这里实际上是AppClassLoader,结合注释1,2看
        if (this.parentClassLoader == null) {
            this.parentClassLoader = this.context.getParentClassLoader();
        }

        Class[] argTypes = new Class[]{ClassLoader.class};
        Object[] args = new Object[]{this.parentClassLoader};
        Constructor constr = clazz.getConstructor(argTypes);
        /** 3.这里构建一个TomcatEmbeddedWebappClassLoader,并把parentClassLoader当作这个类的父加载器
         *   双亲委派机制相关。这里划重点
         */
        classLoader = (WebappClassLoaderBase)constr.newInstance(args);
        return classLoader;
    }
看到这里,关于不打包的情况下,内置Tomcat如何加载项目的答案应该已经出来了。
TomcatEmbeddedWebappClassLoader 这个ClassLoader实际上什么也不会加载,他把最终的加载任务丢到了它的父加载器,在这里是AppClassLoader。这样,我们的Classes最终都会被AppClassLoader加载,而AppClassLoader又是Context所持有的加载器的父加载器,于是Context就可以成功访问我们的资源项目。
2.打成jar包时,如何完成加载?
在这种情况下,相比上面的情况要更复杂一些。
主要是由于,打包成jar的时候,AppClassLoader在默认的情况下无法加载jar中依赖的jar。
这里解决的方式很多,在Spring Boot之前,通用的解决方式一般有两种。
1:把所有依赖的jar解压后和你的项目一起打包
2:把所有依赖的jar放在你打包的jar外部,并且在 MANIFEST.MF 文件中配置Class-PATH指向这些jar
Spring Boot中没有采取上述的两种方法,而是通过 spring-boot-maven-plugin 来打包,生成archive的方式来完成的。
下面的图片分别是Spring Boot项目打包后的结构图,以及 MANIFEST.MF 文件。
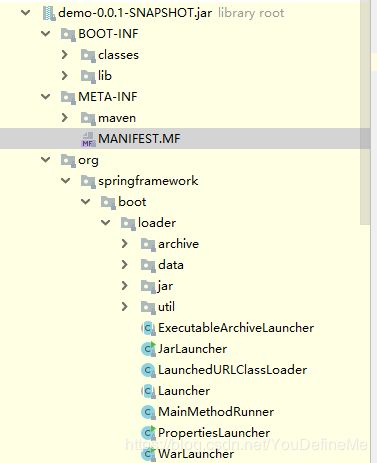
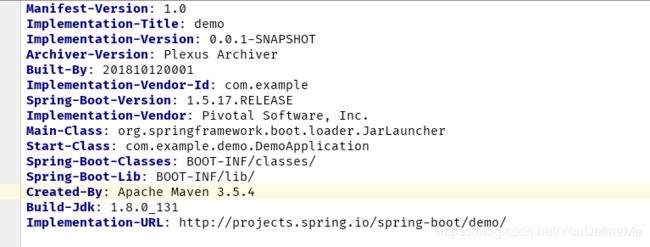
打包后的文件可以看到,BOOT-INF目录中的才是我们自己项目的代码。而 MANIFEST.MF 文件中的Main-Class并非指向我们自己的Application,而是指向了一个名称为 JarLauncher 的类。
在这个类中,如果是做如下几件事。
1.首先是createClassLoader,创建一个Spring Boot自定义的类加载器 LaunchedURLClassLoader。这个类加载器拥有可以加载jar中的jar包的能力。所有依赖的外部jar最终都由它来加载。

2.把创建好的 LaunchedURLClassLoader 设置到线程变量ContextClassLoader中,然后再开一个线程来执行我们Application中的main方法

3.在这个新开的线程中,通过线程对象获取到 LaunchedURLClassLoader ,然后用这个类加载器来加载我们的Application,再反射执行main方法。
这里的关键点是用 LaunchedURLClassLoader 这个类加载器来加载我们的Application。如此做的原因是因为,每个Class对象内部都有一个referen指向加载它的ClassLoader。由这个类触发加载的Class文件,默认优先使用的就是这个referen指向的ClassLoader来尝试加载这个类。
因此,只有这样做,才可以使用 LaunchedURLClassLoader 加载我们需要的文件。否则默认使用的是AppClassLoader,而在这里AppClassLoader无法加载到我们需要的文件。
