搭建SSH框架(SpringMVC4+Spring4+Hibernate5)
本文转载自:https://www.2cto.com/kf/201705/635694.html
前言:
搭建SSH框架(SpringMVC4+Spring4+Hibernate5)。现在比较流行SSM(SpringMVC,Spring,MyBatis),但是持久层这一块大公司用Hibernate用的比较多,小项目用MyBatis用的比较多,因为较Hibernate而言,MyBatis要显得更为灵活,也正是因此,它的封装性不如hibernate好,所以对于追求稳定的大型项目而言,用hibernate还是比较合适。关于Hibernate和MyBatis的比较,读者可以查阅更多相关的资料。在这使用Hibernate框架。
整体思路:
1.首先搭建SpringMVC框架
2.搭建Hibernate框架
3.使用Spring整合SpringMVC,Hibernate
搭建SpringMVC框架:
1.导入jar文件
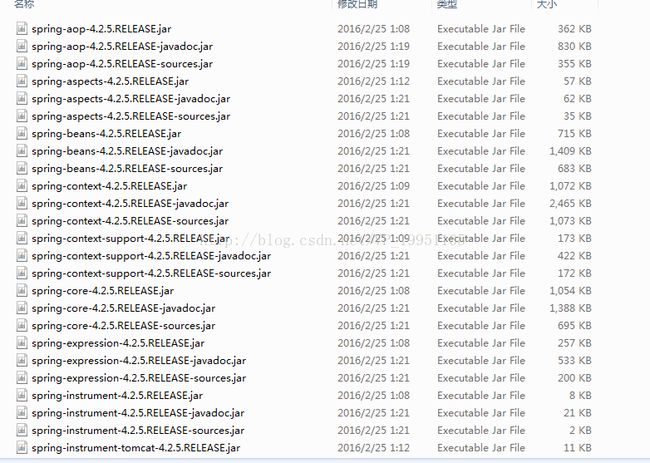
如上图所示,这是我从官网下载的spring framework解压缩后,libs中所包含的所有jar包,我们只需要将spring-*-4.2.5.RELEASE.jar复制,然后粘贴至工程项目中的lib目录下。就是将所有以RELEASE.jar结尾的,而不用将以javadoc.jar和sources.jar结尾的jar包放至lib目录下。
2.配置web.xml
|
1
2
3
4
5
6
7
8
9
10
11
12
13
14
|
1
|
具体执行步骤如下:
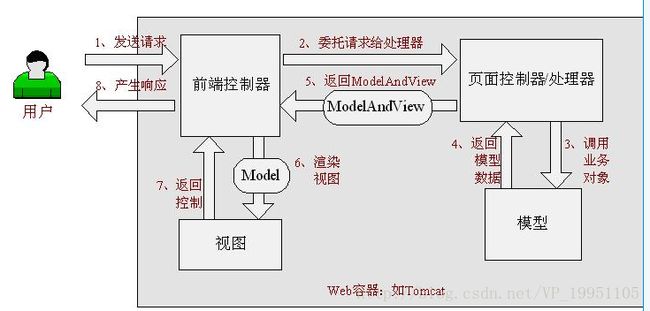
1、 首先用户发送请求————>前端控制器,前端控制器根据请求信息(如URL)来决定选择哪一个页面控制器进行处理并把请求委托给它,即以前的控制器的控制逻辑部分;图2-1中的1、2步骤;
2、 页面控制器接收到请求后,进行功能处理,首先需要收集和绑定请求参数到一个对象,这个对象在Spring Web MVC中叫命令对象,并进行验证,然后将命令对象委托给业务对象进行处理;处理完毕后返回一个ModelAndView(模型数据和逻辑视图名);图2-1中的3、4、5步骤;
3、 前端控制器收回控制权,然后根据返回的逻辑视图名,选择相应的视图进行渲染,并把模型数据传入以便视图渲染;图2-1中的步骤6、7;
4、 前端控制器再次收回控制权,将响应返回给用户,图2-1中的步骤8;至此整个结束。
springmvc核心框架图:

核心架构的具体流程步骤如下:
1、 首先用户发送请求——>DispatcherServlet,前端控制器收到请求后自己不进行处理,而是委托给其他的解析器进行处理,作为统一访问点,进行全局的流程控制;
2、 DispatcherServlet——>HandlerMapping, HandlerMapping将会把请求映射为HandlerExecutionChain对象(包含一个Handler处理器(页面控制器)对象、多个HandlerInterceptor拦截器)对象,通过这种策略模式,很容易添加新的映射策略;
3、 DispatcherServlet——>HandlerAdapter,HandlerAdapter将会把处理器包装为适配器,从而支持多种类型的处理器,即适配器设计模式的应用,从而很容易支持很多类型的处理器;
4、 HandlerAdapter——>处理器功能处理方法的调用,HandlerAdapter将会根据适配的结果调用真正的处理器的功能处理方法,完成功能处理;并返回一个ModelAndView对象(包含模型数据、逻辑视图名);
5、 ModelAndView的逻辑视图名——> ViewResolver, ViewResolver将把逻辑视图名解析为具体的View,通过这种策略模式,很容易更换其他视图技术;
6、 View——>渲染,View会根据传进来的Model模型数据进行渲染,此处的Model实际是一个Map数据结构,因此很容易支持其他视图技术;
7、返回控制权给DispatcherServlet,由DispatcherServlet返回响应给用户,到此一个流程结束。
现在对SpringMVC是不是有了一个大致的了解呢?
配置好了web.xml(整个web应用的配置文件)之后,接下来我们需要配置spring-servlet.xml(这是springmvc的配置文件,文件名默认为servletName-servlet.xml,这里我们的servlet名字是spring,当然你也可以自定义名字,然后再web.xml中指定,这在上面的配置中也有体现。)
下面是spring-servlet的具体配置:
|
1
2
3
4
5
6
7
8
9
10
11
12
13
14
15
16
17
18
19
20
21
22
23
24
25
26
27
|
xmlns:context=
"http://www.springframework.org/schema/context"
xmlns:mvc=
"http://www.springframework.org/schema/mvc"
xmlns:xsi=
"http://www.w3.org/2001/XMLSchema-instance"
xsi:schemalocation="http://www.springframework.org/schema/beans
http:
//www.springframework.org/schema/beans/spring-beans-4.0.xsd
http:
//www.springframework.org/schema/mvc
http:
//www.springframework.org/schema/mvc/spring-mvc-4.0.xsd
http:
//www.springframework.org/schema/context
http:
//www.springframework.org/schema/context/spring-context-4.0.xsd">
|
好了,现在对web应用的配置,springmvc的配置已经完成了,万事俱备,只欠东风,我们具体的执行动作呢?
|
1
2
3
4
5
6
7
8
9
10
11
|
@Controller
public
class
TestController {
@RequestMapping
(value=
"/test"
)
public
ModelAndView testMVC(){
System.out.println(
"testMVC()"
);
ModelAndView modelAndView =
new
ModelAndView(
"/test"
);
modelAndView.addObject(
"info"
,
"hewei"
);
return
modelAndView;
}
}
|
@RequestMapping 表示匹配请求动作,这里将匹配 test 这个请求动作(使用value配置)
ModelAndView modelAndView = new ModelAndView("/test"); 表示返回test.jsp,并且是/WEB-INF/views下的jsp文件(前面讲过的)
我们来看看超级简单的test.jsp
|
1
2
|
<%@ page language=
"java"
contentType=
"text/html; charset=UTF-8"
pageEncoding=
"UTF-8"
%>
|
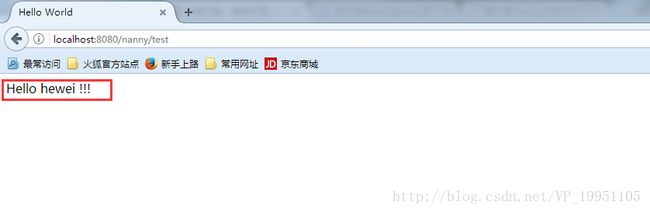
现在我们来做一个测试:
访问地址:http://localhost:8080/nanny/test,在浏览器中得到如下显示
至此,我们的SpringMVC框架已经搭建完成,向前走了一小步。下面我们更进一步,来看看Hibernate框架的搭建
搭建Hibernate框架:
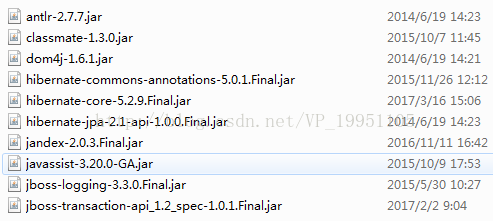
第一步,导入jar包(将下载的Hibernate Framework中required的jar包复制粘贴到lib文件目录中)
第二 步,建立POJO对象
|
1
2
3
4
5
6
7
8
9
10
11
12
13
14
15
16
17
18
19
20
21
22
23
24
25
26
27
28
29
30
31
32
33
34
35
36
37
38
39
40
41
42
43
44
45
46
47
48
49
50
51
52
53
54
55
56
57
58
59
60
61
62
63
64
65
66
67
68
69
70
71
72
73
74
75
|
package
com.bjtu.entity;
import
javax.persistence.Column;
import
javax.persistence.Entity;
import
javax.persistence.GeneratedValue;
import
javax.persistence.GenerationType;
import
javax.persistence.Id;
import
javax.persistence.Table;
@Entity
@Table
(name=
"nannyuser"
)
public
class
NannyUser {
@Id
@GeneratedValue
(strategy = GenerationType.IDENTITY)
private
int
id;
@Column
private
String username;
@Column
private
String password;
@Column
private
int
gender;
@Column
private
String name;
public
NannyUser(){
}
public
int
getId() {
return
id;
}
public
void
setId(
int
id) {
this
.id = id;
}
public
String getUsername() {
return
username;
}
public
void
setUsername(String username) {
this
.username = username;
}
public
String getPassword() {
return
password;
}
public
void
setPassword(String password) {
this
.password = password;
}
public
int
getGender() {
return
gender;
}
public
void
setGender(
int
gender) {
this
.gender = gender;
}
public
String getName() {
return
name;
}
public
void
setName(String name) {
this
.name = name;
}
}
|
这个对象将与 数据库 中的某一张表对应,对于数据库的增删改查,可以抽象到对象这个层次。对于上面代码中的注解,先不用研究,到时Spring注入的时候会提到。
第三步,建立对象映射文件(NannyUser.hbm.xml)
|
1
2
3
4
5
6
7
8
9
10
11
12
13
14
15
|
<
class
name=
"com.bjtu.entity.NannyUser"
table=
"nannyuser"
>
|
第四步,建立Hibernate配置文件(包含数据库连接信息等)
|
1
2
3
4
5
6
7
8
9
10
11
12
13
14
15
16
17
18
19
20
|
|
第五步,新增数据,测试
|
1
2
3
4
5
6
7
8
9
10
11
12
13
14
15
16
17
18
19
20
21
22
23
24
25
26
27
28
29
30
31
32
33
34
35
36
37
38
39
40
41
42
43
44
|
package
com.bjtu.test;
import
java.util.List;
import
org.hibernate.Session;
import
org.hibernate.SessionFactory;
import
org.hibernate.Transaction;
import
org.hibernate.cfg.Configuration;
import
org.hibernate.query.Query;
import
com.bjtu.entity.NannyUser;
public
class
HibernateTest {
public
static
void
main(String[] args) {
//初始化一个POJO对象
NannyUser user =
new
NannyUser();
user.setPassword(
"password"
);
user.setGender(
1
);
user.setName(
"vp"
);
//读取hibernate.cfg.xml配置,并初始化配置
Configuration cfg =
new
Configuration();
cfg.configure();
//根据配置获取sessionFactory,然后开启事务
SessionFactory sessionFactory = cfg.buildSessionFactory();
Session session = sessionFactory.openSession();
Transaction tx = session.beginTransaction();
//使用HQL语句查询
Query query = session.createQuery(
"from NannyUser"
);
List
System.out.println(userList.size());
//存入user对象至nannyuser表中
session.save(user);
//提交事务,关闭会话
tx.commit();
session.close();
}
}
|
现在我们来查看一下后台数据库:

至此,我们的hibernate框架也搭建完毕,下面我们来用Spring整合SpringMVC,Hibernate。这个过程可能较以上两个过程而言要麻烦一些,但是不必担心,慢慢来。
Spring 整合SpringMVC和Hibernate:
在开始这个步骤之前,我们需要了解一些东西:
1.SpringMVC是Spring框架的一部分,所以它能很好的和Spring配合使用。
2.下面我们将使用全注解方式来完成整合,所以你必须对Spring的注解有一个详细的了解,这里有个传送门。
3.对IOC(控制反转),DI(依赖注入)要有一定了解
4.熟悉MVC分层架构(对于Controller,Service,DAO有一定了解)
5.Spring管理hibernate,其实管理的就是Hibernate的sessionFactory
下面我们来一一剖析
第一步,配置web.xml文件(在web.xml文件中加入下段)
|
1
2
3
4
5
6
7
8
|
|
在上面的配置中我们看到,指定了一个spring全局配置文件beans.xml(这个名字你任意取,这是在指定情况下)。默认情况是/WEB-INF/applicationContext.xml
第二步,配置beans.xml
|
1
2
3
4
5
6
7
8
9
10
11
12
13
14
15
16
17
18
19
20
21
22
23
24
25
26
27
28
29
30
31
32
33
34
35
36
37
38
39
40
41
42
43
44
45
|
http:
//www.springframework.org/schema/beans/spring-beans-4.0.xsd
http:
//www.springframework.org/schema/context
http:
//www.springframework.org/schema/context/spring-context-4.0.xsd
http:
//www.springframework.org/schema/tx
http:
//www.springframework.org/schema/tx/spring-tx-4.0.xsd
http:
//www.springframework.org/schema/aop
http:
//www.springframework.org/schema/aop/spring-aop-4.0.xsd">
|
这个文件的配置很重要,对于各个配置点的具体信息,详细情况,请查阅更多资料。
第三步,建立MVC结构
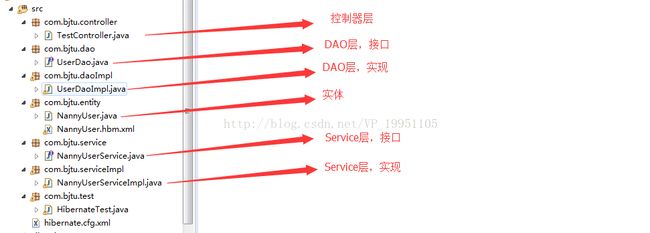
第四步,编写每层代码
TestController的代码,加入注解之后
|
1
2
3
4
5
6
7
8
9
10
11
12
13
14
15
16
17
18
19
20
21
22
23
24
25
26
27
28
29
30
31
32
33
34
|
package
com.bjtu.controller;
import
java.util.List;
import
org.springframework.beans.factory.annotation.Autowired;
import
org.springframework.stereotype.Controller;
import
org.springframework.web.bind.annotation.RequestMapping;
import
org.springframework.web.servlet.ModelAndView;
import
com.bjtu.entity.NannyUser;
import
com.bjtu.service.NannyUserService;
@Controller
public
class
TestController {
@Autowired
private
NannyUserService nannyUserService;
public
NannyUserService getNannyUserService() {
return
nannyUserService;
}
public
void
setNannyUserService(NannyUserService nannyUserService) {
this
.nannyUserService = nannyUserService;
}
@RequestMapping
(value=
"/test"
)
public
ModelAndView testMVC(){
System.out.println(
"testMVC()"
);
List
System.out.println(
"list.size():"
+list.size());
ModelAndView modelAndView =
new
ModelAndView(
"/test"
);
modelAndView.addObject(
"info"
,
"hewei"
);
return
modelAndView;
}
}
|
这里在Controller持有一个NannyUserService层对象引用,将等待Spring注入。(PS,如果对上面注解不理解,请看看传送门内的内容吧)
我们来看看NannyUserService接口吧
|
1
2
3
4
5
6
7
8
9
10
|
package
com.bjtu.service;
import
java.util.List;
import
com.bjtu.entity.NannyUser;
public
interface
NannyUserService {
public
List
public
boolean
isExists(String username);
}
|
那么,它的具体实现NannyUserServiceImpl呢?
|
1
2
3
4
5
6
7
8
9
10
11
12
13
14
15
16
17
18
19
20
21
22
23
24
25
26
27
28
29
30
31
32
33
34
35
36
37
38
39
40
41
42
|
package
com.bjtu.serviceImpl;
import
java.util.List;
import
org.springframework.beans.factory.annotation.Autowired;
import
org.springframework.stereotype.Service;
import
com.bjtu.dao.UserDao;
import
com.bjtu.daoImpl.UserDaoImpl;
import
com.bjtu.entity.NannyUser;
import
com.bjtu.service.NannyUserService;
@Service
public
class
NannyUserServiceImpl
implements
NannyUserService{
@Autowired
private
UserDao userDao;
public
UserDao getUserDao() {
return
userDao;
}
public
void
setUserDao(UserDao userDao) {
this
.userDao = userDao;
}
public
NannyUserServiceImpl(){
System.out.println(
"NannyUserServiceImpl()"
);
}
@Override
public
List
return
userDao.getAllUser();
}
@Override
public
boolean
isExists(String username) {
return
userDao.isExists(username);
}
}
|
|
1
2
3
4
5
6
7
8
9
10
11
12
13
|
package
com.bjtu.dao;
import
java.util.List;
import
com.bjtu.entity.NannyUser;
public
interface
UserDao {
// 得到所有用户
public
List
// 检测用户名是否存在
public
boolean
isExists(String username);
}
|
|
1
|
那么它的具体实现呢?UserDaoImpl
|
|
1
|
package
com.bjtu.daoImpl;
import
java.util.ArrayList;
import
java.util.List;
import
org.hibernate.Session;
import
org.hibernate.SessionFactory;
import
org.hibernate.Transaction;
import
org.hibernate.query.Query;
import
org.springframework.beans.factory.annotation.Autowired;
import
org.springframework.beans.factory.annotation.Qualifier;
import
org.springframework.orm.hibernate5.support.HibernateDaoSupport;
import
org.springframework.stereotype.Repository;
import
com.bjtu.dao.UserDao;
import
com.bjtu.entity.NannyUser;
@Repository
public
class
UserDaoImpl
extends
HibernateDaoSupport
implements
UserDao {
/*****注入*****/
@Autowired
@Qualifier
(
"sessionFactory"
)
private
SessionFactory sessionFactory;
/*****bean实例化时执行该方法*******/
@Autowired
public
void
setSessionFactory(){
super
.setSessionFactory(sessionFactory); }
public
UserDaoImpl(){ System.out.println(
"UserDaoImpl"
); }
@SuppressWarnings
({
"unchecked"
,
"rawtypes"
})
@Override
public
List
new
ArrayList
"from NannyUser"
); userList = query.getResultList(); tx.commit(); session.close();
return
userList; }
@Override
public
boolean
isExists(String username) { Query query = sessionFactory.openSession() .createQuery(
"from NannyUser u where u.username = :username"
).setParameter(
"username"
, username); System.out.println(query.list().size());
return
query.list().size()>
0
?
true
:
false
; } }
|
|
1
|
我们在Dao层持有一个SessionFactory对象的引用,等待Spring注入。而之前我们在beans.xml文件中已经初始化了sessionFactory,所以它会注入到userDao中,而userDao中又
|
|
1
|
会注入到nannyUserService中,而nannyUserService又会注入到testController中。这样一环扣一环的逻辑好理解了吧?
|
|
1
|
总结:至此我们SSH环境已经搭建完毕。
|