TensorFlow-gpu 在 CentOS 7 下的完全安装手册
TensorFlow-gpu 在 CentOS 7 下的完全安装手册
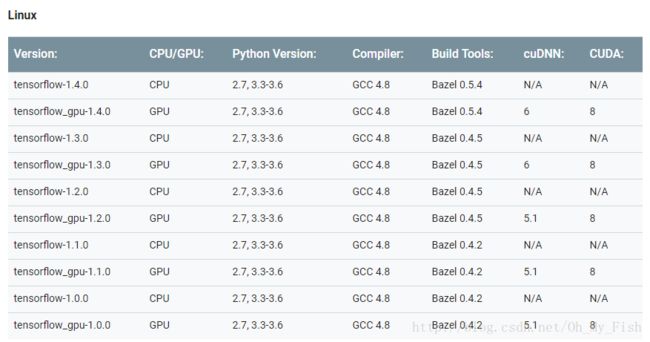
鉴于目前部分TensorFlow的Installation Guide已经有些落后于最新版本,以下我将结合我在CentOS下安装时踩过的坑以及 官方教程 ,介绍一下如何在CentOS 7下安装支持GPU运算的TensorFlow 1.4.1。
在安装过程中切记,一定要选择正确的版本进行安装!
I. 检查系统环境
在安装之前,需要先检查系统的软硬件环境是否支持CUDA与TF的安装,具体来说,主要有以下几个步骤:
- 检查是否电脑配置有Nvidia显卡
$ /usr/sbin/lspci | grep -i nvidia执行结果如下:
![]()
- 检查是否安装了正确的GCC版本
$ gcc --version执行结果如下:

II. 安装 CUDA 与 cuDNN
完成了系统环境的检查,就可以开始安装CUDA与cuDNN了。这一步是安装带有GPU支持的TensorFlow必须完成的,否则将无法使用GPU来完成机器学习任务。安装CUDA也是坑最多的一步,没有之一,基本上在安装上遇到的问题基本上都集中在这里,所以一定要谨慎操作。具体的步骤如下:
1. 确定CUDA与cudnn的版本
请参照文章开头的表格,选择与TensorFlow对应的CUDA与cuDNN的版本,例如,我安装的TensorFlow版本为1.4.1,那么对应的CUDA版本为8.0,cuDNN版本为6.0。下载地址如下:
- CUDA:https://developer.nvidia.com/cuda-downloads
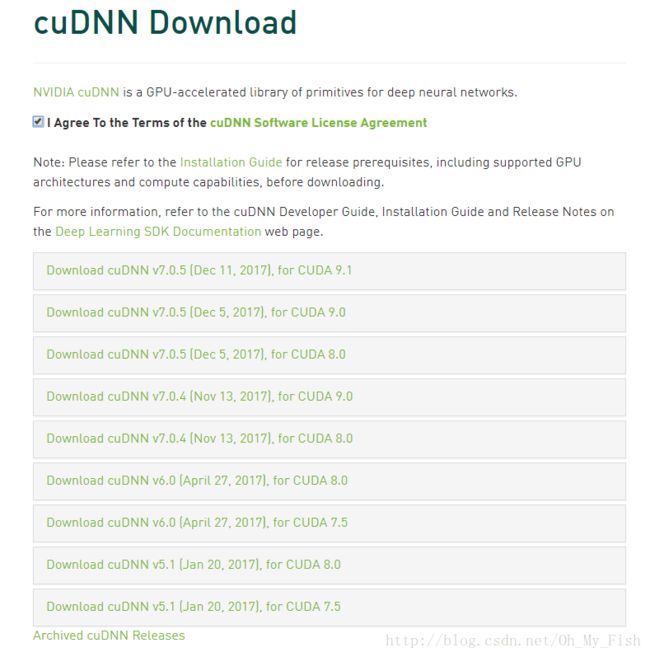
- cuDNN(需要注册Nvidia账号):https://developer.nvidia.com/cudnn
这里切记不要选错了版本,目前(17-12-21)官网的CUDA已经到了9.0,cuDNN已经到了7.0,TensorFlow并不能做到向上兼容,必须选择准确的版本,否则将导致无法正常导入。选择历史版本,CUDA请将网页拉到底部,点击Legacy Releases ;cuDNN请按照网页提示进行操作。
2. 下载CUDA
建议选择RPM安装,选择runfile会遇到一些大坑,需要更复杂的操作,具体原因见下文。

3. 下载cudnn
4. 安装CUDA
下载完成后,进入安装文件所在目录,例如cd ~/Downloads ,执行以下命令,进行CUDA的安装:
$ sudo rpm -i cuda_installer_downloaded_file.rpm
$ sudo yum clean all
$ sudo yum install cuda安装过程中,由于国内的网络环境十分不稳定,下载过程可能会出现下载速度过慢、下载中断等网络环境导致的问题,请耐心等待与重试。安装过程中会有一些选项,询问是否安装其他组件,如OpenGL,如果你安装CUDA只是为了安装TensorFlow,请务必只在“toolkit”时选择yes,否则将导致一系列显卡相关的问题,最坏的情况下,需要重新安装Nvidia显卡驱动。
5. 安装cuDNN
cuDNN的安装,只需要将压缩包解压,并把文件覆盖到CUDA对应的目录中去即可:
$ tar -zxvf cudnn-8.0-linux-x64-v6.0.tgz
$ cd cuda
$ cp include/* /usr/local/cuda-8.0/inlcude/
$ cp lib64/lib* /usr/local/cuda-8.0/lib64/
6. 修改环境变量
执行 sudo vim /etc/profile,在export PATH 那行下面加上两行代码
$ export PATH=/usr/local/cuda-8.0/bin:$PATH
$ export LD_LIBRARY_PATH=/usr/local/cuda-8.0/lib64:$LD_LIBRARY_PATH
之后别忘了执行 source /etc/profile命令,不然还得重启添加的环境变量才能起作用。
III. 安装TensorFlow
完成了CUDA与cudnn的安装,只需要调用sudo pip install tensorflow-gpu 就能完成TensorFlow的安装。这里需要注意的是,必须是tensorflow-gpu,否则安装的tensorflow可能不支持gpu运算。
IV. 测试是否安装成功
首先执行测试代码,看是否能够正常导入,并输出:
import tensorflow as tf

hello = tf.constant('Hello, TensorFlow!')
sess = tf.Session()
sess.run(hello)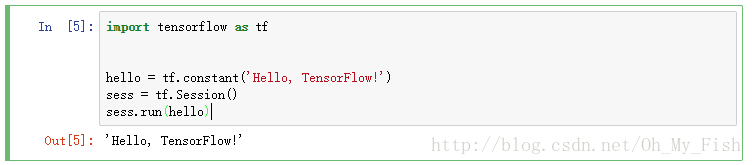
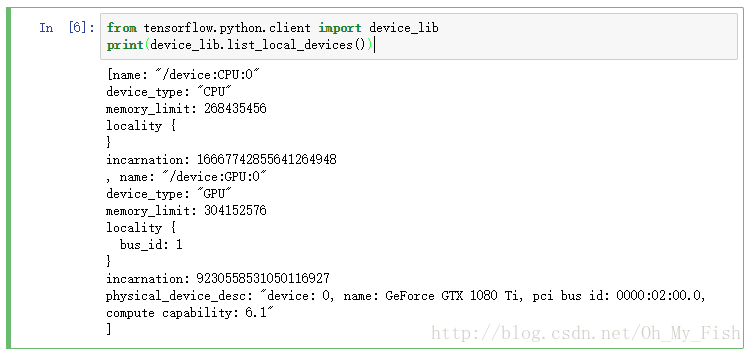
看到了输出还不要高兴的太早,请务必确认正确调用了gpu:
from tensorflow.python.client import device_lib
print(device_lib.list_local_devices())
只有tensorflow检测到了gpu才算是大功告成:
如果在输出中没有检测到gpu,请确认安装的tensorflow为支持gpu的版本:
pip list | grep tensorflow 
V. 注意事项及常见问题
1. 选择RPM还是runfile?(参考博文)
At first I tried using the ‘runfile (local)’ approach. This led to a number of problems that I am listing here for anyone who runs into similar issues:
1) I had to ‘blacklist nouveau’. Nouveau is an open source driver for nVidia GPUs that can interfere with the installation.
2) “ERROR: You appear to be running an X server”. I resolved this by typing ‘sudo telinit 3’ on my terminal and killing the GUI completely. This took me to console mode. While this error went away, another one appeared (next point) that I couldn’t eventually resolve.
3) “The driver installation is unable to locate the kernel source. Please make sure that the kernel source packages are installed and set up correctly. If you know that the kernel source packages are installed and set up correctly, you may pass the location of the kernel source with the ‘–kernel-source-path’ flag.”
I tried to manually supply the kernel source path but that did not resolve the issue.
With the ‘runfile (local)’ approach, I realized there were several dependencies that were required to be already present in the system. I wasn’t aware of these dependencies hence the problem persisted and I decided to try the ‘RPM (local)’ installer, which worked flawlessly!
2. “ImportError: libcudnn.so.6: cannot open shared object file: No such file or directory”
这是安装tensorflow过程中最常见的问题之一,即cuDNN的版本与tensorflow不匹配,版本对应关系见文首表格。
首先,确认cuDNN版本是否正确,如1.4.1对应的cuDNN版本为6.0,如果下载了其他版本,请重新按照上文,下载6.0版本的cuDNN,或者将tensorflow调整到正确的版本。例如,下载了cuDNN v5.1,则对应的tensorflow版本为1.2.0:
pip uninstall tensorflow-gpu
pip install tensorflow-gpu==1.2
如果排除了版本问题,有可能还需要在terminal中执行下列命令,重新扫描可共享的动态链接库:
sudo ldconfig -v如果还是不行,请再次确认cuDNN库是否正确的拷贝到了CUDA目录中去。
3. “ImportError: libcublas.so.8.0: cannot open shared object file: No such file or directory”
这也是安装tensorflow过程中最常见的问题之一,即CUDA的版本与tensorflow不匹配,版本对应关系见文首表格。
首先,确认CUDA的版本是否正确,如1.4.1对应的CUDA版本为8.0,其他操作与第二个问题相同。
如果排除了版本问题,请确认环境变量确实已经修改:
echo $PATH
echo $LD_LIBRARY_PATH