SpringBoot实战学习(二) SpringMVC搭建项目
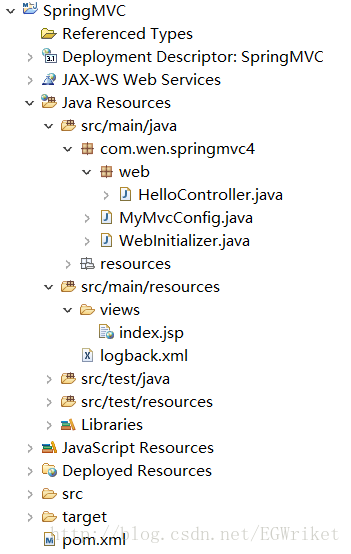
1.目录结构
2.构建项目
1.pom.xml内容:
<project xmlns="http://maven.apache.org/POM/4.0.0" xmlns:xsi="http://www.w3.org/2001/XMLSchema-instance" xsi:schemaLocation="http://maven.apache.org/POM/4.0.0 http://maven.apache.org/xsd/maven-4.0.0.xsd">
  <modelVersion>4.0.0modelVersion>
  <groupId>com.wen.springmvc4groupId>
  <artifactId>SpringMVCartifactId>
  <version>0.0.1-SNAPSHOTversion>
  <packaging>warpackaging>

  <properties>

      <java.version>1.8java.version>
      <project.build.sourceEncoding>UTF-8project.build.sourceEncoding>
      <project.reporting.outputEncoding>UTF-8project.reporting.outputEncoding>

      <jsp.version>2.2jsp.version>
      <jstl.version>1.2jstl.version>
      <servlet.version>3.1.0servlet.version>

      <spring-framework.version>4.1.5.RELEASEspring-framework.version>

      <logback.version>1.0.13logback.version>
      <slf4j.version>1.7.5slf4j.version>
  properties>

  <dependencies>
      <dependency>
          <groupId>javaxgroupId>
          <artifactId>javaee-web-apiartifactId>
          <version>7.0version>
          <scope>providedscope>
      dependency>


      <dependency>
          <groupId>org.springframeworkgroupId>
          <artifactId>spring-webmvcartifactId>
          <version>${spring-framework.version}version>
      dependency>


      <dependency>
         <groupId>javax.servletgroupId>
         <artifactId>jstlartifactId>
         <version>${jstl.version}version>
      dependency>
      <dependency>
         <groupId>javax.servletgroupId>
         <artifactId>javax.servlet-apiartifactId>
         <version>${servlet.version}version>
         <scope>providedscope>
      dependency>
      <dependency>
          <groupId>javax.servlet.jspgroupId>
          <artifactId>jsp-apiartifactId>
          <version>${jsp.version}version>
          <scope>providedscope>
      dependency>


      <dependency>
          <groupId>org.springframeworkgroupId>
          <artifactId>spring-txartifactId>
          <version>${spring-framework.version}version>
      dependency>


      <dependency>
          <groupId>org.slf4jgroupId>
          <artifactId>slf4j-apiartifactId>
          <version>${slf4j.version}version>
      dependency>
      <dependency>
          <groupId>log4jgroupId>
          <artifactId>log4jartifactId>
          <version>1.2.16version>
      dependency>
      <dependency>
          <groupId>org.slf4jgroupId>
          <artifactId>jcl-over-slf4jartifactId>
          <version>${slf4j.version}version>
      dependency>
      <dependency>
          <groupId>ch.qos.logbackgroupId>
          <artifactId>logback-classicartifactId>
          <version>${logback.version}version>
      dependency>
      <dependency>
          <groupId>ch.qos.logbackgroupId>
          <artifactId>logback-coreartifactId>
          <version>${logback.version}version>
      dependency>
      <dependency>
          <groupId>ch.qos.logbackgroupId>
          <artifactId>logback-accessartifactId>
          <version>${logback.version}version>
      dependency>

  dependencies>

  <build>
      <plugins>
          <plugin>
              <groupId>org.apache.maven.pluginsgroupId>
              <artifactId>maven-compiler-pluginartifactId>
              <version>2.3.2version>
              <configuration>
                  <source>${java.version}source>
                  <target>${java.version}target>
              configuration>
          plugin>
          <plugin>
              <groupId>org.apache.maven.pluginsgroupId>
              <artifactId>maven-war-pluginartifactId>
              <version>2.2version>
              <configuration>
                  <failOnMissingWebXml>falsefailOnMissingWebXml>
              configuration>
          plugin>
      plugins>
  build>

project>
2.日志配置
src/main/resource目录下,新建logback.xml
<configuration scan="true" scanPeriod="1 seconds">
   <contextListener class="ch.qos.logback.classic.jul.LevelChangePropagator">
      <resetJUL>trueresetJUL>
   contextListener>

   <jmxConfigurator>jmxConfigurator>
   <appender name="console" class="ch.qos.logback.core.ConsoleAppender">
      <encoder>
         <pattern>logbak: %d{HH:mm:ss.SSS} %logger{36} - %msg%npattern>
      encoder>
   appender>


   <logger name="org.springframework.web" level="DEBUG">logger>
   <root level="info">
      <appender-ref ref="console">appender-ref>
   root>
configuration>
3.测试页面
src/main/resource目录下,新建views目录,并新建index.jsp
<%@ page language="java" contentType="text/html; charset=UTF-8" pageEncoding="UTF-8"%>

<html>
<head>
<meta http-equiv="Content-Type" content="text/html; charset=ISO-8859-1">
<title>Insert title heretitle>
head>
<body>
    <pre>Welcome to Spring MVCpre>
body>
html>
4.SpringMVC配置
package com.wen.springmvc4;

import org.springframework.context.annotation.Bean;
import org.springframework.context.annotation.ComponentScan;
import org.springframework.context.annotation.Configuration;
import org.springframework.web.servlet.config.annotation.EnableWebMvc;
import org.springframework.web.servlet.view.InternalResourceViewResolver;
import org.springframework.web.servlet.view.JstlView;

/**
 * Spring MVC配置
 * @author EGWri
 *
 */
@Configuration//声明当前类是一个配置类
@EnableWebMvc//开启默认配置,开启SpringMVC支持
@ComponentScan("com.wen.springmvc4")//自动扫描包名下所有使用@Service、@Component、@Repository和@Controller的类,并注册为Bean
public class MyMvcConfig{

    @Bean
    public InternalResourceViewResolver viewResolver(){
        //SpringMVC渲染核心,映射路径和实际页面的位置
        InternalResourceViewResolver viewResolver=new InternalResourceViewResolver();
        viewResolver.setPrefix("/WEB-INF/classes/views/");//表示路径前缀(运行时目录结构)
        viewResolver.setSuffix(".jsp");//表示路径后缀,假设 ViewName 为 hello,则完整路径为 /WEB-INF/page/hello.jsp
        viewResolver.setViewClass(JstlView.class);//viewClass: 表示要解析的视图类型
        return viewResolver;
    }
}
5.Web配置
package com.wen.springmvc4;

import javax.servlet.ServletContext;
import javax.servlet.ServletException;
import javax.servlet.ServletRegistration.Dynamic;

import org.springframework.web.WebApplicationInitializer;
import org.springframework.web.context.support.AnnotationConfigWebApplicationContext;
import org.springframework.web.servlet.DispatcherServlet;
/**
 * Web配置
 * @author EGWri
 *
 */
//WebApplicationInitializer是Spring提供用来配置ServLet3.0配置的接口,替代web.xml
//实现此接口会自动被SpringServletContainerInitializer(启动Servlet3.0)获取到
public class WebInitializer implements WebApplicationInitializer {

    @Override
    public void onStartup(ServletContext servletContext) throws ServletException {
        //新建WebApplicationContext,注册配置类,并将其和当前servletContext关联
        AnnotationConfigWebApplicationContext ctx=new AnnotationConfigWebApplicationContext();
        ctx.register(MyMvcConfig.class);
        ctx.setServletContext(servletContext);
        //注册SpringMVC的DispatcherServlet
        Dynamic servlet=servletContext.addServlet("dispatcher", new DispatcherServlet(ctx));
        servlet.addMapping("/");
        servlet.setLoadOnStartup(1);

    }

}
6.控制器
package com.wen.springmvc4.web;

import org.springframework.stereotype.Controller;
import org.springframework.web.bind.annotation.RequestMapping;

@Controller//声明是一个控制器
public class HelloController {

    @RequestMapping("/index")//配置URL和方法之间的映射
    public String hello(){
        System.out.println("HelloController");
        //通过ViewResolver的Bean配置,返回值为index,说明我们的页面放置的路径为/WEB-INF/classes/views/index.jsp
        return "index";
    }
}
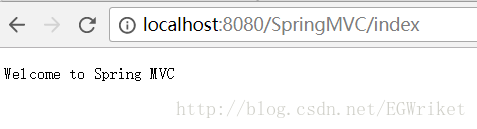
3.运行
将程序部署到Tomcat,运行,访问http://localhost:8080/SpringMVC/index